ULTIMATE Home Assistant Beginner’s Guide!
Everything you need to know about Home Assistant, including how to set it up, navigate the user interface, add devices, create automations, build dashboards, manage voice assistants, troubleshoot issues, and more.
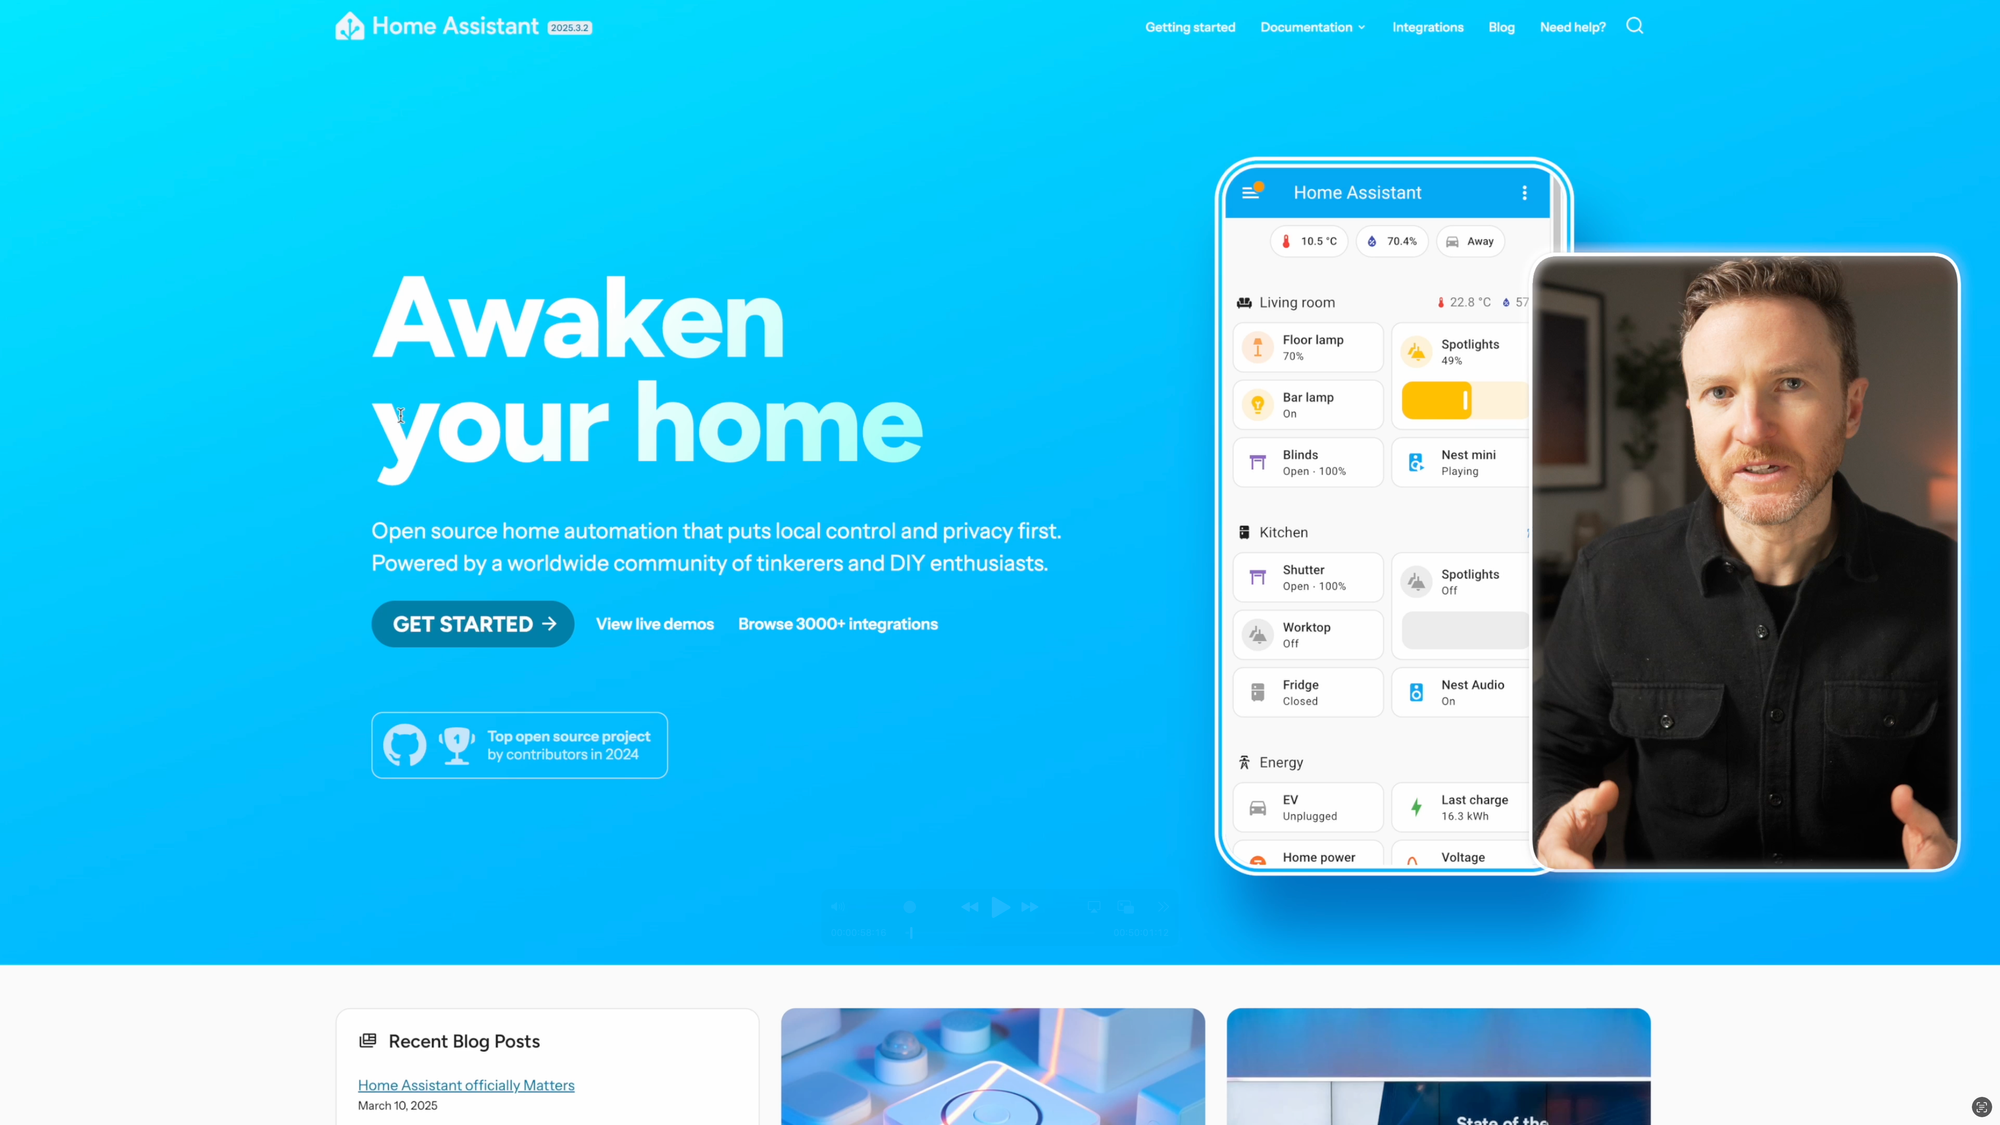
Home Assistant is the most powerful, flexible, and customizable platform for powering your smart home. But it can be overwhelming when you’re just starting out. To make the transition less daunting, I’m going to show you everything you need to know about Home assistant, including the terminology, how to set it up, navigate the user interface, add devices, use different communication protocols, create automations, build dashboards, manage voice assistants, track energy usage, utilize to-do lists, troubleshoot issues, backup your data, access your smart home remotely, and so much more.
Home Assistant has been powering my smart home for over years. My goal is to make it easier for you to get started, take the next step, or learn something you didn’t know before. This is the most jam-packed tutorial I’ve ever created, and I’m going to keep things simple.
Main Points
What is Home Assistant
Home Assistant is a free, open source, home automation platform that serves as a single destination for managing and controlling your smart home. This includes adding and viewing devices, interacting with them, and creating automations that link them together, like turning lights on and off, adjusting the thermostat, and more.
You can access and control Home Assistant using an iOS or Android app on a mobile phone or tablet, a web browser, or by voice commands using natural language.
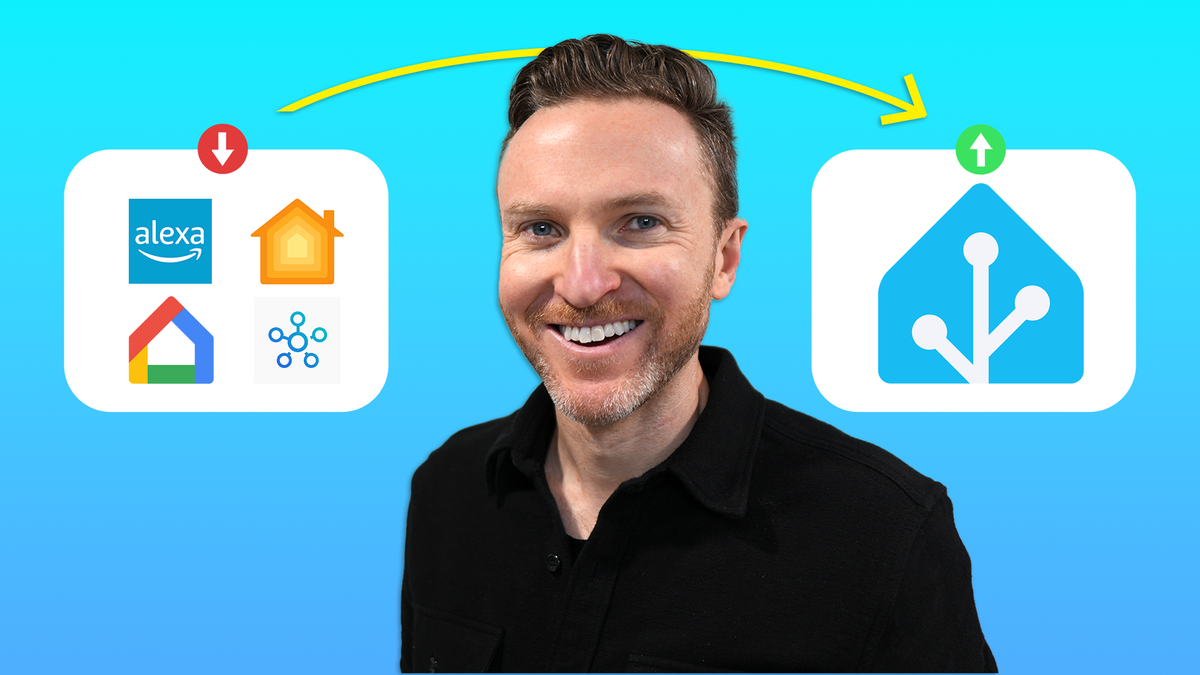
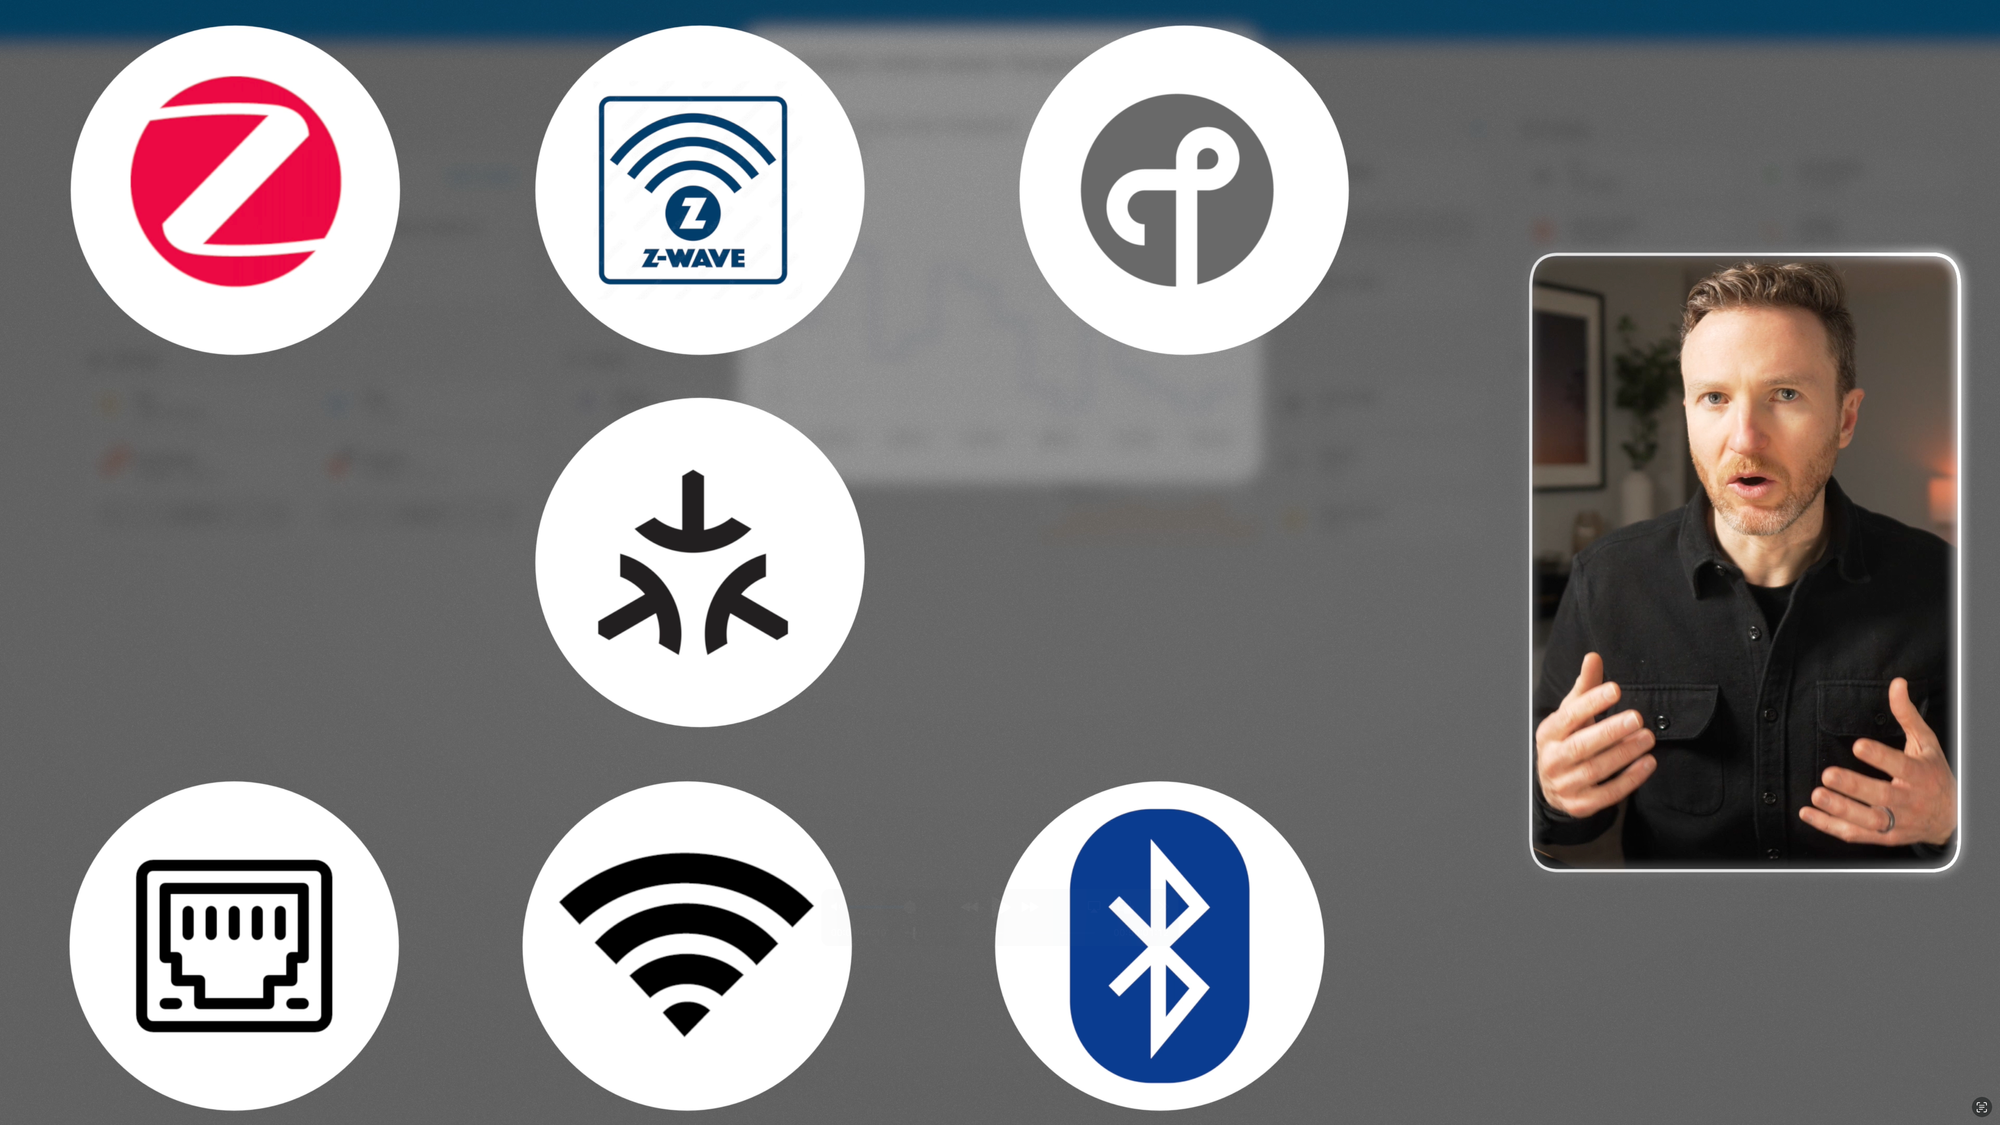
Home Assistant emphasizes local control and privacy, and is a project of the Open Home Foundation, which is a nonprofit. It works with ecosystems from Amazon, Apple, Google, and SmartThings, but is independent of them. It supports all types of wireless communication protocols used by smart home devices, including Ethernet, WiFi, Bluetooth, Zigbee, Z-Wave, Thread, and Matter. This not only gives you more options on the types of devices you can use, but also lets you build a smart home that operates locally in your home without the need for a cloud service.
What is Home Assistant
Getting Started
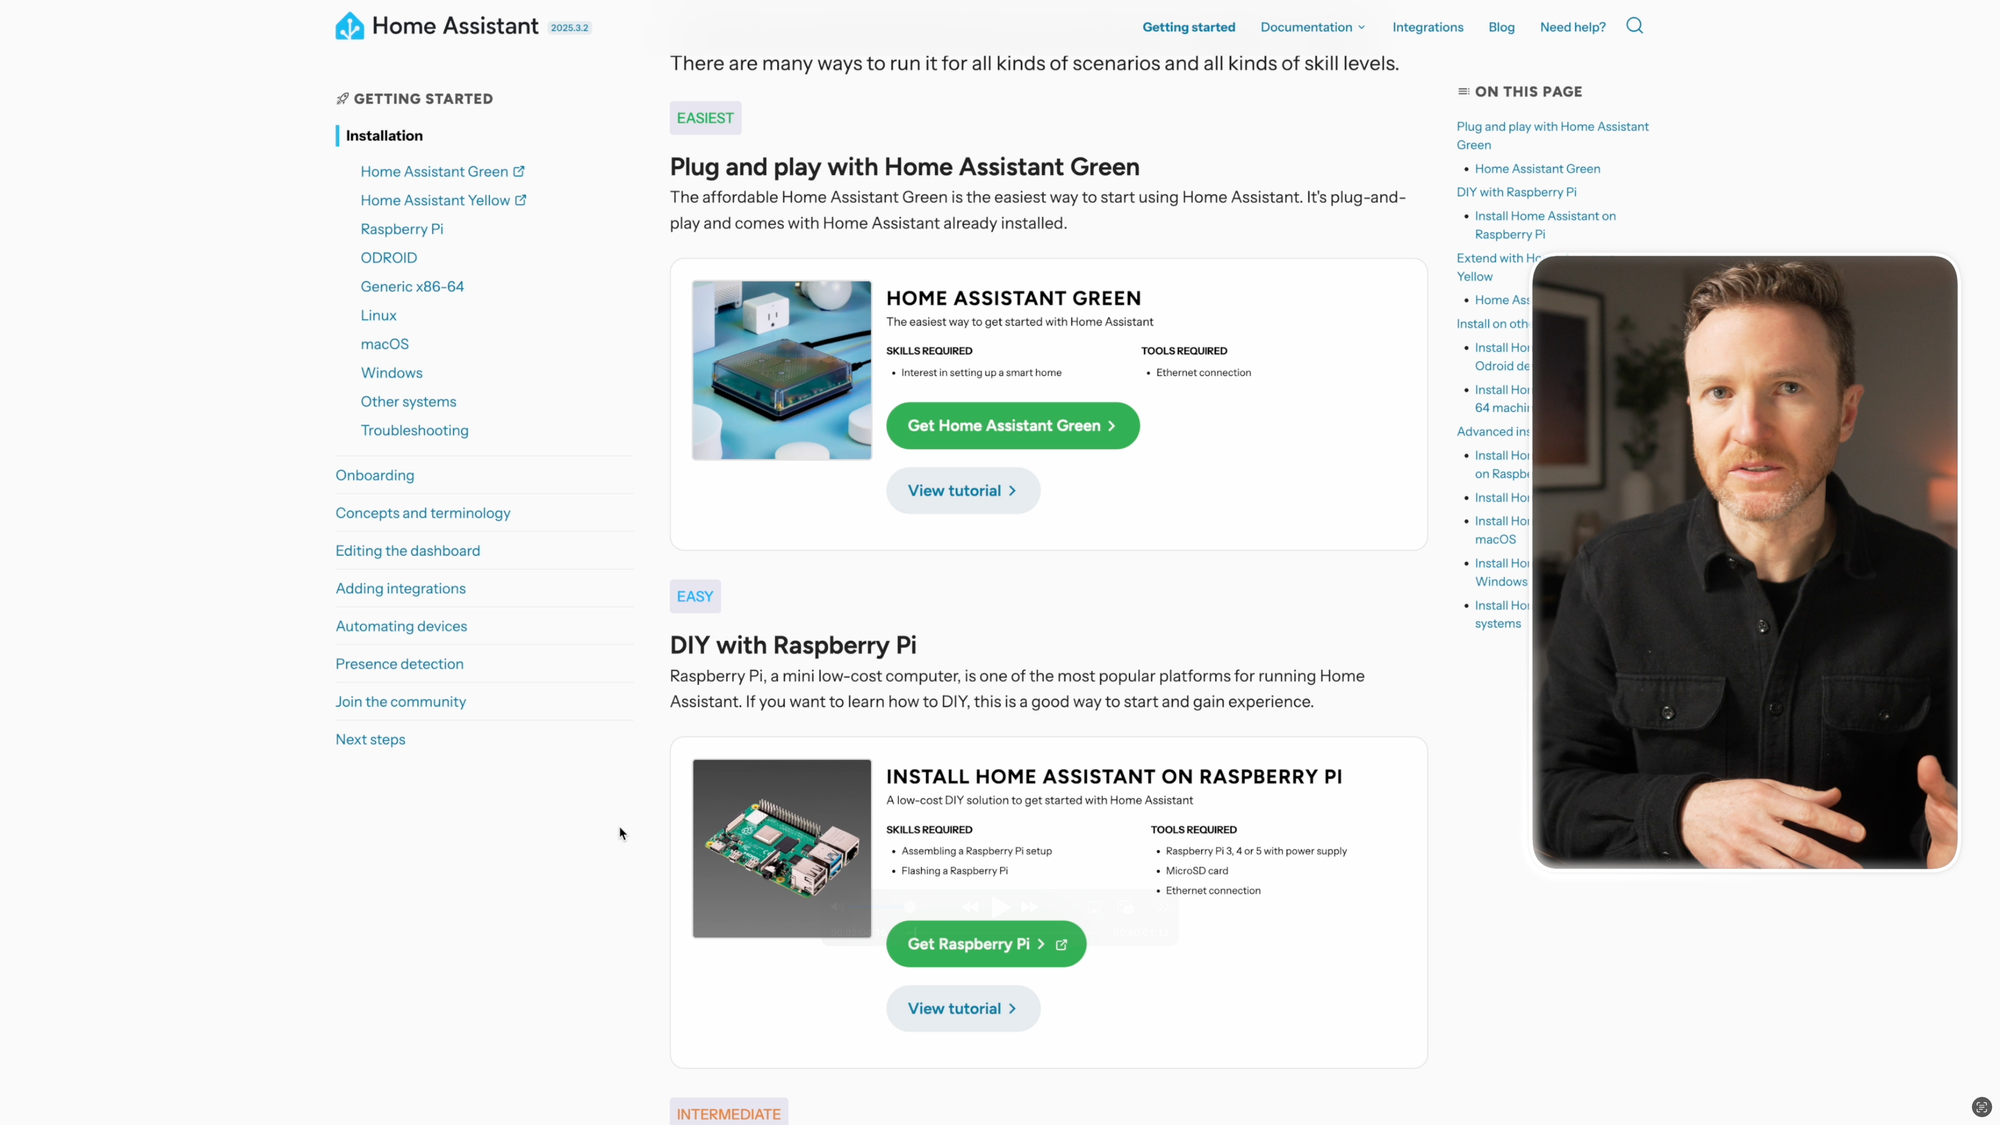
The first step to take is installing Home Assistant on a device. For the remainder of this tutorial, I’ll be focused on the Home Assistant Operating System (HOAS) installation method. You have lots of options for the device to install Home Assistant on, and this is where some folks may get overwhelmed. But Home Assistant is all about giving you options, and getting started with Home Assistant has never been easier.
The easiest way to get started with Home Assistant is to purchase a device called Home Assistant Green. This comes with Home Assistant already installed. You just plug it in, and it’s ready to use. All you need is an Ethernet connection. I wish this existed when I began my Home Assistant journey.
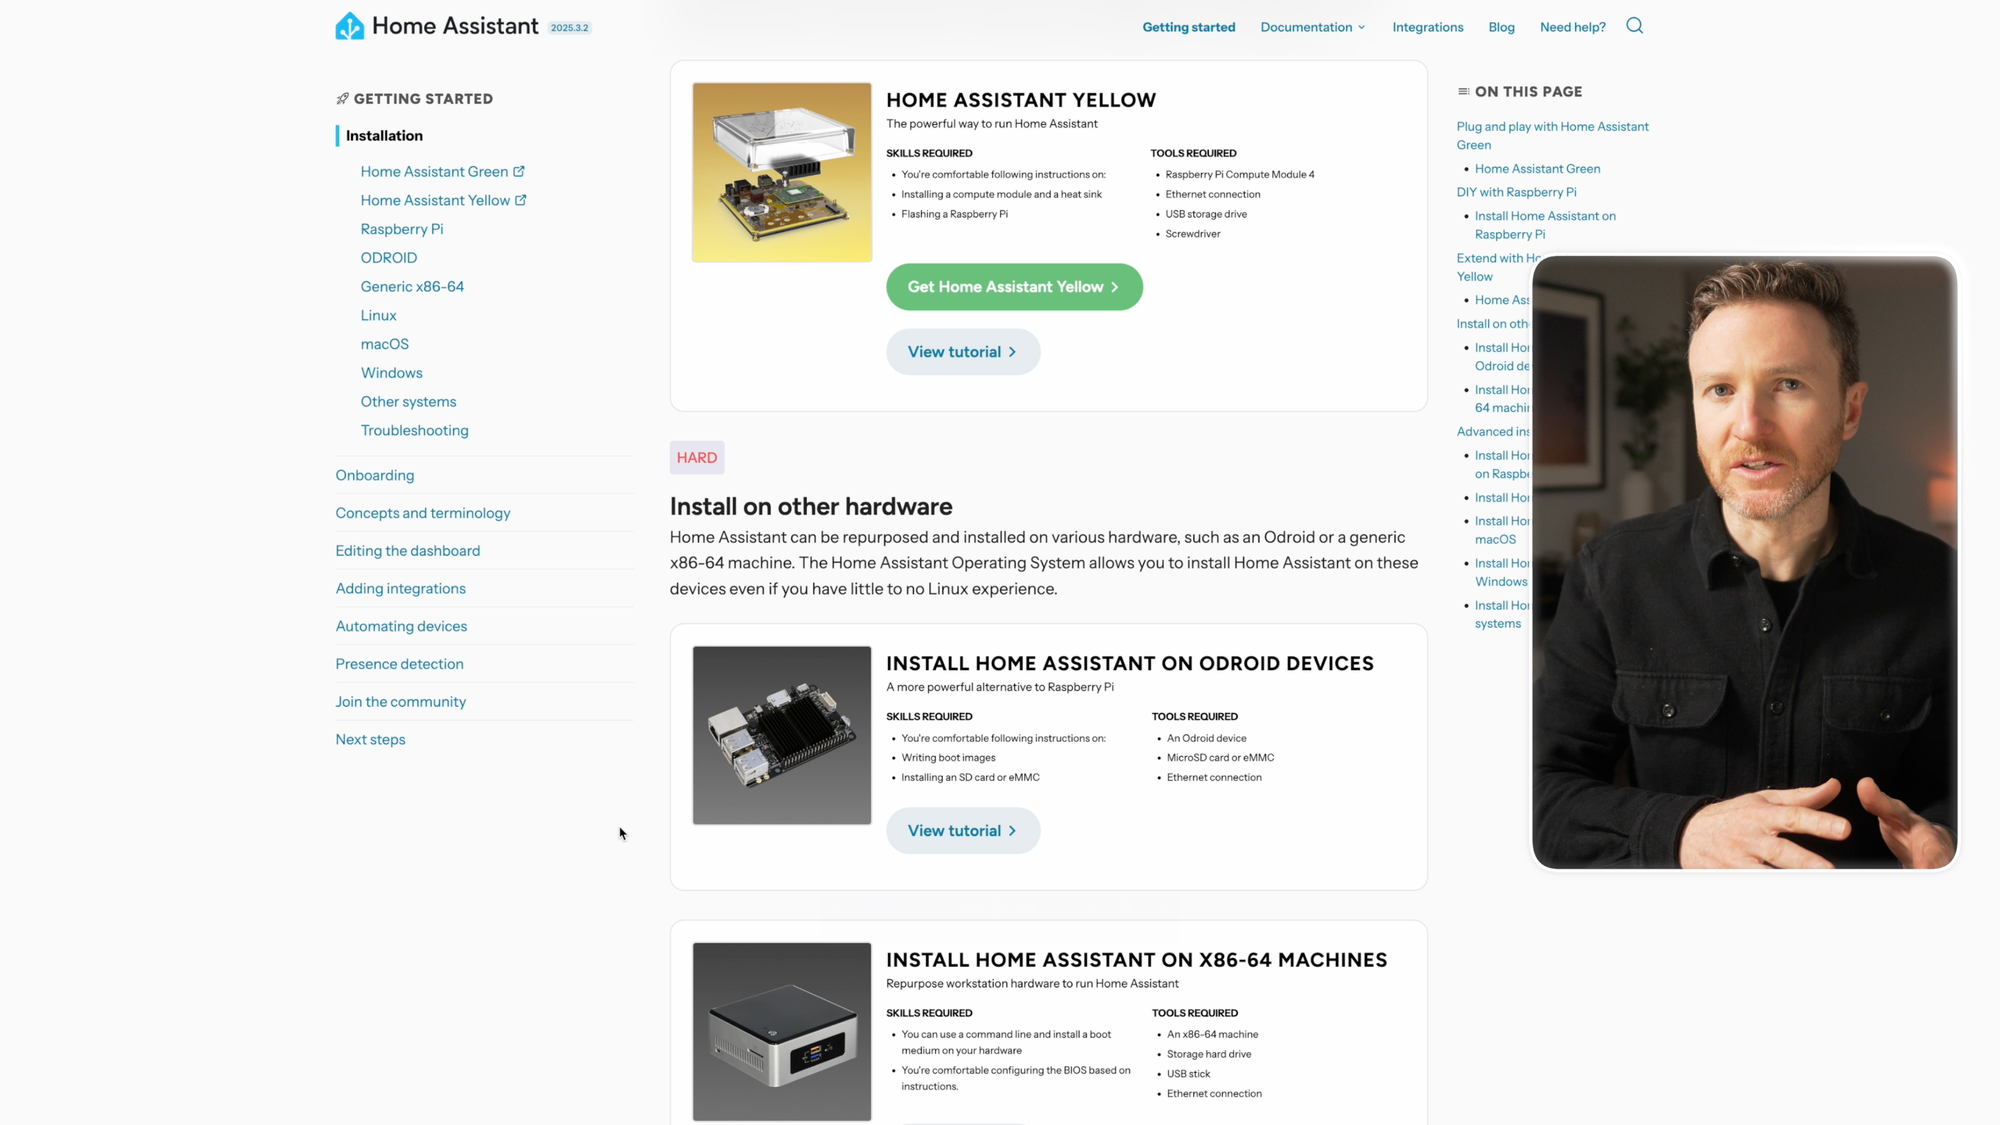
But if you prefer a DIY approach, you have lots of additional options to choose from, starting with a Raspberry Pi. This is a small computer, and is one of the most popular ways to run Home Assistant. It’s also a nice introduction to learning DIY skills that you may use later on during your journey with Home Assistant. I made an entire step-by-step guide to installing Home Assistant on a Raspberry Pi.
If you want Home Assistant to run as fast as possible or just want to future-proof your setup so that it can take on any project you might throw at it down the road, like virtualization and docker containers, then you might consider installing Home Assistant on an X86 machine, often referred to as a mini PC or N100. This is a more time-consuming and complex installation method, and not what I recommend for most beginners. Home Assistant runs perfectly well on a Home Assistant Green or a Raspberry Pi, both of which are much easier to get started with. But if you are interested in this approach, I made an entire step-by-step guide to installing Home Assistant on a mini PC.
There are even more installation methods to choose from, such as a Home Assistant Yellow, Odroid device, or running Home Assistant in a virtualized environment like Proxmox, but I’m focusing on the basics for now.
Home Assistant: Getting Started
Understanding the Layout
Once Home Assistant is up and running, you’ll end up on the dashboard. Home Assistant will automatically display devices that it found during the installation process, or that you set up thereafter. But I’ll come back to dashboards later. Right now, I’m going to help you navigate the user interface, be it on a web browser or the companion app on a mobile device.
On the left is the side navigation menu. You may need to swipe to reveal it on the companion app. I’ll go over the different menu items as I go through this tutorial. At the bottom you can access user settings, including the ability to edit the navigation menu. You can re-arrange the order of items, or remove and add items from view. Just keep in mind that this is a browser-dependent setting, meaning you’ll need to edit the navigation menu to your preferred layout on each device that you use with Home Assistant.
Above the user you’ll see important notifications, like if a new device has been discovered, if something needs to be fixed, or if there is an update available to install.
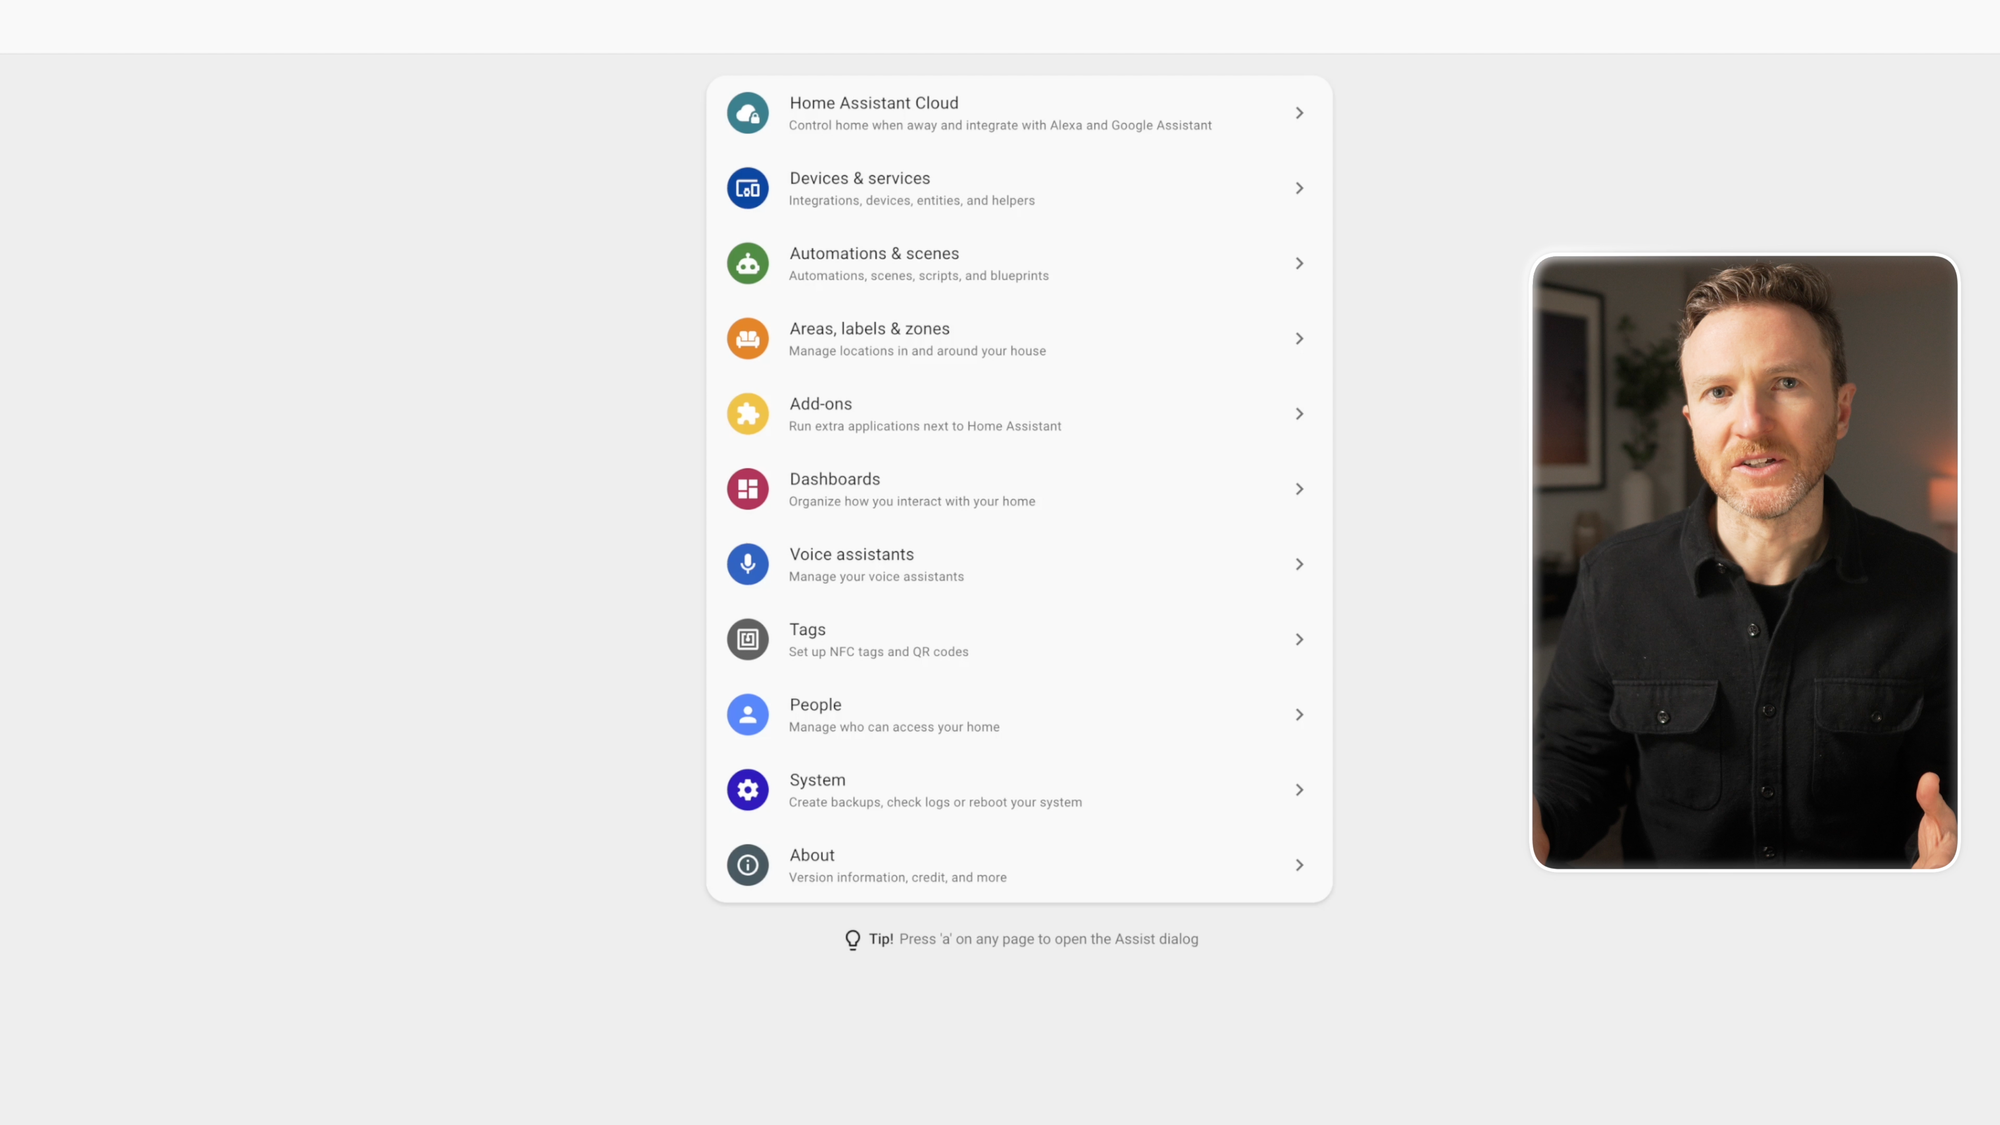
From the settings menu, you can access all of the features of Home Assistant. This is where you can add and view devices, create home automations, install applications, create new dashboards, manage voice assistants, and much more. I’ll take you through these one-by-one.
Home Assistant: Understanding the Layout
Integrations
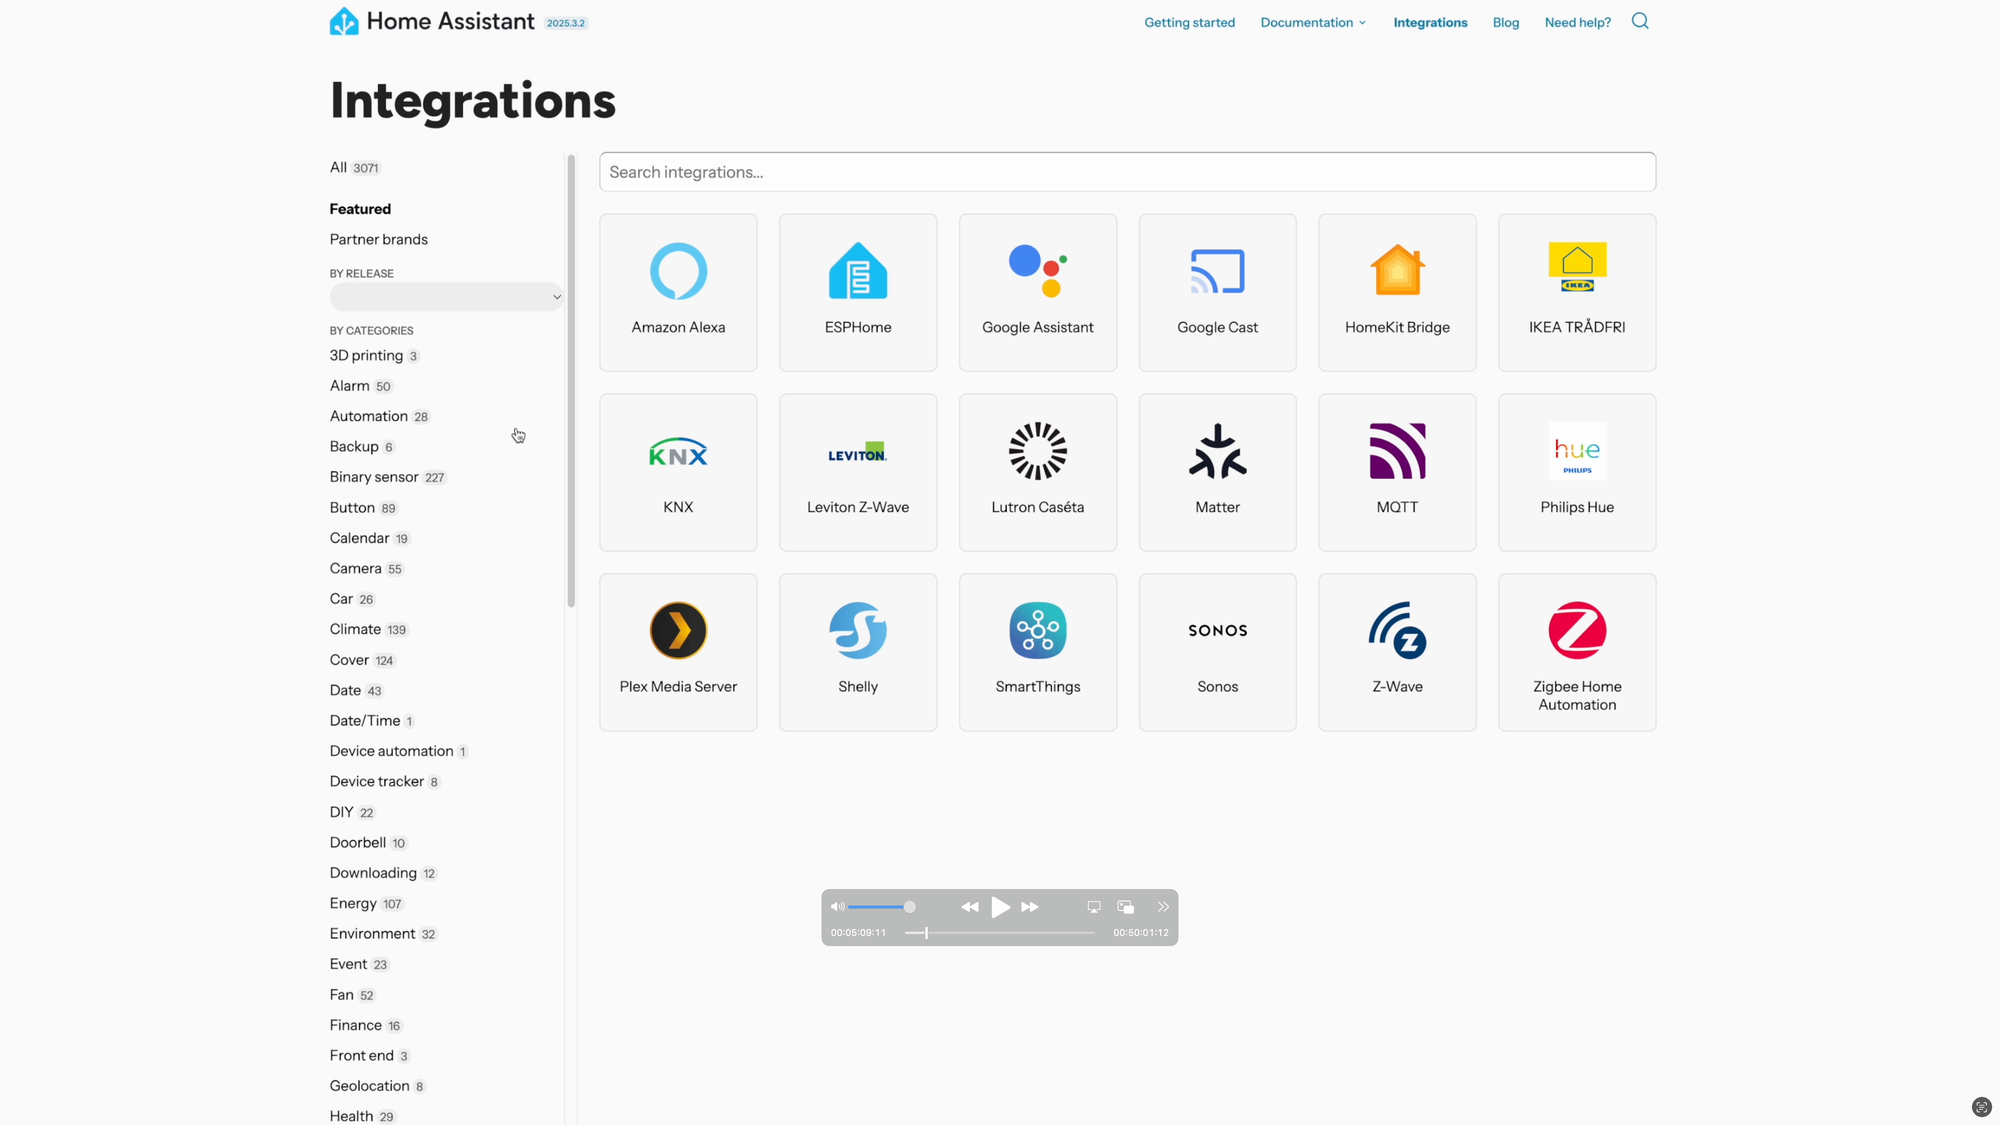
From Devices & services, you will see all of the integrations currently installed on your Home Assistant, and this is also where you can install new integrations. You can think of integrations as ways to connect to and communicate with smart home software, devices, and services. For example, the Philips Hue integration allows Home Assistant to communicate with the Hue Bridge, so that any compatible device connected to the Hue Bridge also shows up as a device in Home Assistant.
You can manually add new integrations by clicking the plus icon, and searching from the list. There are over 3,000 integrations to choose from, so there’s a good chance that the device you want to use will work with Home Assistant.
Once added, integrations that rely on the cloud to function will have a cloud icon. Likewise, any unofficial, custom-made integrations imported from another source will have a special icon as well. I’ll speak more about custom integrations later in this tutorial.
Home Assistant: Integrations
Devices
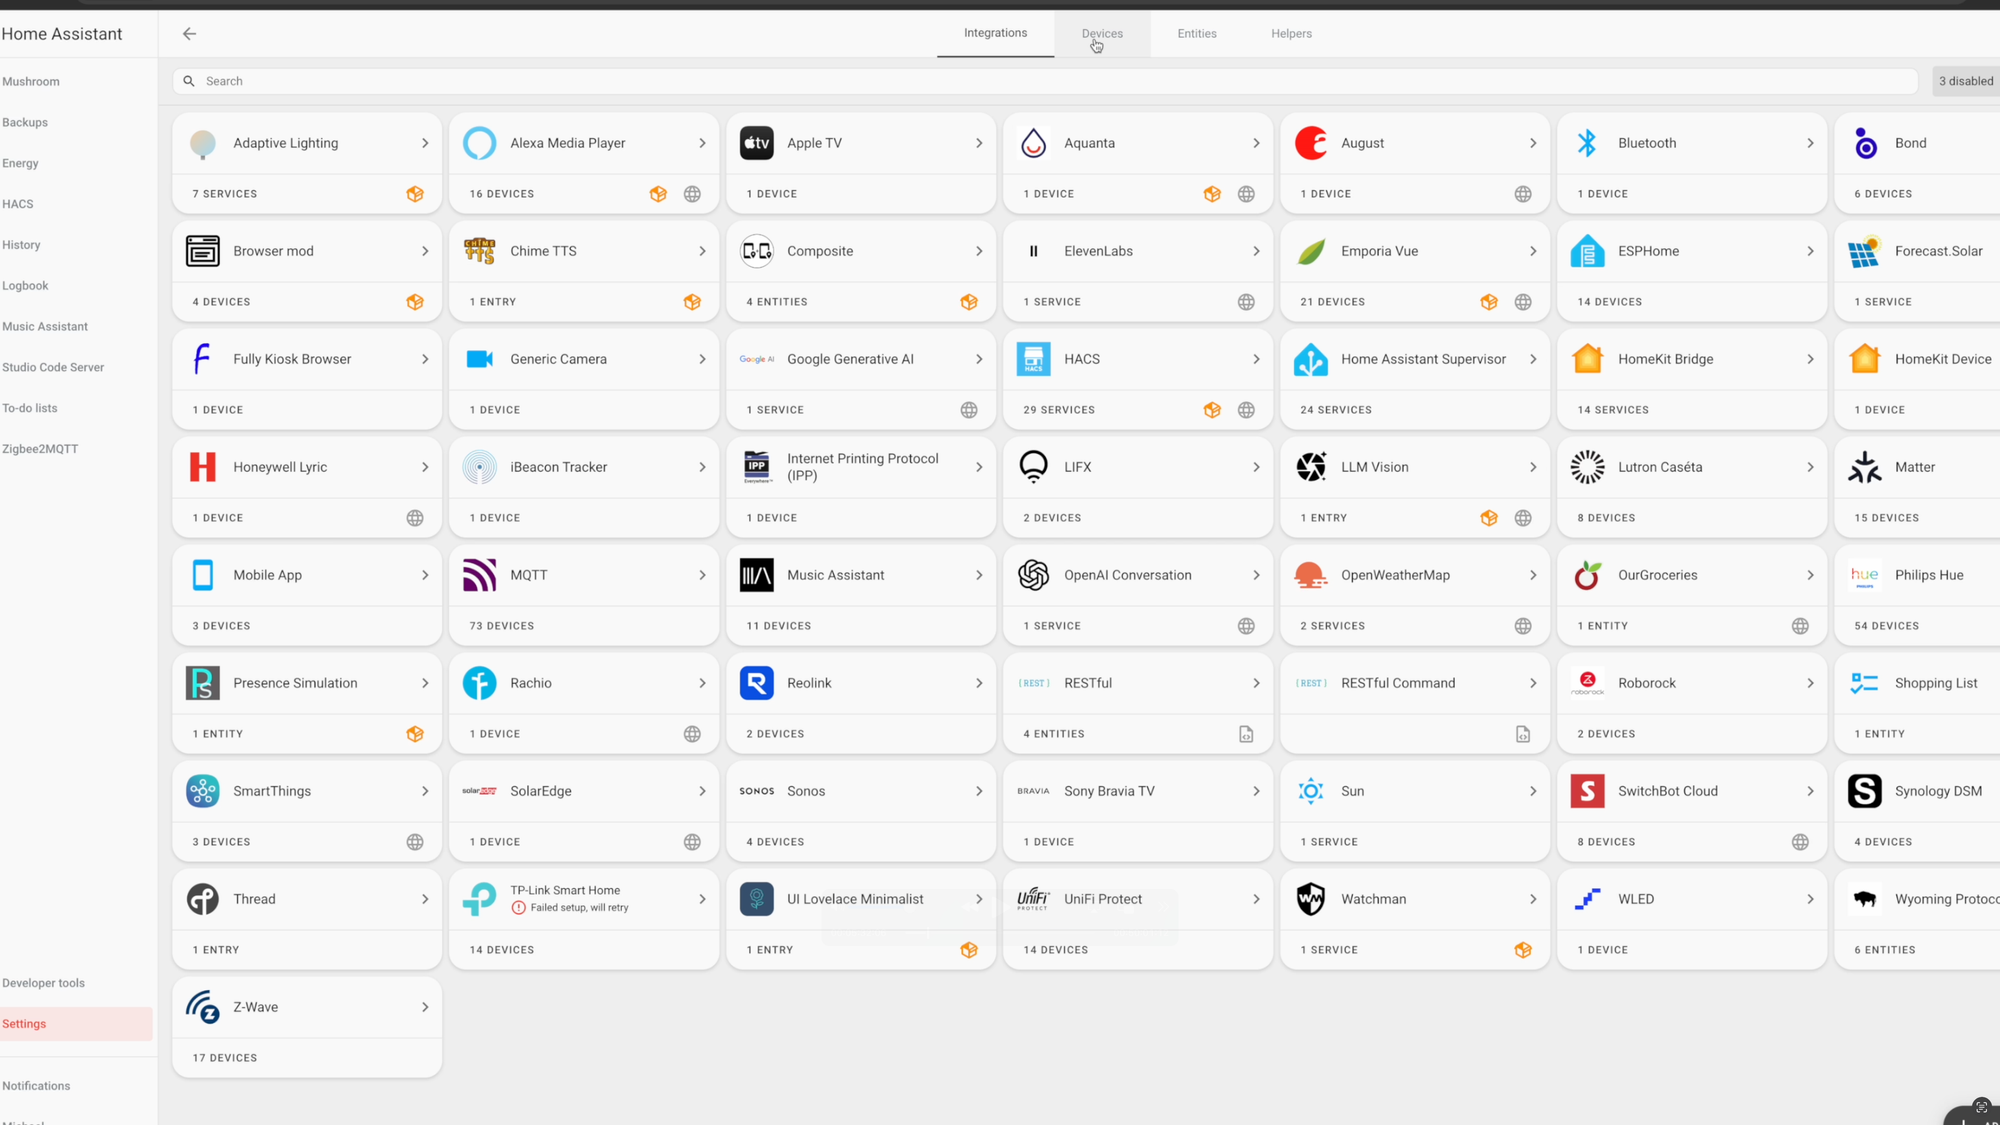
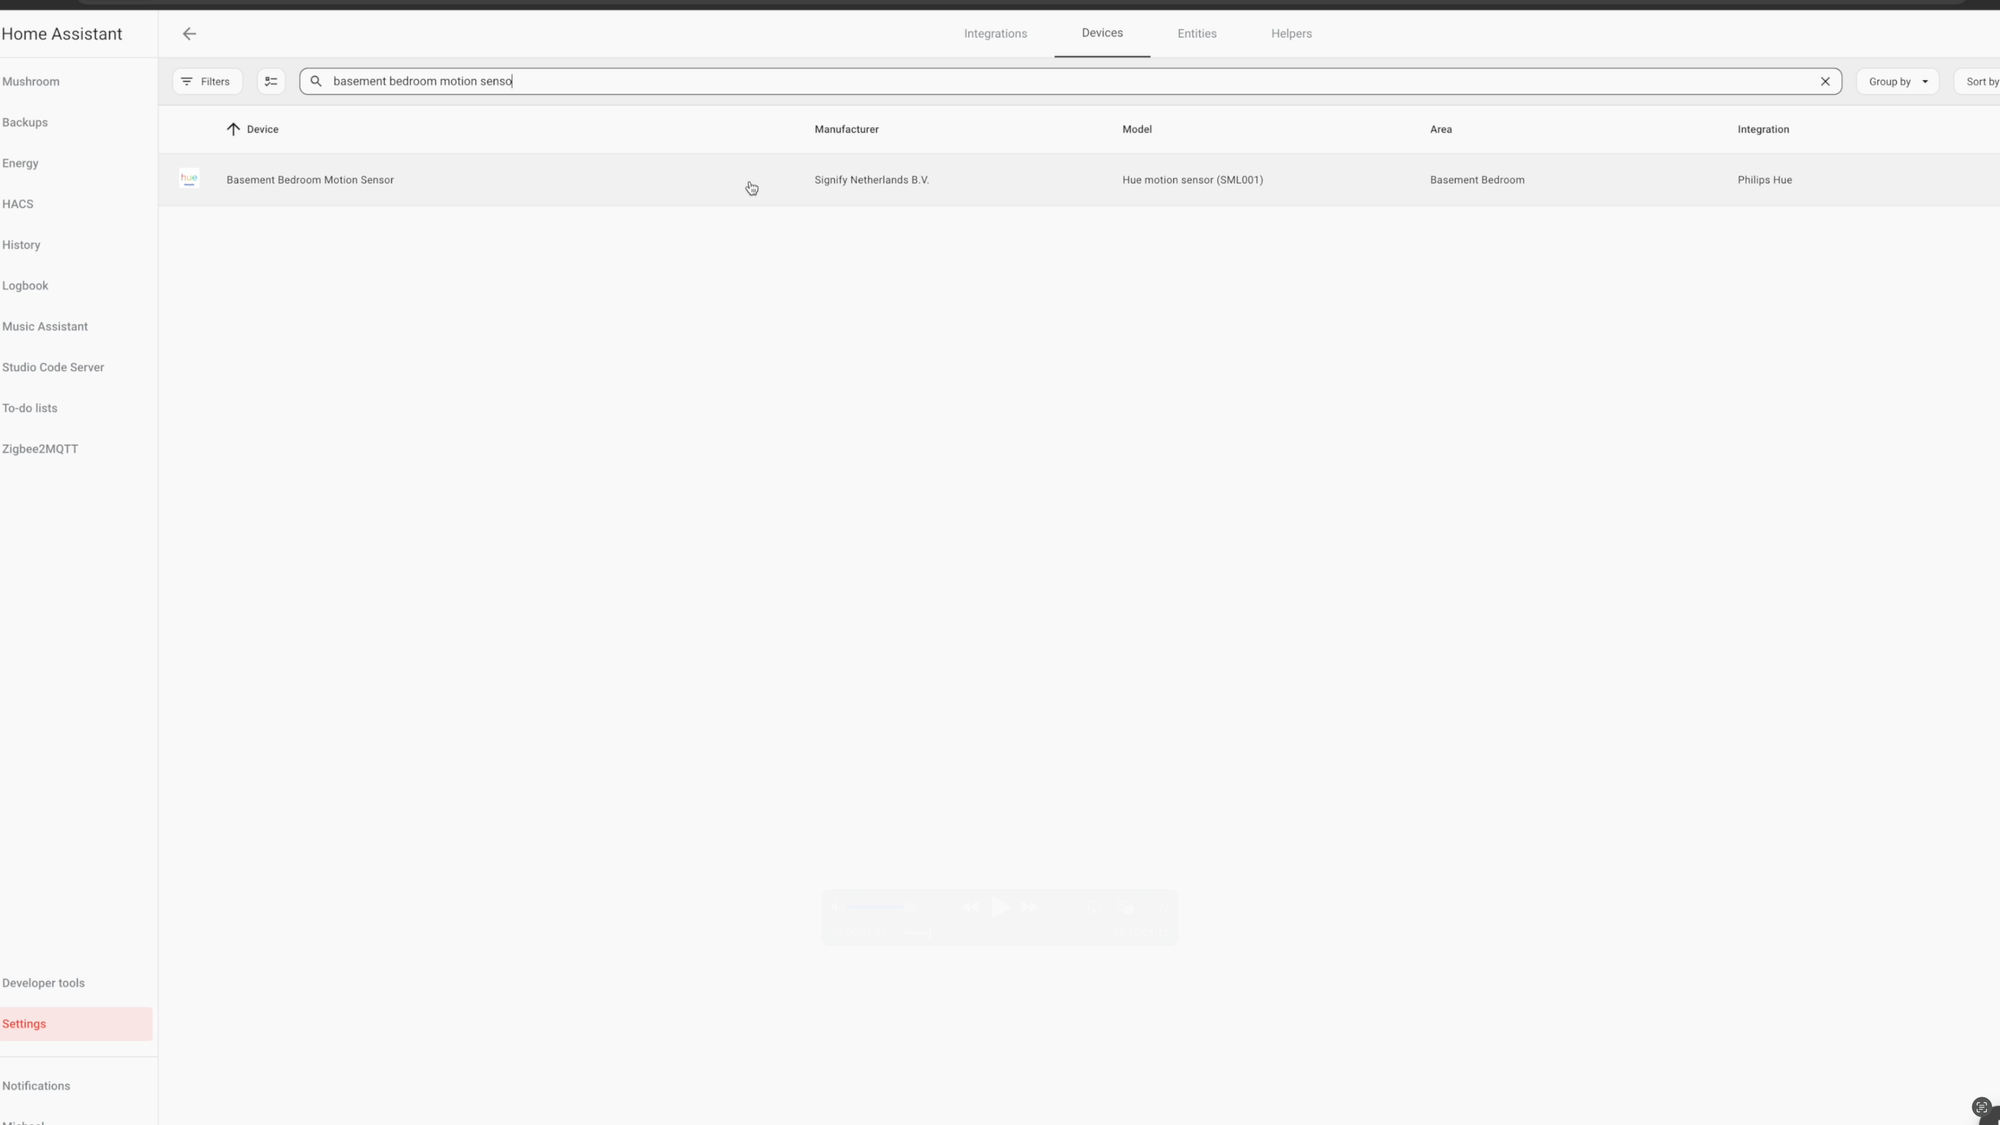
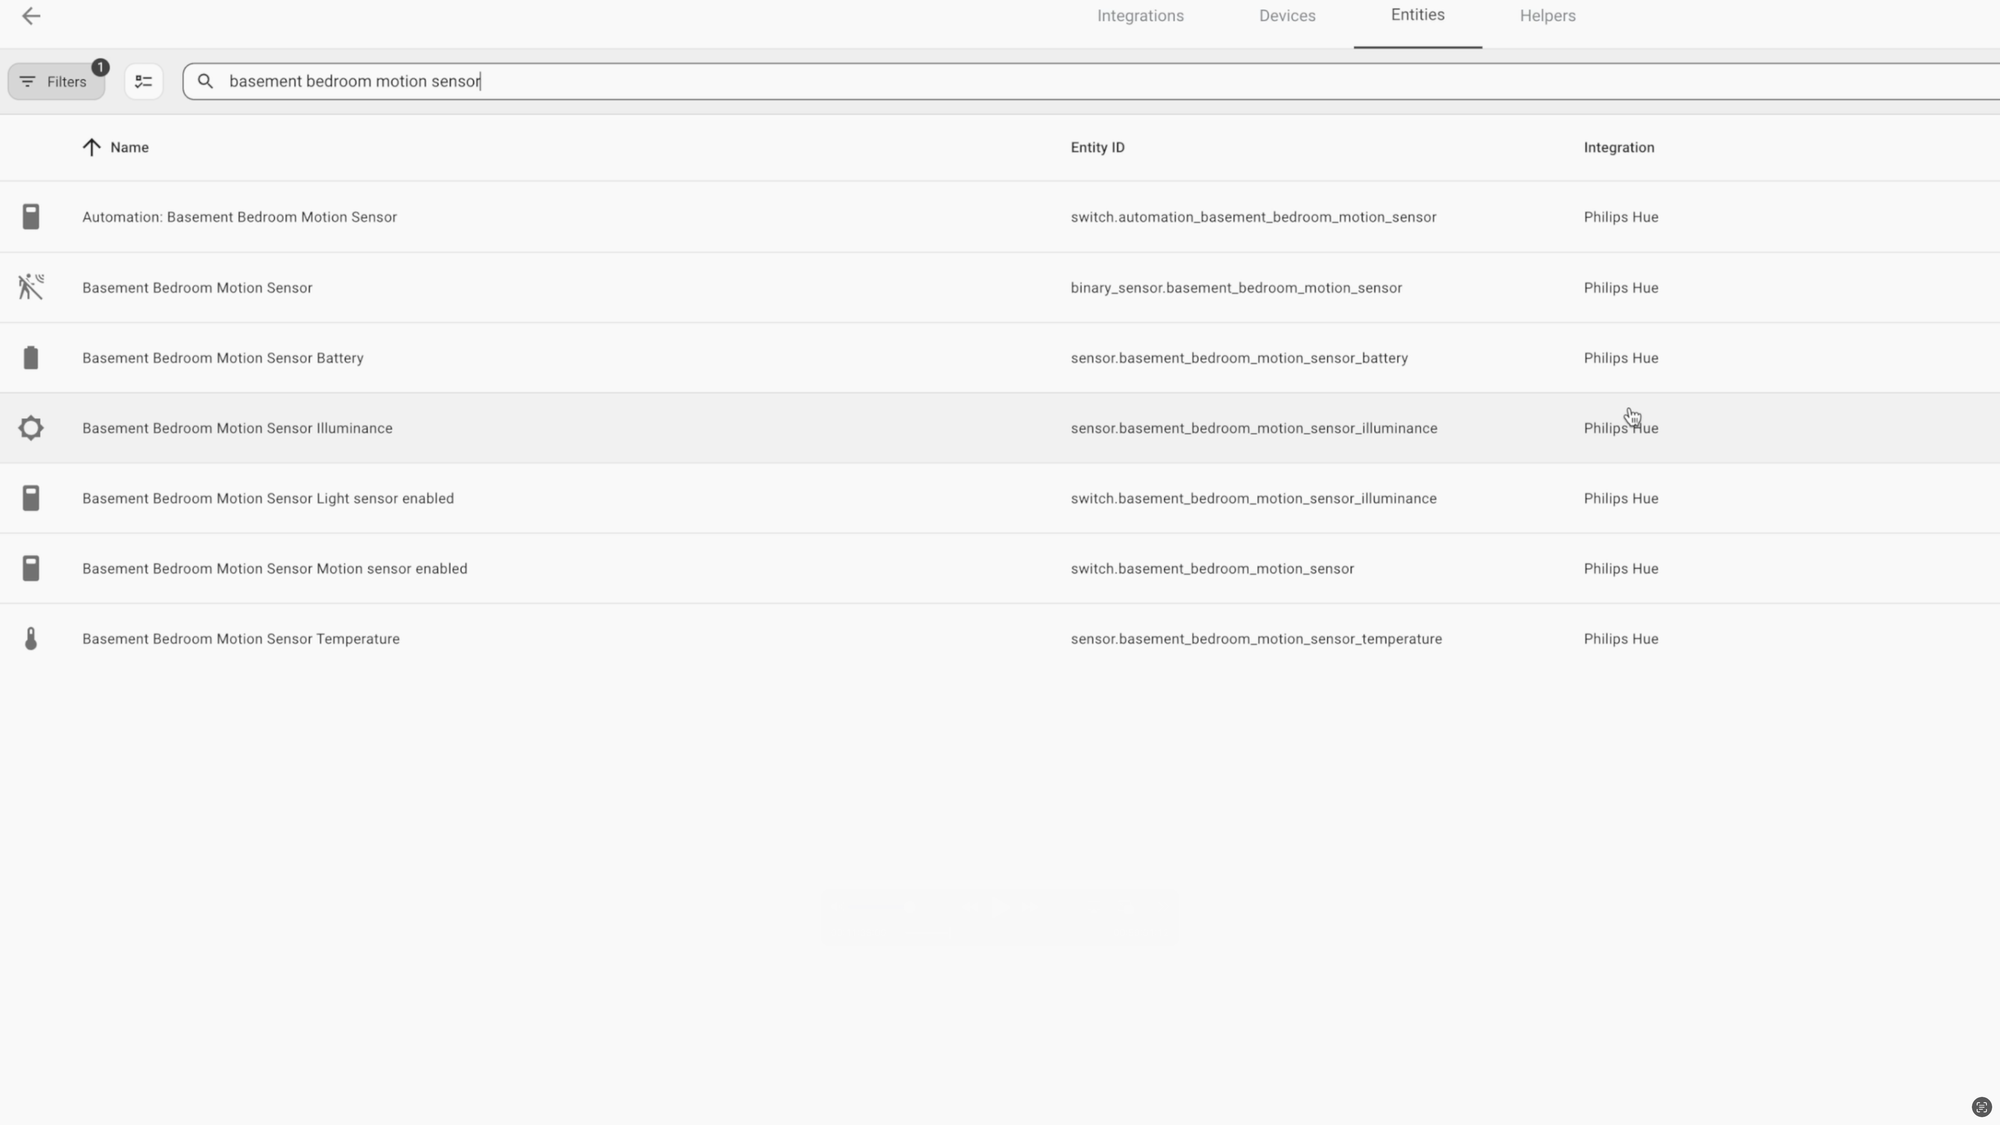
From Devices & services, you can also see and manage your smart home devices. In Home Assistant terms, a device may refer to a physical device in your home, or a logical grouping of multiple entities. Auto-discovered devices appear at the top of the page. Similar to integrations, you can manually add new devices by clicking the plus icon and searching. You can also use the search field at the top of the page to find a specific device already added to your Home Assistant. This is really useful as your smart home grows, and you wind up with hundreds of device like me.
You may consider having a standardized naming convention for your devices, though this is not required. For example, a device may be added to Home Assistant with a confusing name like, “slwf_03.” This may make it harder to find the device you want when creating automations or adding the device to a dashboard. Generally, I name my devices by the room and device type, such as Basement Bedroom Light or Basement Bedroom Motion Sensor.
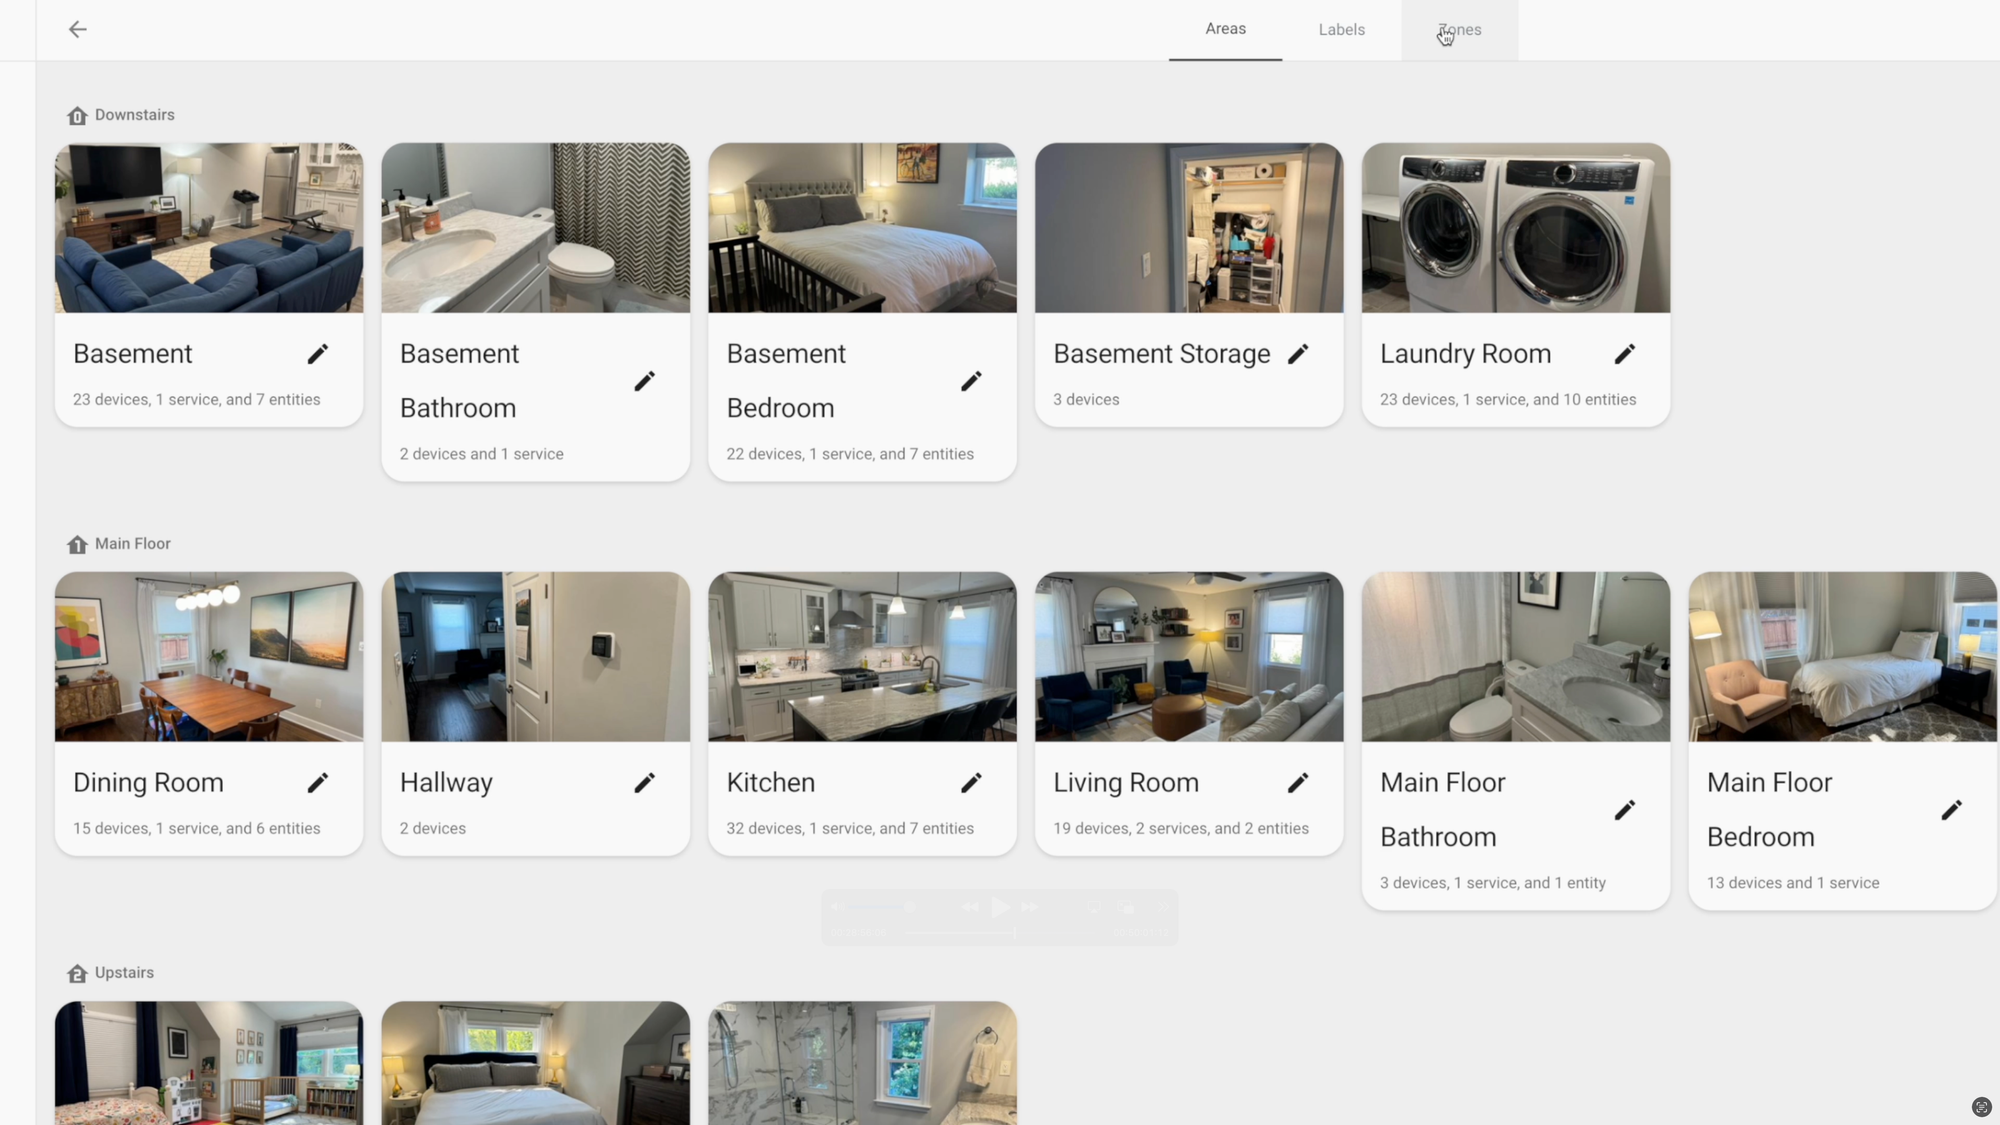
Each device can be assigned to an area, which could be a room in your home. Assigning devices to areas not only helps to organize your smart home, but also makes it easier to control. For example, you can use a voice command or an automation to turn on all of the lights in a specific area. Areas can then be assigned to floors, like downstairs, main floor, and upstairs.
From the list of devices, you can also see the estimated battery percentage of your wireless, battery-powered devices. You can even create automations to notify you when a device’s battery percentage drops below a certain threshold to avoid your smart home devices going offline due to a depleted battery.
Home Assistant: Devices and Areas
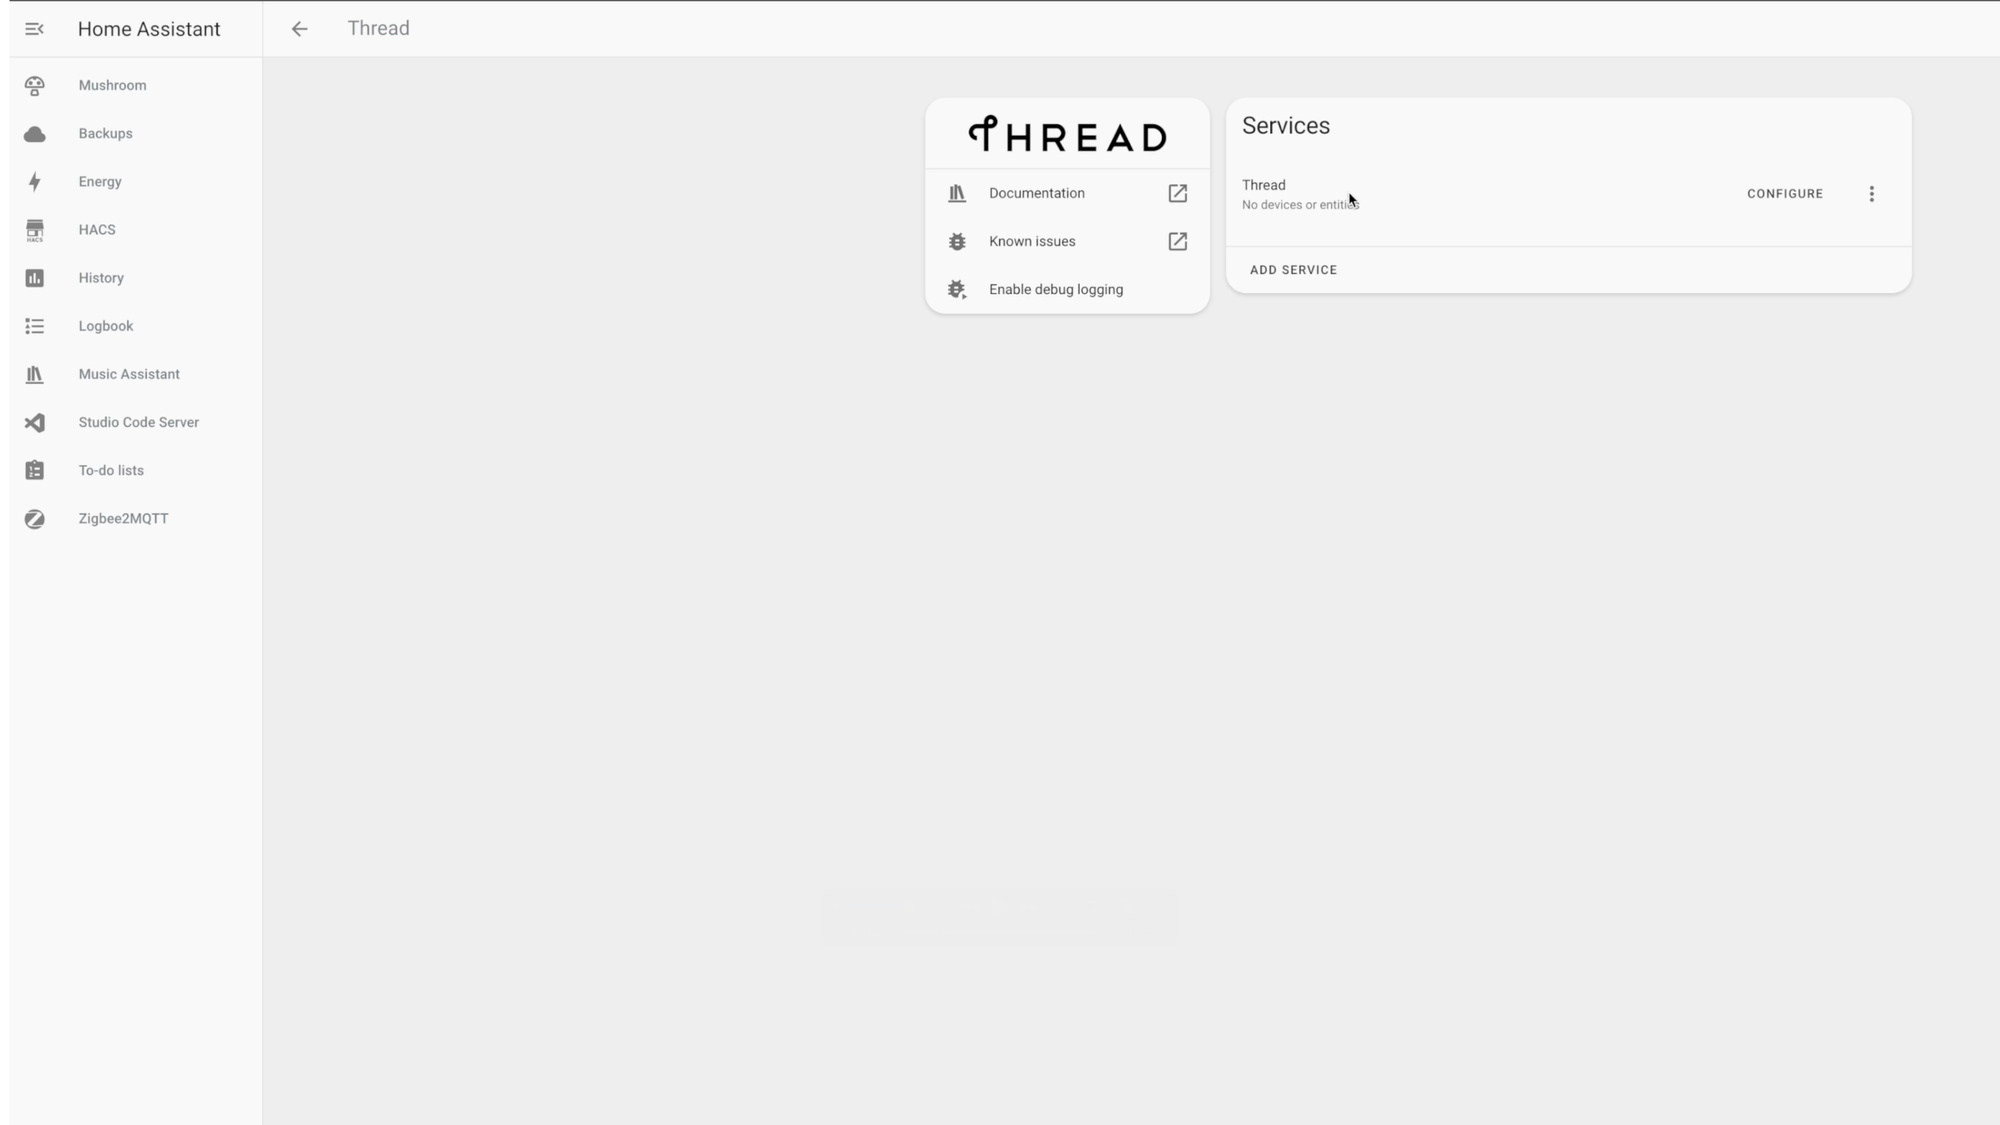
Protocols
Protocols Overview: I mentioned earlier that Home Assistant supports all types of wireless communication protocols, including Zigbee, Z-Wave, and Thread. But, how do you got about adding devices that rely on these? For that, you’ll need a controller connected to your Home Assistant that broadcasts the protocol.
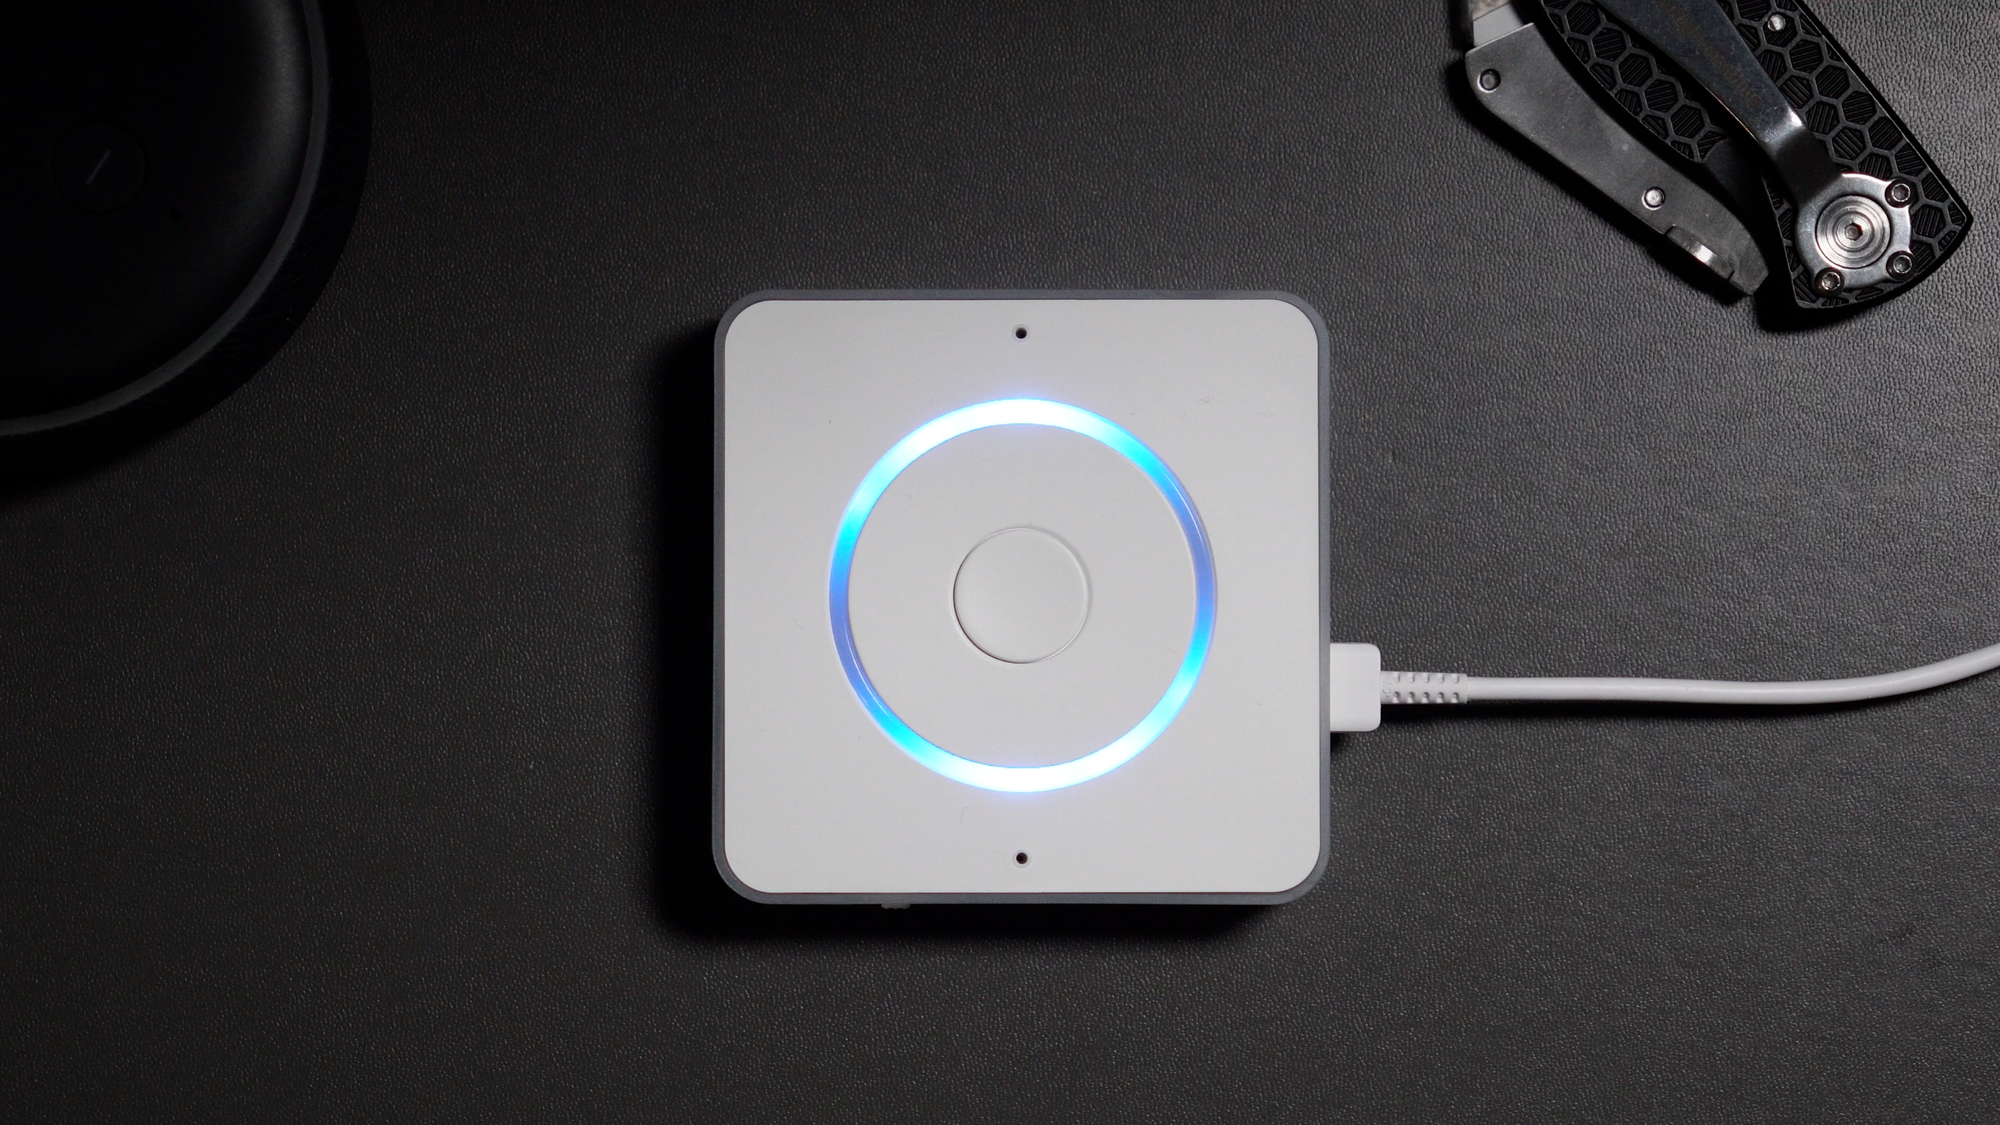
I have a dedicated USB stick with a Zigbee radio, and another for Z-Wave. Both of these are plugged into my computer running Home Assistant. You can do this whether you installed Home Assistant on a Home Assistant Green, a Raspberry Pi, or a mini PC. One tip is to connect the USB sticks using extension cables, instead of plugging them directly into the machine. This will help avoid signal interference from other networking equipment. My favorite way to connect devices to Home Assistant is directly to my Zigbee or Z-Wave controllers because it offers local control without any reliance on the cloud, or manufacturer-specific apps or hubs.
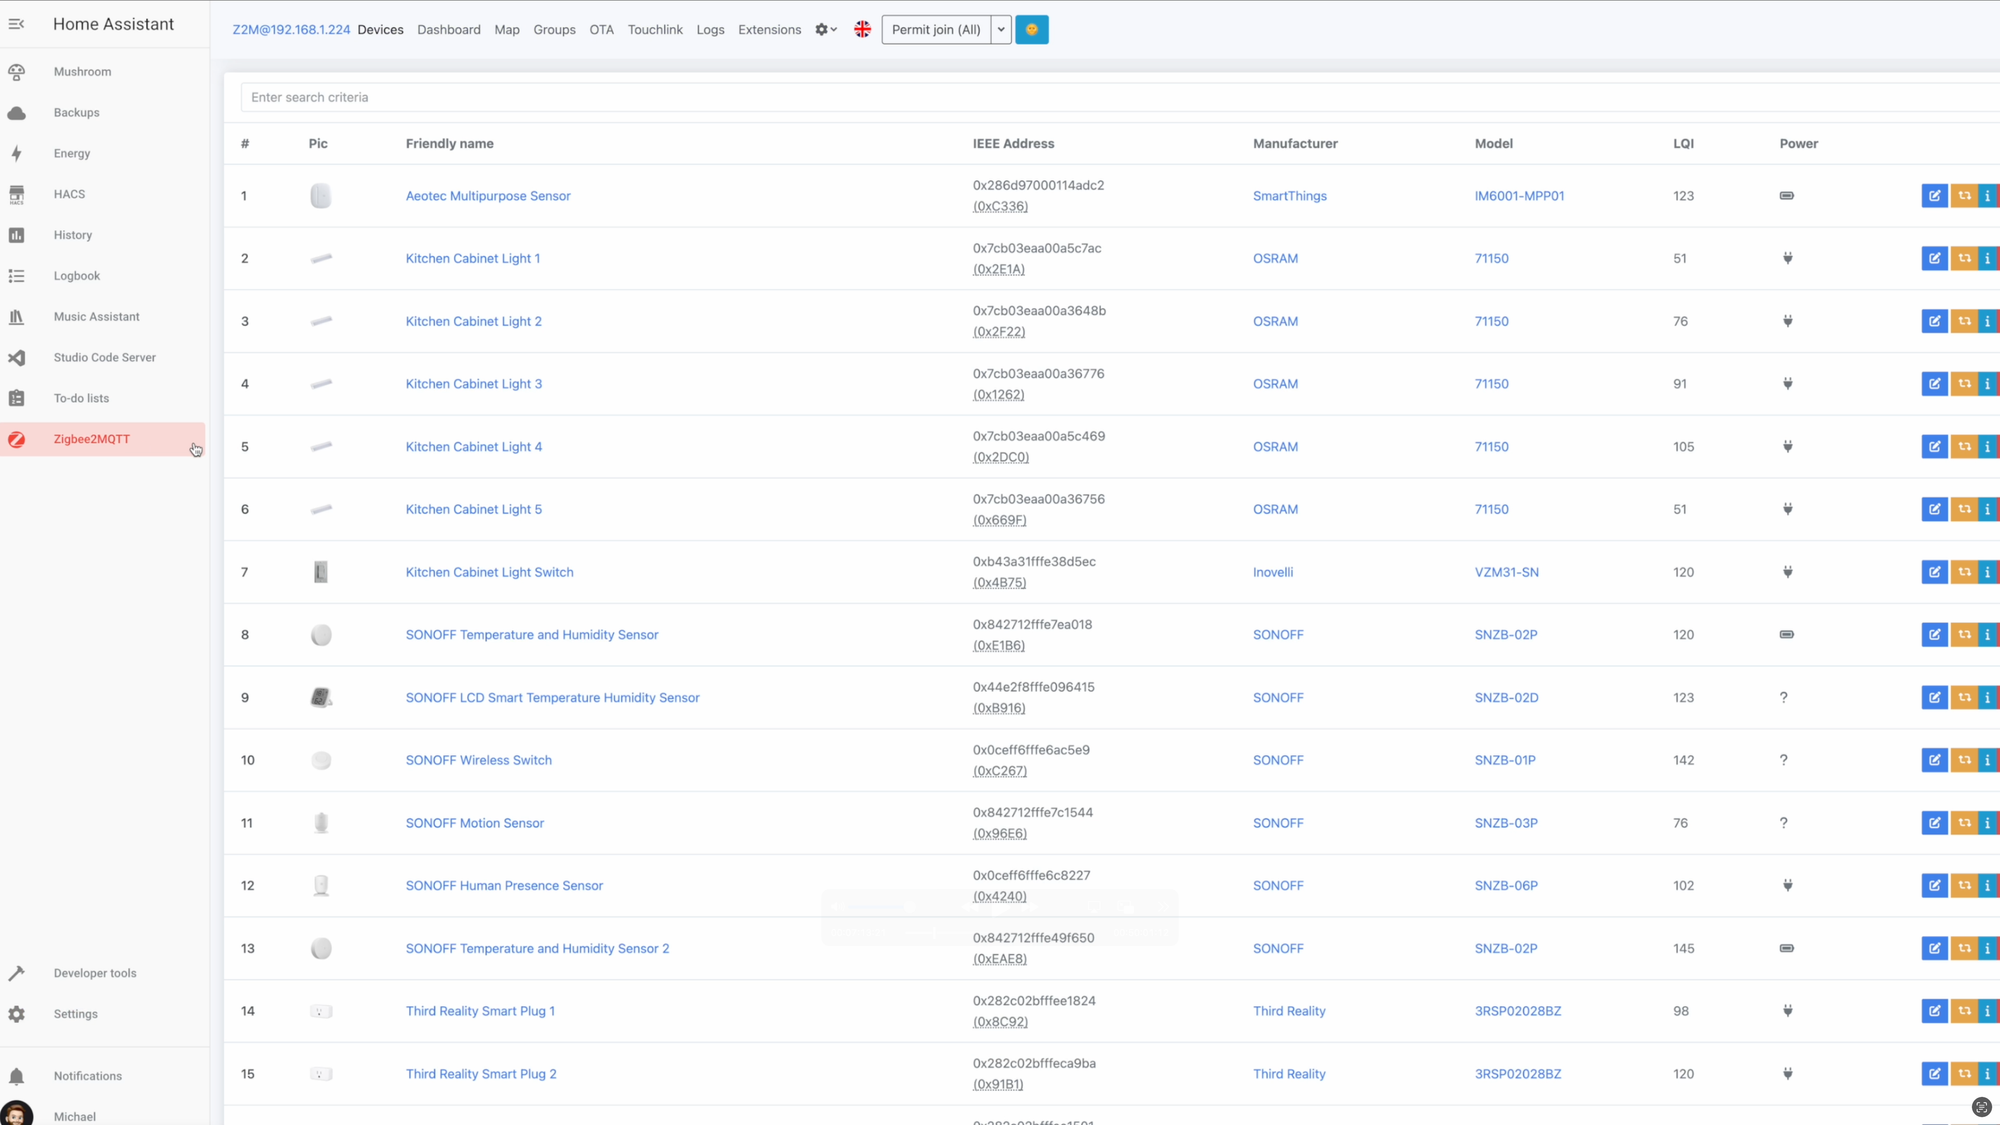
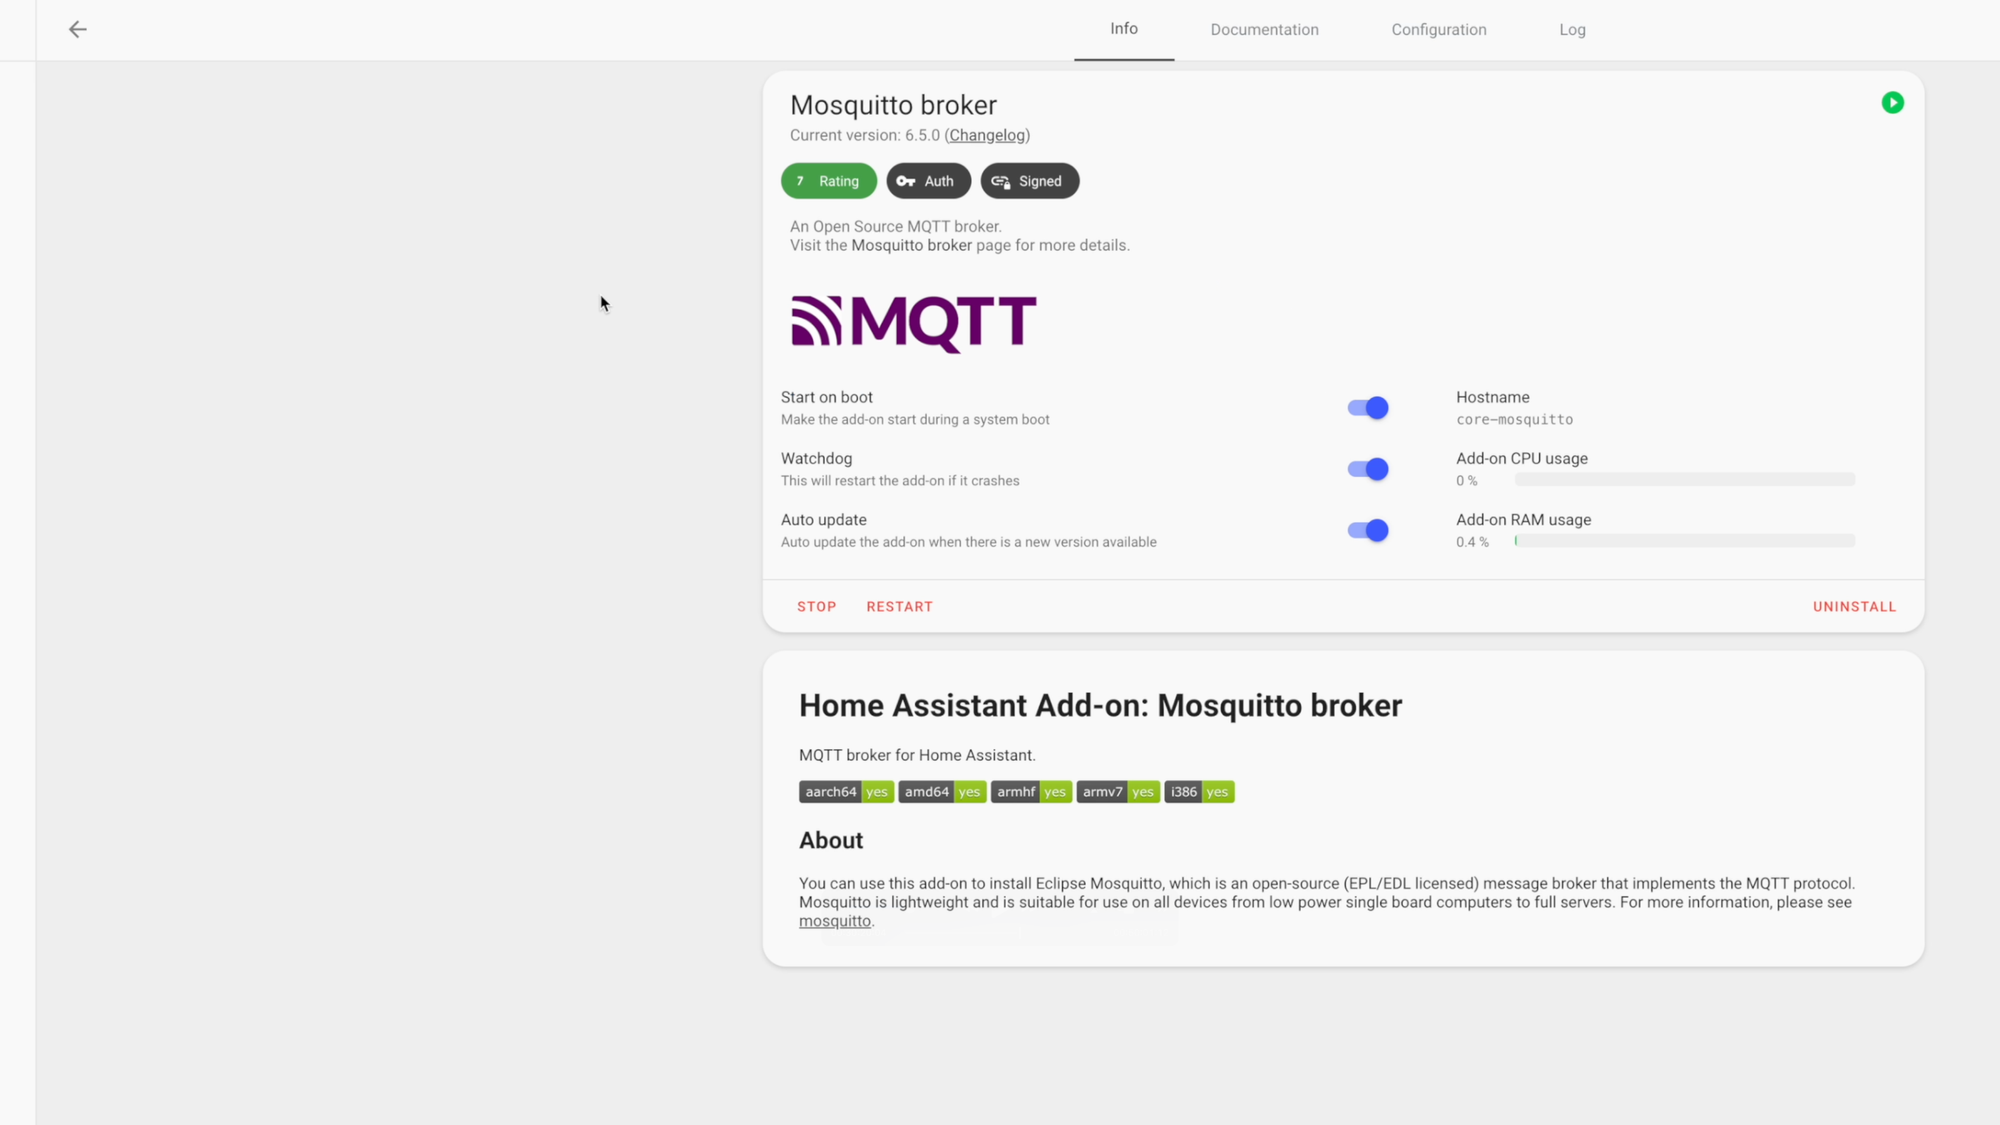
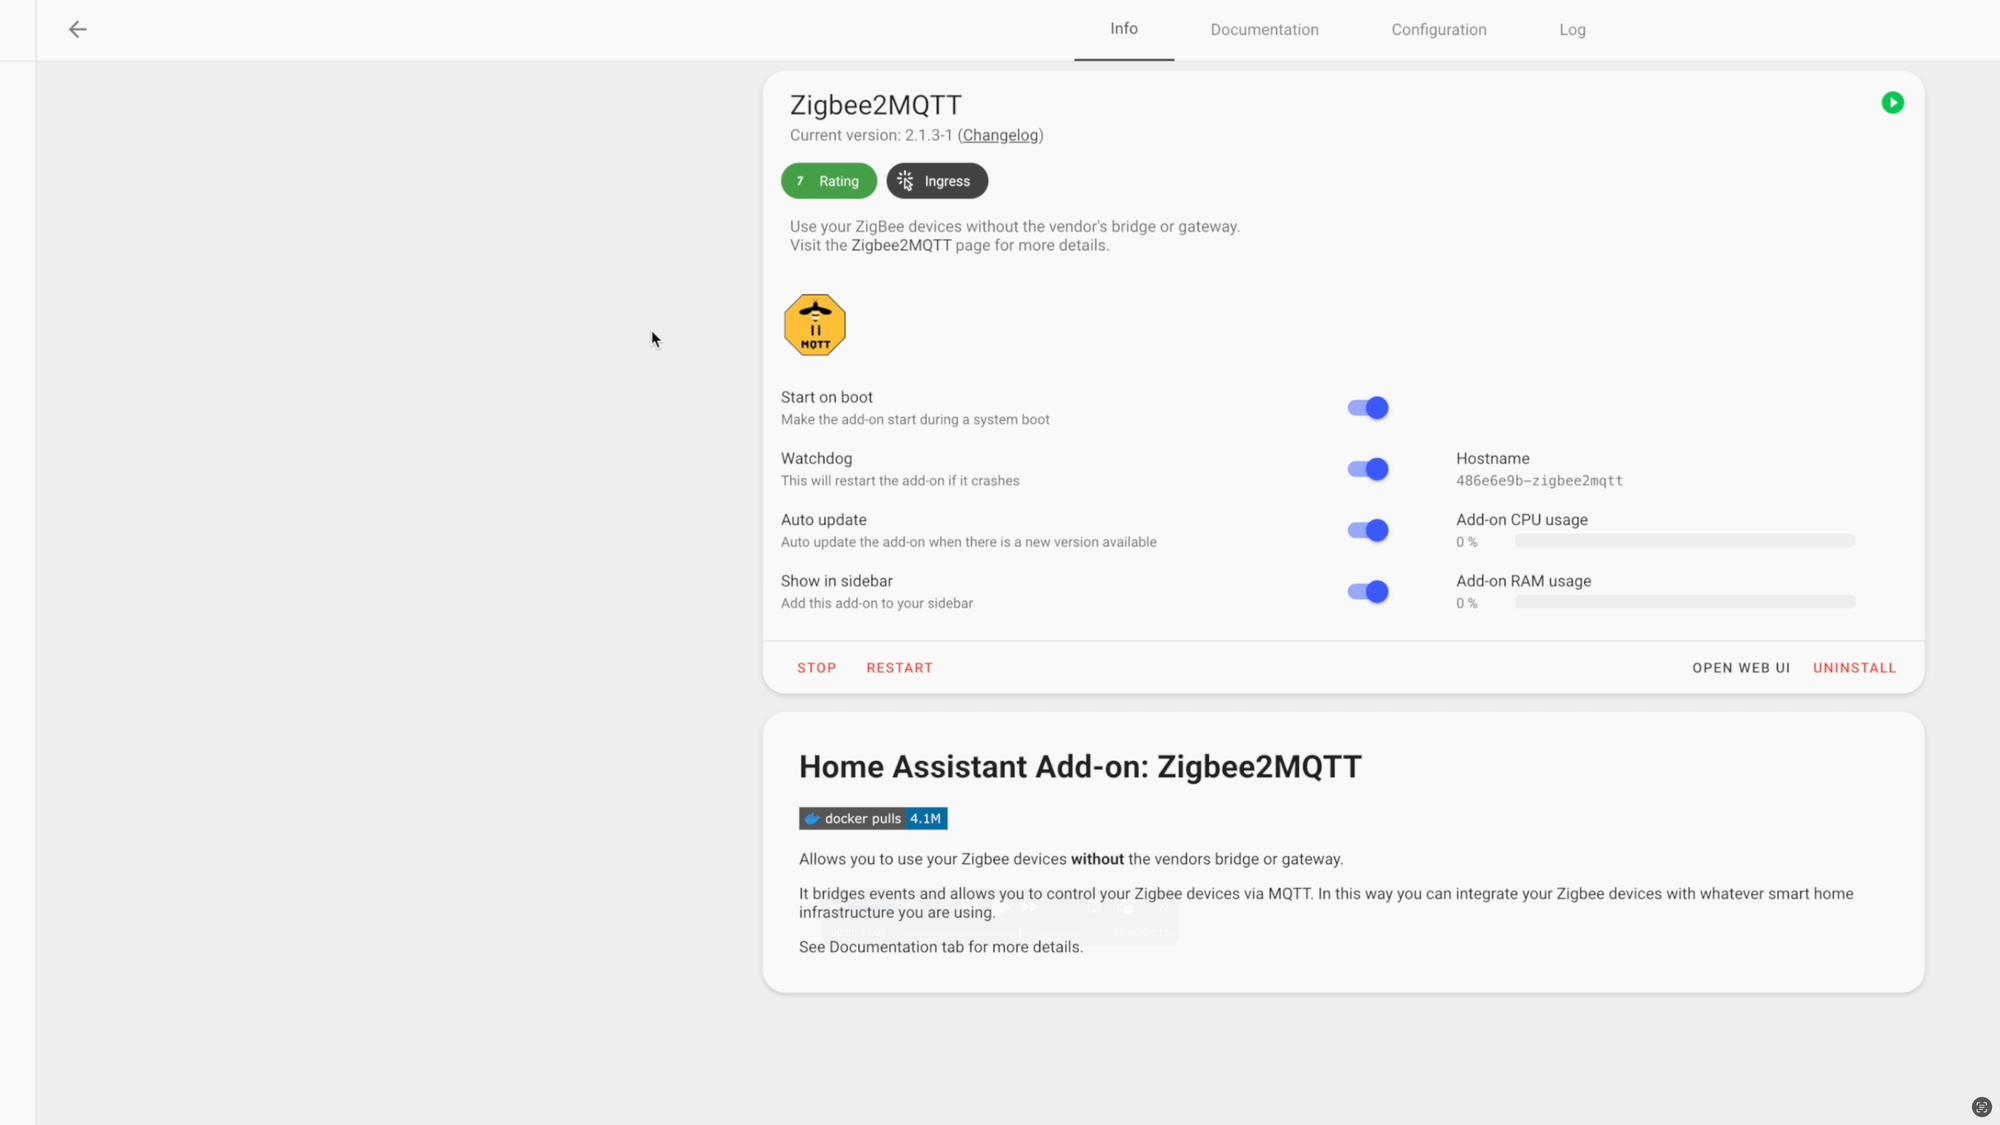
Zigbee: One of the benefits of Zigbee is that as you add more Zigbee devices, they work together to create a mesh network, making your Zigbee connections even stronger. I’ll show you how to add a Zigbee device to Home Assistant using an add-on called Zigbee2MQTT, which relies on another add-on called Mosquito Broker. I’ll talk more about add-ons later in this tutorial, and you can learn how to install Zigbee2MQTT here. For now, I’ll show you what it looks like to add a Zigbee device.
Open the Zigbee2MQTT add-on > click Permit Join All, and put your Zigbee device into pairing mode, usually be pressing a specific button. Zigbee2MQTT will discover and add the device to your Zigbee network in Home Assistant. You can now find the device within the MQTT integration on the Devices & services page.
Z-Wave: Now, let’s take a look at how to add a Z-Wave device to Home Assistant. First, you’ll need to install the Z-Wave JS integration, and select the Z-Wave controller plugged into a USB port on the machine running Home Assistant. Once installed, you can click the plus icon to add a Z-Wave device. Clicking this will put your Z-Wave controller into inclusion mode, which tells it to search for devices trying to join the network. Then, you’ll put the device you want to add into pairing mode, for example, by pressing a specific button on the device a few times. The controller will then find the device, and it may ask you for a pin code printed on the device. This ensures a random device cannot join your Z-Wave network. After you enter the pin code, the controller will interview the device, and display a confirmation message that it was added successfully. I made an earlier video just on the topic of Z-Wave.
If you encounter an error, or if it says the device was not added securely, try excluding the device, and then re-adding it. To exclude a device, choose remove device from the controller software, and then put the device into exclusion mode, perhaps by triple pressing the same button when pairing.
Thread: But I use every type of communication protocol in my smart home. For Thread, you’ll need a Thread Border Router added to your Home Assistant. Examples of these include an Apple HomePod or Apple TV 4K, an Amazon Echo, or Google Nest, but there are lots of other options out there. These are just some of the ones you may already own. If you do use one of these, that doesn’t mean you have to add your Thread devices to those ecosystems. Home Assistant only uses them to access the Thread radio network. Similar to Zigbee, devices in a Thread network form a mesh, helping the devices maintain a strong connection.
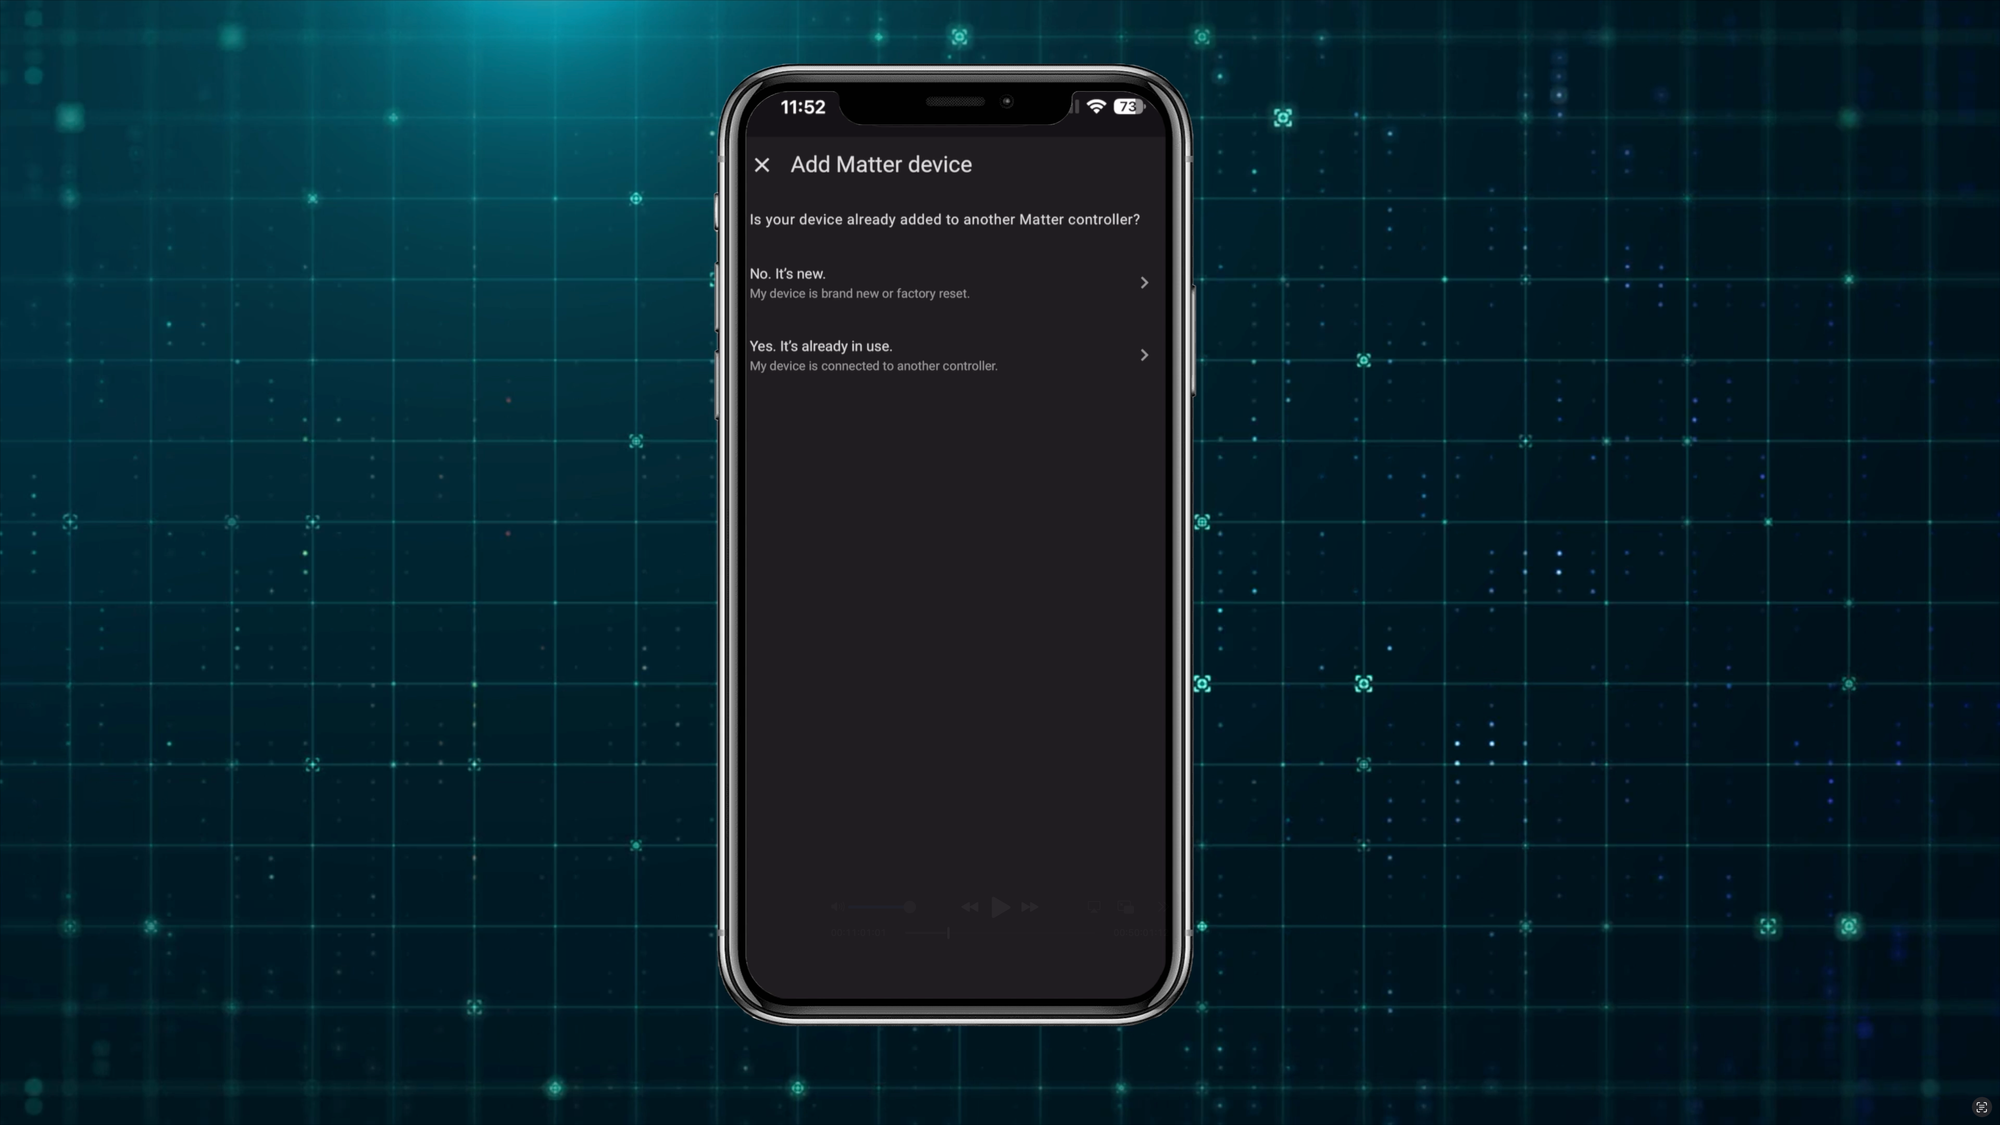
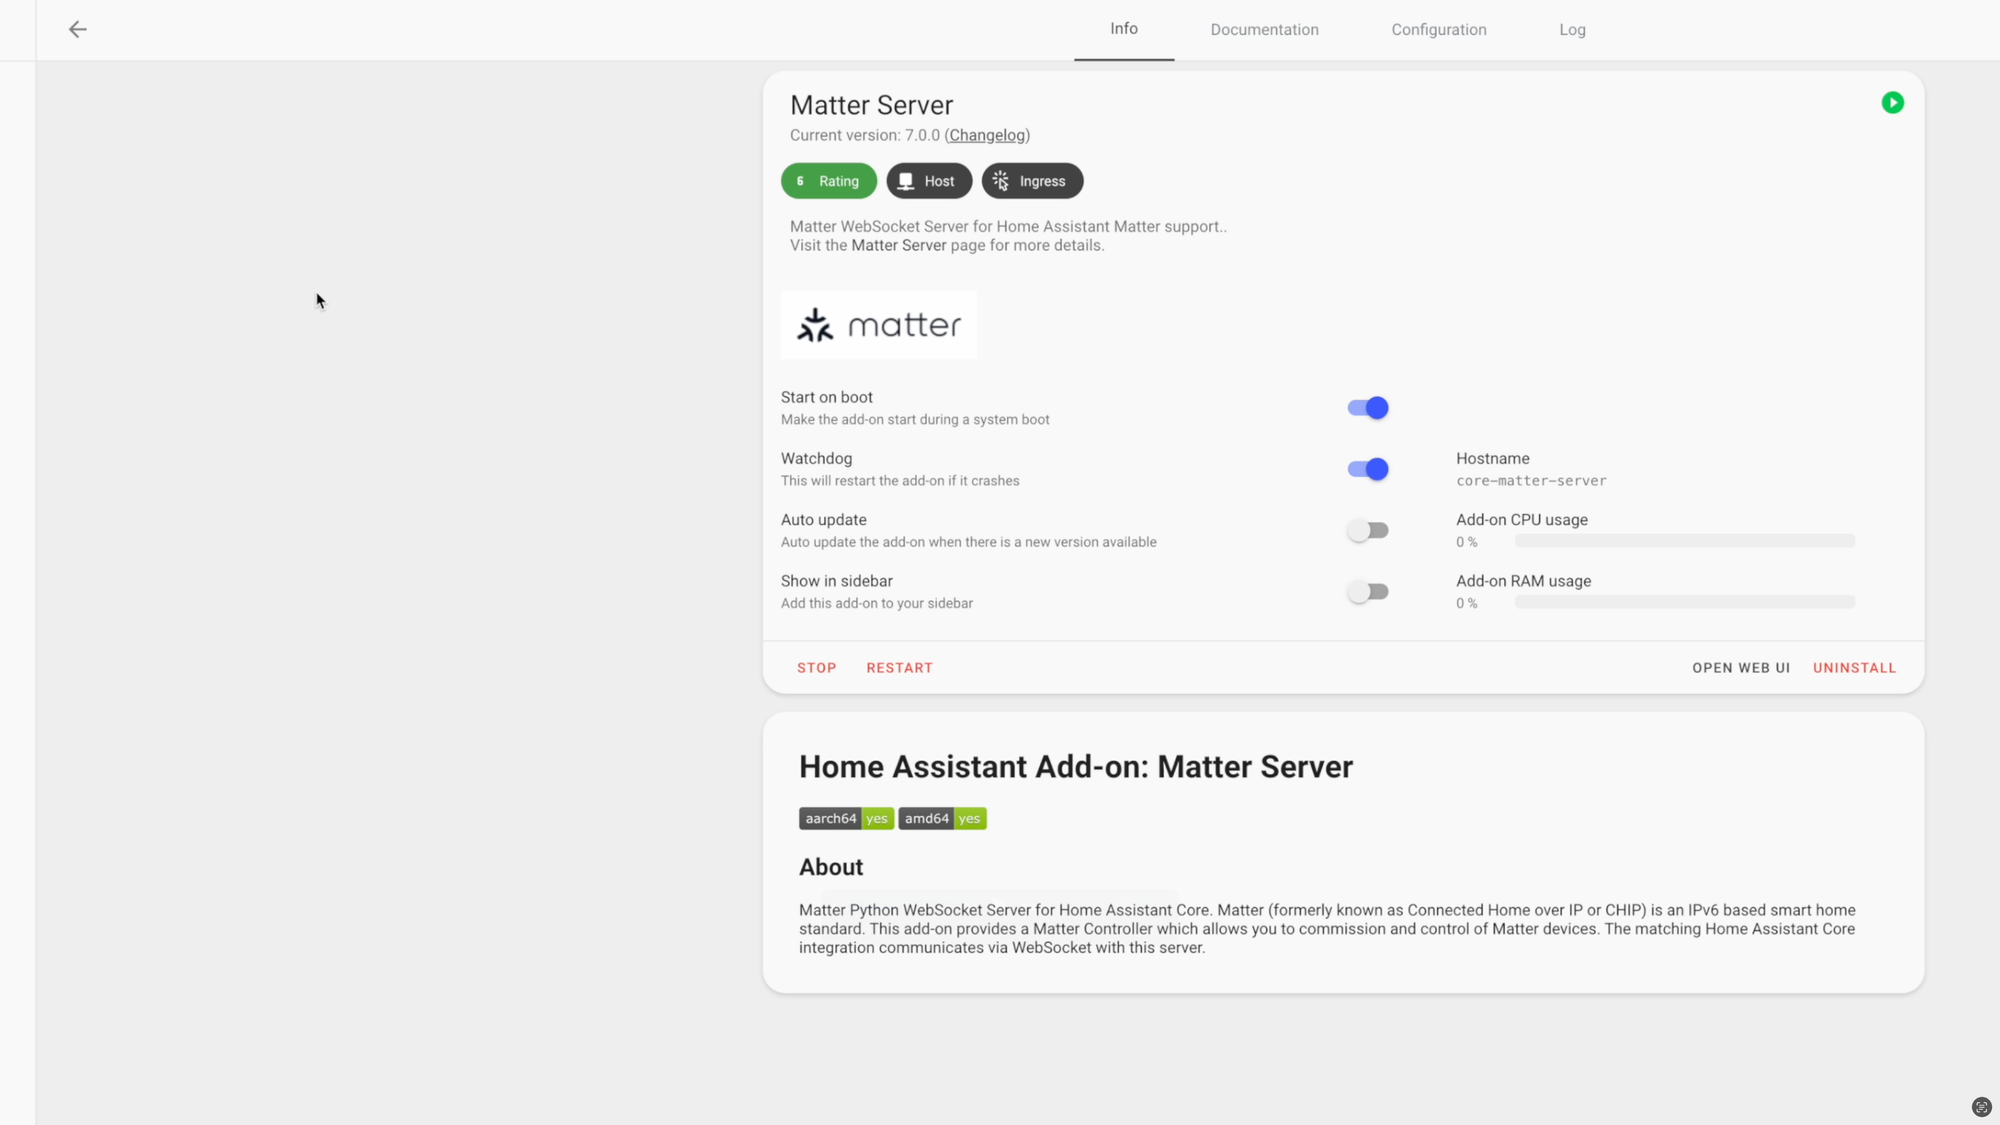
Matter: Thread is typically used as the underlying communication protocol for the Matter smart home standard. Matter aims to ensure interoperability of devices across smart home ecosystems, whether that’s Amazon, Apple, Google, SmartThings, or Home Assistant. But Matter is not limited to operating on Thread; some Matter devices operate over WiFi. There should be a logo on the device packaging telling you which type it uses. I’ll show you how to add a Matter device to Home Assistant. The steps are similar whether it’s Matter-over-Thread, or Matter-over-WiFi.
To begin, you’ll need the Matter integration added to Home Assistant, which can be done by going to Settings > Devices & services > Add integration > Add the Matter integration. This will also install the Matter Server add-on. Now, you can start adding Matter devices to Home Assistant. If adding a Matter-over-WiFi device, make sure your phone is connected to a 2.4GHz WiFi network. Then, open the Home Assistant companion app on your phone, and go to Settings > Devices & services > Devices > Add Device > Add Matter device > No. It’s new > and it will ask to scan a Matter QR code printed on the device or its packaging. After you scan the Matter QR code, the device will connect to Home Assistant, and appear under the Matter integration.
If you’re unsure what Zigbee or Z-Wave controllers to get, or what Thread Border Router to use, you can view all of the smart home tech I’m using here.

Home Assistant: Protocols
Entities
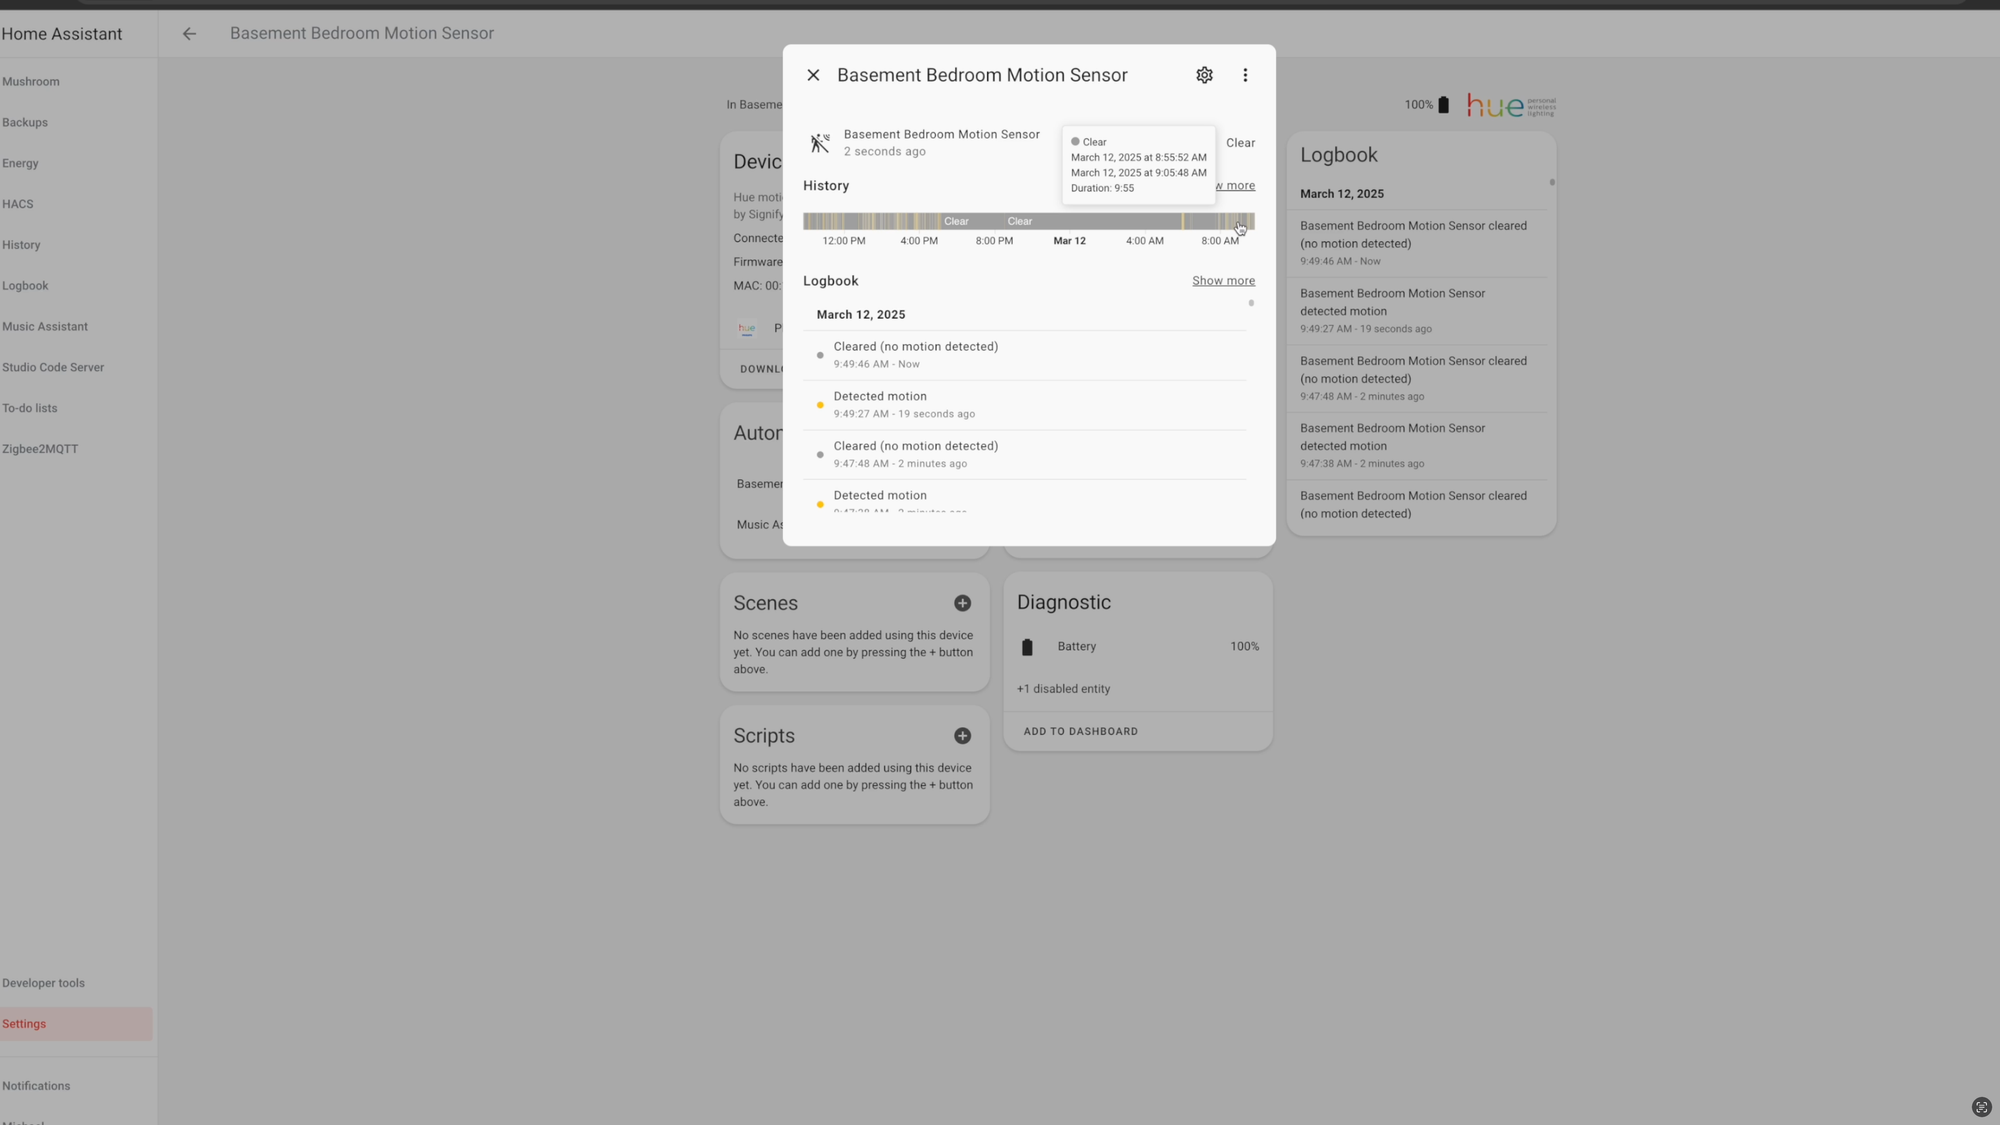
Next to the devices page is a list entities. You can think of entities as the sub-components of a device. For example, let’s say I added the Philips Hue integration, which then added a Philips Hue motion sensor to Home Assistant. The motion sensor will show up under the list of devices, but this motion sensor consists of multiple entities. There are separate entities for illuminance, motion, and temperature. Each entity has a state associated with it. In this case, the states are the light level in that room, if motion is detected or not, and the room’s ambient temperature.
You can create home automations based on the state of an entity, such as turning on a light when motion is detected and when the light level is low. You can also show the state of an entity on your dashboard, like if a light is on or off.
Home Assistant: Entities
Helpers
Next to the entities page you’ll find helpers. You can think of helpers as variables that you can use to store data. This topic, like many that I’ll cover, could be its own separate tutorial. I’ll show a couple of examples to help make sense of helpers.
From the helpers page, you can click the plus icon to create a helper. There are many options to choose from, which is a theme in Home Assistant. One of the helper types is called a toggle, also known as an input boolean. You can think of this as a virtual switch that is either on or off.
For example, you can create a toggle helper and make it a condition in your automations. If the toggle is off, the automation will run, but if the toggle is on, then the automation will not run. It’s like flipping a switch to prevent an automation from running.
One example for this is lighting automations. Let’s say you have an automation to turn the bedroom lights on and off based on things like presence detection, light level, and time of day. This may work fine 99% of the time, but what about that one time that you go to bed early because you are not feeling well? You wouldn’t want the lights turning on constantly when you’re trying to rest. To prevent this, you could navigate through the Home Assistant settings, find the automation in question, and disable it, and then remember to re-enable it the next day. What I prefer to do is flip the toggle helper on, accomplishing the same thing as disabling the automation, but with less hassle. I’ll show an example of an automation with this later in the tutorial. I can even create an automation that resets all my toggle helpers overnight, so the automations are ready to go the next morning without me having to do anything.
Another example of a helper that you should know about is a group. This is great for combining multiple entities together so they can be controlled as a single entity. It’s especially convenient for controlling lights. I have two nightstand lamps in this bedroom. Using a group helper, I can combine them into one entity to turn them on and off, or control their brightness or color temperature, without having to do this separately for each light.

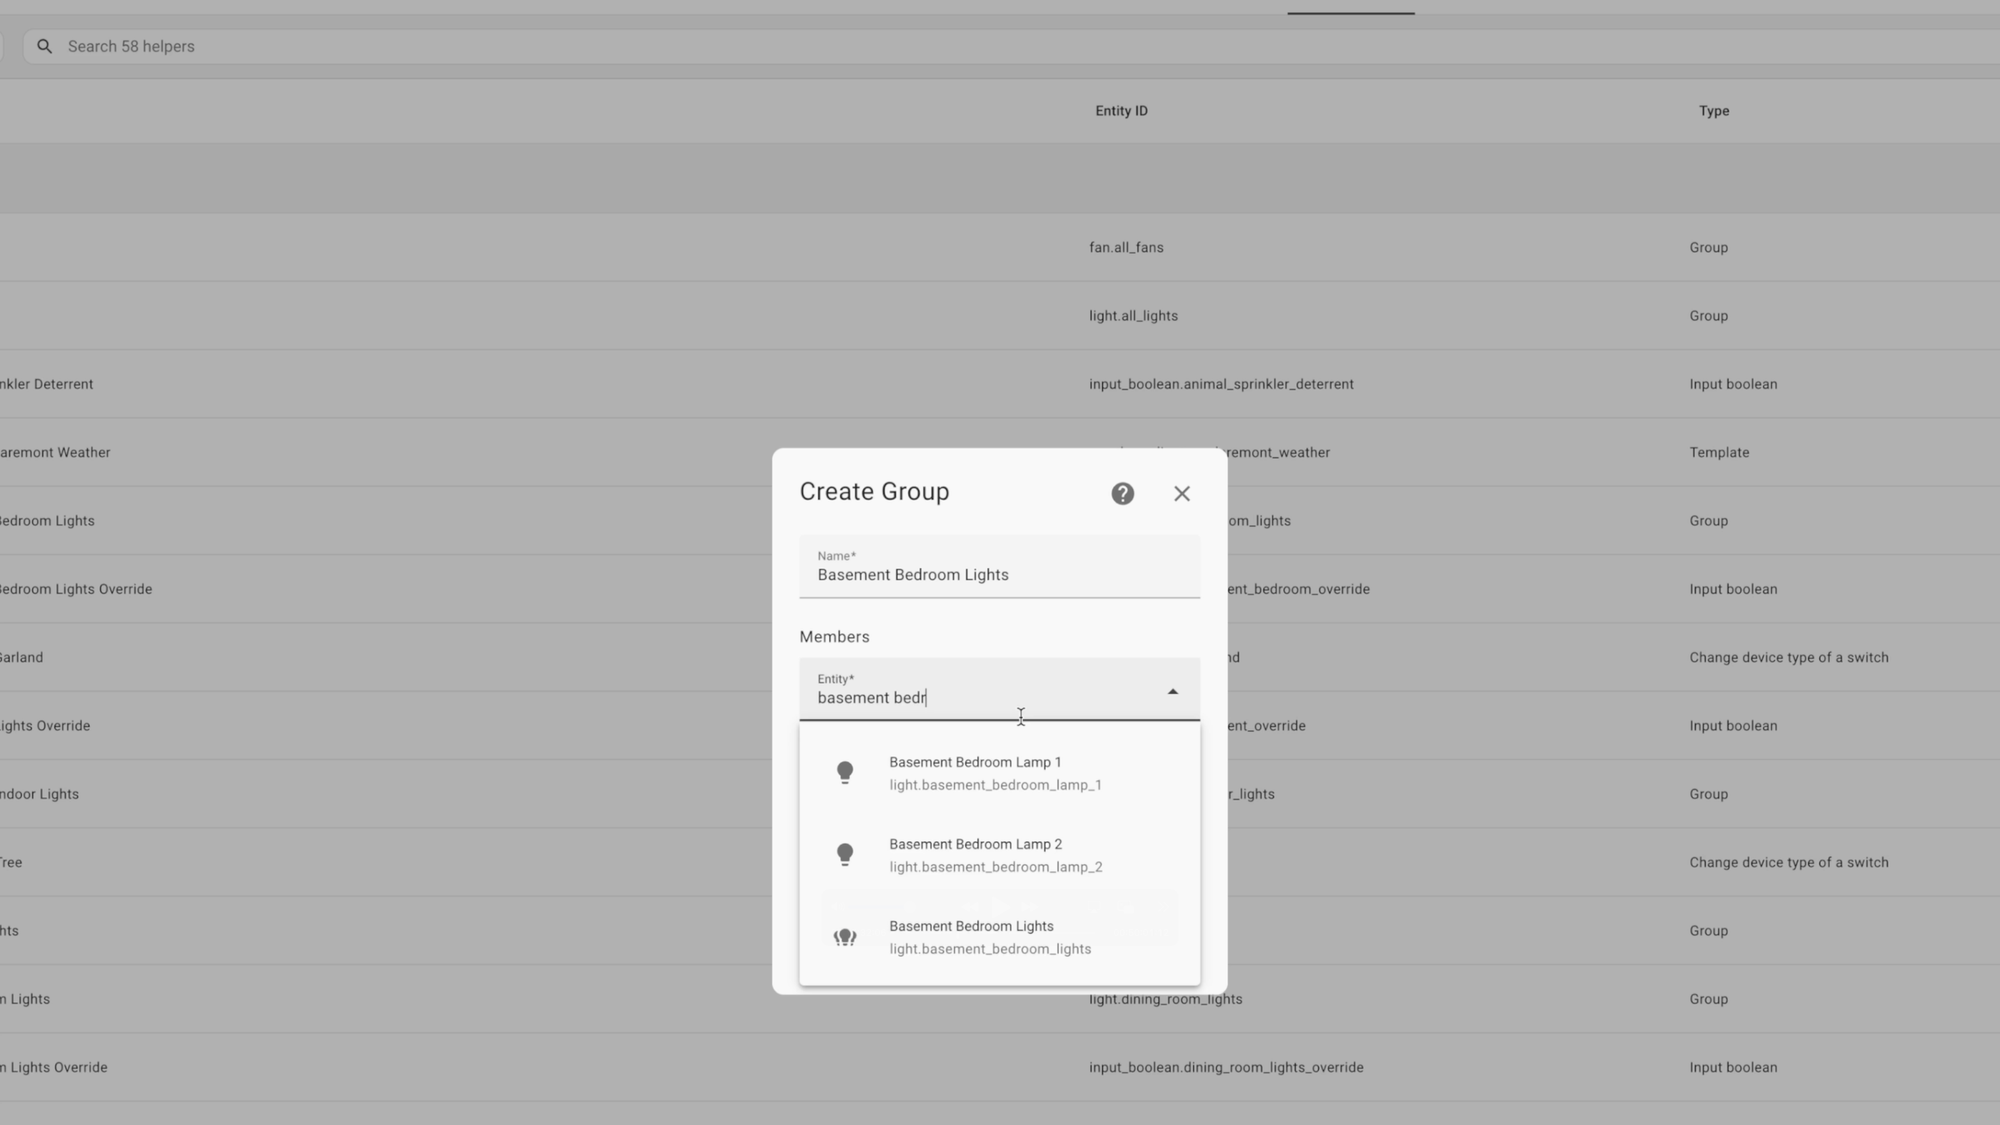
Home Assistant: Helpers
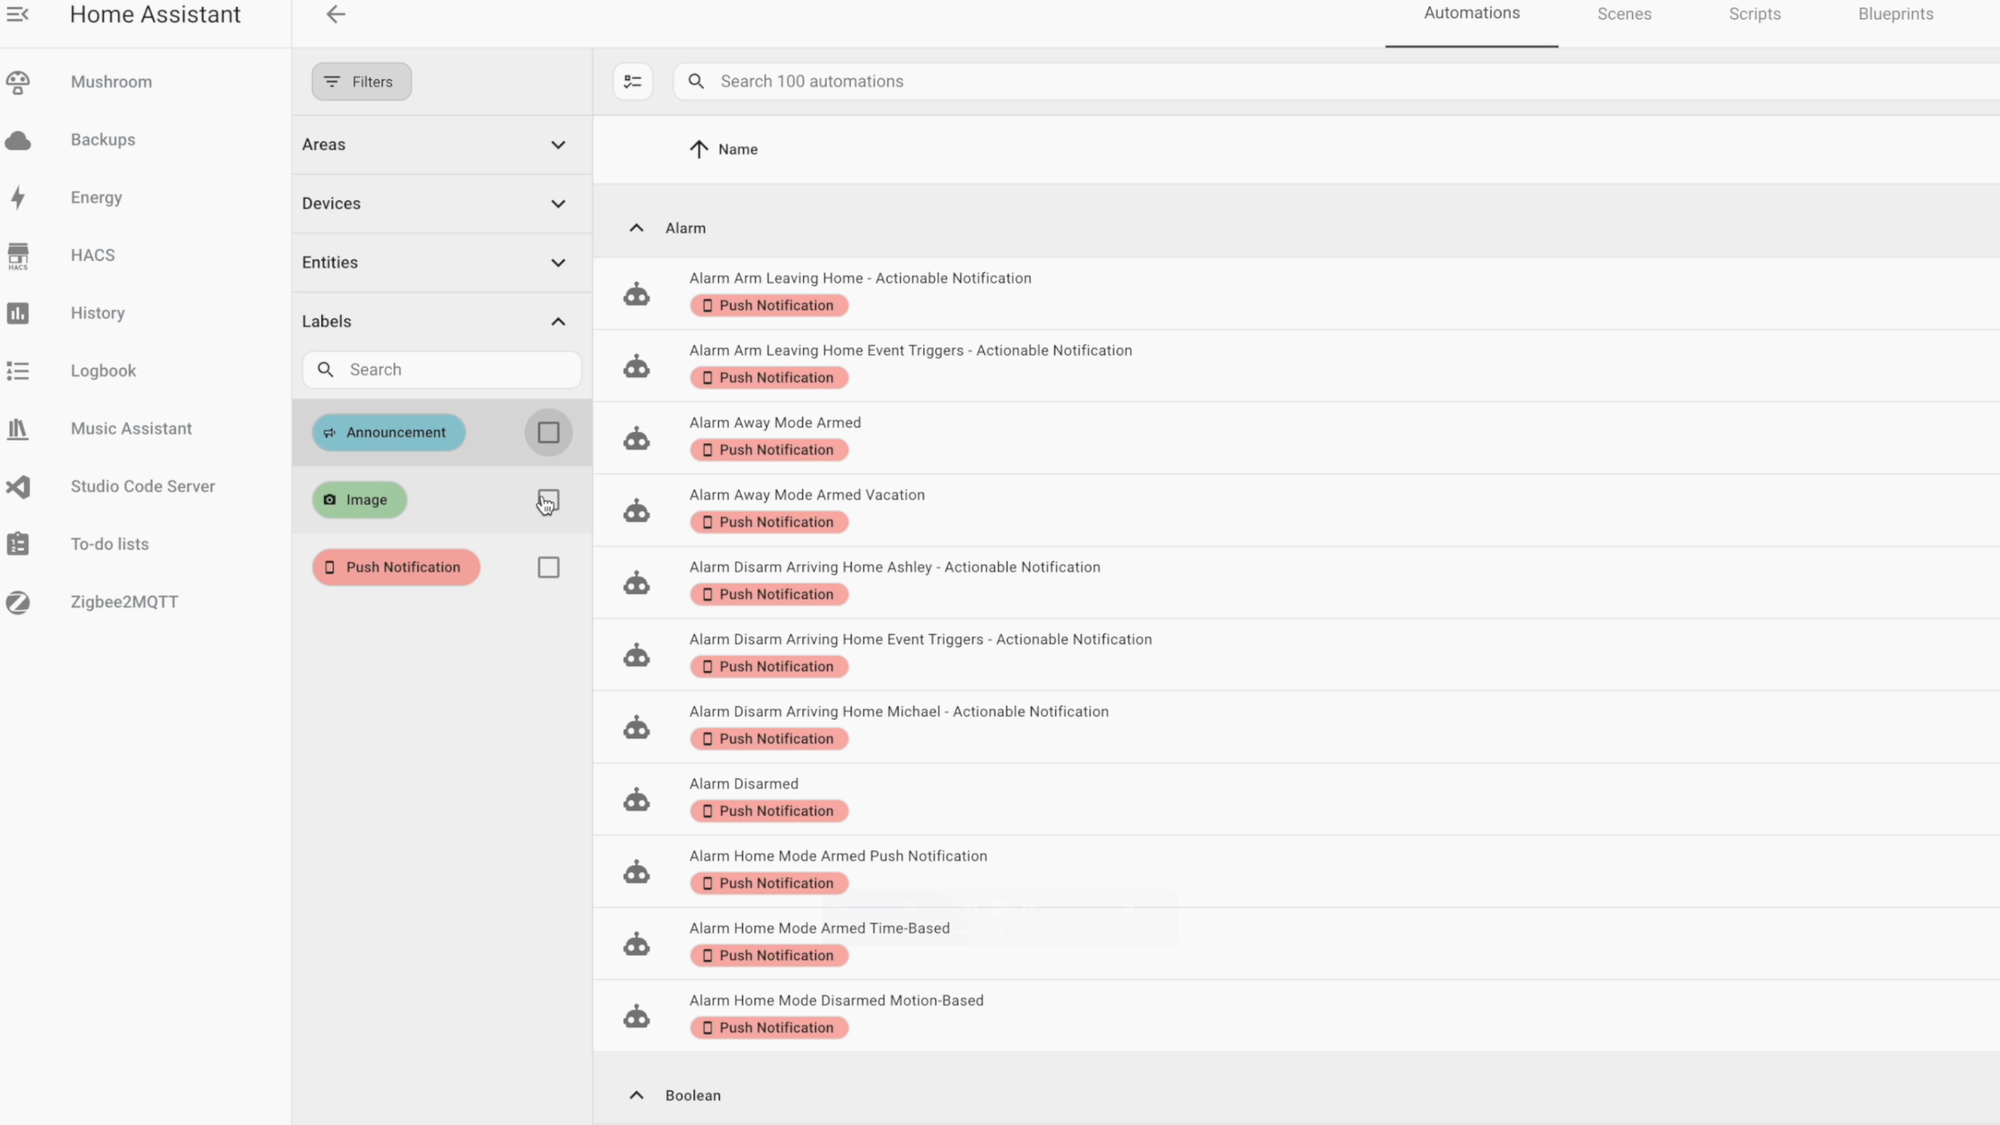
Automations
Automations Overview: Below Devices & services is a collection of settings where you’ll probably end up spending the majority of your time, since this is where you can create home automations. And I’m going to spend a lot of time on this subject.
Since Home Assistant contains information about your smart home devices, you can use this information to trigger automatons. After all, a truly smart home is one that takes action seamlessly in the background without requiring you to do anything.
Automations consist of a trigger and an action. You also have the option to add conditions.
A trigger could include something like motion being detected, someone entering or leaving a zone, a specific time of day, and much more. By default, triggers use the “any” logic, meaning the automation will initiate when any of the specified triggers is triggered.
After triggers you have conditions. Conditions are optional but allow you to tailor the automation to your specific needs, so the automation only runs exactly when you want it to. Unlike triggers, conditions use the “all” logic by default, meaning all of the conditions must pass for the automation to continue. Keep in mind that your conditions will be processed in the order they are listed. If the first condition does not pass, it will not evaluate the second one; the entire automation just stops there.
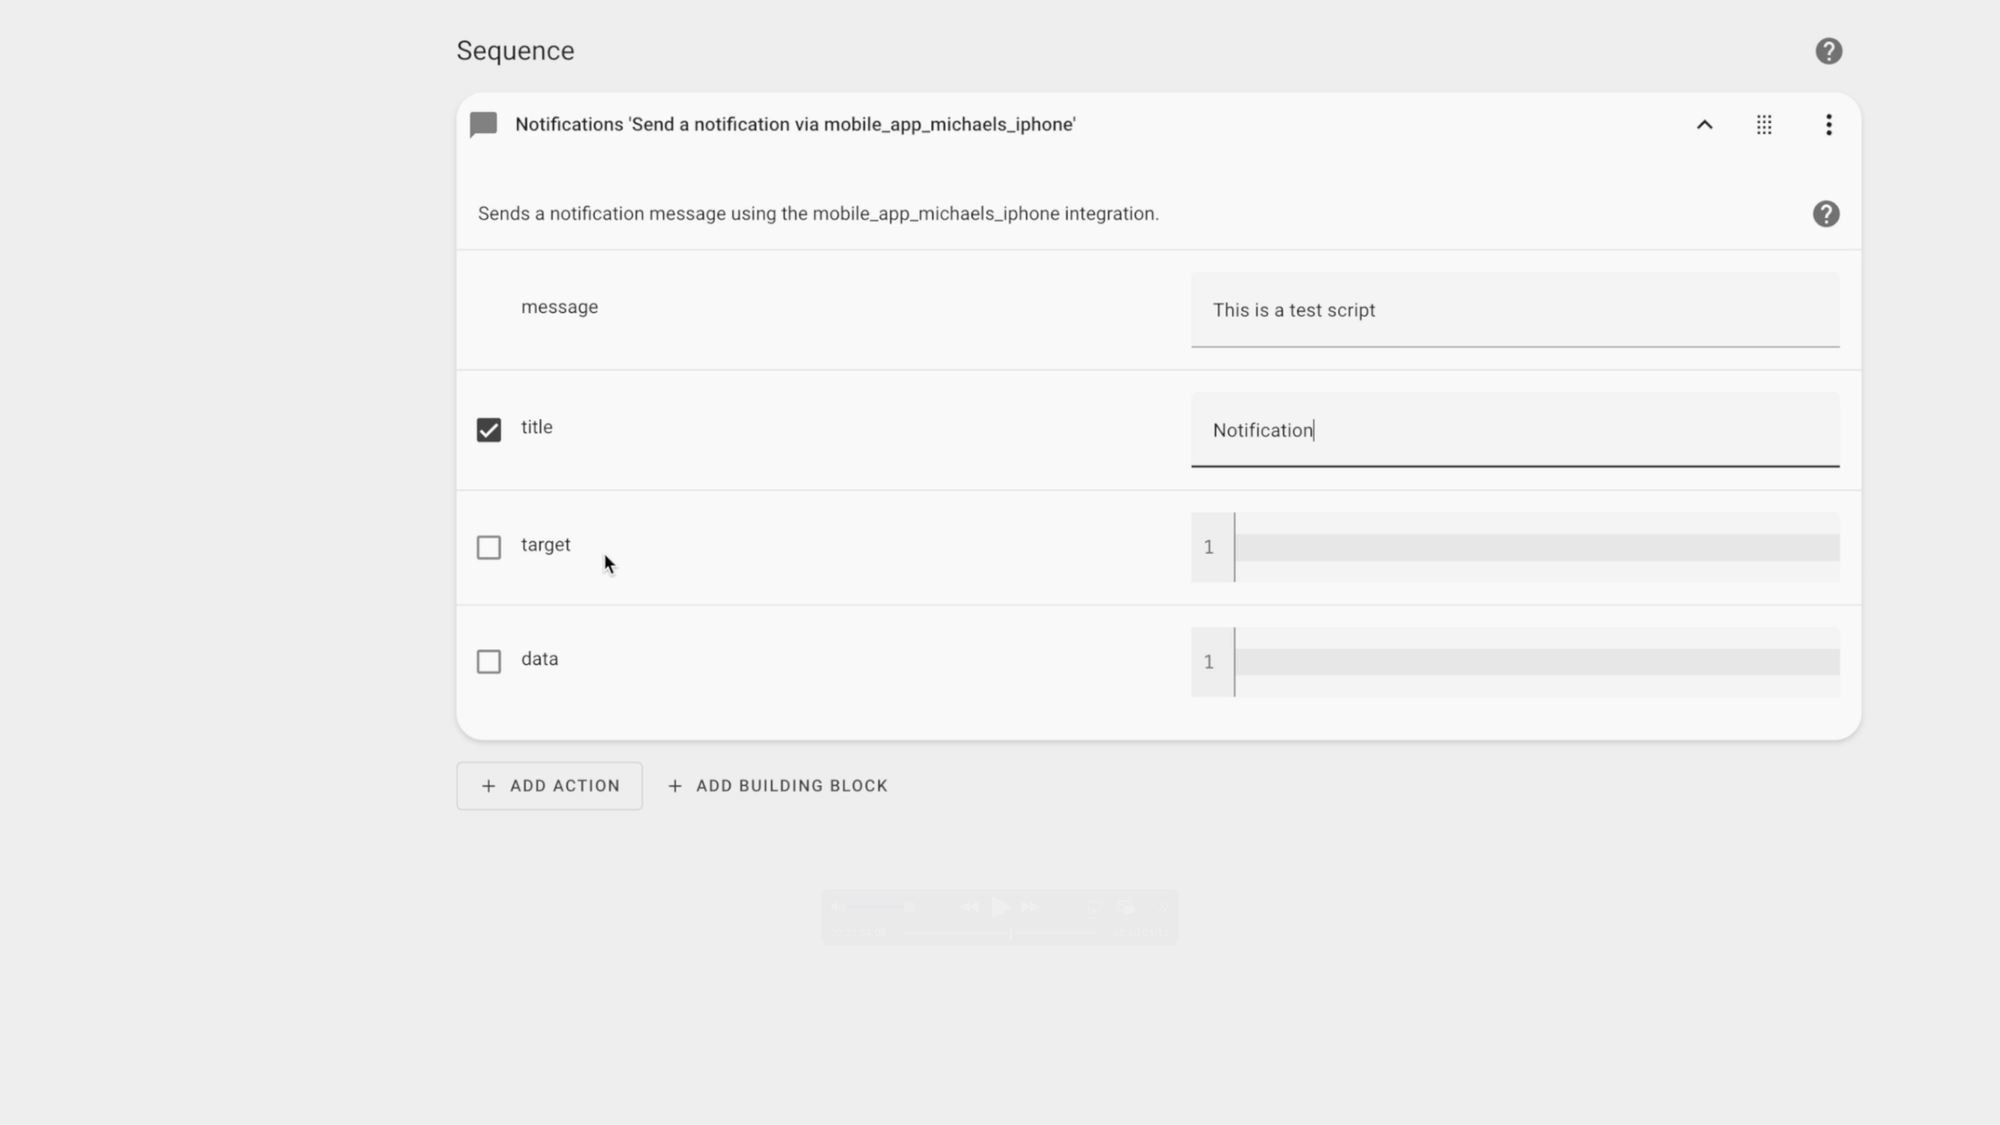
An action is what is being executed after a triggering event occurs and all of the conditions pass. For example, an action may be turning something on or off, setting a device to a specific setting, broadcasting an announcement, sending a message to your phone, activating a scene, or a bunch more.
You can even place conditions within actions. Let’s say you have multiple actions that you want processed. You could put conditions that apply to all actions in the conditions section, and then add unique conditions for each action in the actions section.

Home Assistant: Automations Overview
Basic Automation: Let’s look walkthrough a basic automation example to make sense of how you can use triggers, conditions, and actions. For this example, let’s start by creating an automation that turns on a light in the bedroom when motion is detected and it’s dark.
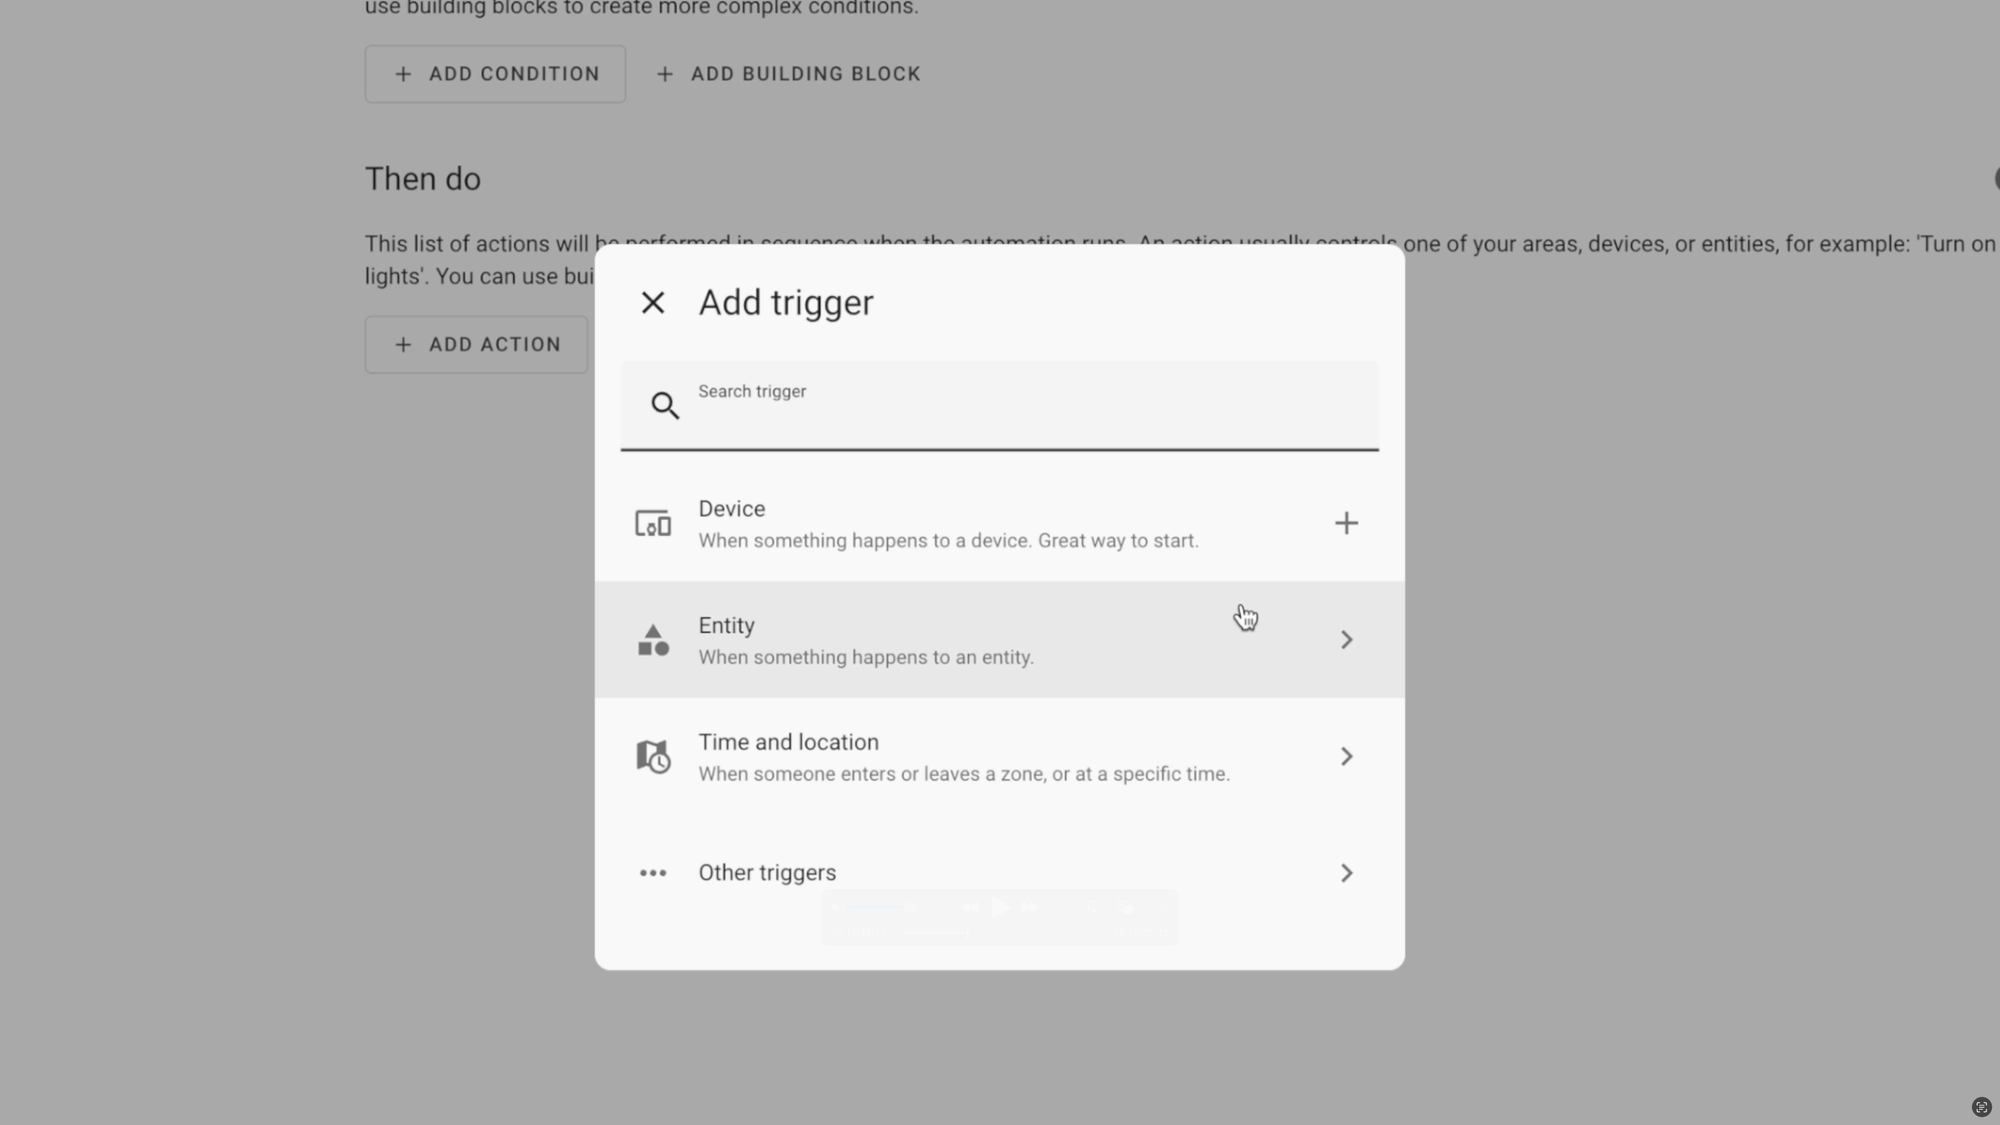
To create the automation, click the plus sign. You can choose whether to create an automation from scratch, or to utilize a blueprint. I’ll come back to blueprints in a moment. The automation editor is segmented into “When - And if - Then do” sections to represent the triggers, conditions, and actions, respectively. Let’s build an automation for the example that I just gave about turning on a light.
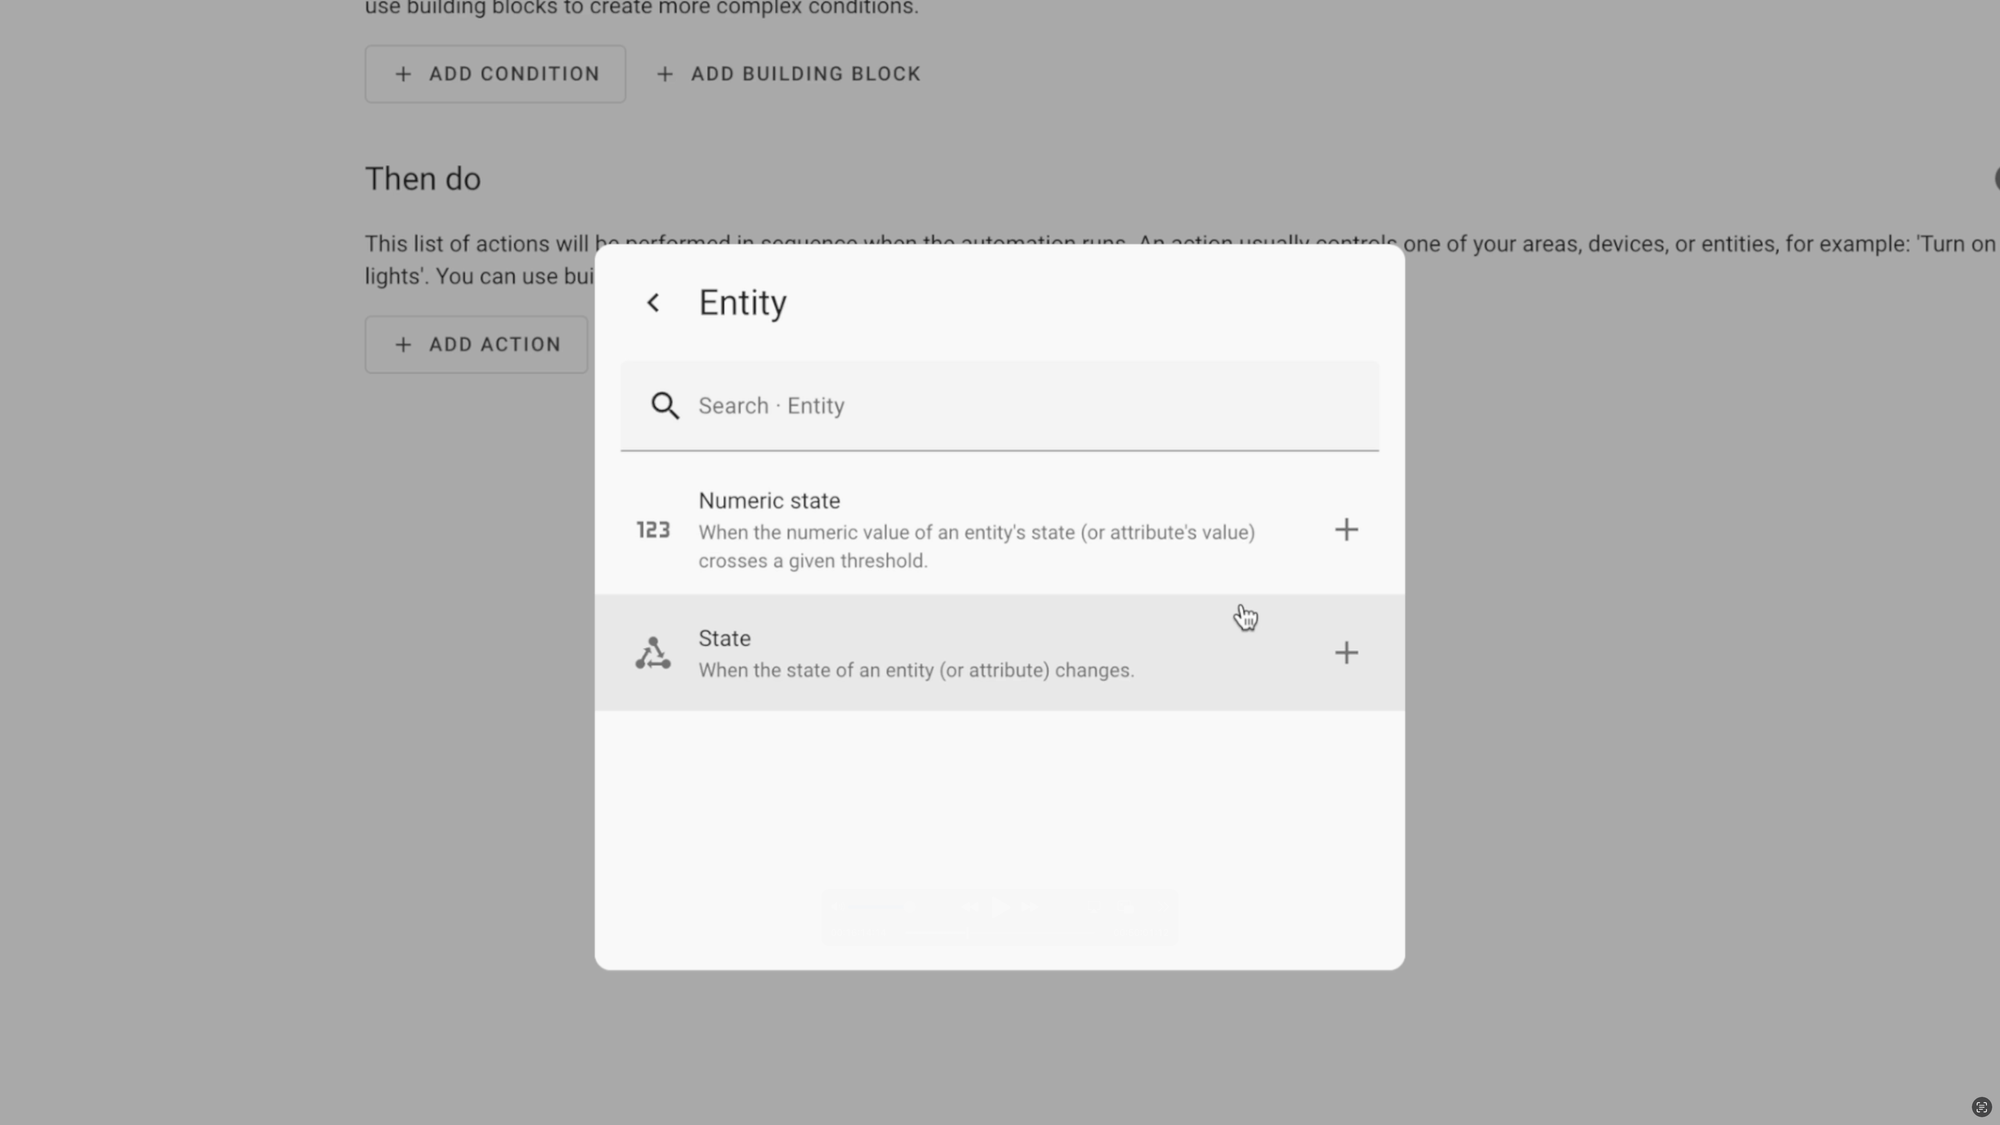
I’ll start by adding a trigger, and there are a few options to choose from. Personally, I prefer the granularity of basing a trigger on an entity. Remember, an entity is a sub-component of a device, like light level, temperature, or motion detection.
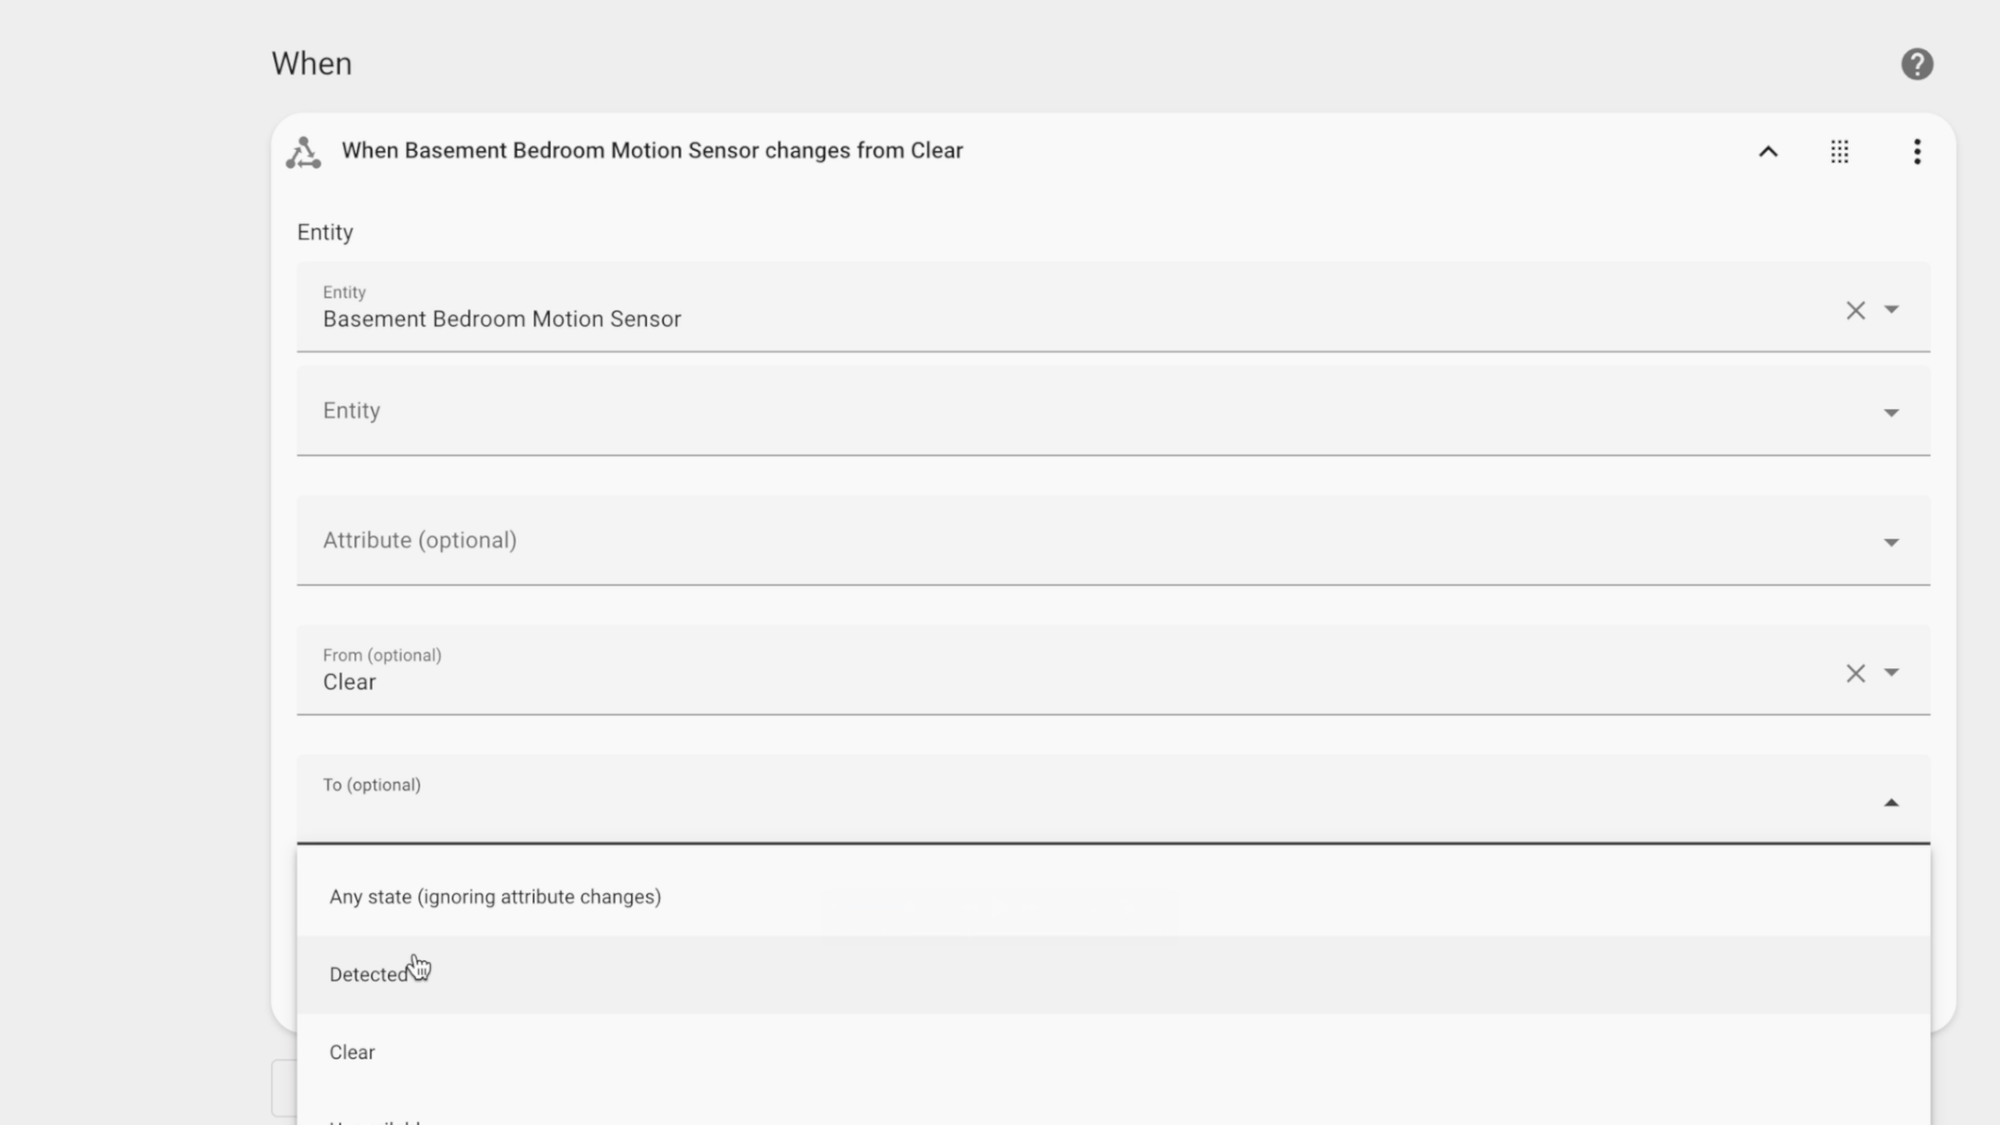
In this case, I want to trigger the automation based on the state of motion detection, so I’ll choose “state.” From the dropdown, I’ll search for the motion sensor entity. Then, I’ll select when it changes state from “clear” to “detected.” This means the automation will be triggered when the motion sensor is detecting motion.
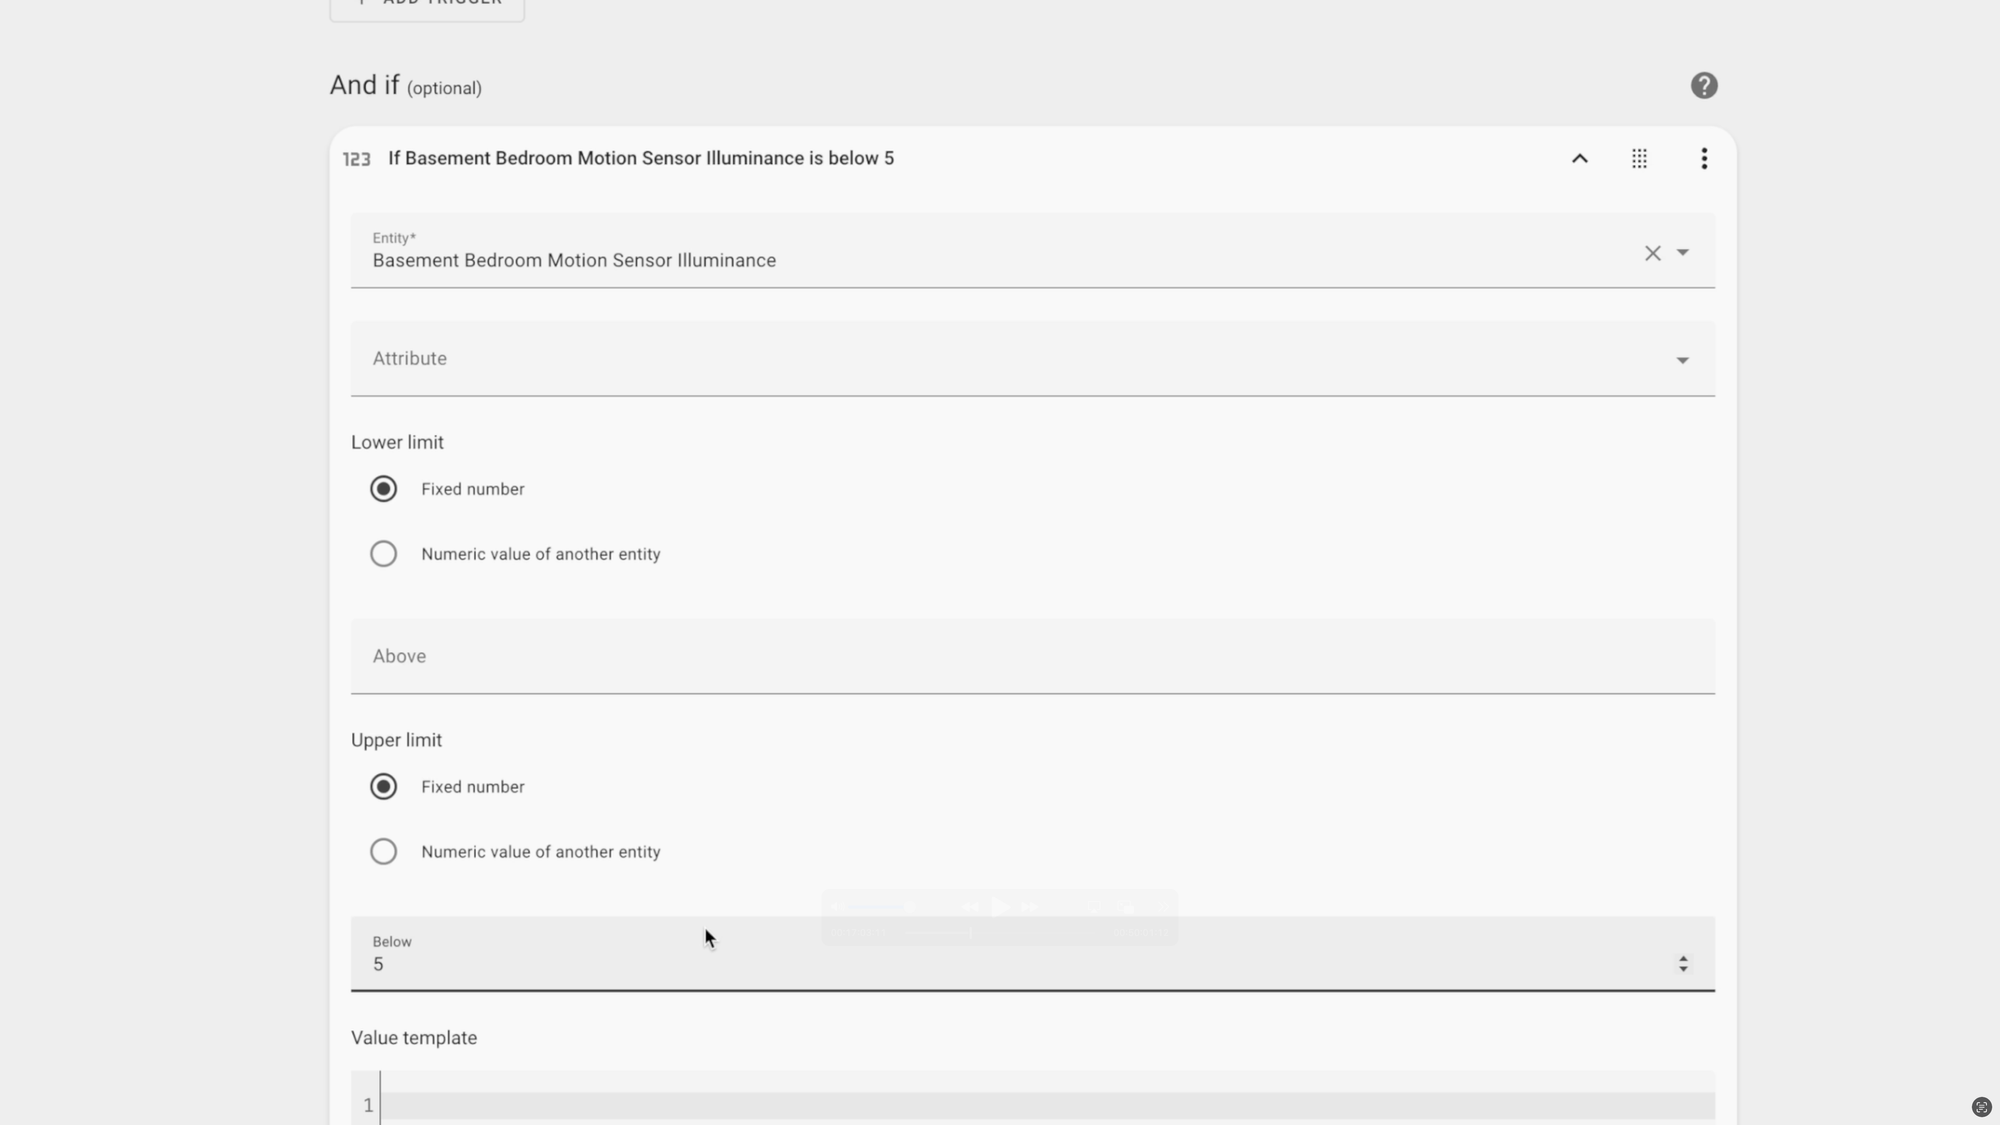
For my condition, I’ll again choose “entity,” and this time search for the light level entity, because I only want the light to turn on if it’s dark in the room. This time though, I’ll choose “numeric state.” This allows me to set a condition that the light level, also called illuminance, must be below a certain number, which will represent that it’s dark in the room. The exact number you use will depend on your environment and personal preferences. You can always look at the entity’s real-time light level in Home Assistant to determine your desired threshold. After creating a condition, you can click the three dots and test if that condition passes or not. This is a nice way to confirm if things are working as expected.
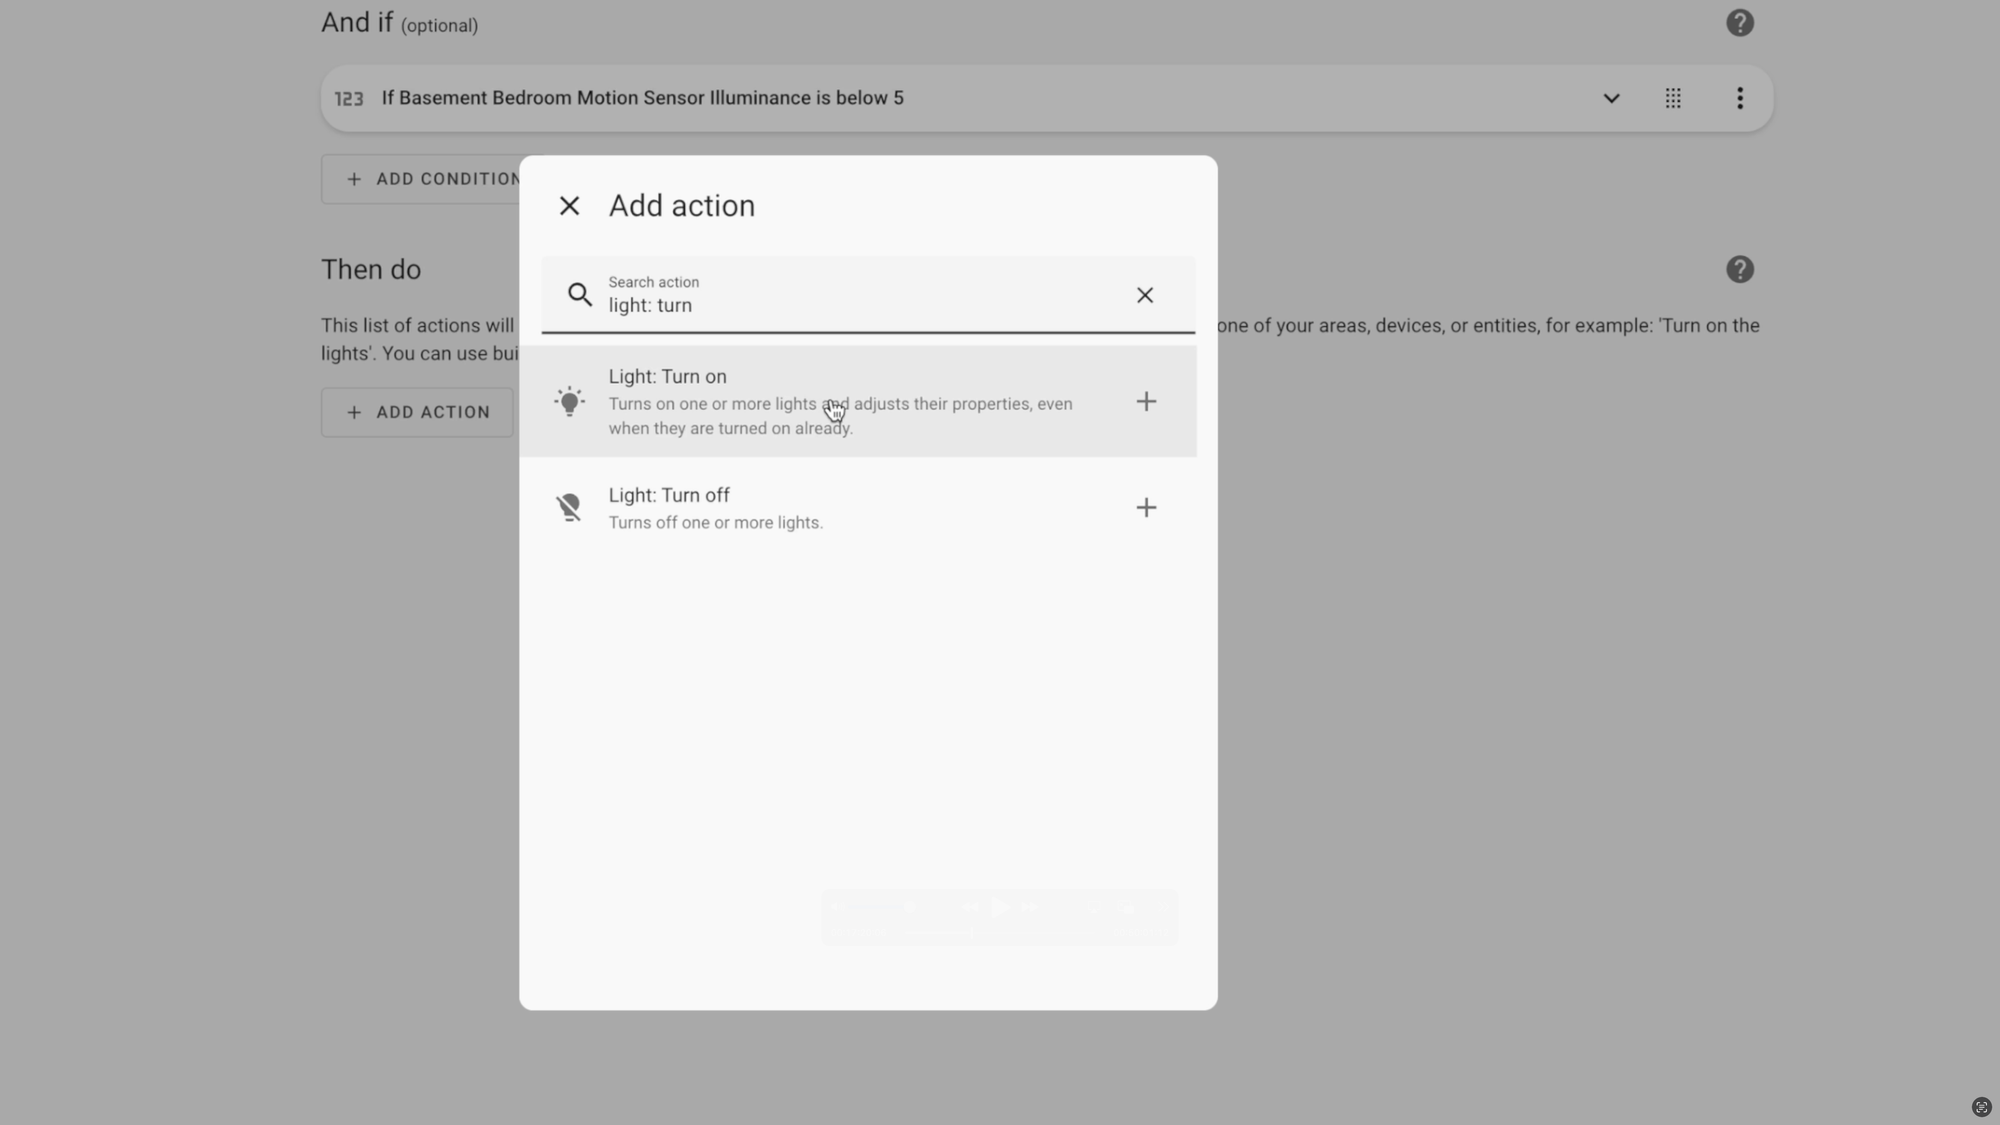
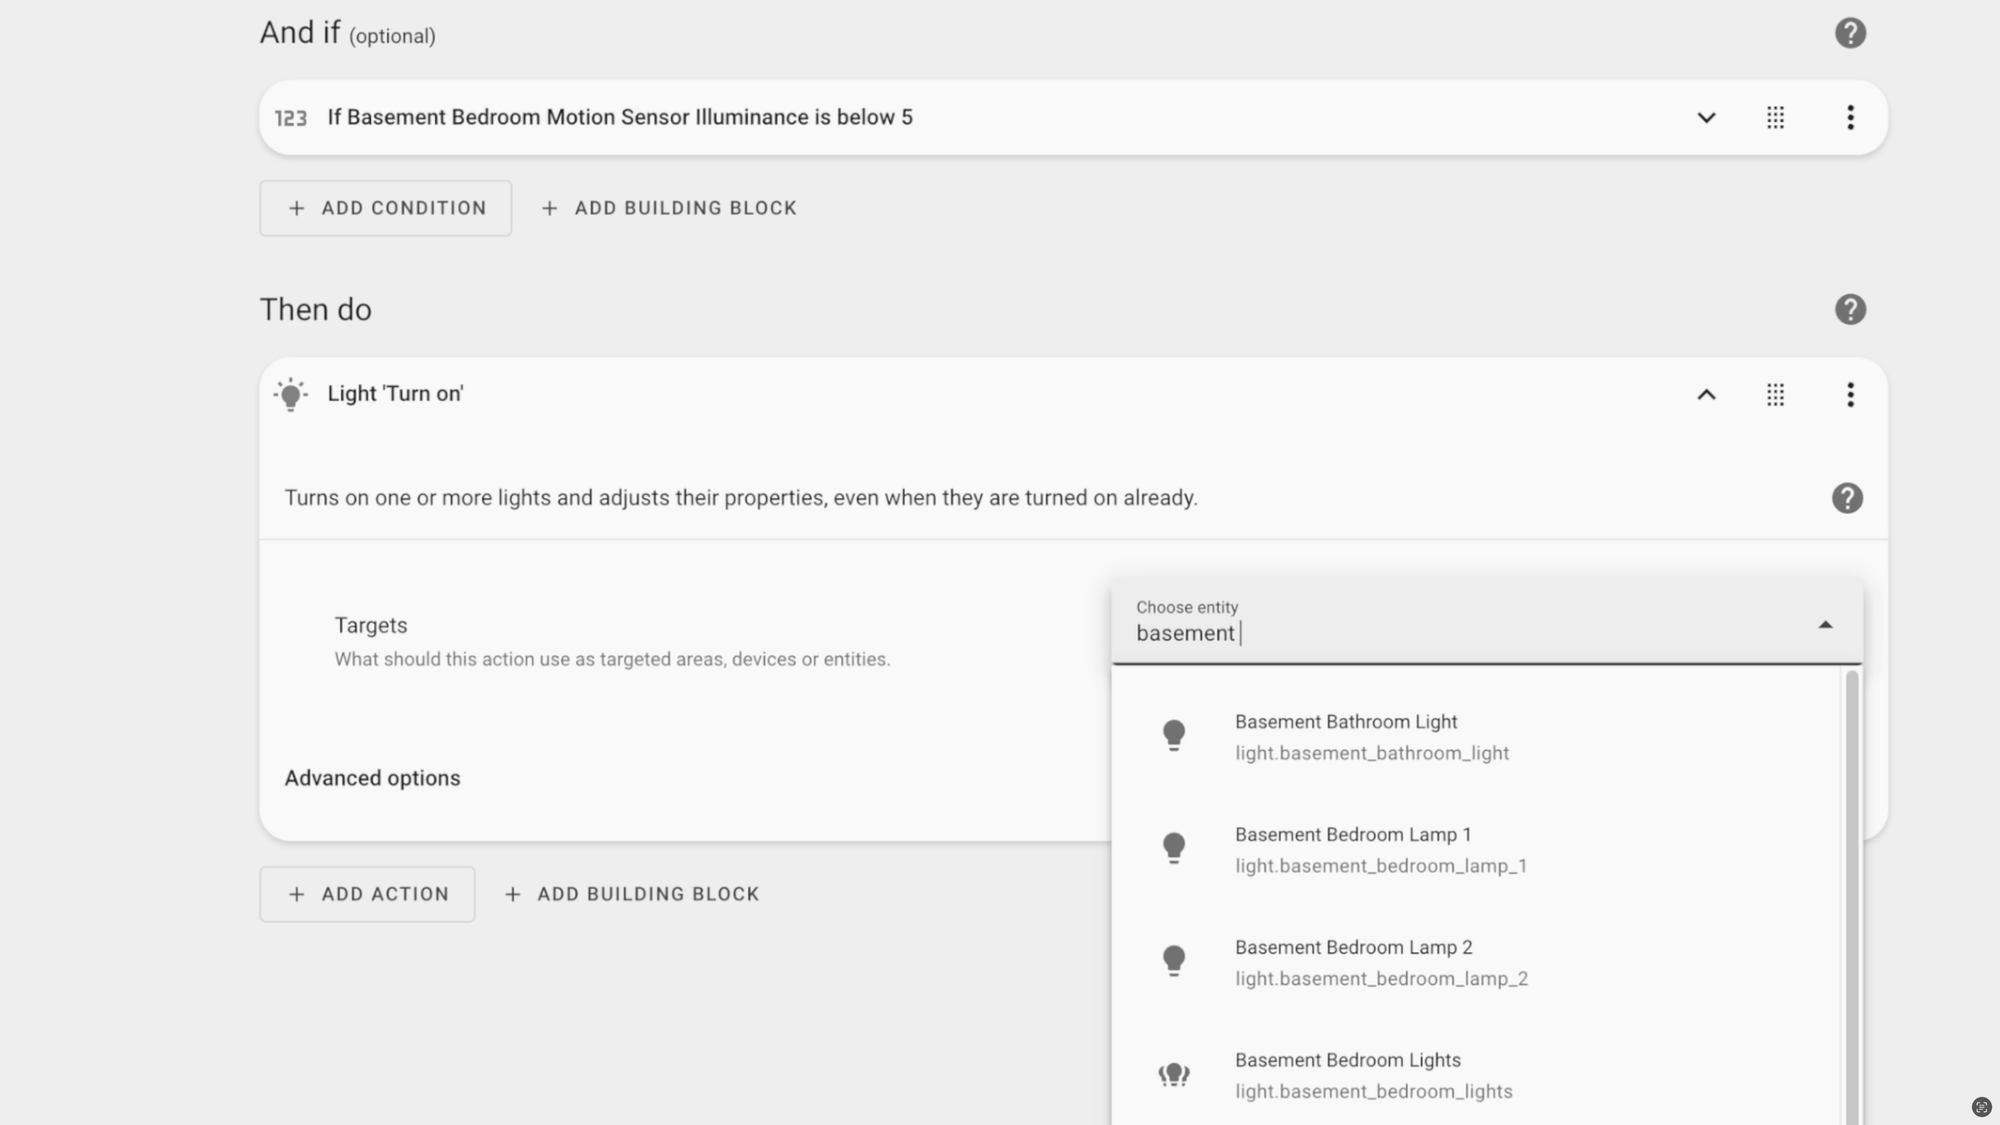
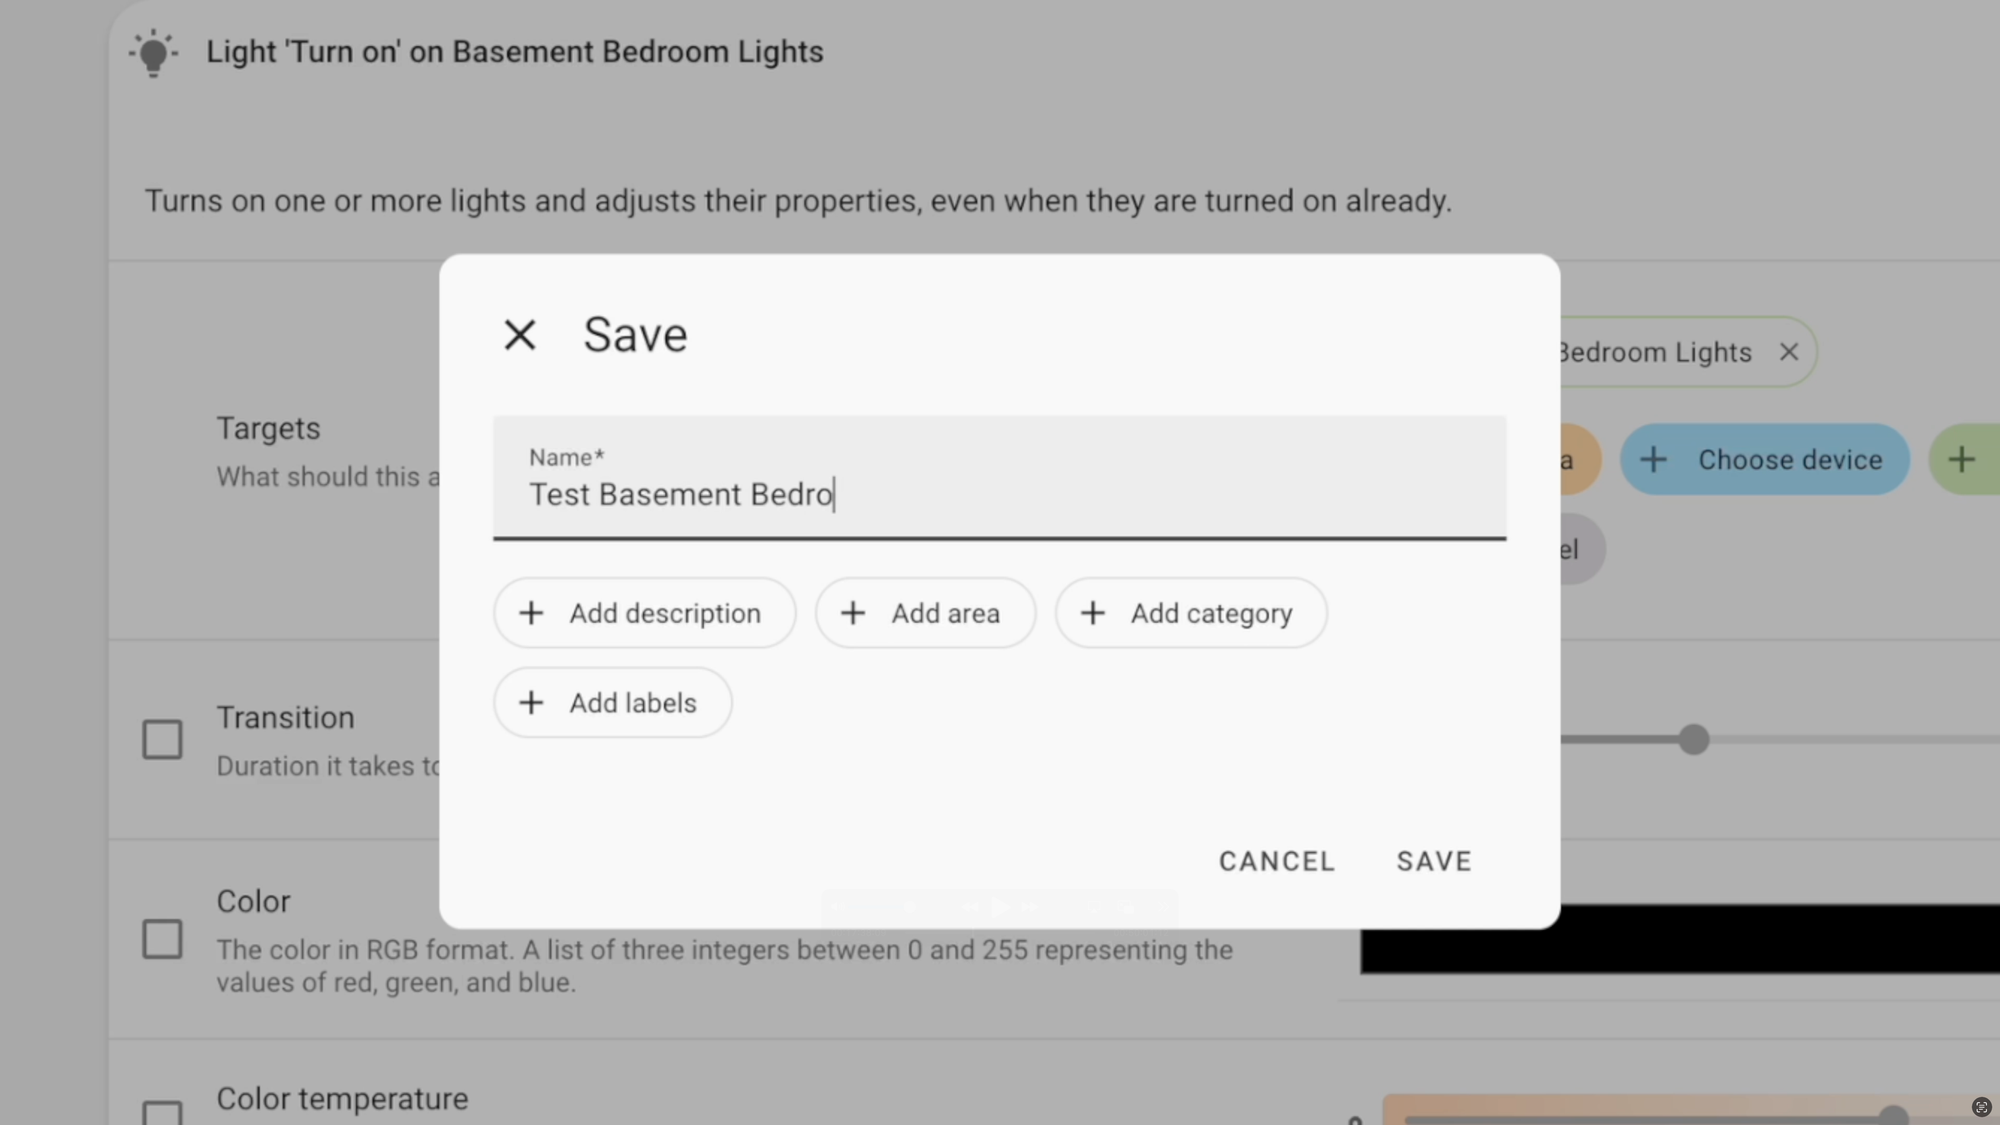
For the action, I will search for “Light: Turn on,” and then select the entity that I want to turn on, which is the bedroom lights.
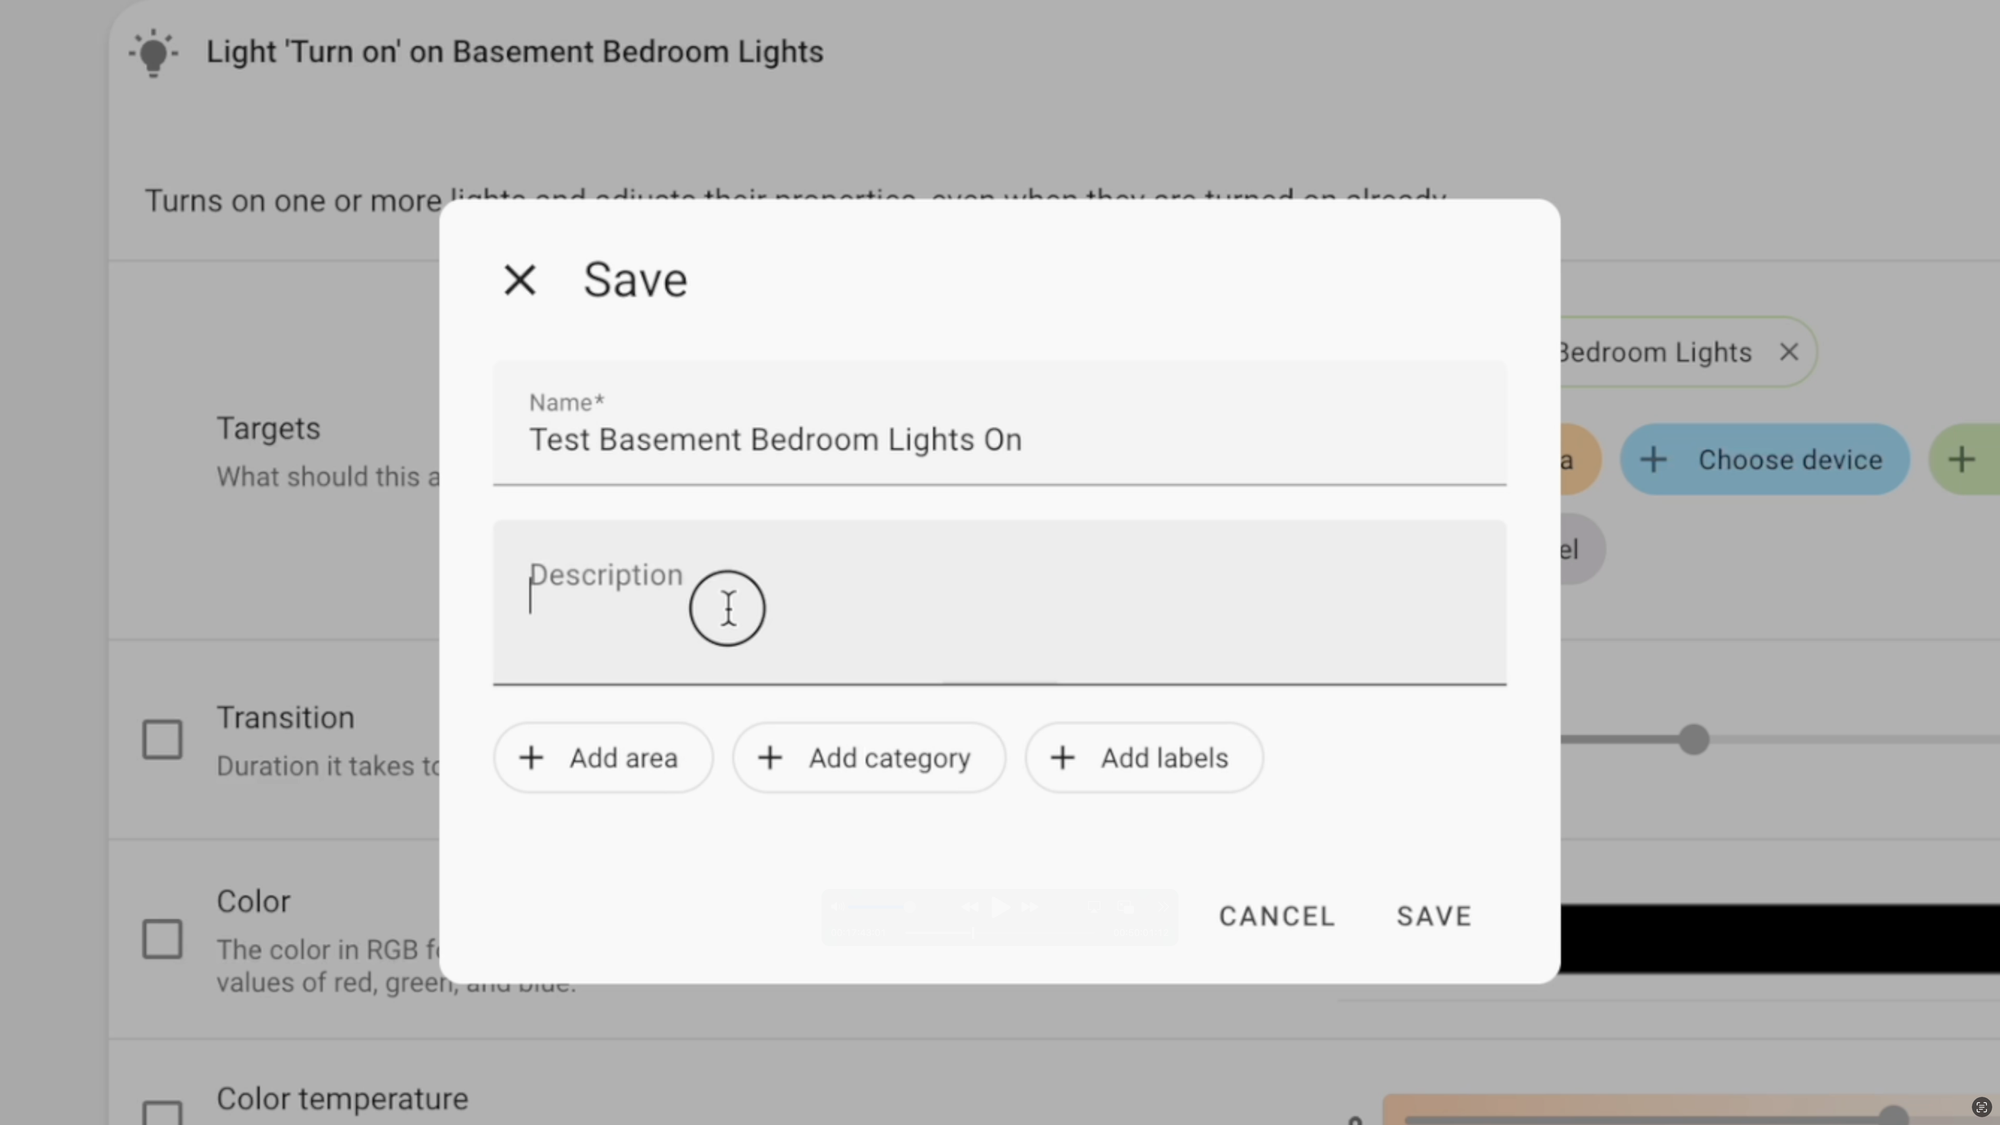
Click “save” when done. You can give the automation a name, and optionally choose to add a description, or assign it to an area, category, or label. I like to use a standard convention for my automation names, which just helps me stay organized. For example, all of my alarm-related automations begin with the word “alarm.” You can name things however you would like.

Home Assistant: Basic Automation
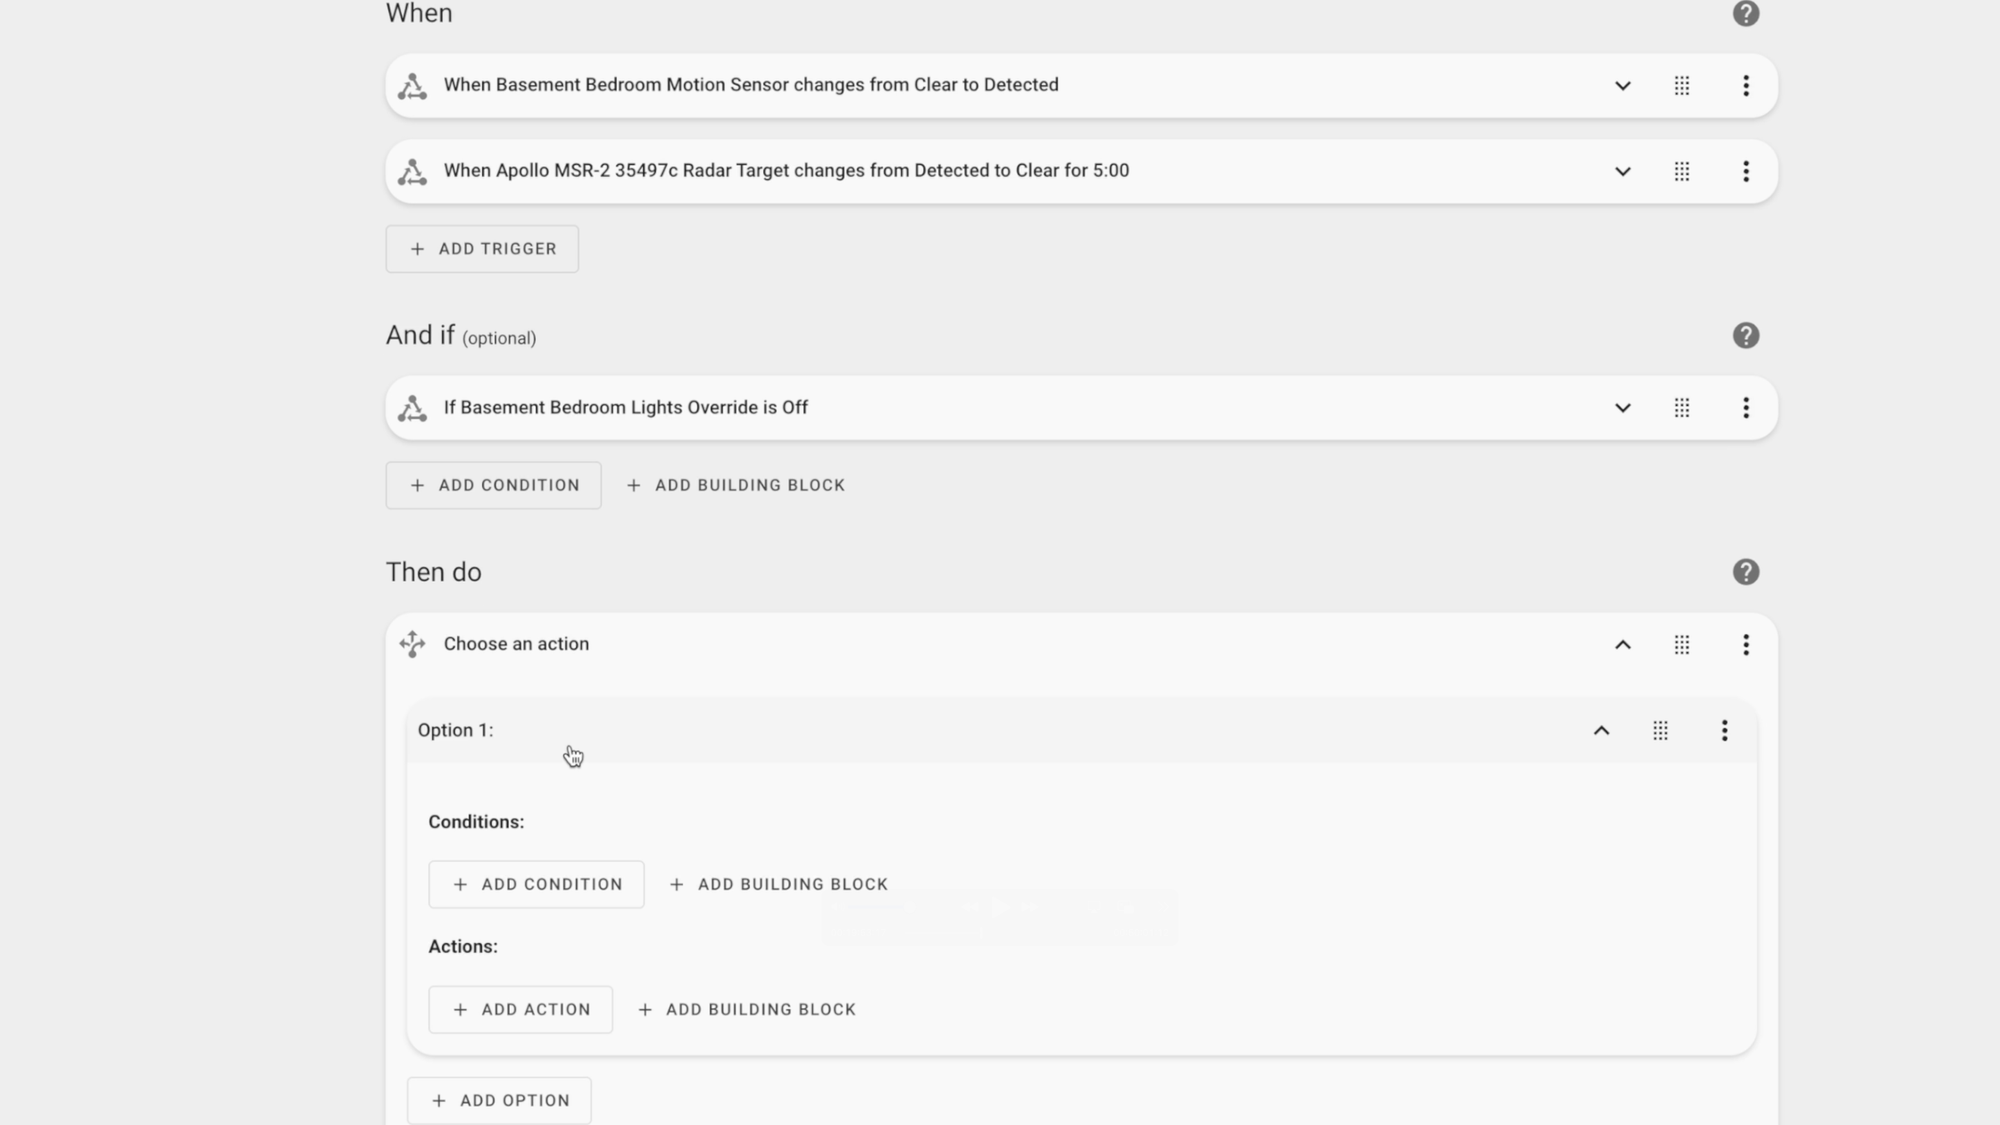
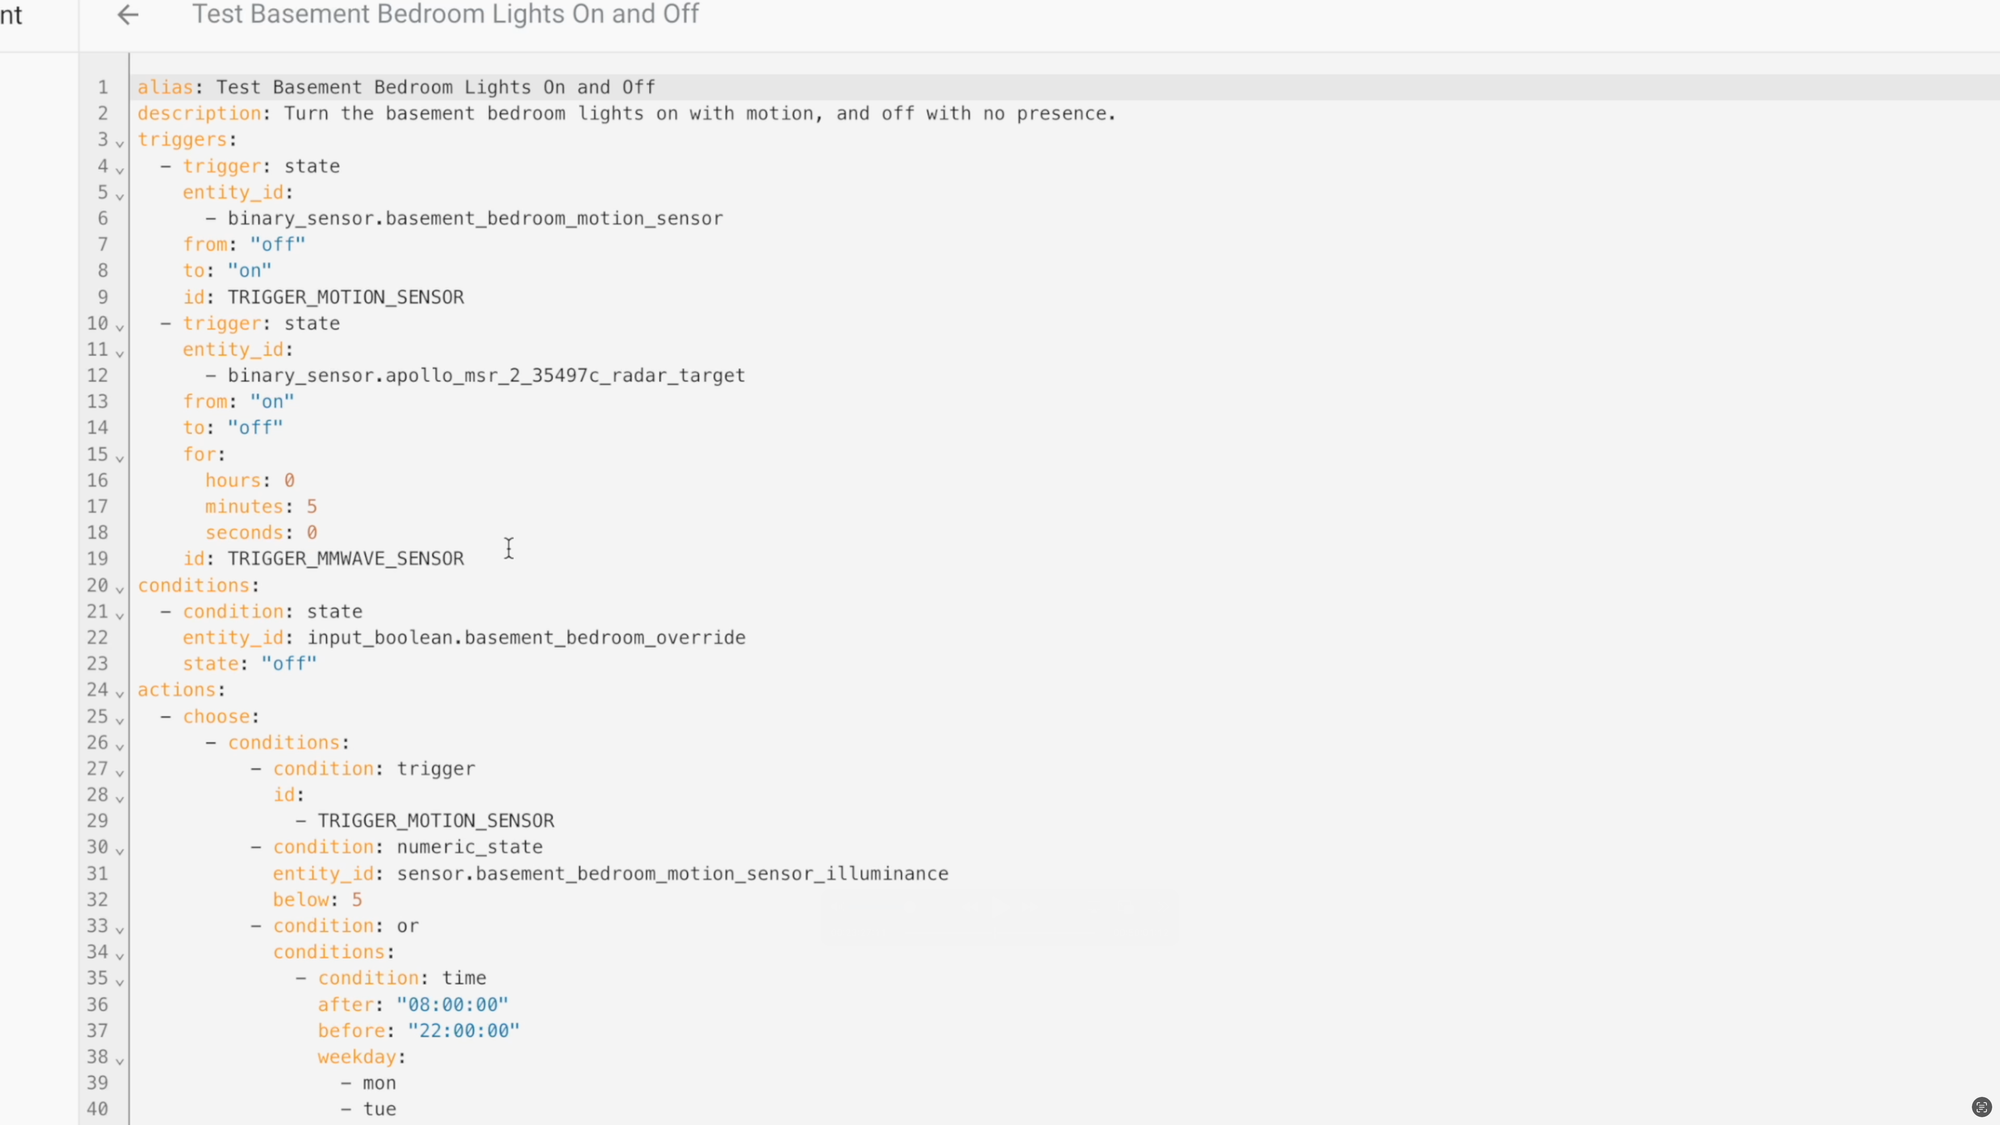
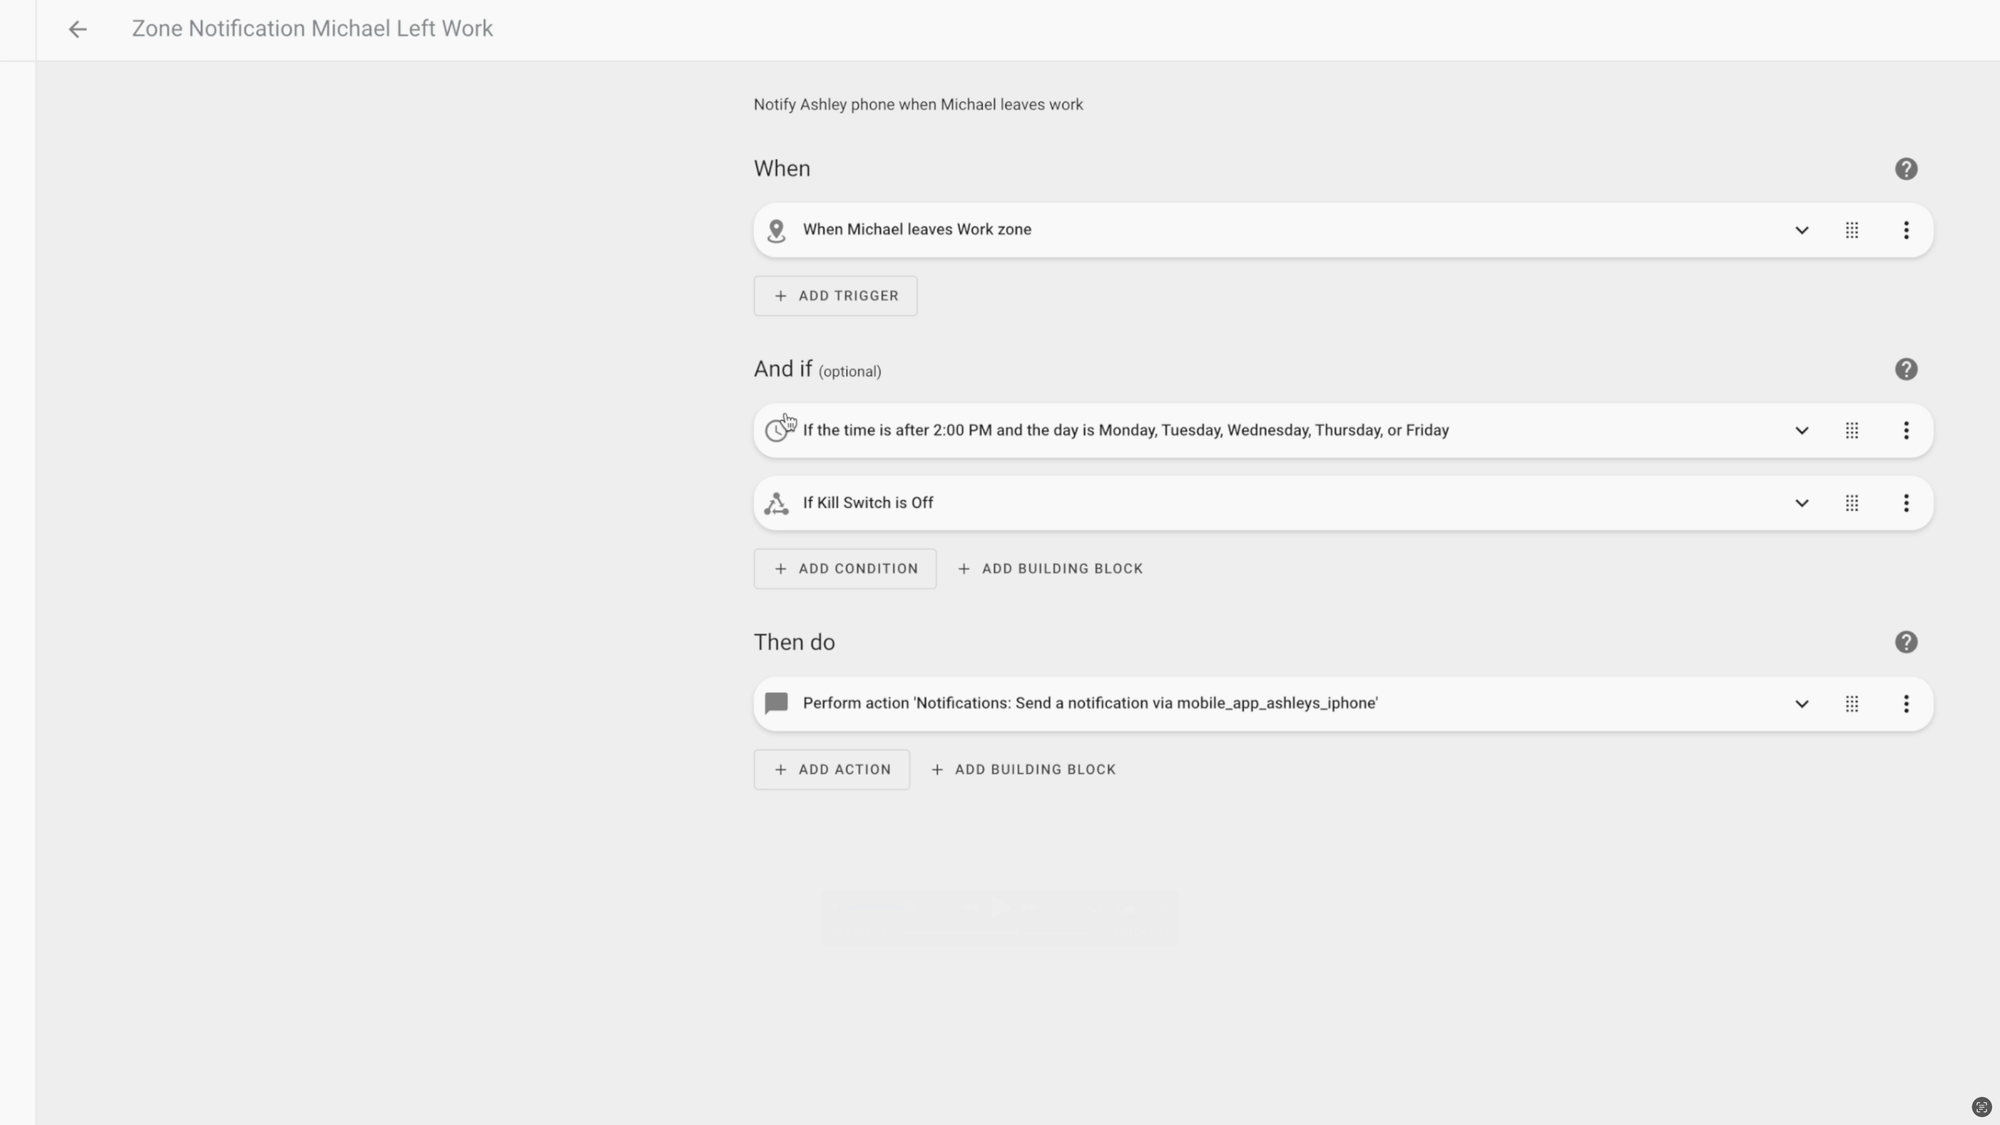
Advanced Automation: Now let’s look at a slightly more complex automation. I’ll again focus on turning a light on based on motion, but add in additional conditions related to time of day, plus an action to turn the light off when no one is detected in the room.
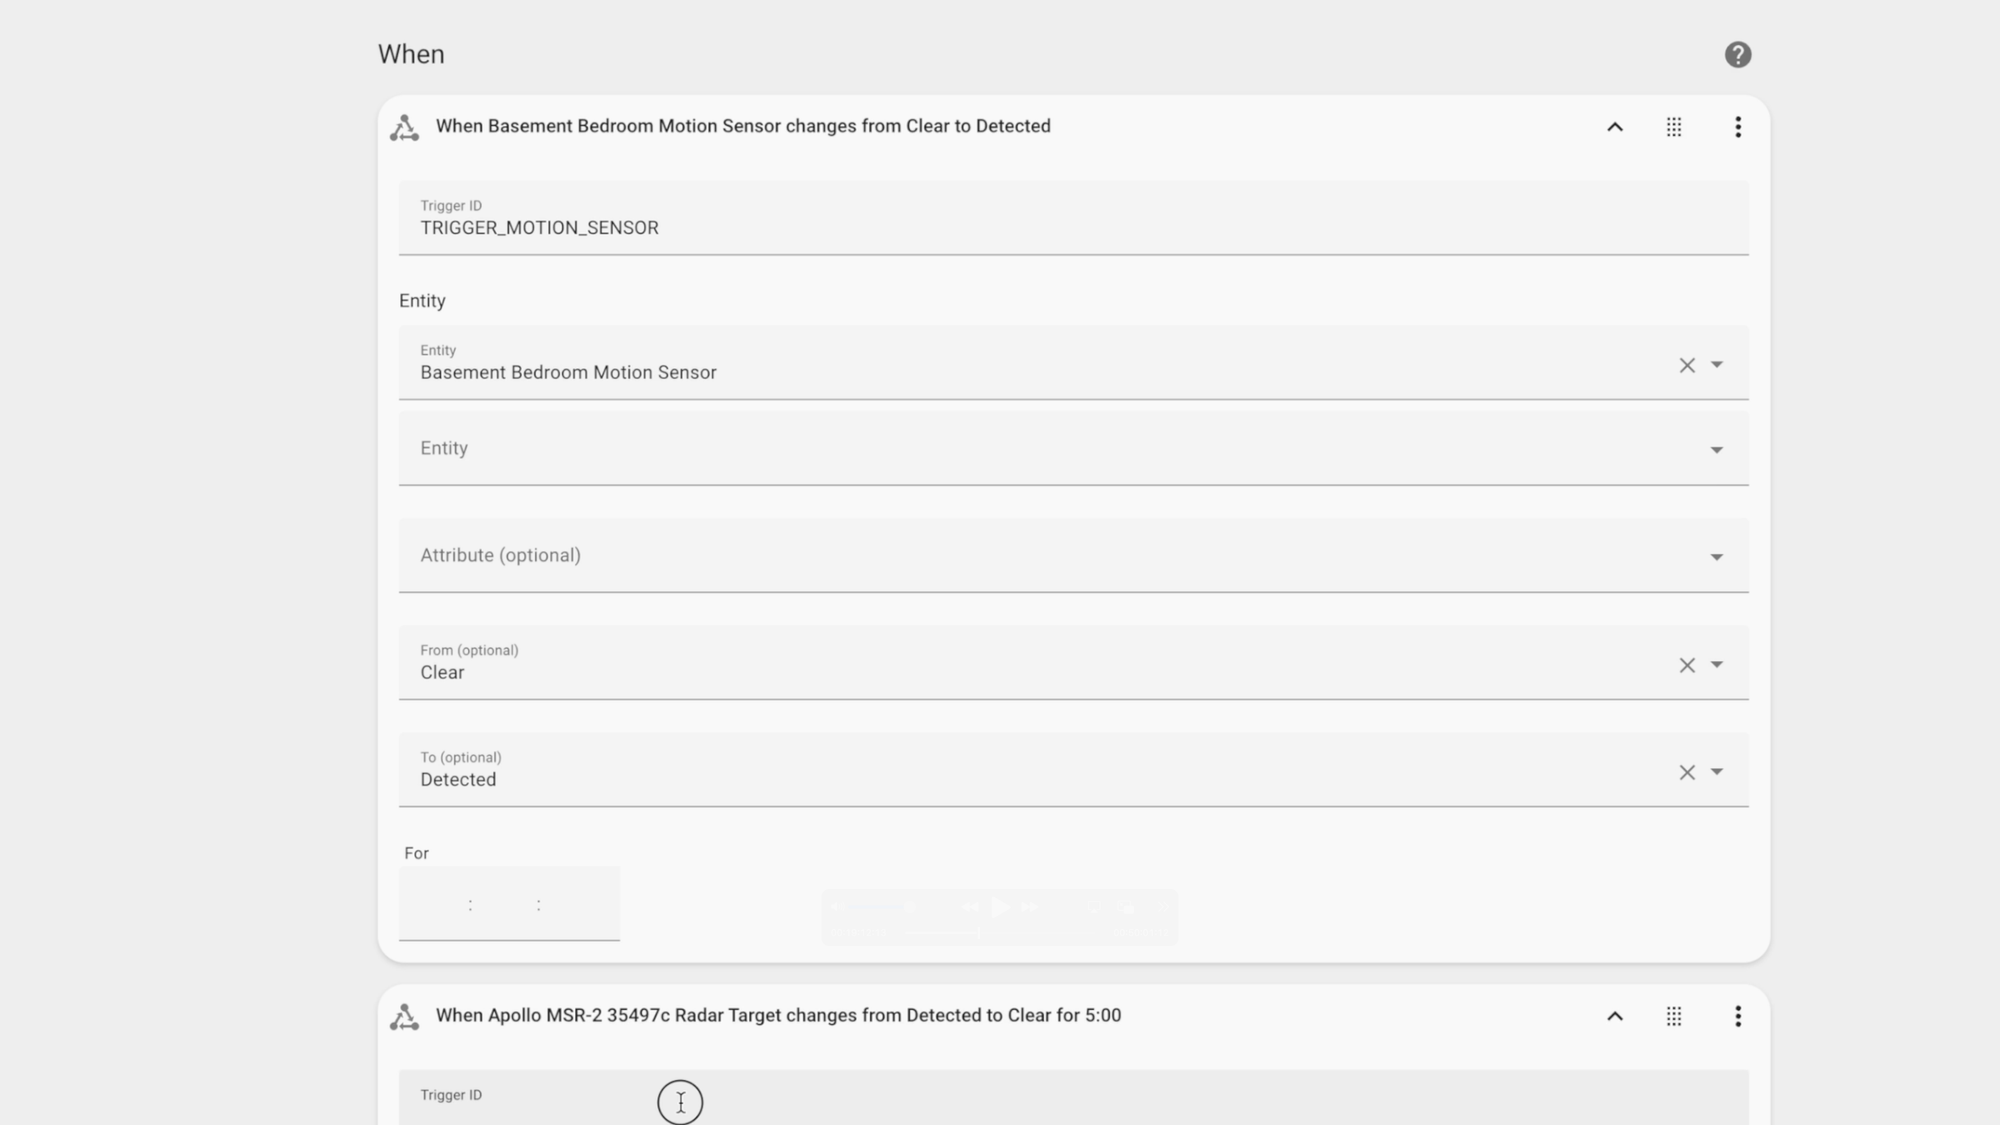
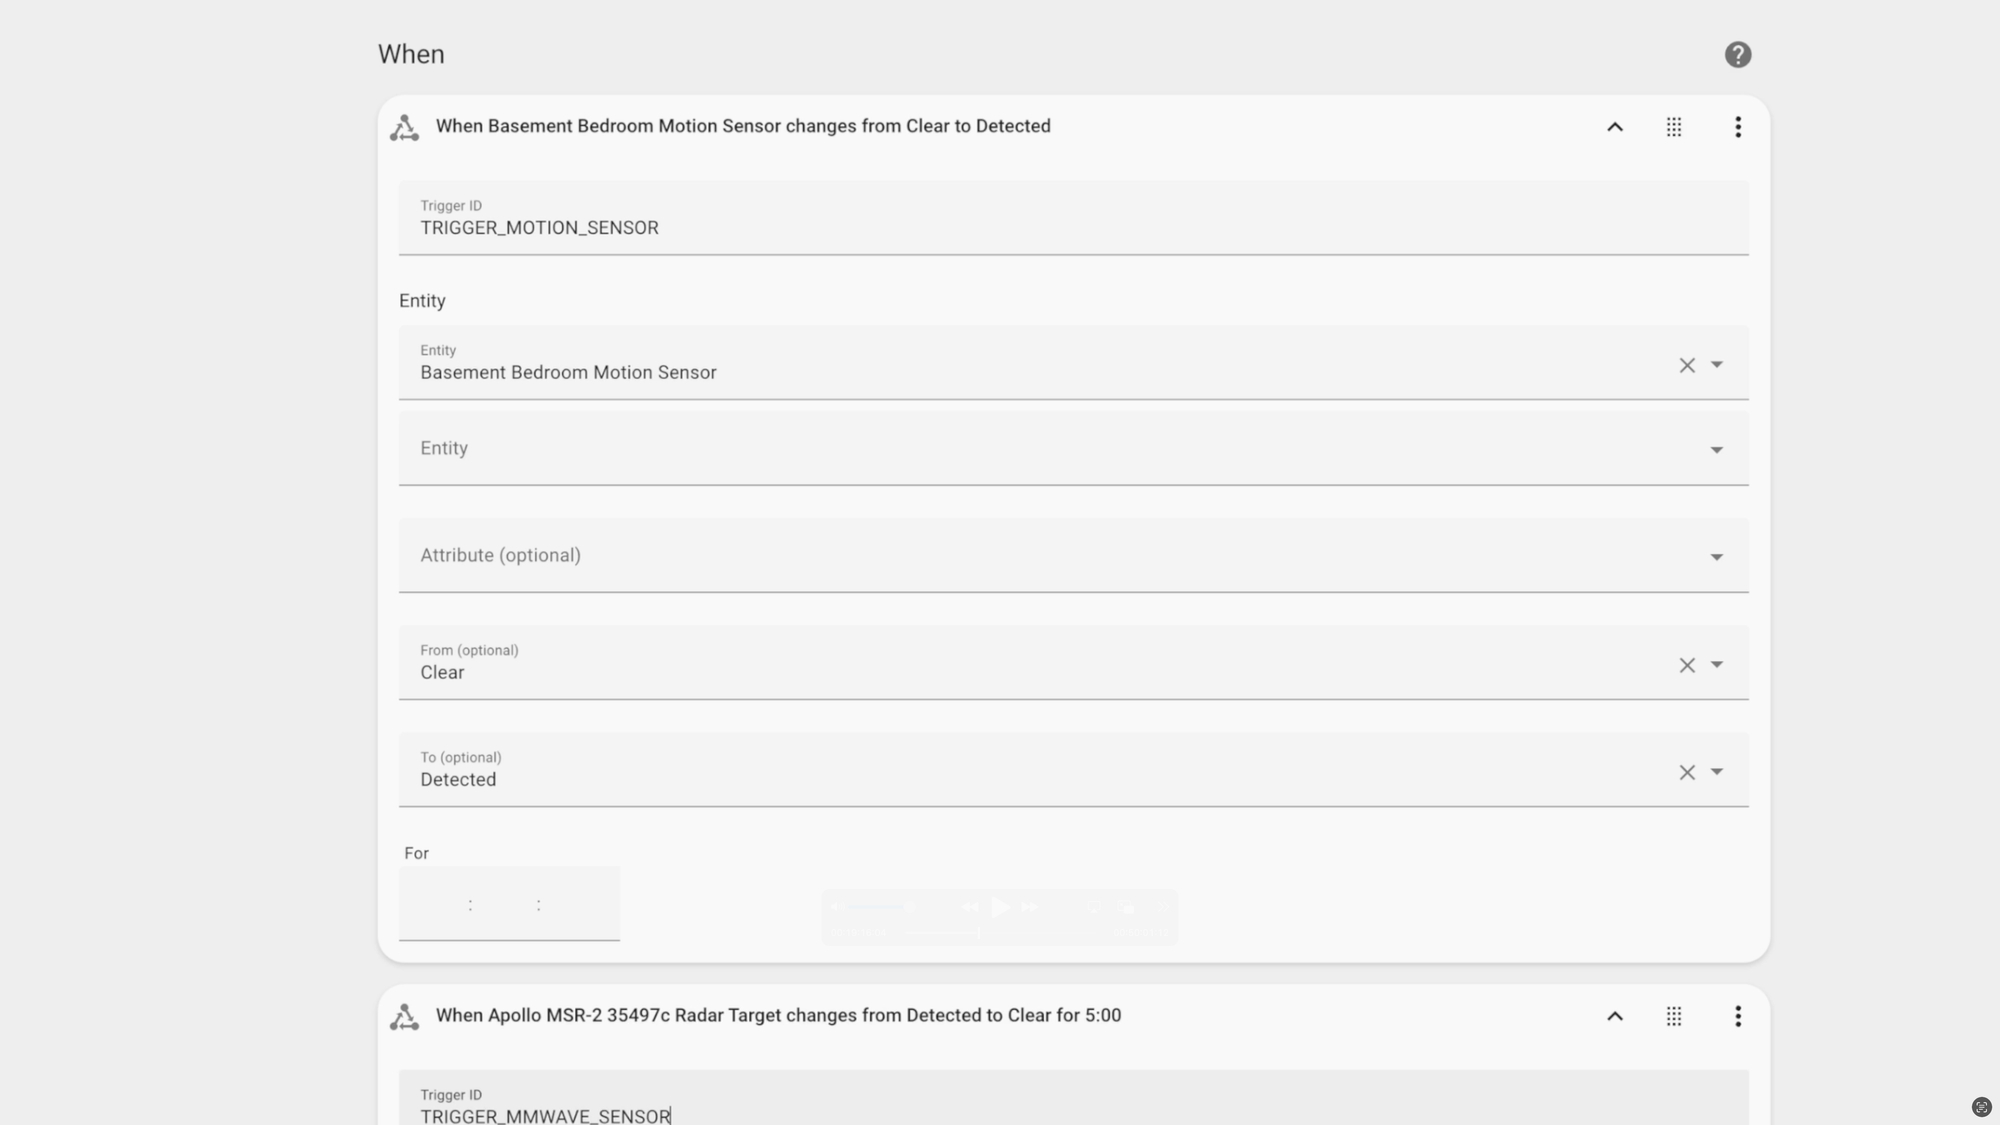
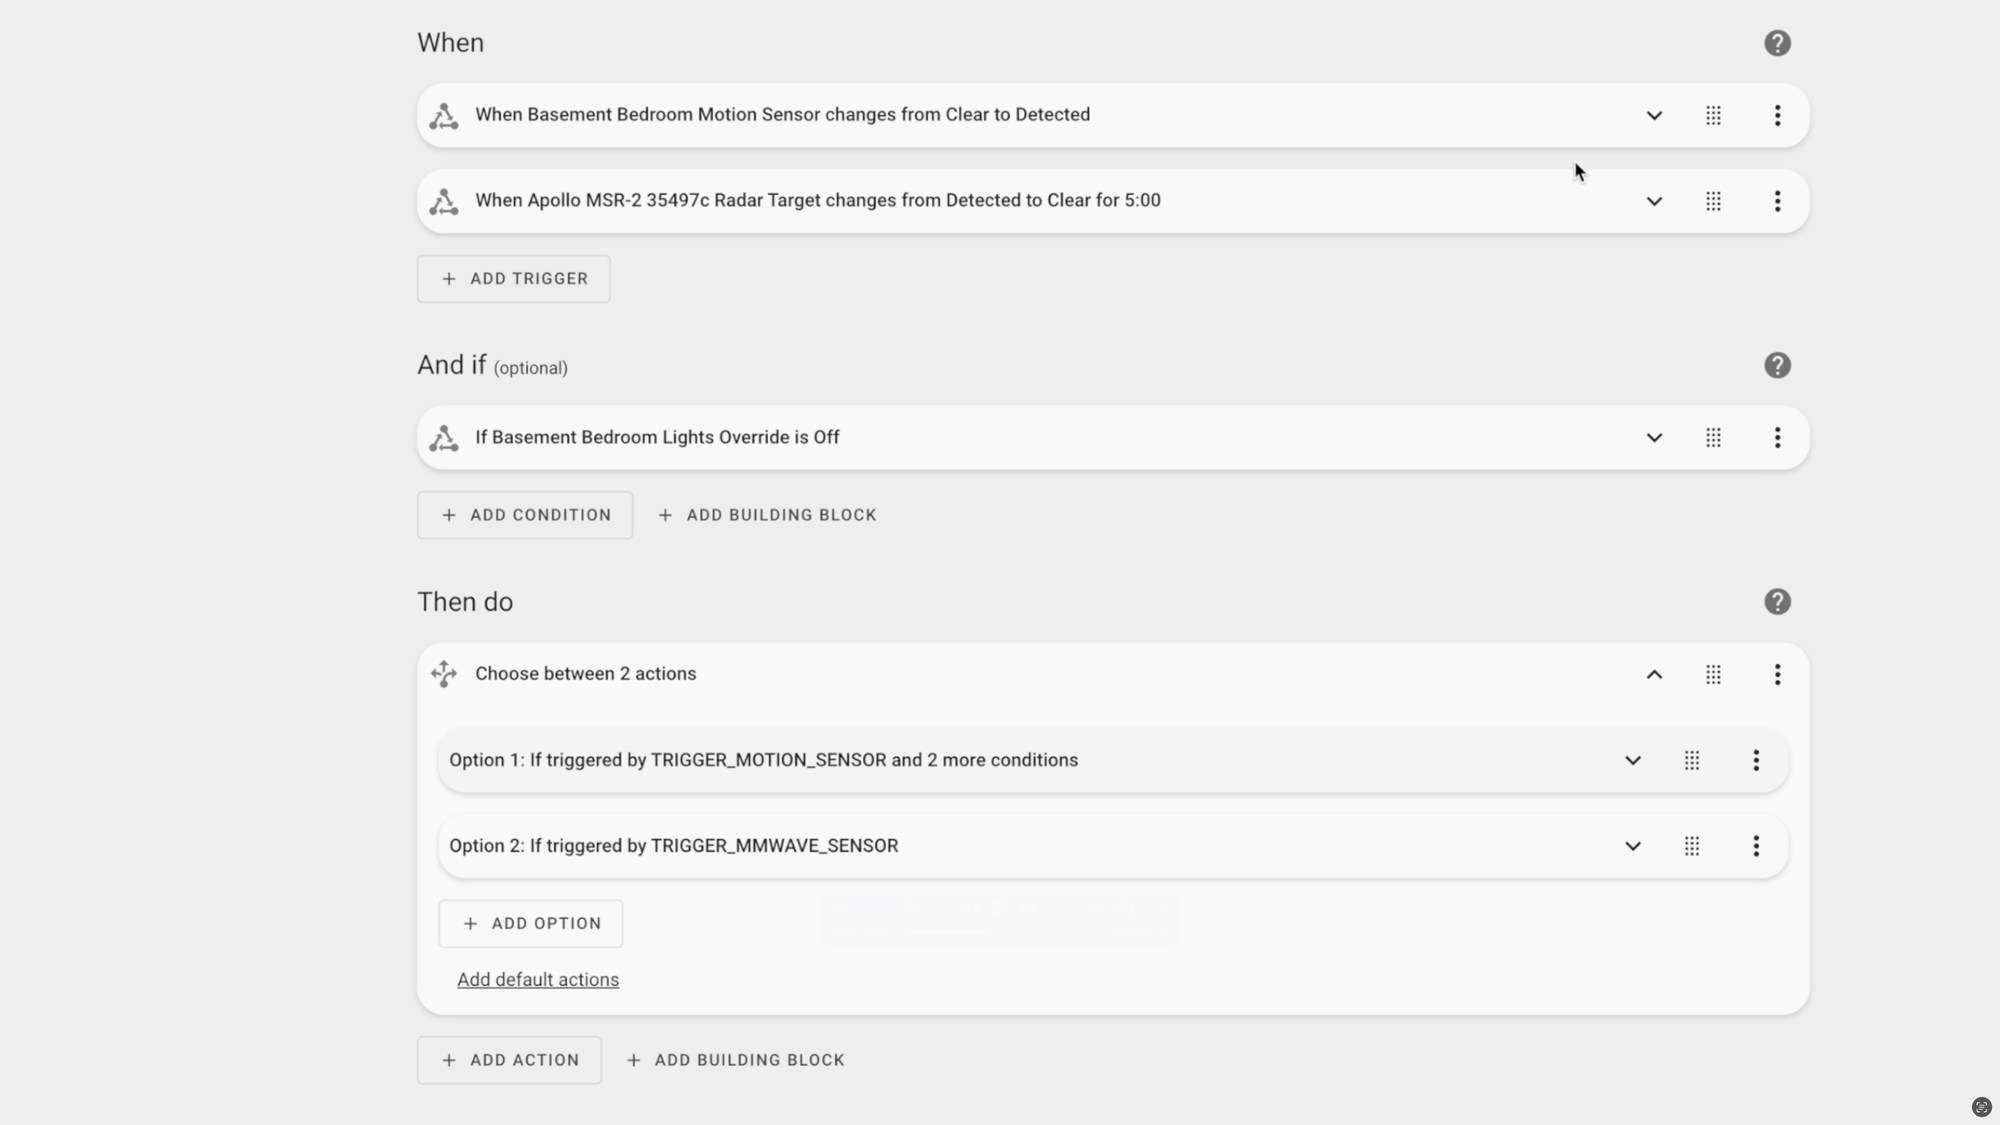
This time, I’m going to have two triggers. The first is the same as before: When the motion sensor changes from “clear” to “detected.” I’m going to add a second trigger, this time for when a mmWave presence sensor changes from “detected” to “clear” for five minutes. The first trigger will be used to turn the lights on, and the second trigger will be used to turn the lights off.
Under each trigger, there is the option to set a time interval for how long the triggering event should last before proceeding with the rest of the automation. I like to use this for turning lights off, because I wouldn’t want the lights to turn off if someone was in the room, but just really still for one second. By setting it to five minutes, it means that the presence sensor must remain clear for five minutes before the event is triggered.
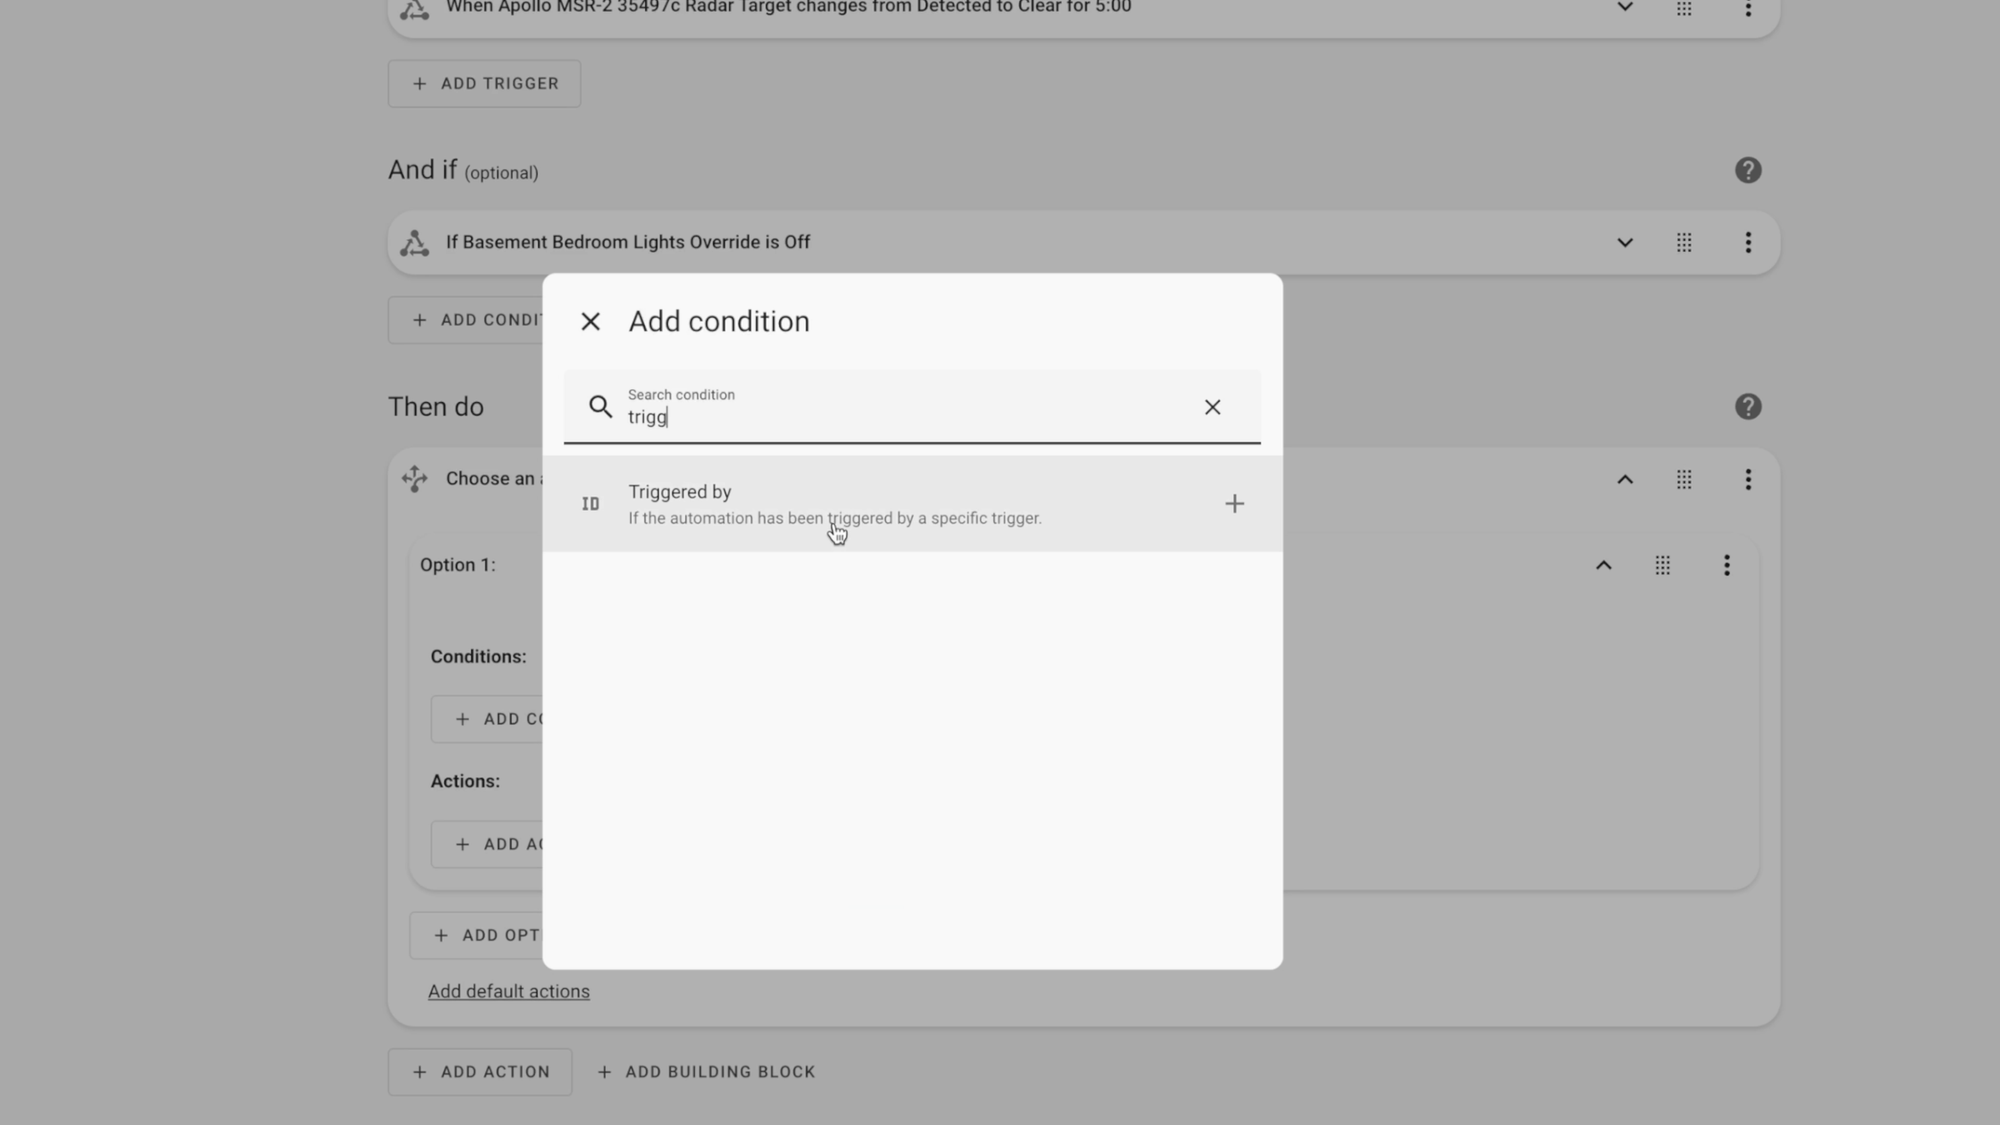
Since I have multiple triggers and each will lead to different actions, I am going to assign a Trigger ID to each trigger. This is a way of referring back to a specific trigger later in the automation. To do this, click the three dots next to the trigger, and select “Edit ID.” This adds a new field under the trigger, and you can give it any name that makes sense to you. I’ll do this for each trigger, giving each a unique name.
Moving down to conditions, I’m going to add a state entity condition that says a toggle helper, also known as an input boolean, must be switched off. If it’s on, the automation will not run. This is just like I talked about earlier when covering helpers. I’m adding it here because I want it to be true for any of the actions to process. You might be wondering what happened to the condition about light level in the room. I’ll show you.
Going down to the actions, this time I’m going to select the “choose” function. This way, I can specify what action to take for each trigger.
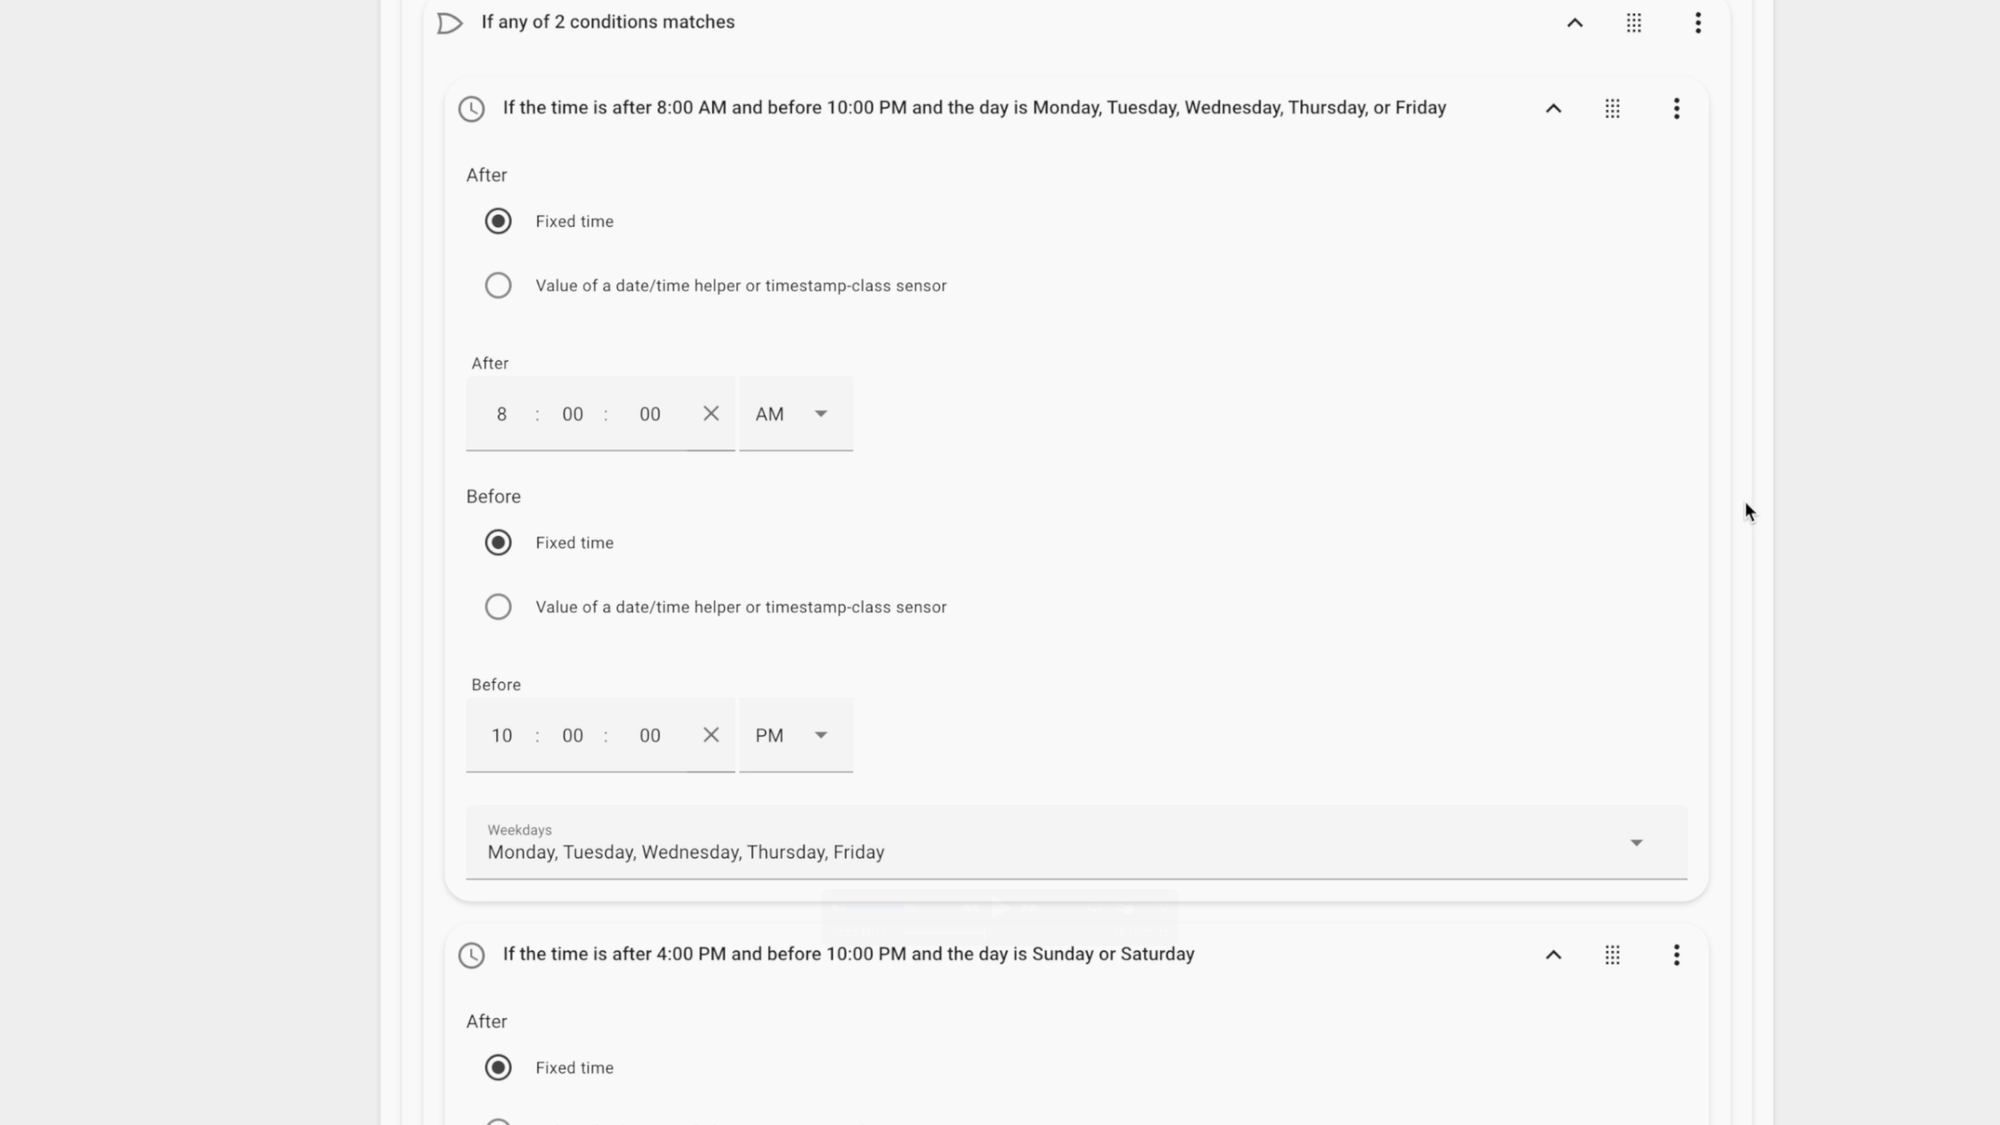
For the first option under “Choose,” I’ll select “triggered by” for the condition. Then, I can select from the list of trigger IDs that I created earlier. For the first option, I’ll select the motion detector, which is meant to trigger the lights to turn on. Then, I can add the condition regarding light level that I had in the more basic automation. Note that this condition only applies to this first trigger option. I can also get more specific, for example, by specifying times and days of the week that I want the action of turning on lights to occur. I can choose and “or” condition, and specify that either of the following conditions must pass before proceeding: The time must be after 8 AM and before 10 PM on weekdays, and after 4 PM and before 10 PM on weekends. Now, I can add the action for this first option. I could just use the same “Light: Turn on” that I used in the basic automation. But if the light is already on, I don’t need Home Assistant to send a command to turn on the light. So, I like to add an “If-Then” statement, saying if the state of the light is off, then turn on the bedroom lights.
Now it’s time for the second option that will turn the lights off. This time, I’ll choose the trigger ID for the mmWave presence sensor. As a reminder, this is triggered when the sensor changes from “detected” to “clear” for five minutes. I don’t have any more conditions for this one. So, I’ll add another “If-Then” statement, this time saying if the state of the light is on, then turn off the bedroom lights.
To help you stay organized as the complexity of your automations increases, you can rename things. For example, you can click the three dots next to one of the “choose” options, and give each option a name that means something to you, like “Lights on” and “Lights off.”
You can also click the three dots and choose to disable parts of an automation, which you may want to do to temporarily to test something out, rather than having to delete and then re-create that part. For example, maybe I’m troubleshooting an automation that sends a push notification to me and my wife. To avoid spamming with her notifications while I’m testing, I can temporarily disable the notification to her phone.
To recap, I created two triggers: one to trigger to turn the lights on, and another trigger to turn the lights off. I gave each trigger a unique ID. Then, I added a condition that must pass before proceeding with firing the actions. Finally, I created the actions: one set for handling the first trigger, and another for handling the second trigger.

Home Assistant: Advanced Automation
Automation Tips and Tricks: There are a bunch of other ways that you can configure your automations. For example, you can choose for your actions to “run in parallel,” that way your entire automation is not paused if one component of it fails because one device went offline. You can also create “and” conditions to test if multiple things are true, and “not” conditions to test if a condition is not true, in addition to “or” conditions to test if any condition is true.
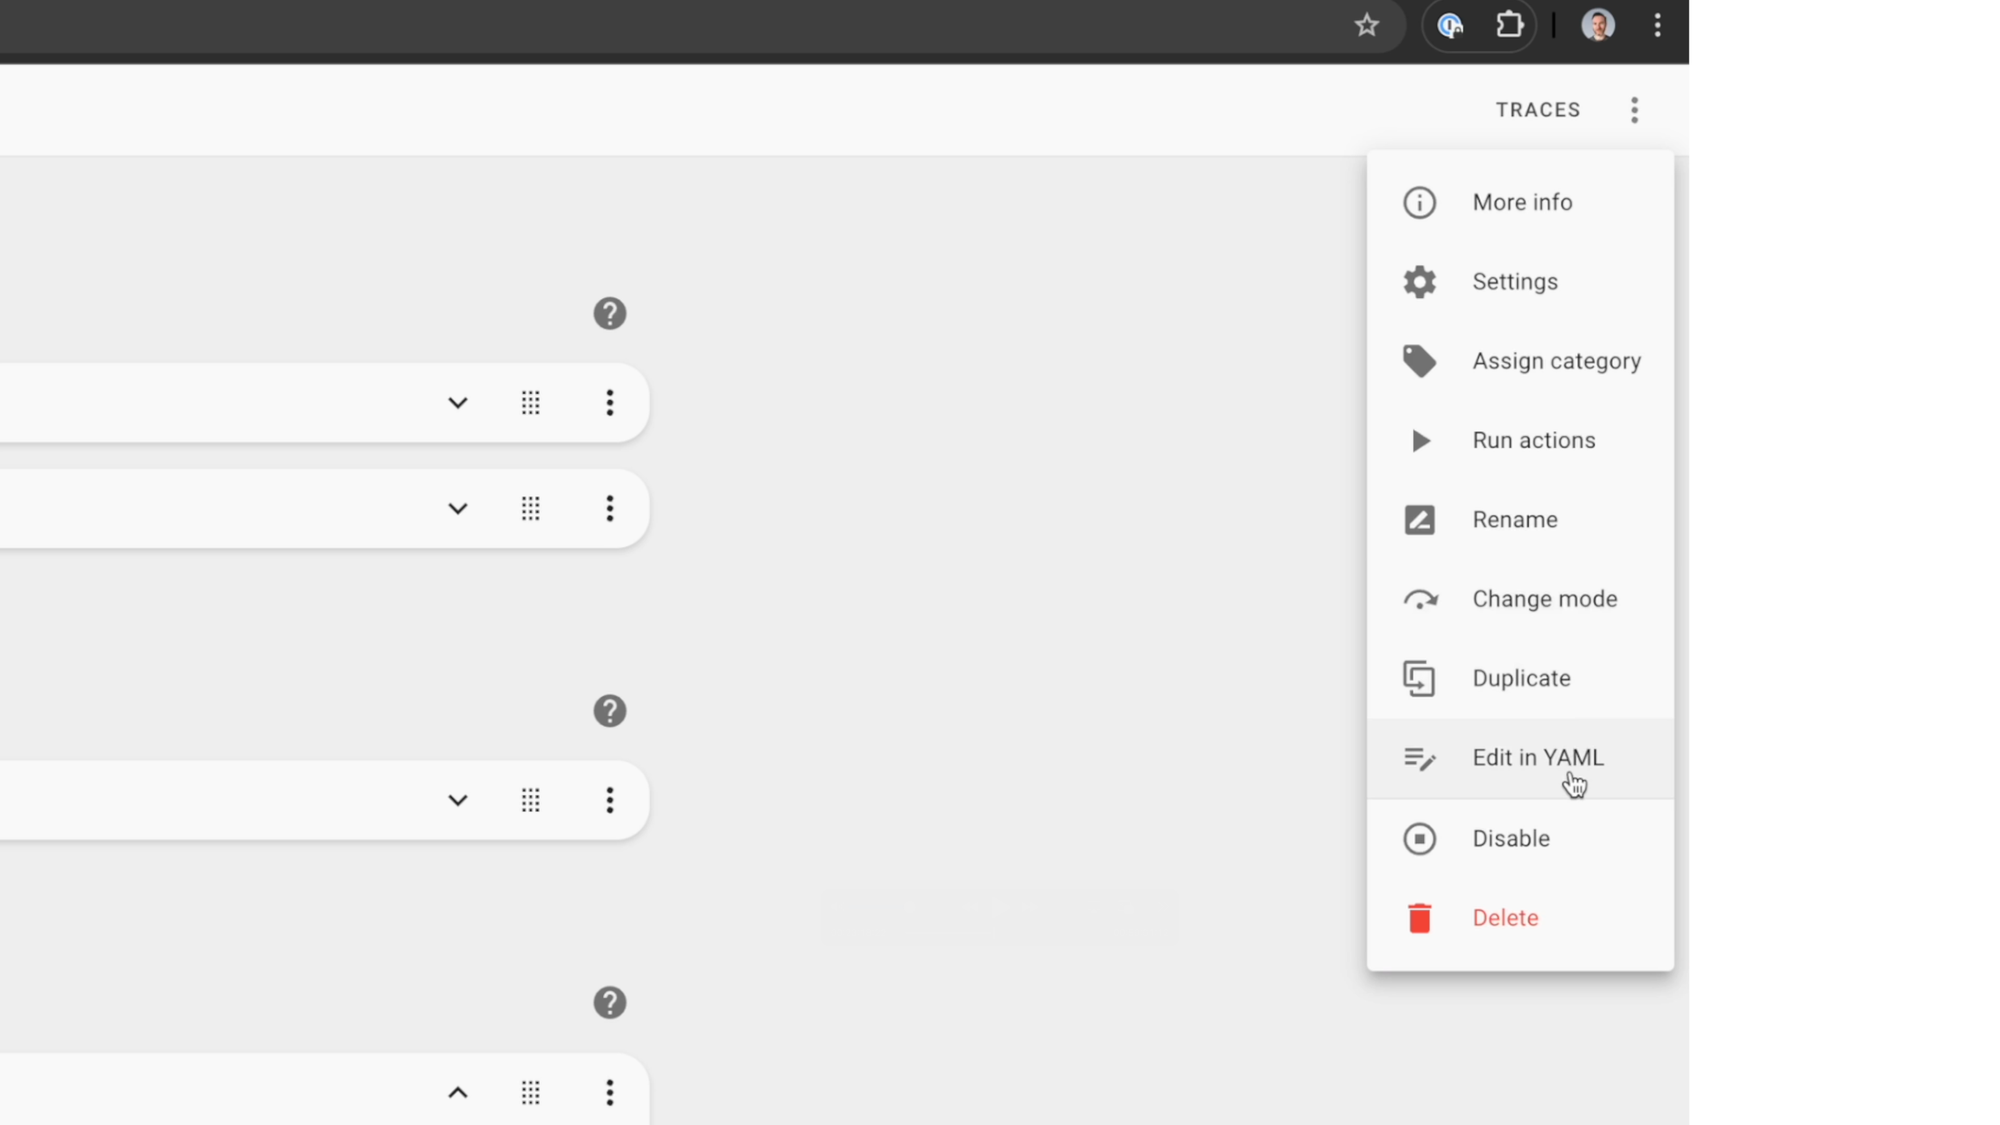
For those that really want to dive into the weeds, you can click the three dots at the top of the automation, and choose to “Edit in YAML.” YAML is the programming language underpinning your automations. You can set up most anything from the user interface without needing to bother with YAML, which can be overwhelming if you’re just starting out. But for certain things like using “templates,” you may need to write YAML code. Learning YAML is beyond the scope of this beginners’s guide, but I do think it’s helpful to be able to have a basic grasp of it. Looking at the automation I just created, you can see the triggers at the top, followed by the conditions, and then actions. Note that all of the indentations and spacing matter in YAML. To go back, click the three dots again, but this time choose “Edit in visual editor.”
There are a few other tips and tricks that can help you create automations in Home Assistant. One of these is the ability to drag and drop, or move up and down. If you want to re-arrange your conditions or actions, it’s as easy as dragging and dropping, or clicking the three dots next to a condition and selecting “move up” or “move down.” Additionally, you can copy, cut, or paste one component of an automation to another, so you don’t have to start over each time. You can even duplicate an entire automation instead of starting from scratch. All of this can help save you time.
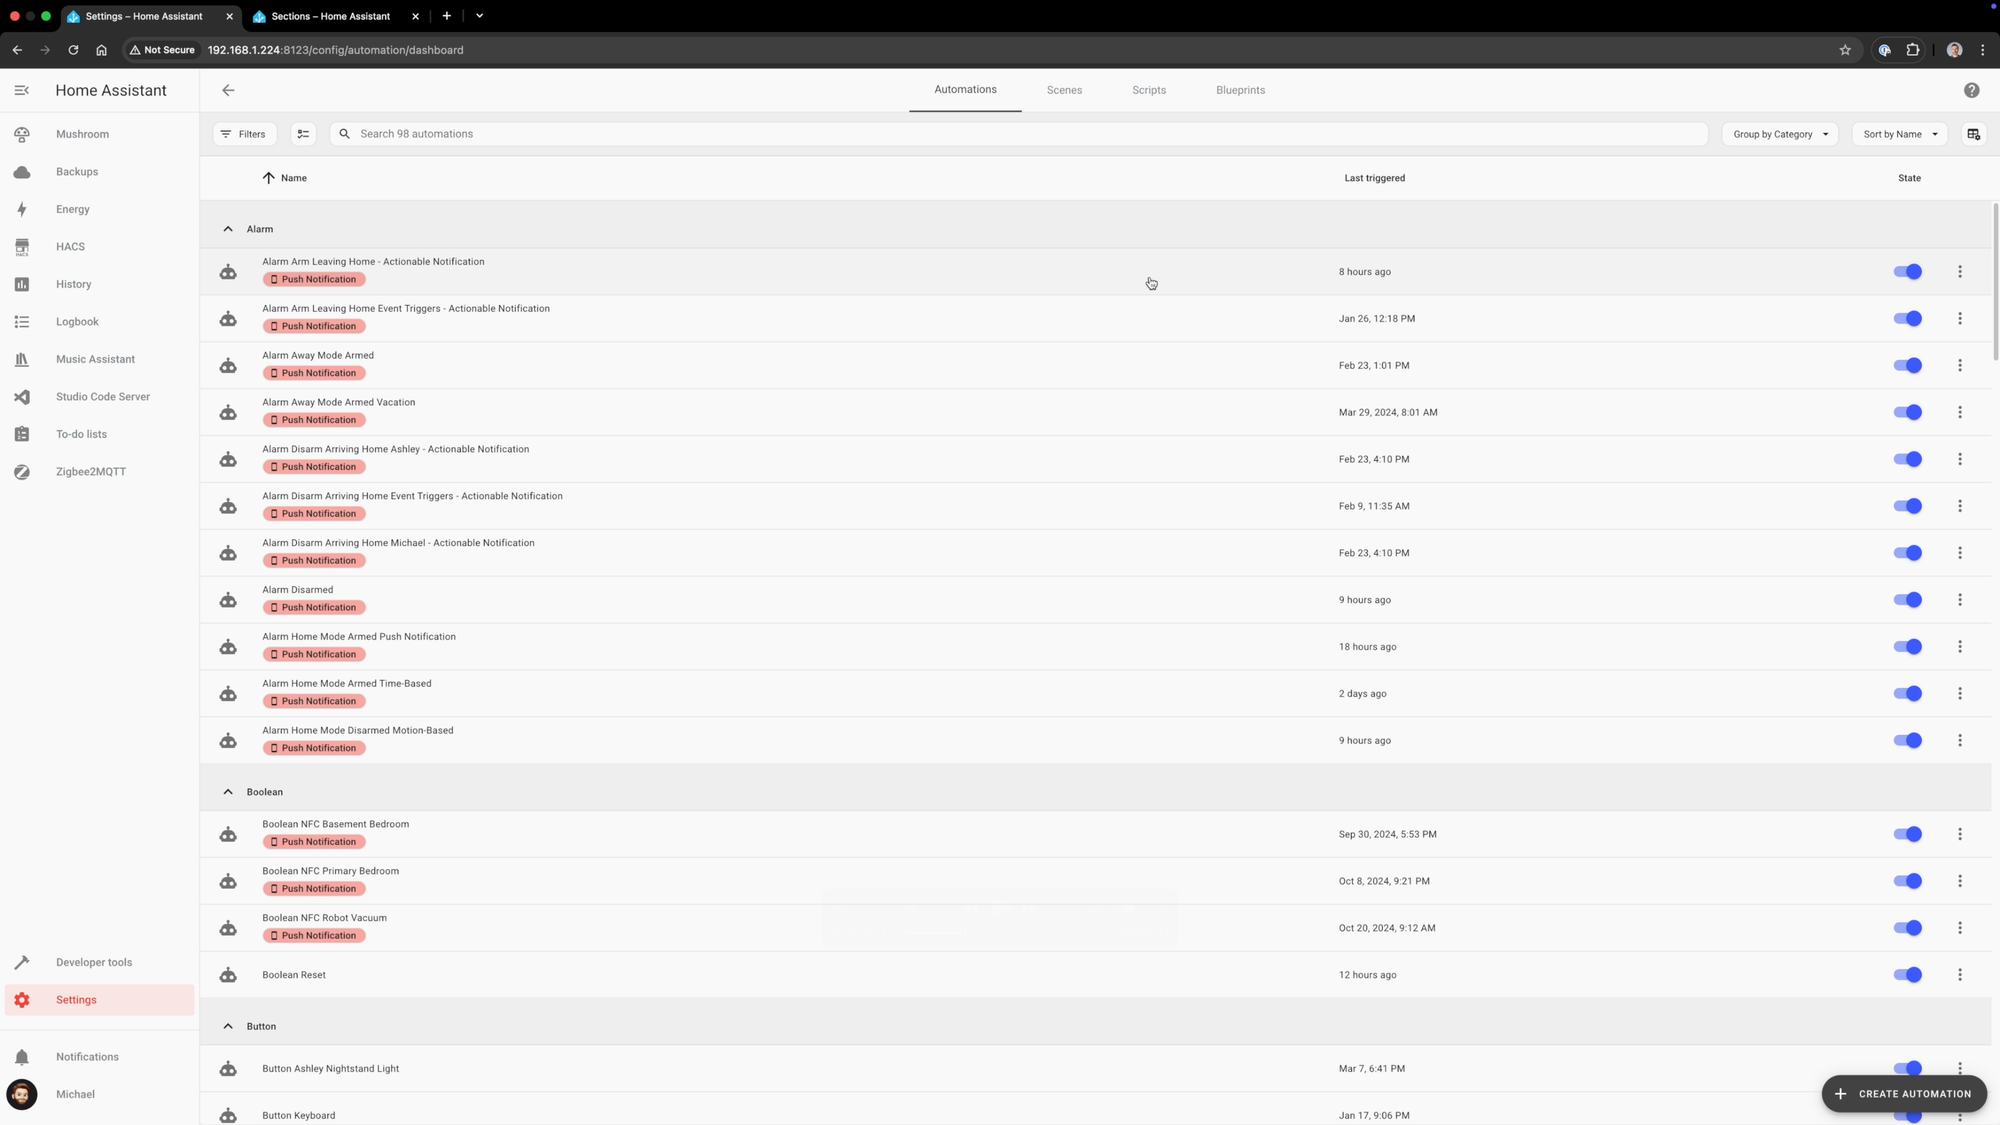
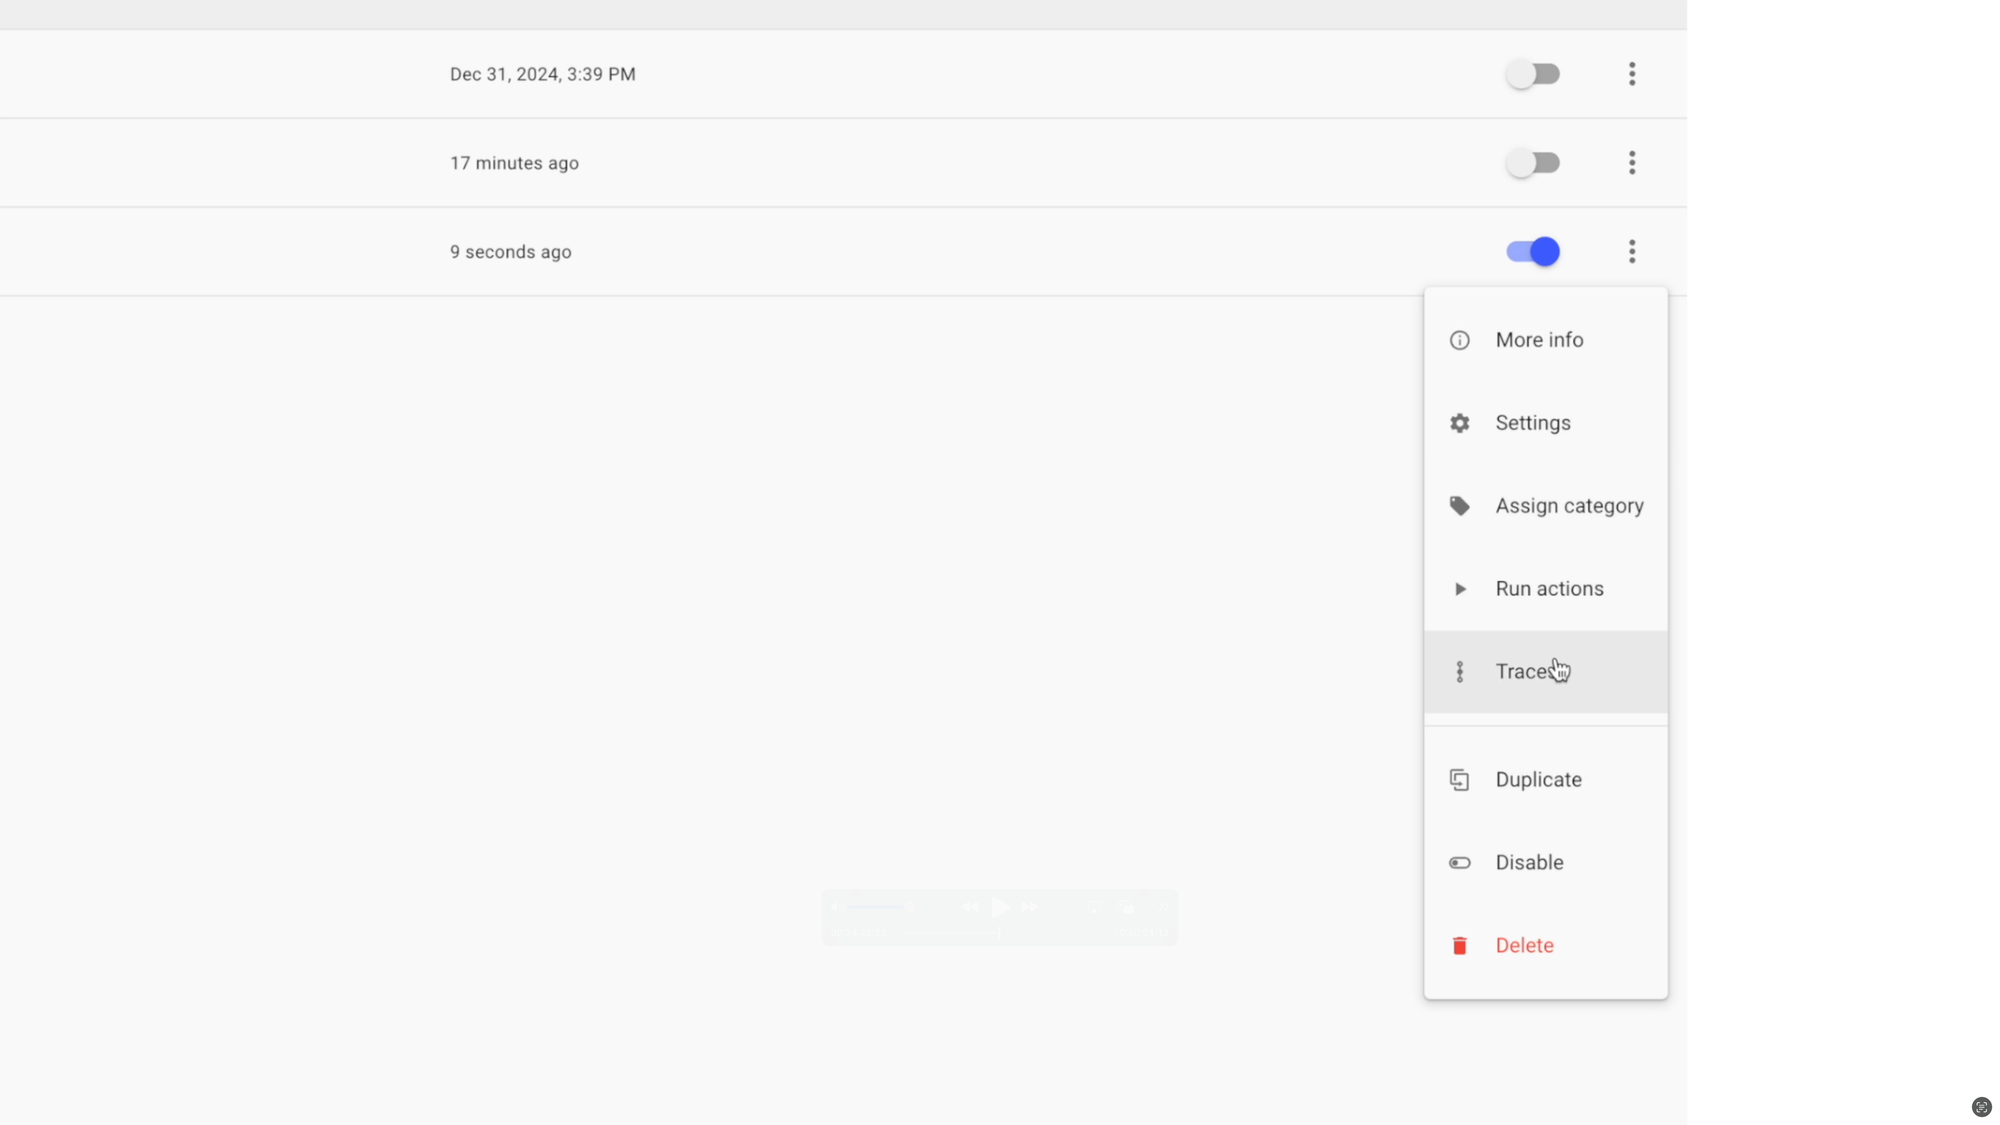
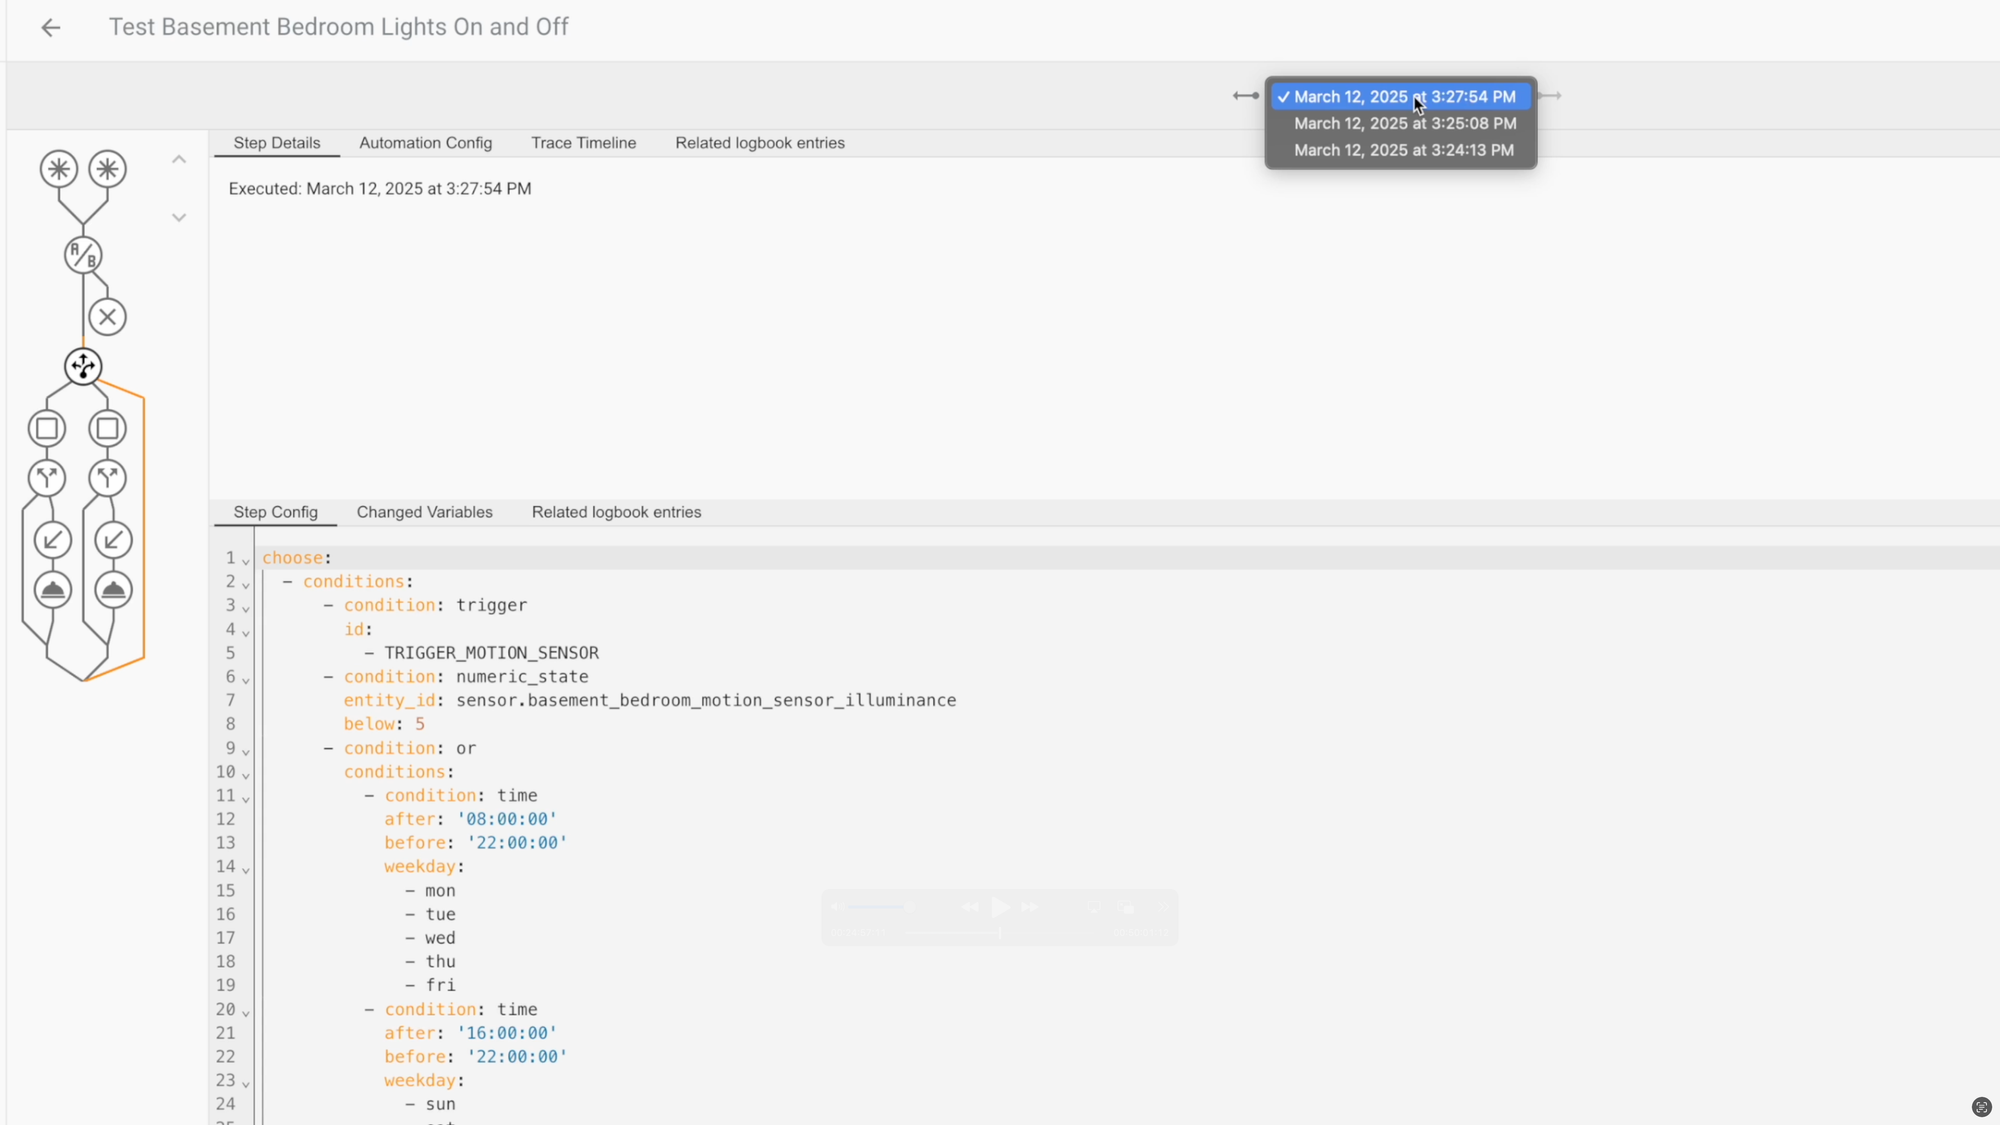
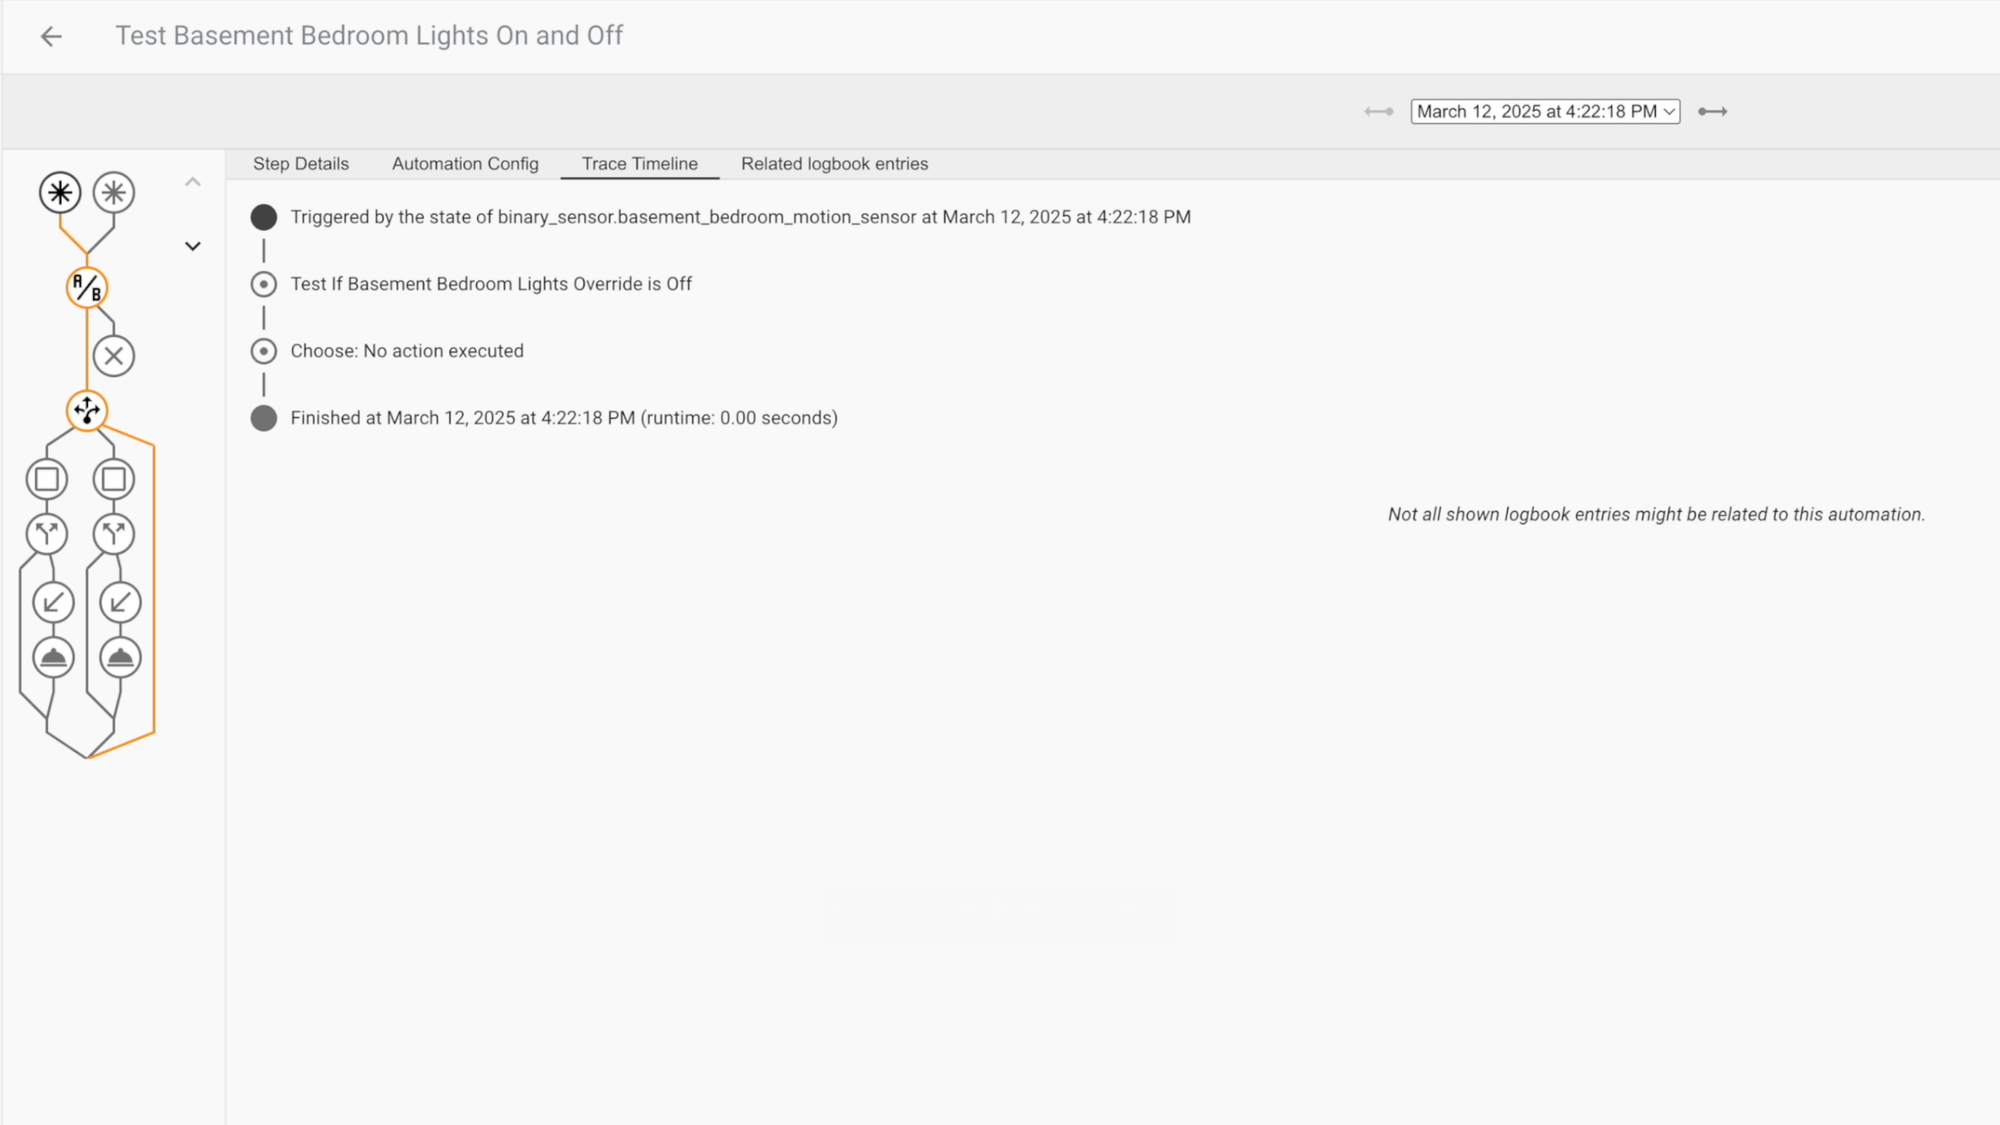
Managing Automations: Once you create automations, you’ll see the time each was last triggered, and a switch to quickly enable or disable that automation. If you click the three dots next to the automation, you can choose “run actions” to test out the automation. If an automation ran but resulted in an unexpected outcome or when you didn’t expect it run, you can click “traces.” By default, this will show the five most recent times that automation was triggered. This is super helpful for troubleshooting, a topic that I’ll speak more about later. From the traces page, you can select the time period in question from the dropdown, and go to the trace timeline to review the chain of events. The information here can help you understand why something did or did not occur as expected.
As you create more automations, you may find it helpful to keep them organized using categories and labels. You might create a category that groups all of your lighting-related automations, and a label for any automation that includes a push notification sent to your phone. This can make it easier and faster to find what you’re looking for when you need to make changes down the road.
Home Assistant: Automation Tips and Tricks
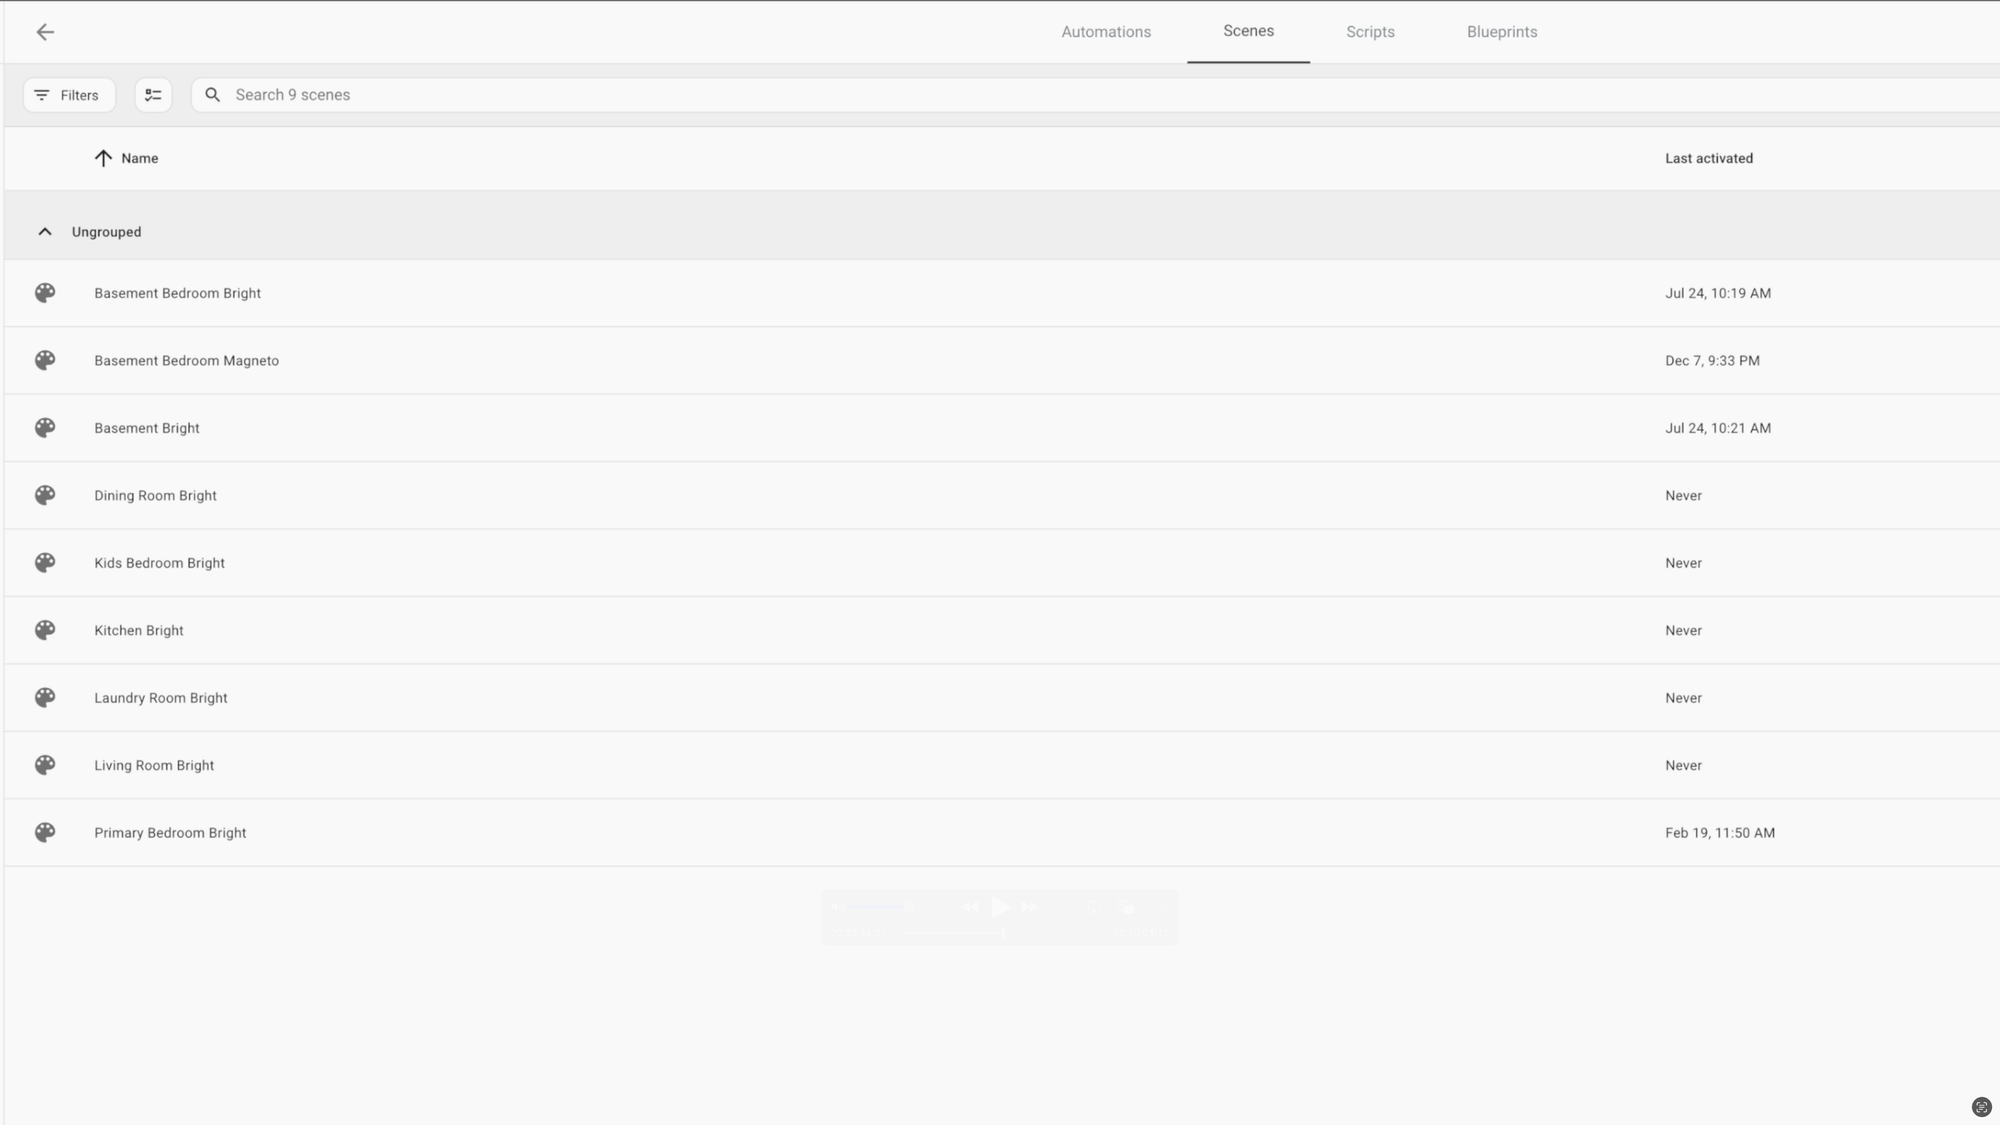
Scenes
Next to automations are scenes. These allow you to create predefined settings for your devices. A scene could be having lights set to a certain brightness level, color temperature, or color, or having the thermostat set to certain mode, like heating or cooling, and to a certain temperature. You could have a scene for watching a movie that dims the lighting and closes motorized shades the moment your TV turns on. While you can accomplish this same thing in an automation, the benefit of saving a scene is that you don’t have to set the individual devices every time. Instead, you just select the scene.
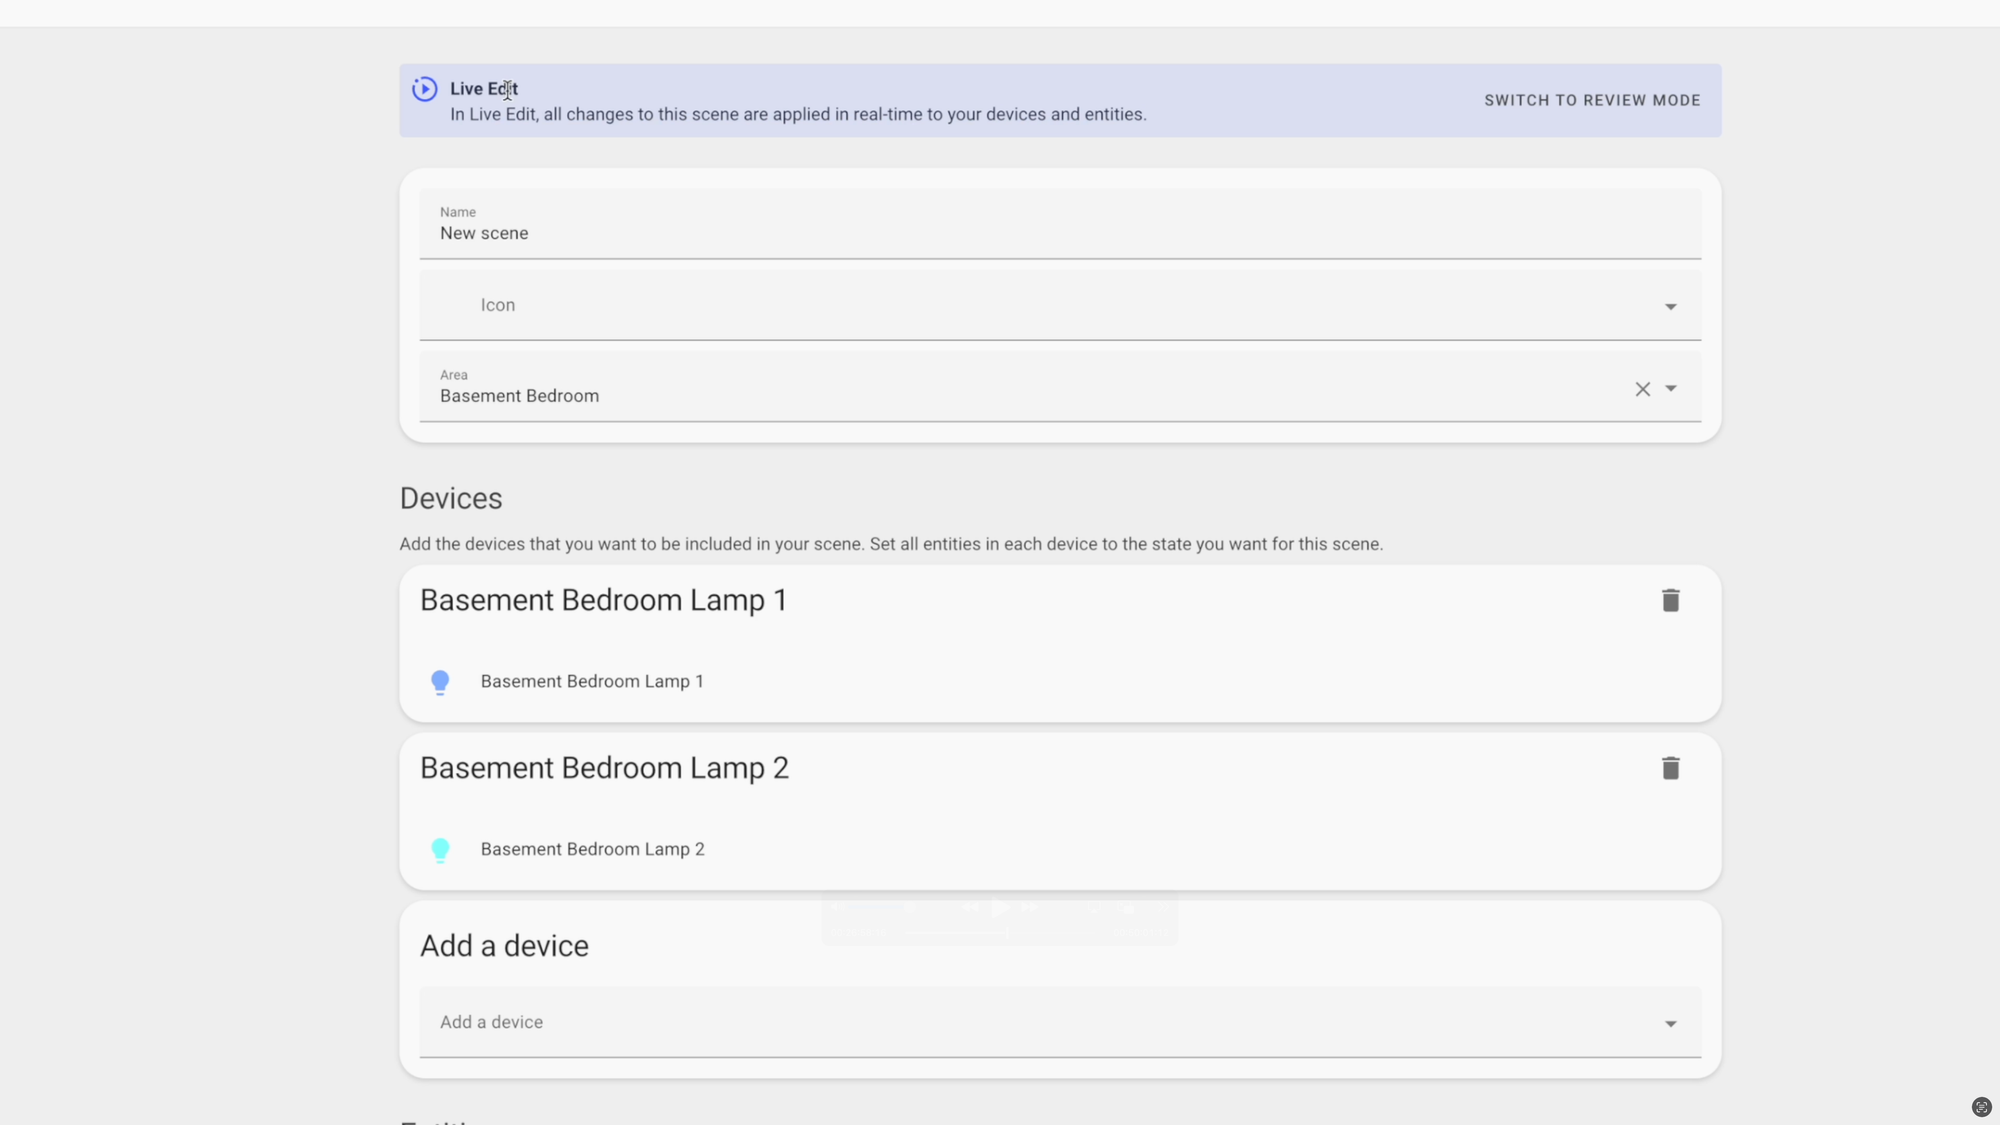
To create a scene, click the plus icon, give the scene a name, add the devices you want to be included in the scene, set the device entities they way you want them, and add any additional entities you’d like to be included, and click save.
When creating a scene, you can do so using “live edit” or “review mode.” Live edit means all changes are applied in real-time so you can make sure everything looks and acts they way you want. But this may not ideal if you’re creating or editing a scene at night when your family is asleep. Instead, you can switch to review mode to avoid disturbing others.
Home Assistant: Scenes
Scripts
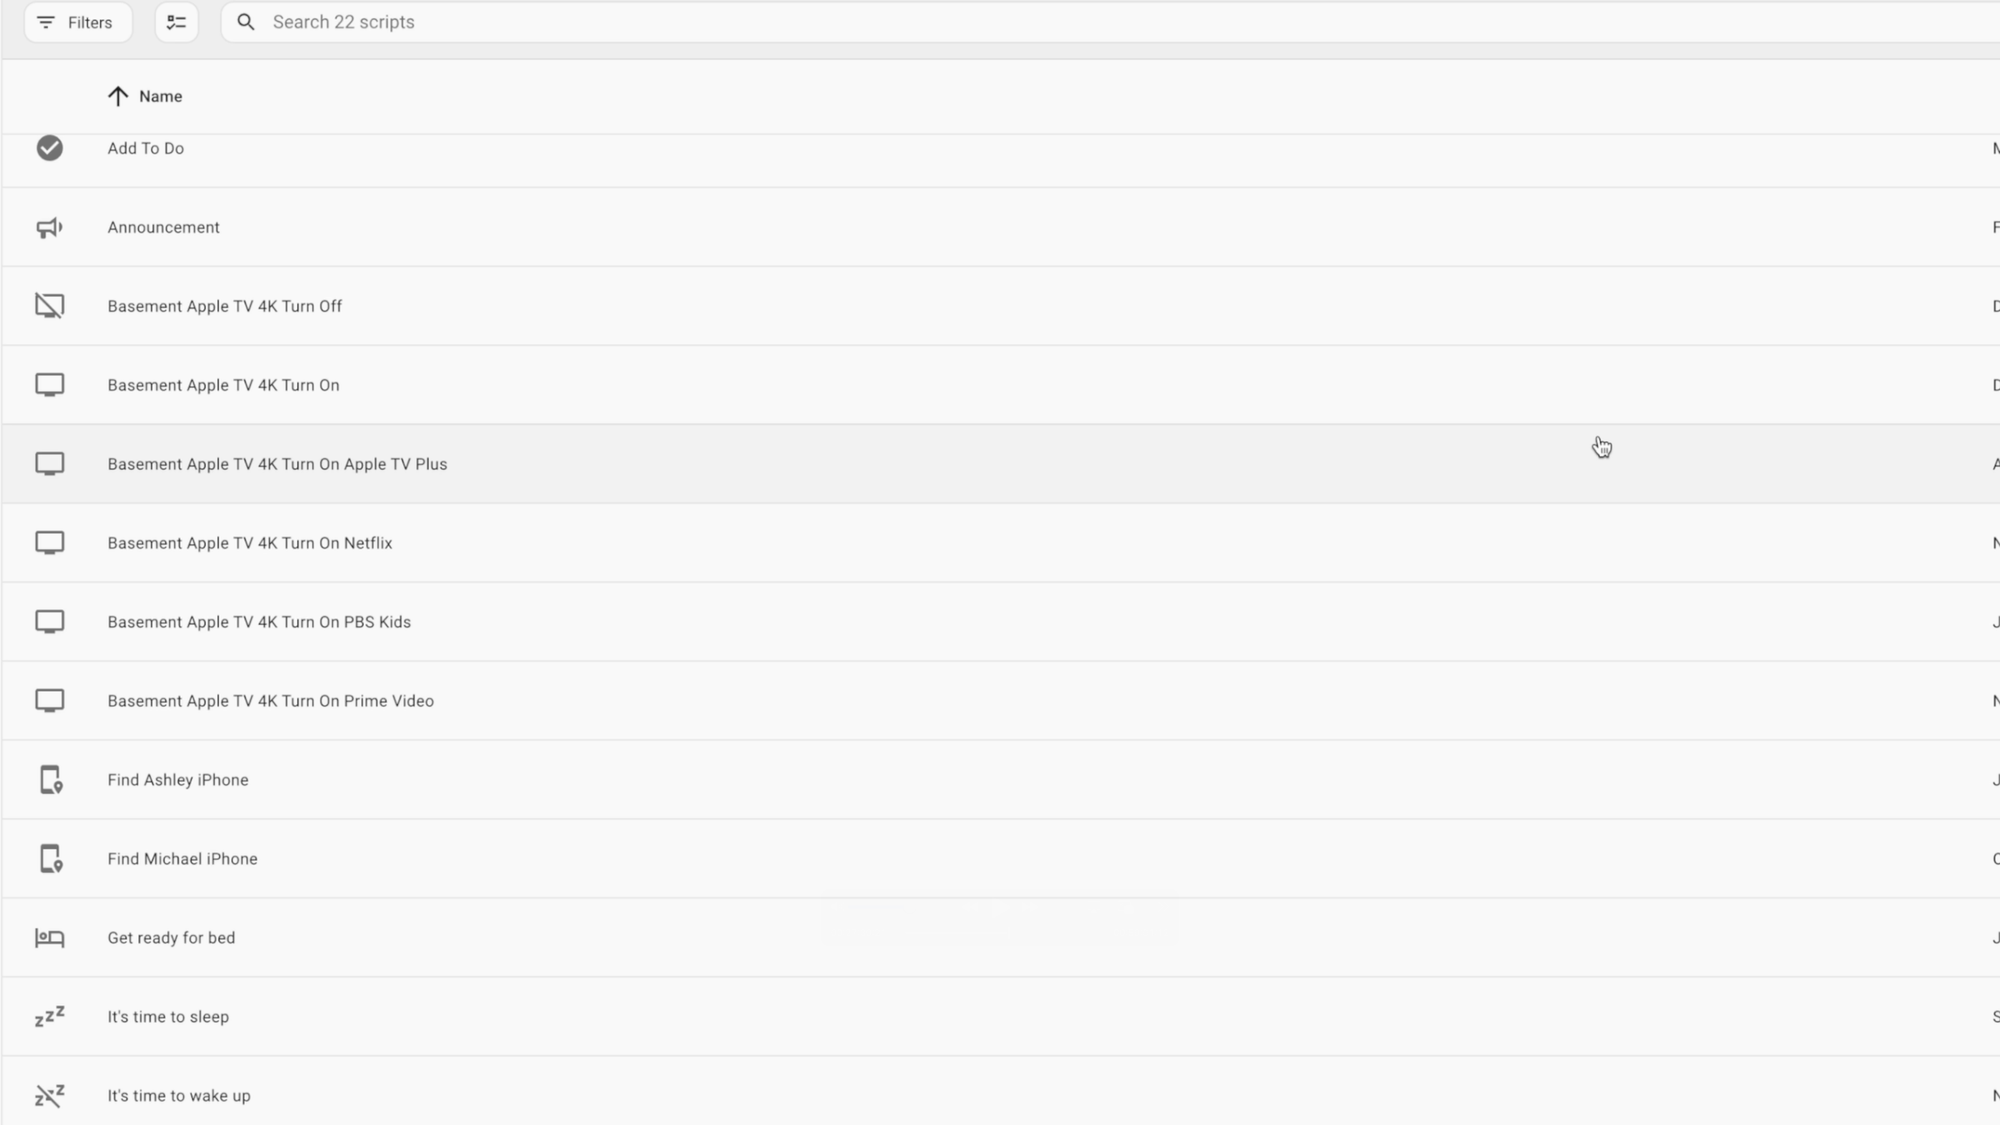
Next to scenes are scripts. Scripts are similar to automations in that they are repeatable actions that you can run. Unlike automations, scripts do not have triggers. This means scripts cannot automatically run on their own, unless they are used in an automation, or initiated by the user. Scripts can be handy when you want to perform the same action in different automations so you don’t have to re-create the same thing over-and-over. They are also helpful if you want to trigger actions by pressing a virtual button on your Home Assistant dashboard, like sending the robot vacuum and mop to clean a specific room.
To create a script, click the plus icon. Like automations, you can choose to create a new one from scratch, or to use a blueprint. Creating a new one from scratch, you’ll see the only option is to add actions; there are no triggers or conditions with scripts. Adding an action is just like adding an action in an automation though. Remember to save your script when you are done. Also, like automations, you can click the three dots next to a script and run it, or click traces to get information about the most recent usage of the script.
Home Assistant: Scripts
Blueprints
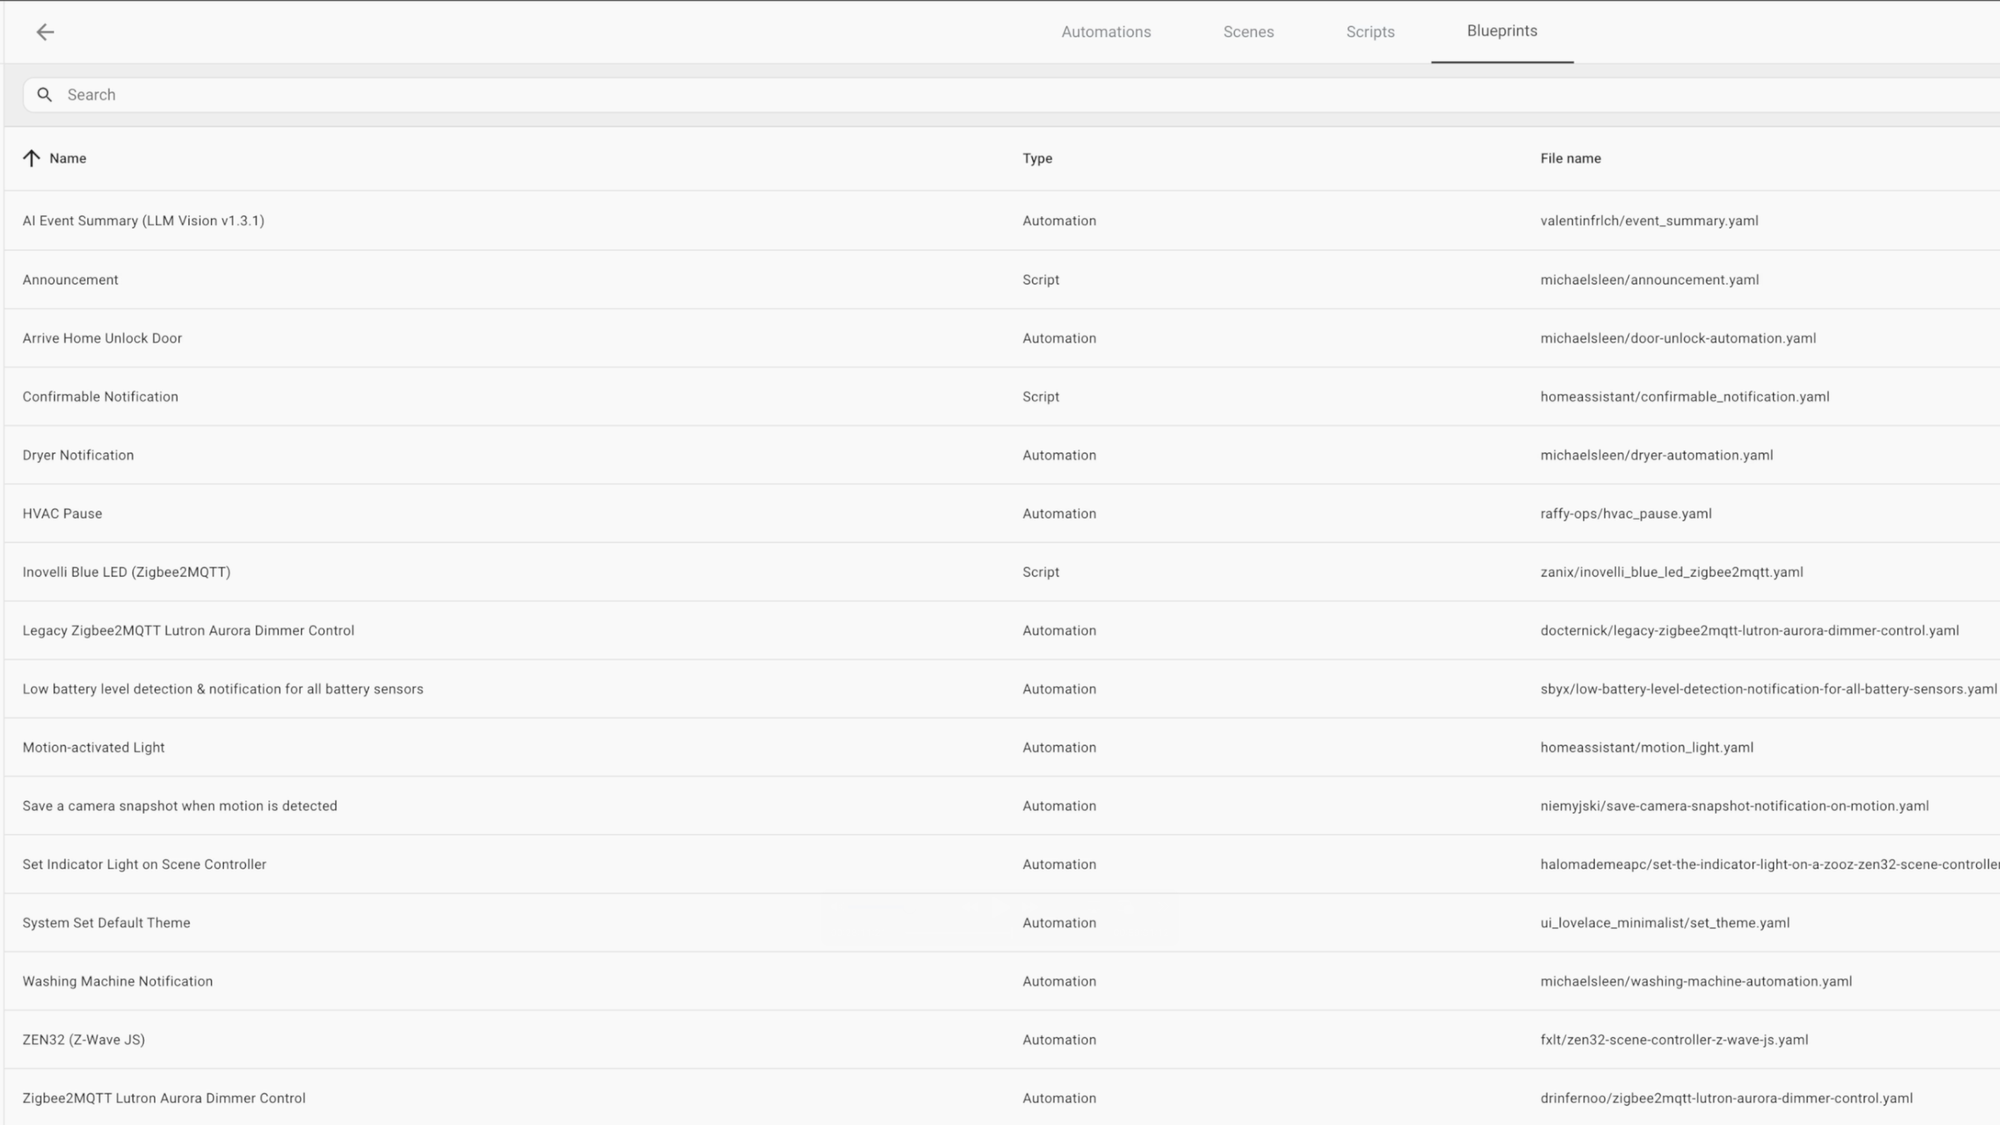
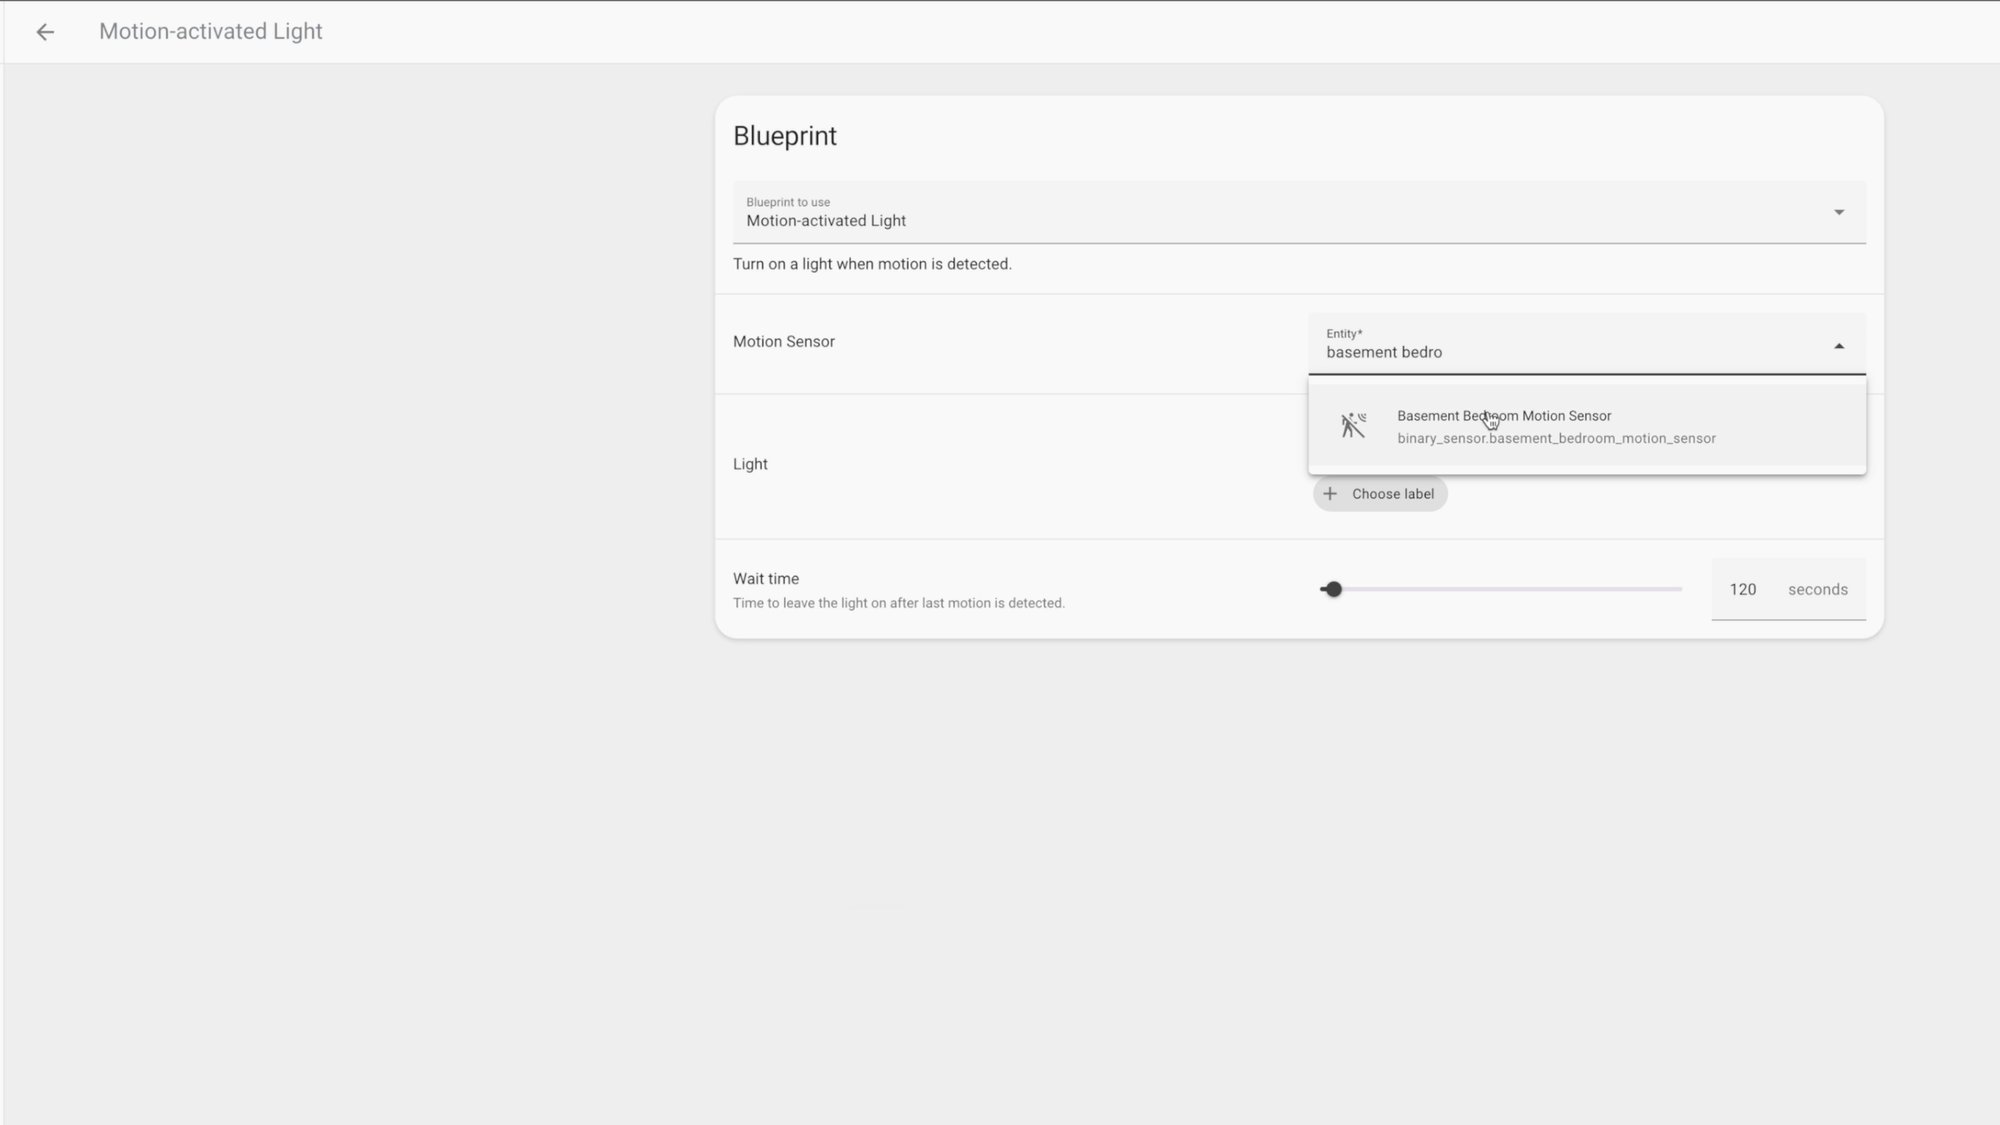
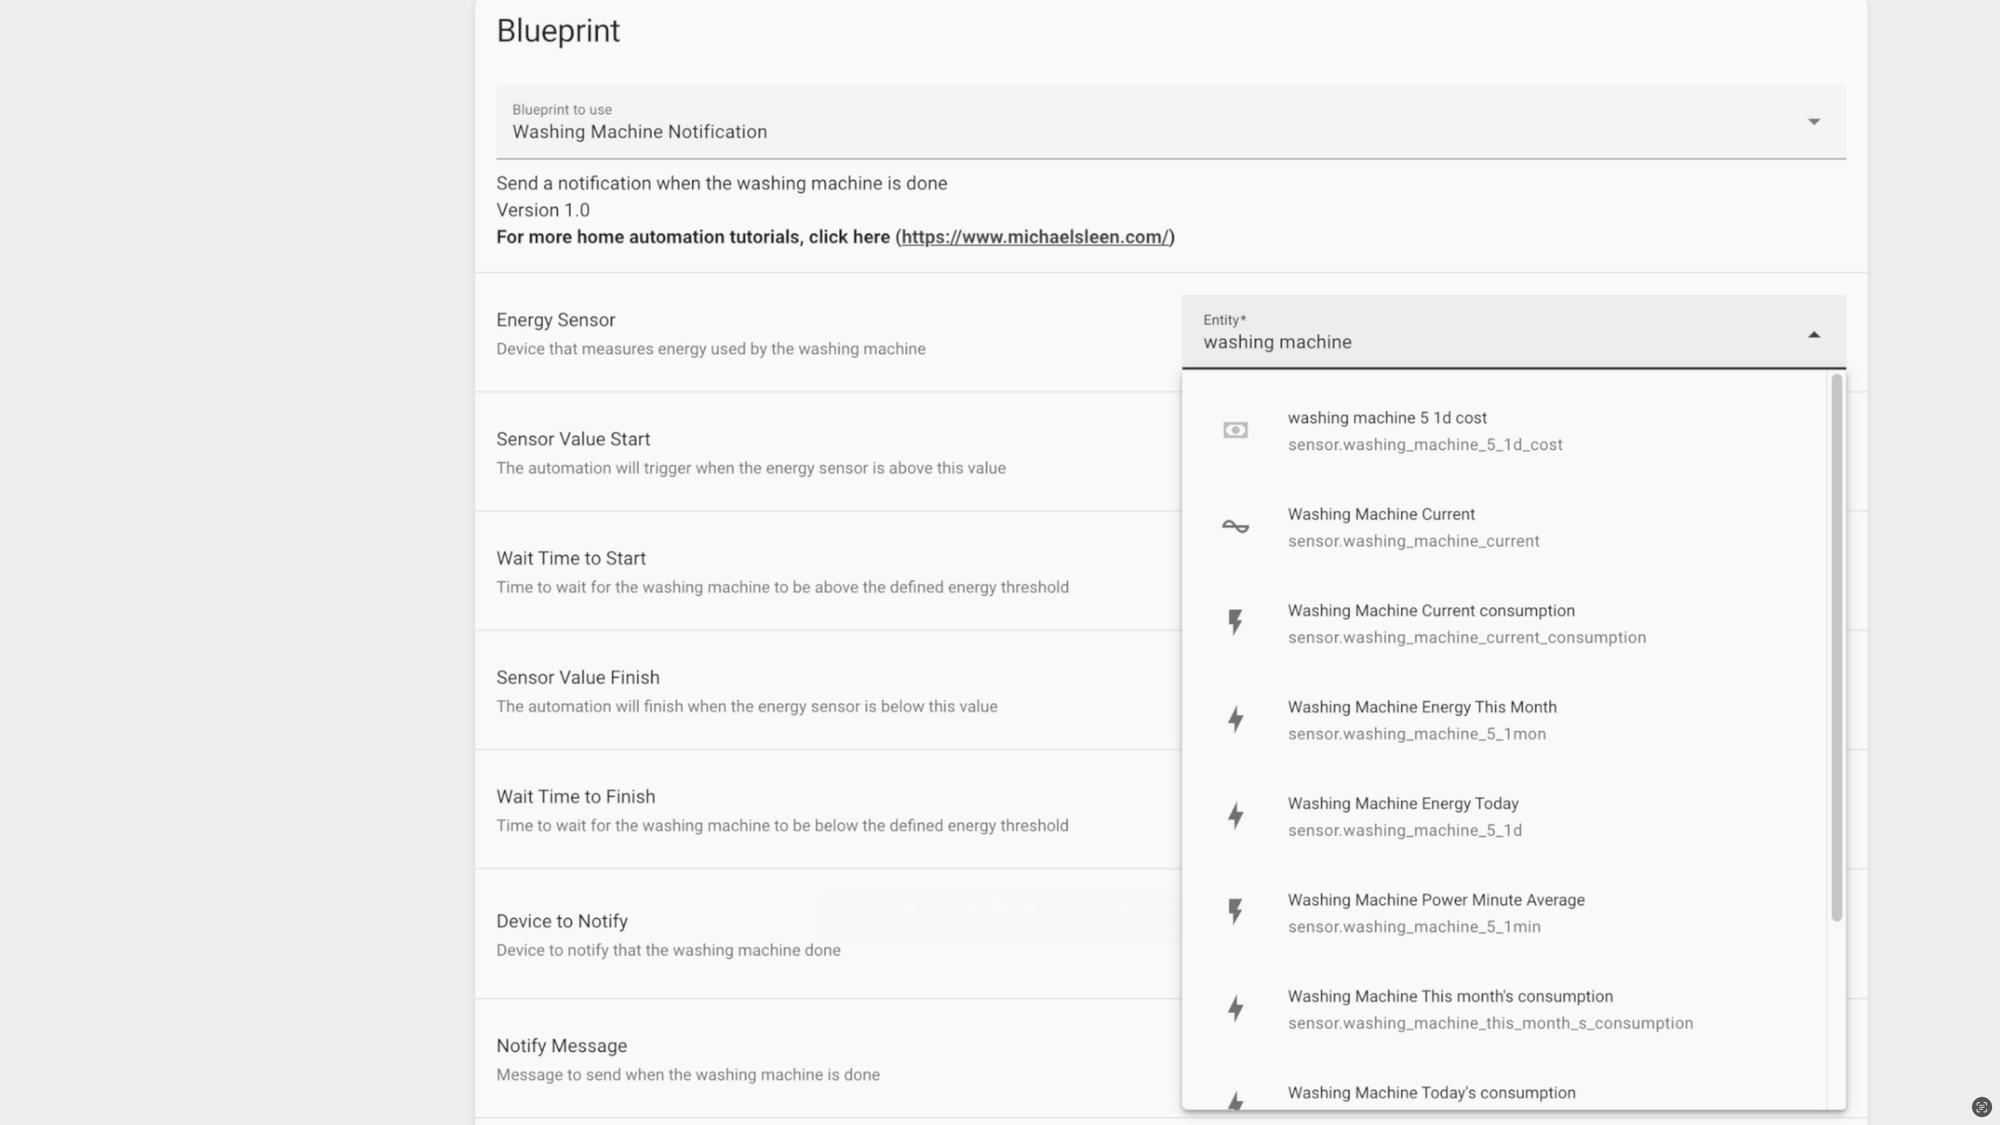
Next to scripts are blueprints. Think of blueprints as templates for automations or scripts with configurable sections. You can create different automations and scripts based on the same blueprint. Let’s look back at the automation I created earlier. A blueprint could establish a framework for a motion sensor trigger and a light to turn on. All you have to do is select which motion sensor you want as the trigger, and which light you want to be the target of the action.
You can find blueprints shared by the community in the blueprint community forum, and those that I created on my website. Some useful blueprints that I’ve used include pausing our HVAC when a door or window is opened, and then resuming it when it’s closed. Also, getting notifications on my phone when a device’s battery drops below a percentage that I can define.
Home Assistant: Blueprints
Zones
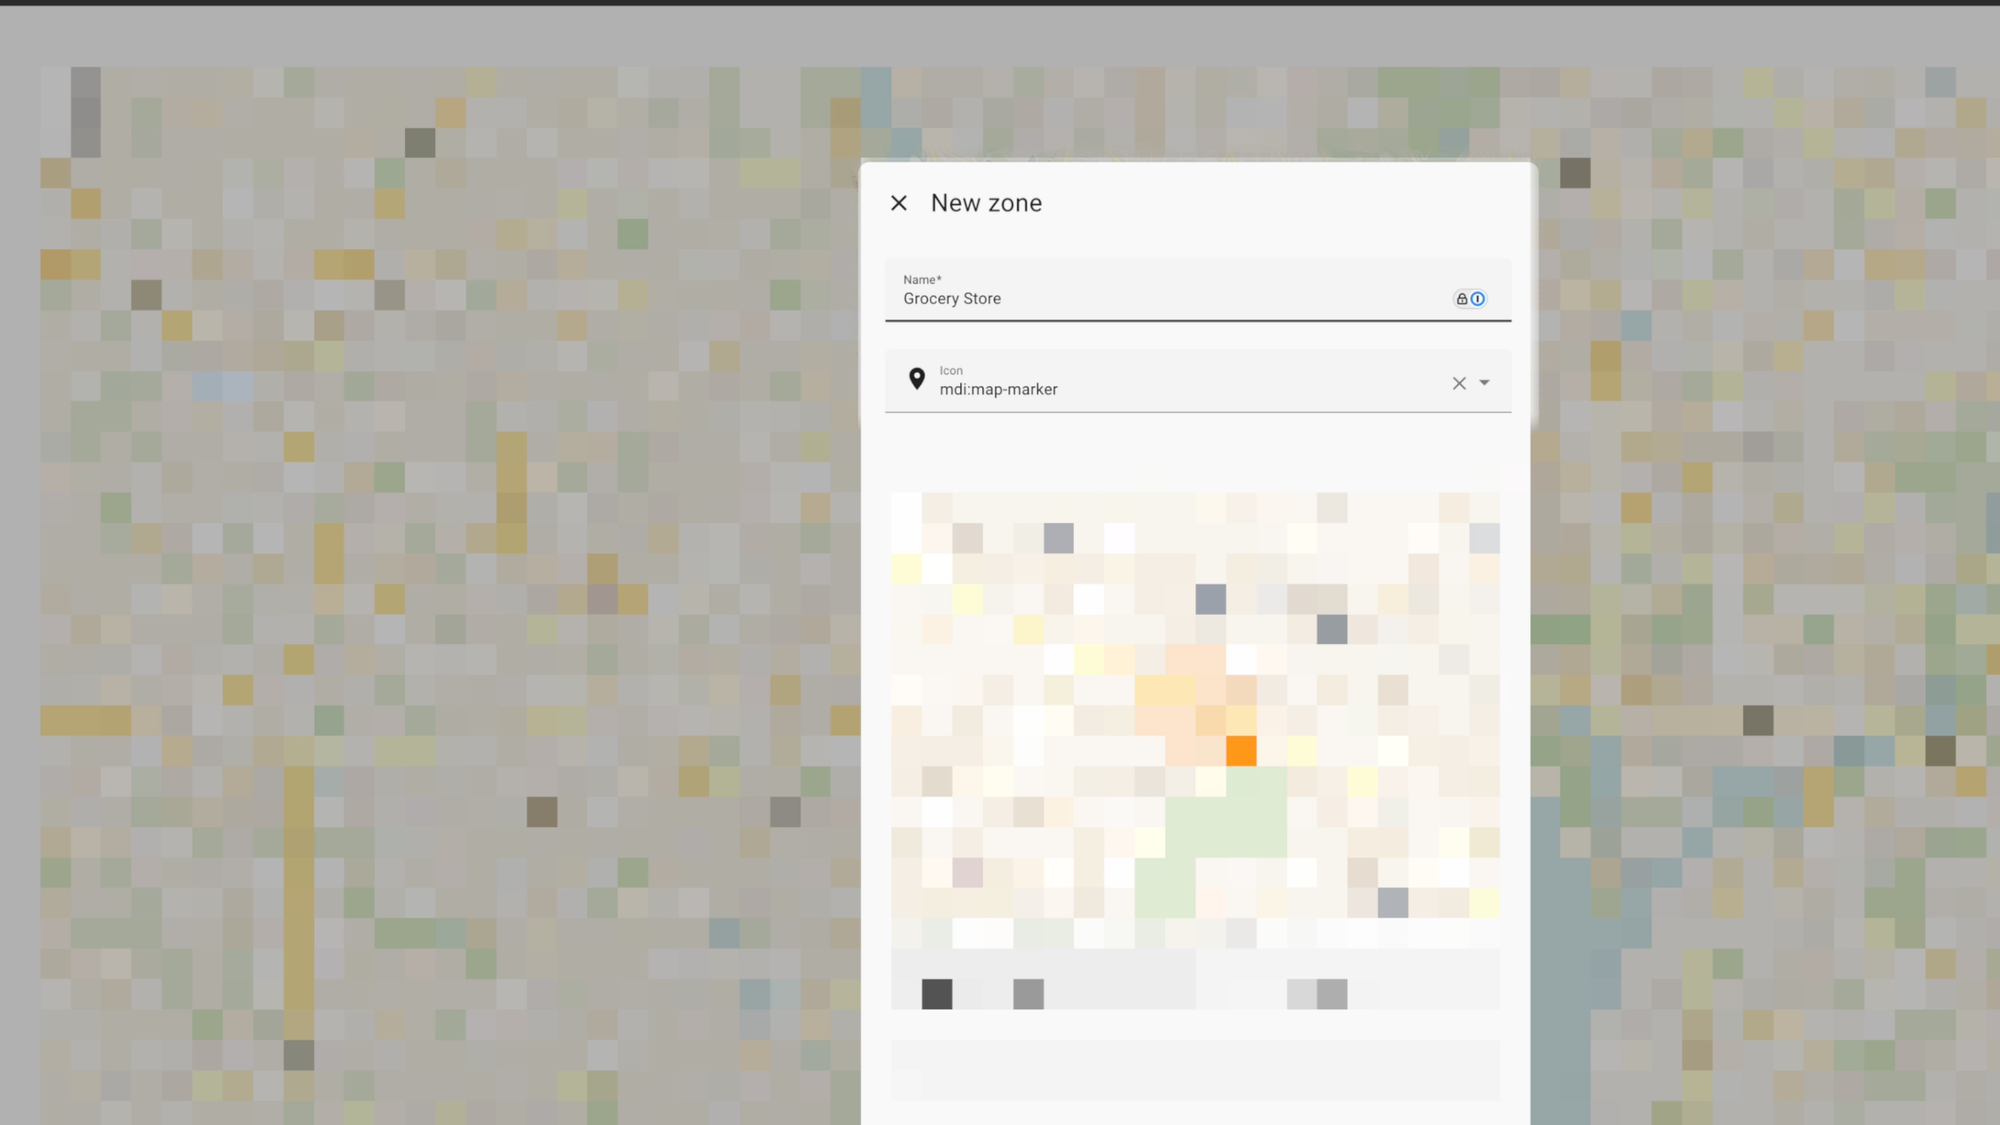
Going back to the settings page, you’ll see a section for managing the areas, labels, and zones in your Home Assistant. I already talked about areas and labels, but what are zones? Well, when you install Home Assistant for the first time, it will ask you for your current location. This is used to create a geofence around your home, AKA your home zone. This comes in handy with your automations. You might want to trigger something based on when a person enters or leaves your home zone. Examples may include automatically opening your garage door, unlocking the door, and disarming the alarm, provided you have other conditions in place to avoid it running when you don’t want it to.
But what if you want similar functionality based on someone entering or leaving other common places that you visit, like the office or a grocery store? From the zones page, you can add these additional zones. You might want an automation to send you a message when your spouse departs the office zone in the evening, or send a notification to your phone to open the shopping list when you enter the grocery store zone
You’ll need to setup zone presence tracking to do this, which I’ll cover later in the People section.
Home Assistant: Zones
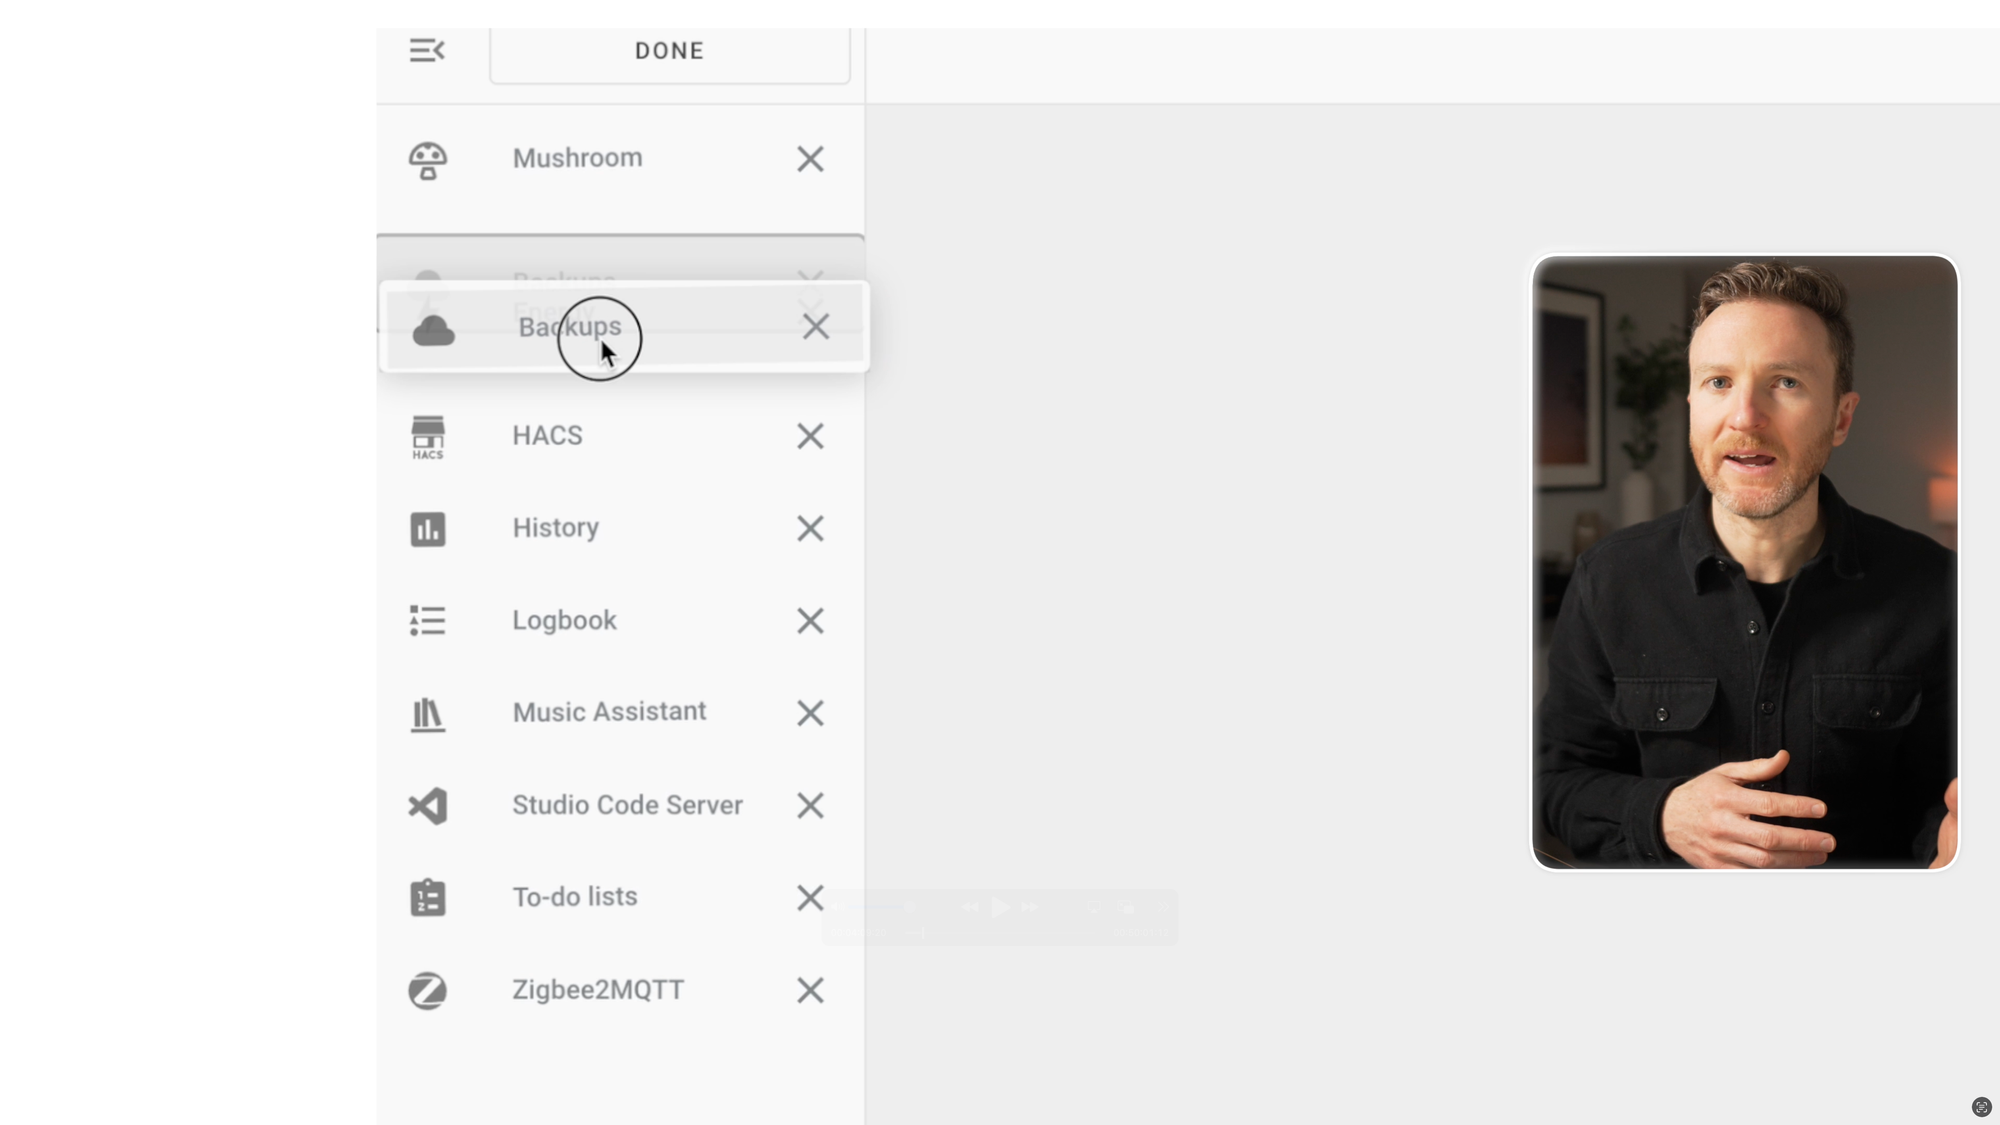
Add-ons
Moving down the settings page we come to add-ons. These are third-party applications that provide additional functionality in Home Assistant. Add-ons run alongside Home Assistant, whereas integrations connect Home Assistant to other apps.
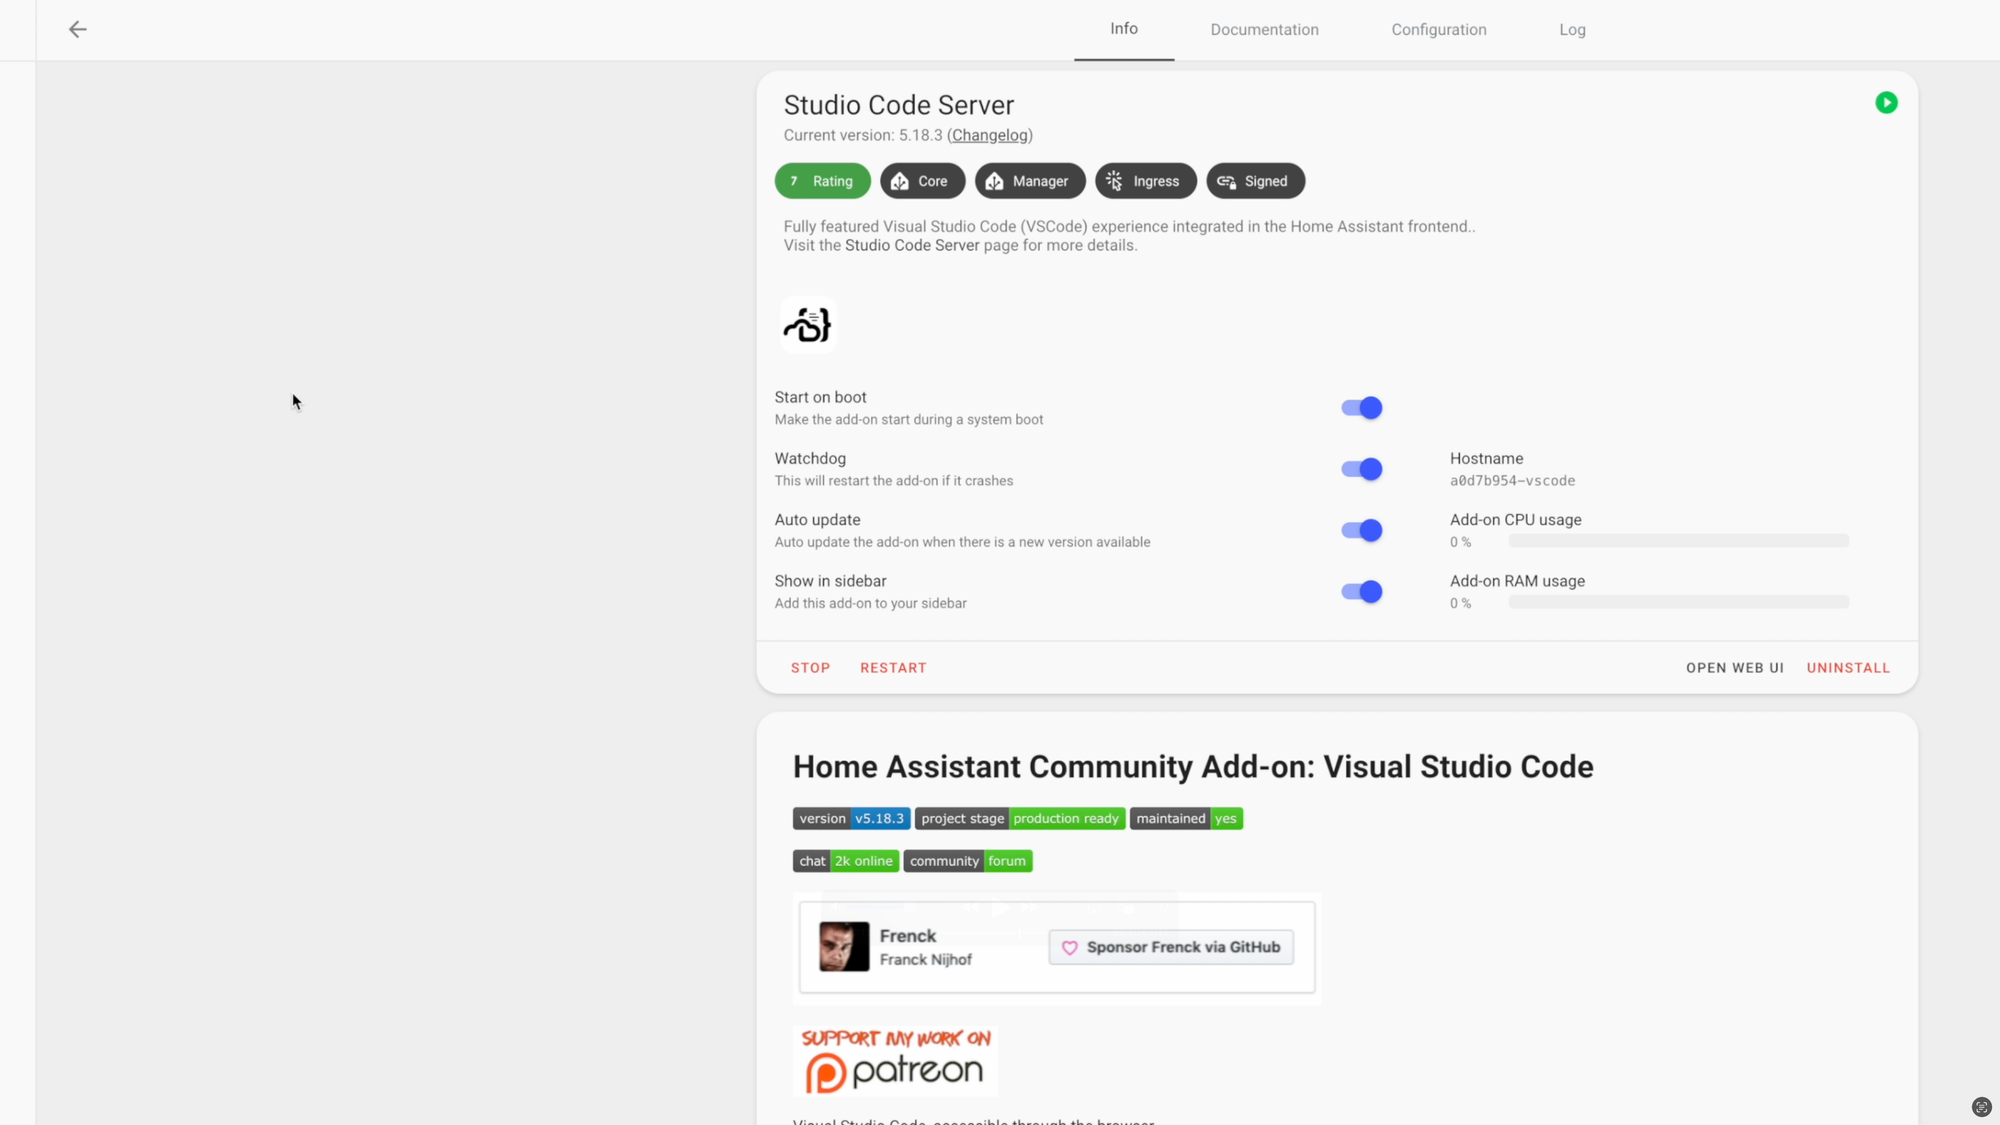
You can install add-ons by visiting the add-on store from this page. Once installed, you need to start the add-on; installing it alone won’t do anything. The add-ons you require will depend on your needs. My top picks for most users will be Studio Code Server for managing your Home Assistant configuration (more on that later), Mosquito Broker for handling the MQTT protocol (certain devices or services will utilize this), Matter Server for adding devices that use the Matter protocol, Z-Wave JS for adding Z-Wave devices, and Zigbee2MQTT for adding Zigbee devices. Keep in mind that add-ons will use disk space, memory, and processor on the machine running your Home Assistant.


Home Assistant: Add-Ons
Home Assistant Community Store (HACS)
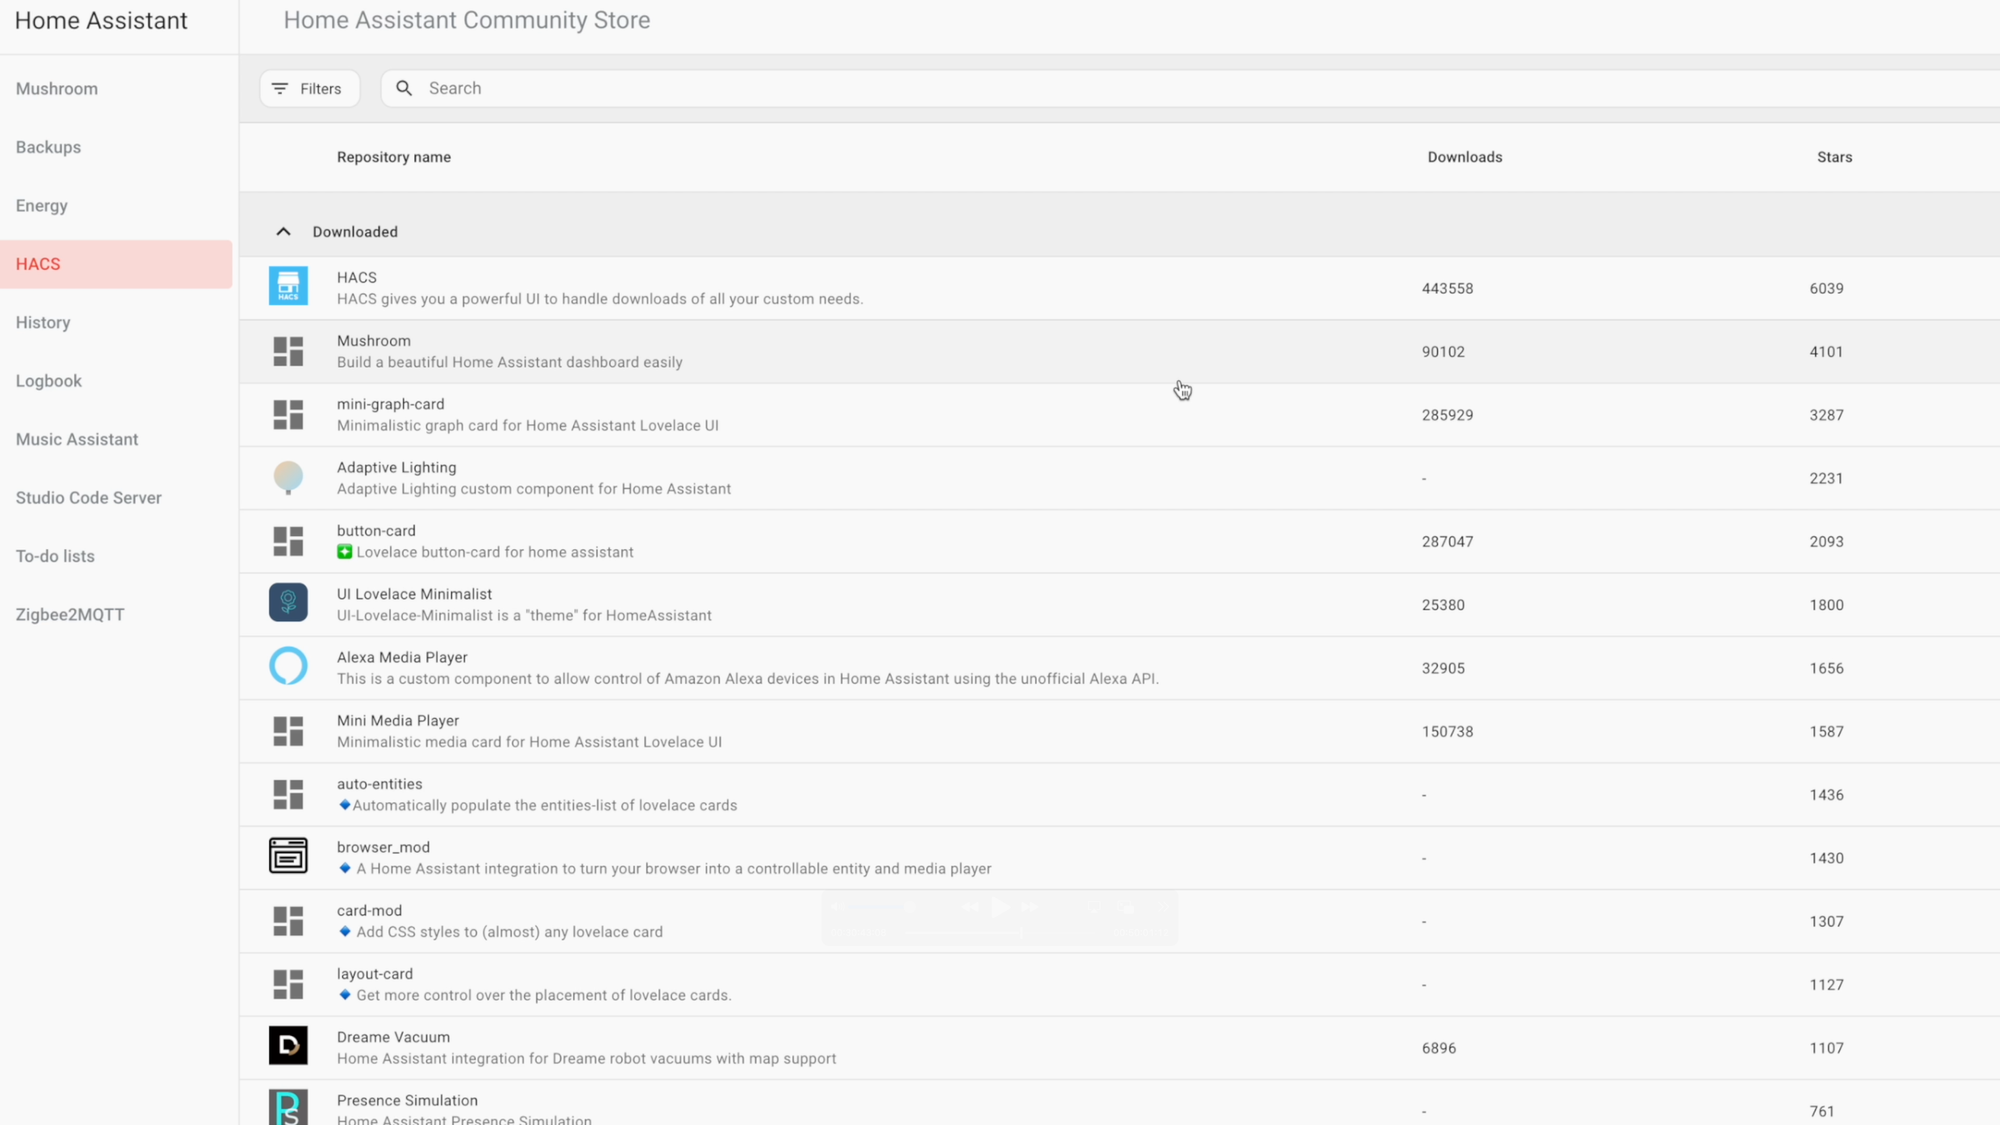
One thing I recommend everyone install is Home Assistant Community Store, commonly referred to as HACS. This is a custom integration that lets you manage custom elements in Home Assistant, including discovering, downloading, updating, and removing them. Examples of custom elements include additional features for dashboards, ways to add devices to Home Assistant that do not have an official integration, or additional capabilities for your Home Assistant. You can download HACS here.
I use HACS components to make my dashboard look and function the way I want with Mushroom Cards, to run Adaptive Lighting which means the lights in our home automatically adjust their brightness and color temperature based on the sun’s position in the sky, and to control Amazon Echo devices in Home Assistant, among other things.
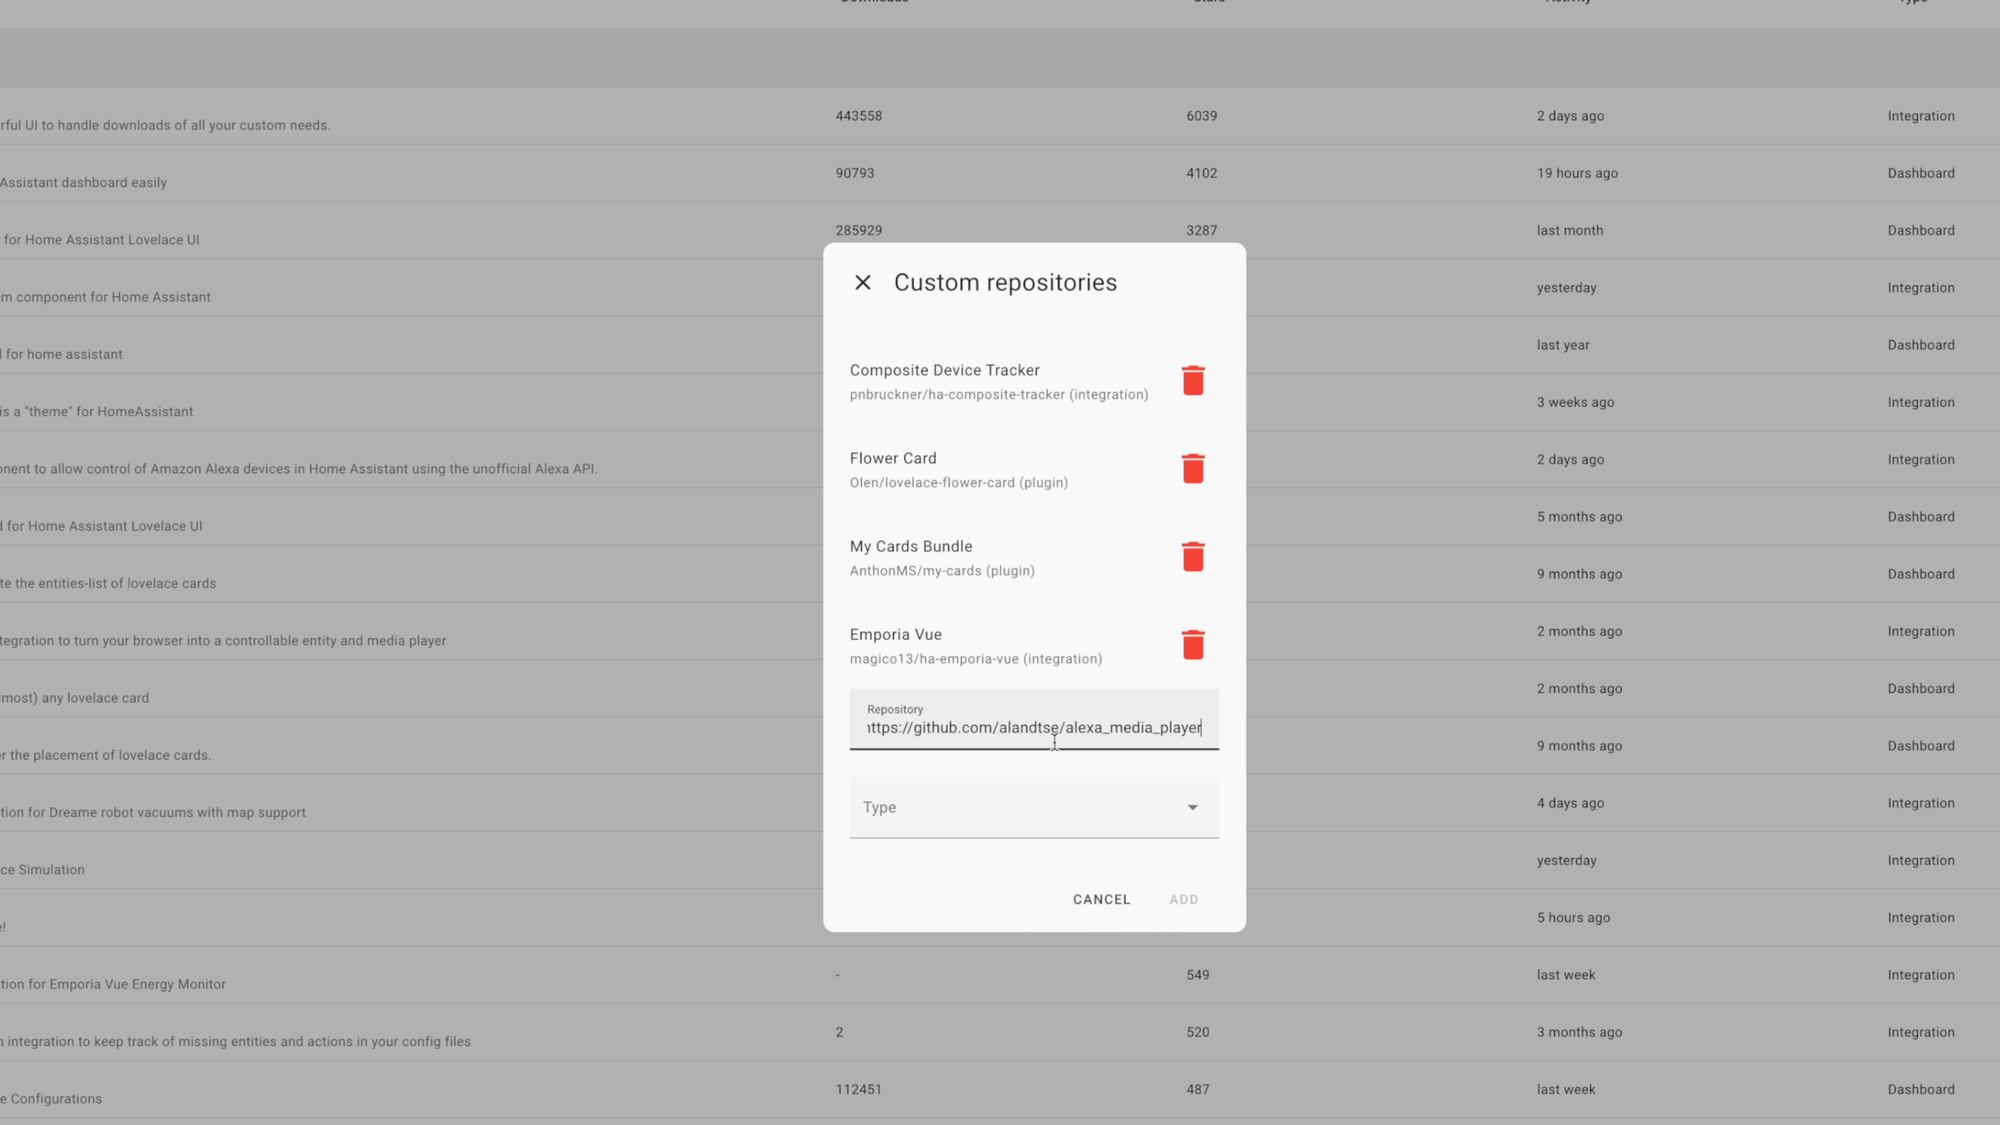
From the HACS page, you can search for repositories to add. Sometimes, you may come across something cool that you want to add to your Home Assistant, and it takes you to a page on GitHub talking about a HACS component. To add this, you may need to copy the GitHub link, then click the three dots in the upper right of the HACS page, choose “custom repositories,” and then paste in the GitHub URL into the “repository” field, and click “add.” After adding a repository to HACS and restarting Home Assistant, you may need to visit the integration page from Devices & services, and search for the HACS component that you just added, so it appears as an integration allowing you to configure it. Generally, you’ll need to restart Home Assistant after adding or updating a custom component.

Home Assistant: HACS
Dashboards
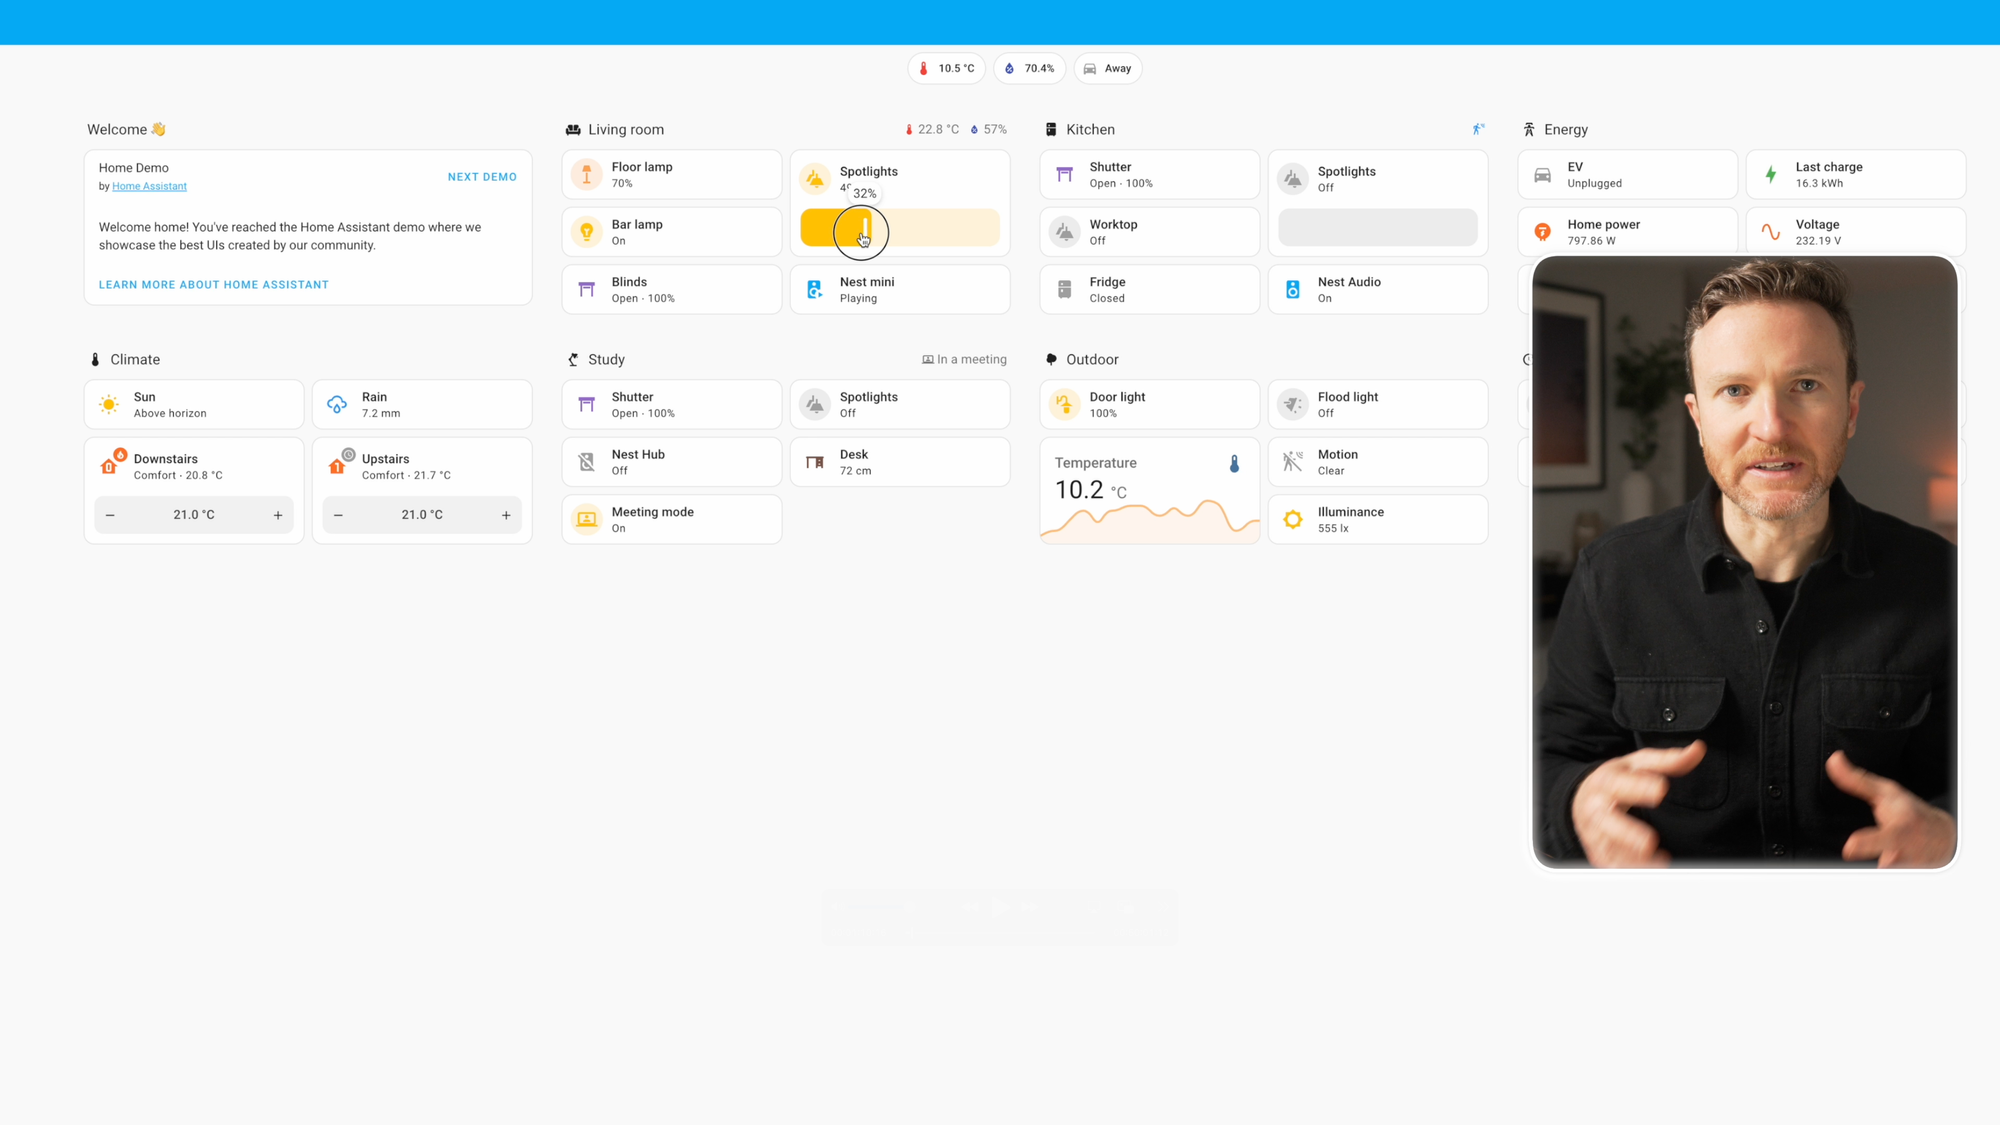
From the settings page, you can also manage your dashboards. There are basically two types of Home Assistant users: those who rely almost exclusively on automations and see no need for a dashboard, and those who spend hundreds of hours tinkering with them. I’m probably the latter.
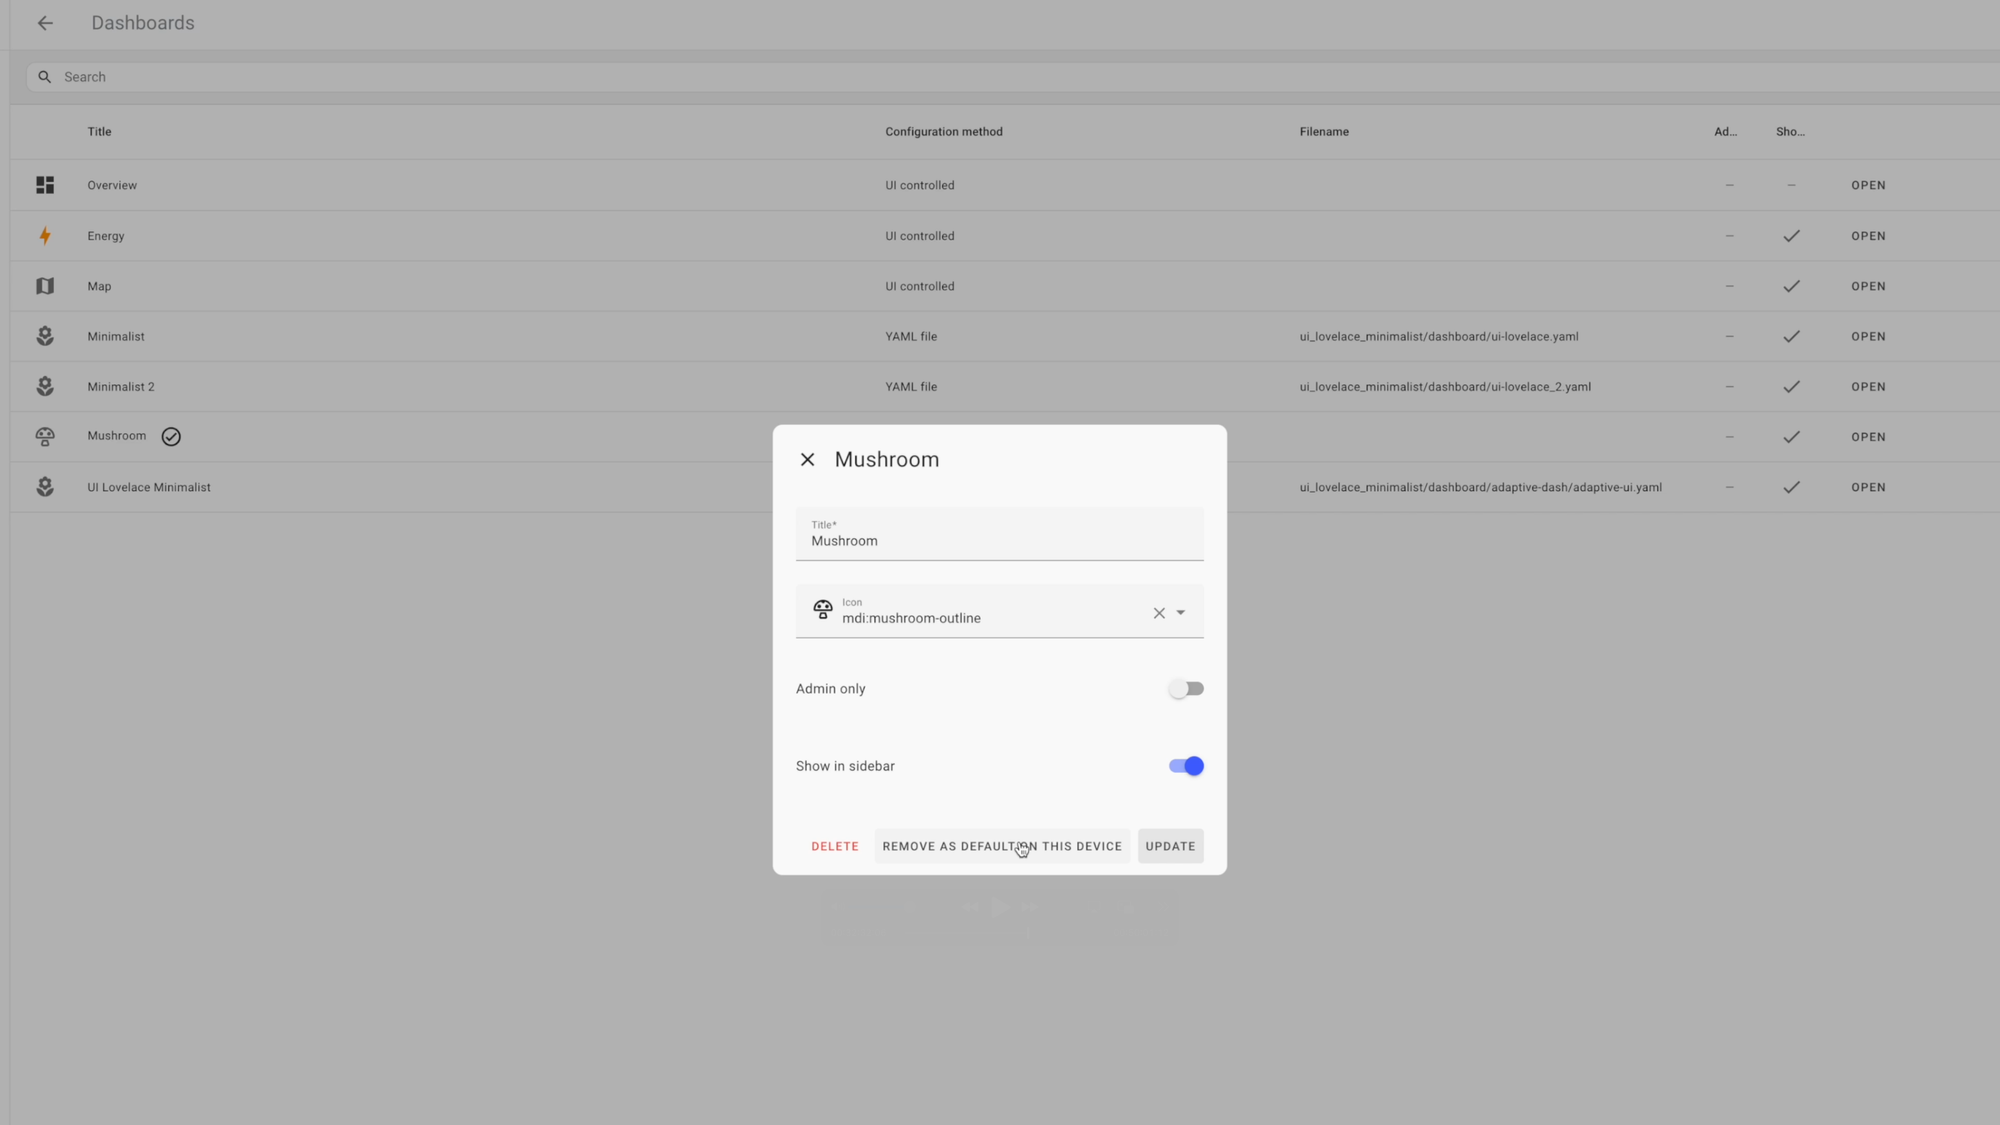
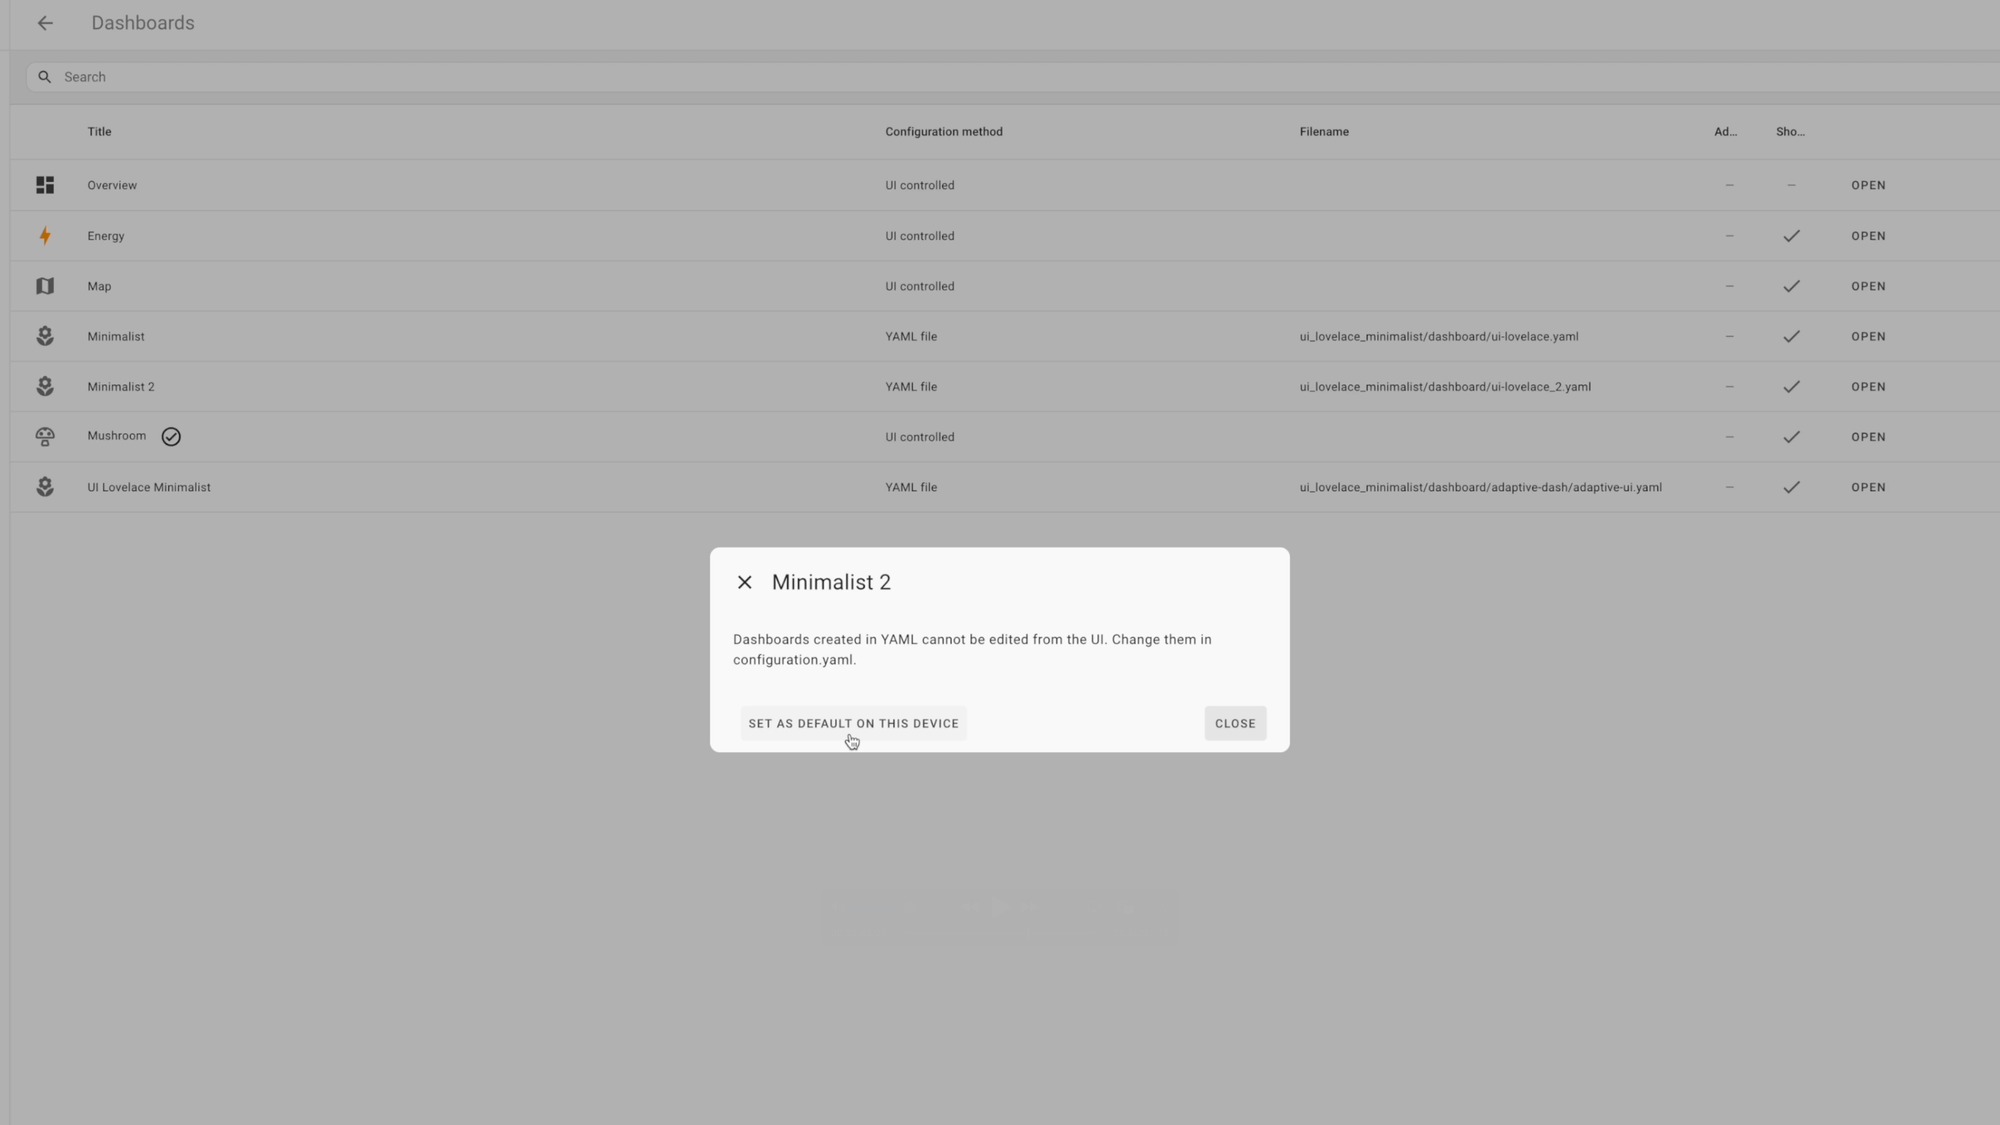
As shown earlier, when you first install Home Assistant, it will generate a dashboard based on the available devices and entities. It may not be the most useful setup though. The dashboard with a checkmark next to it represents your default dashboard. You can change this by clicking on it and selecting “remove as default on this device,” or selecting another dashboard and clicking “set as default on this device.” Note the “on this device part.” That means if you access your Home Assistant from multiple devices, like a phone and computer, you’ll need to make this change on both devices.
If you would like to create and customize your own dashboard, you can click the plus sign from this page, and choose “new dashboard from scratch.” You can give it a name, an icon, and a URL. I recommend keeping “show in sidebar” enabled, that way you can quickly access your dashboard. I’ll walk through the basic components of a custom dashboard.
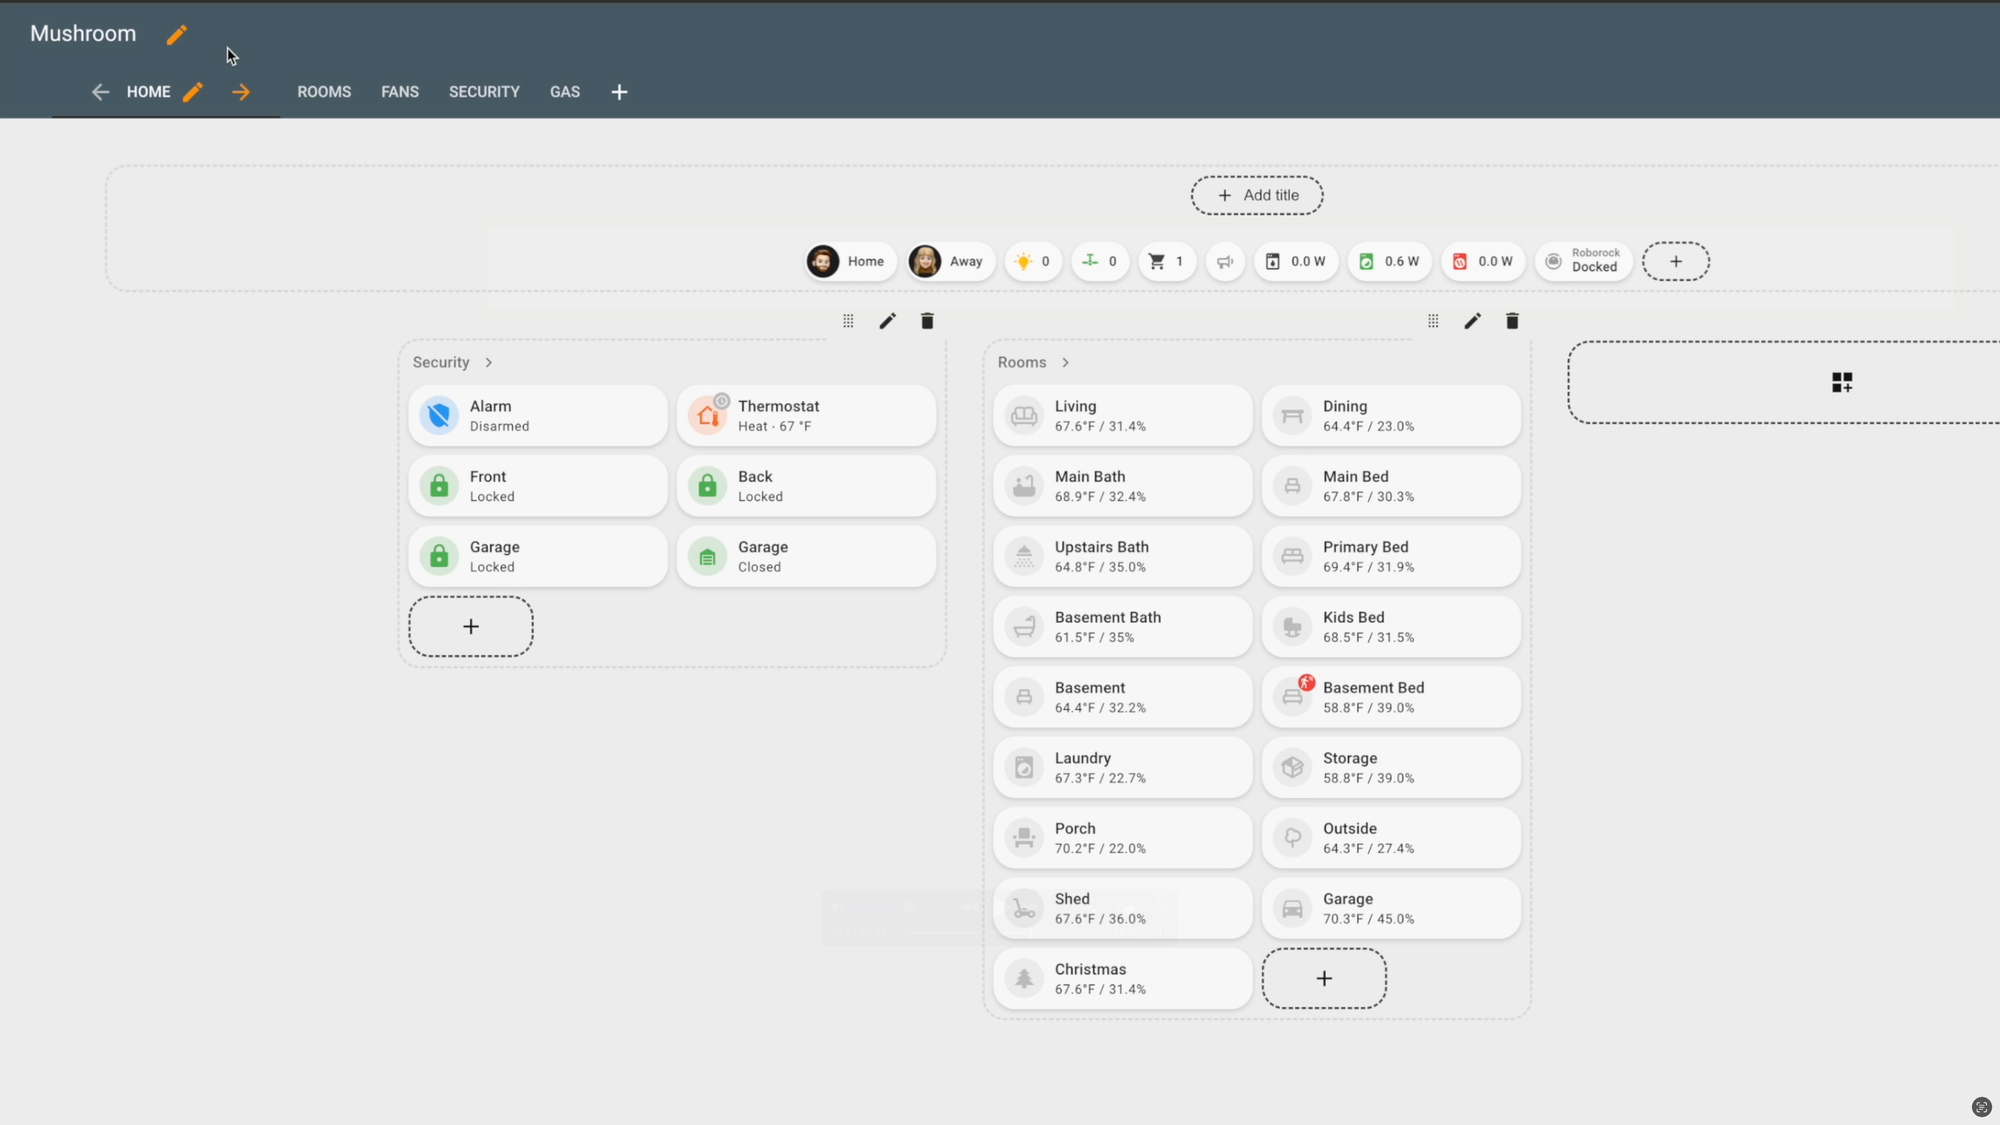
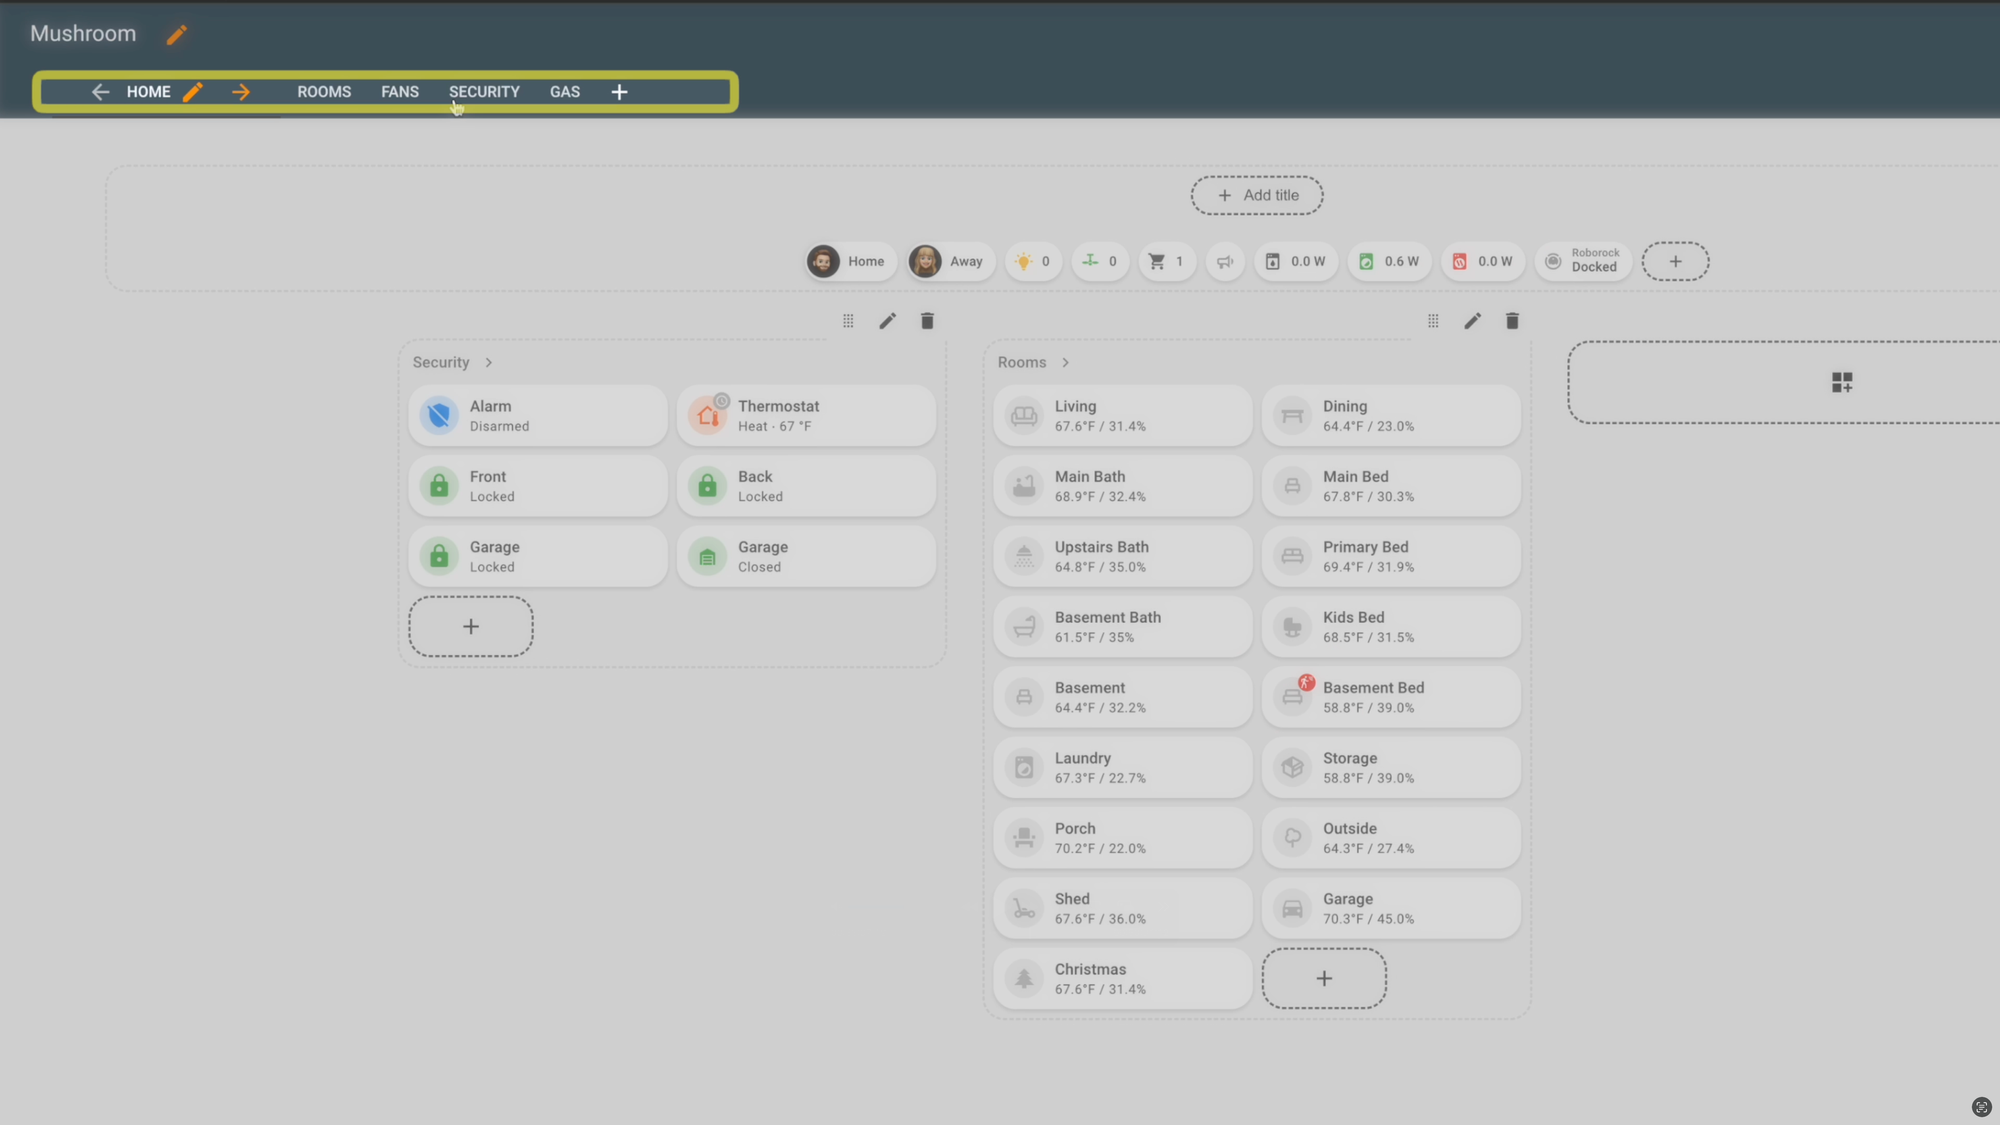
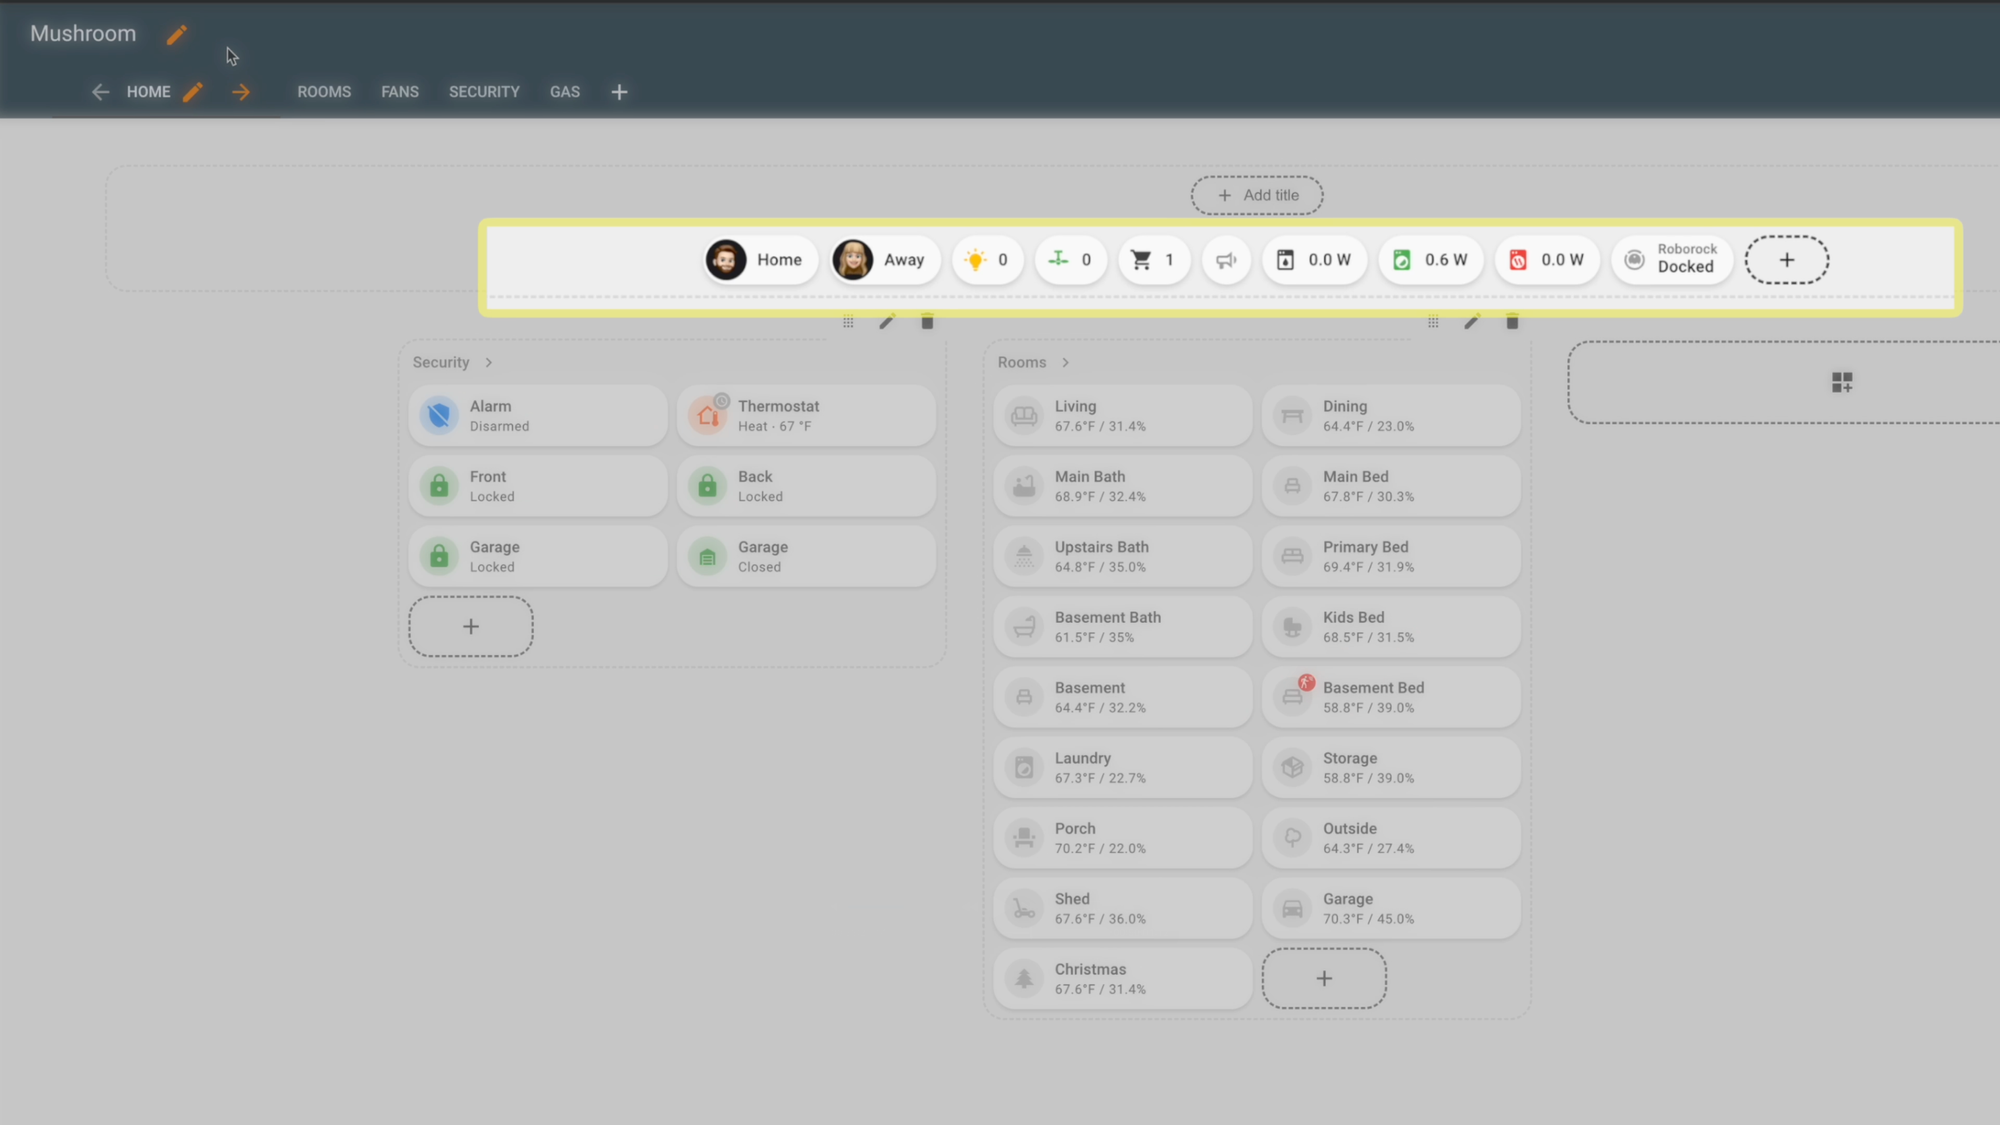
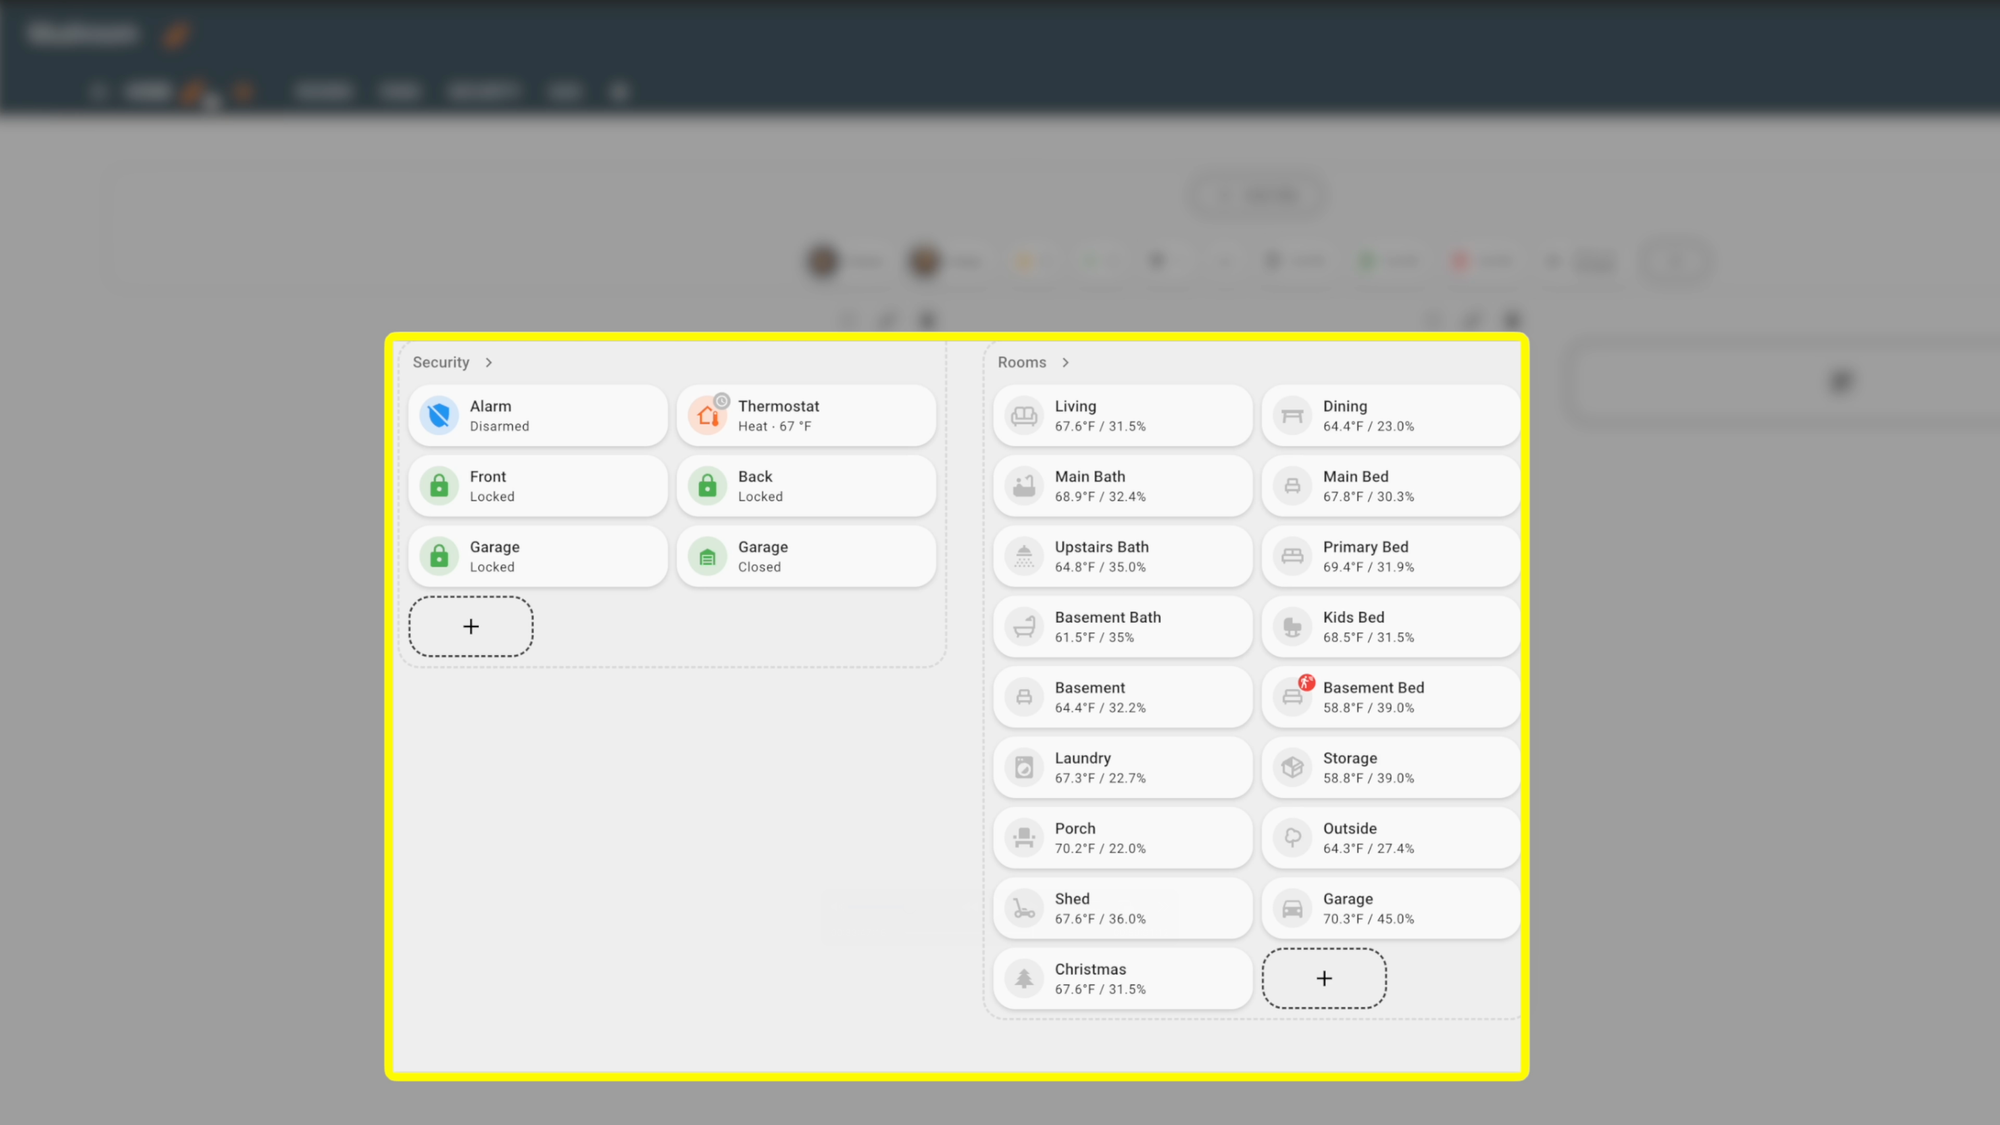
The top represents the different pages in your dashboard. By default it will have a Home page, but you can create additional pages that you may want a button on your dashboard to navigate to, such as a page that lists all of the connected lights in your home. Below this, you have two main sections. The first allows you to add headers and sub-headers, along with badges, all of which are optional. Badges are small icons that can display quick information at a glance, such as the current weather conditions, the number of lights turned on, or the state of your home’s alarm, for example. Clicking into a badge can trigger some action, or navigate to another page, or do nothing beyond displaying information.
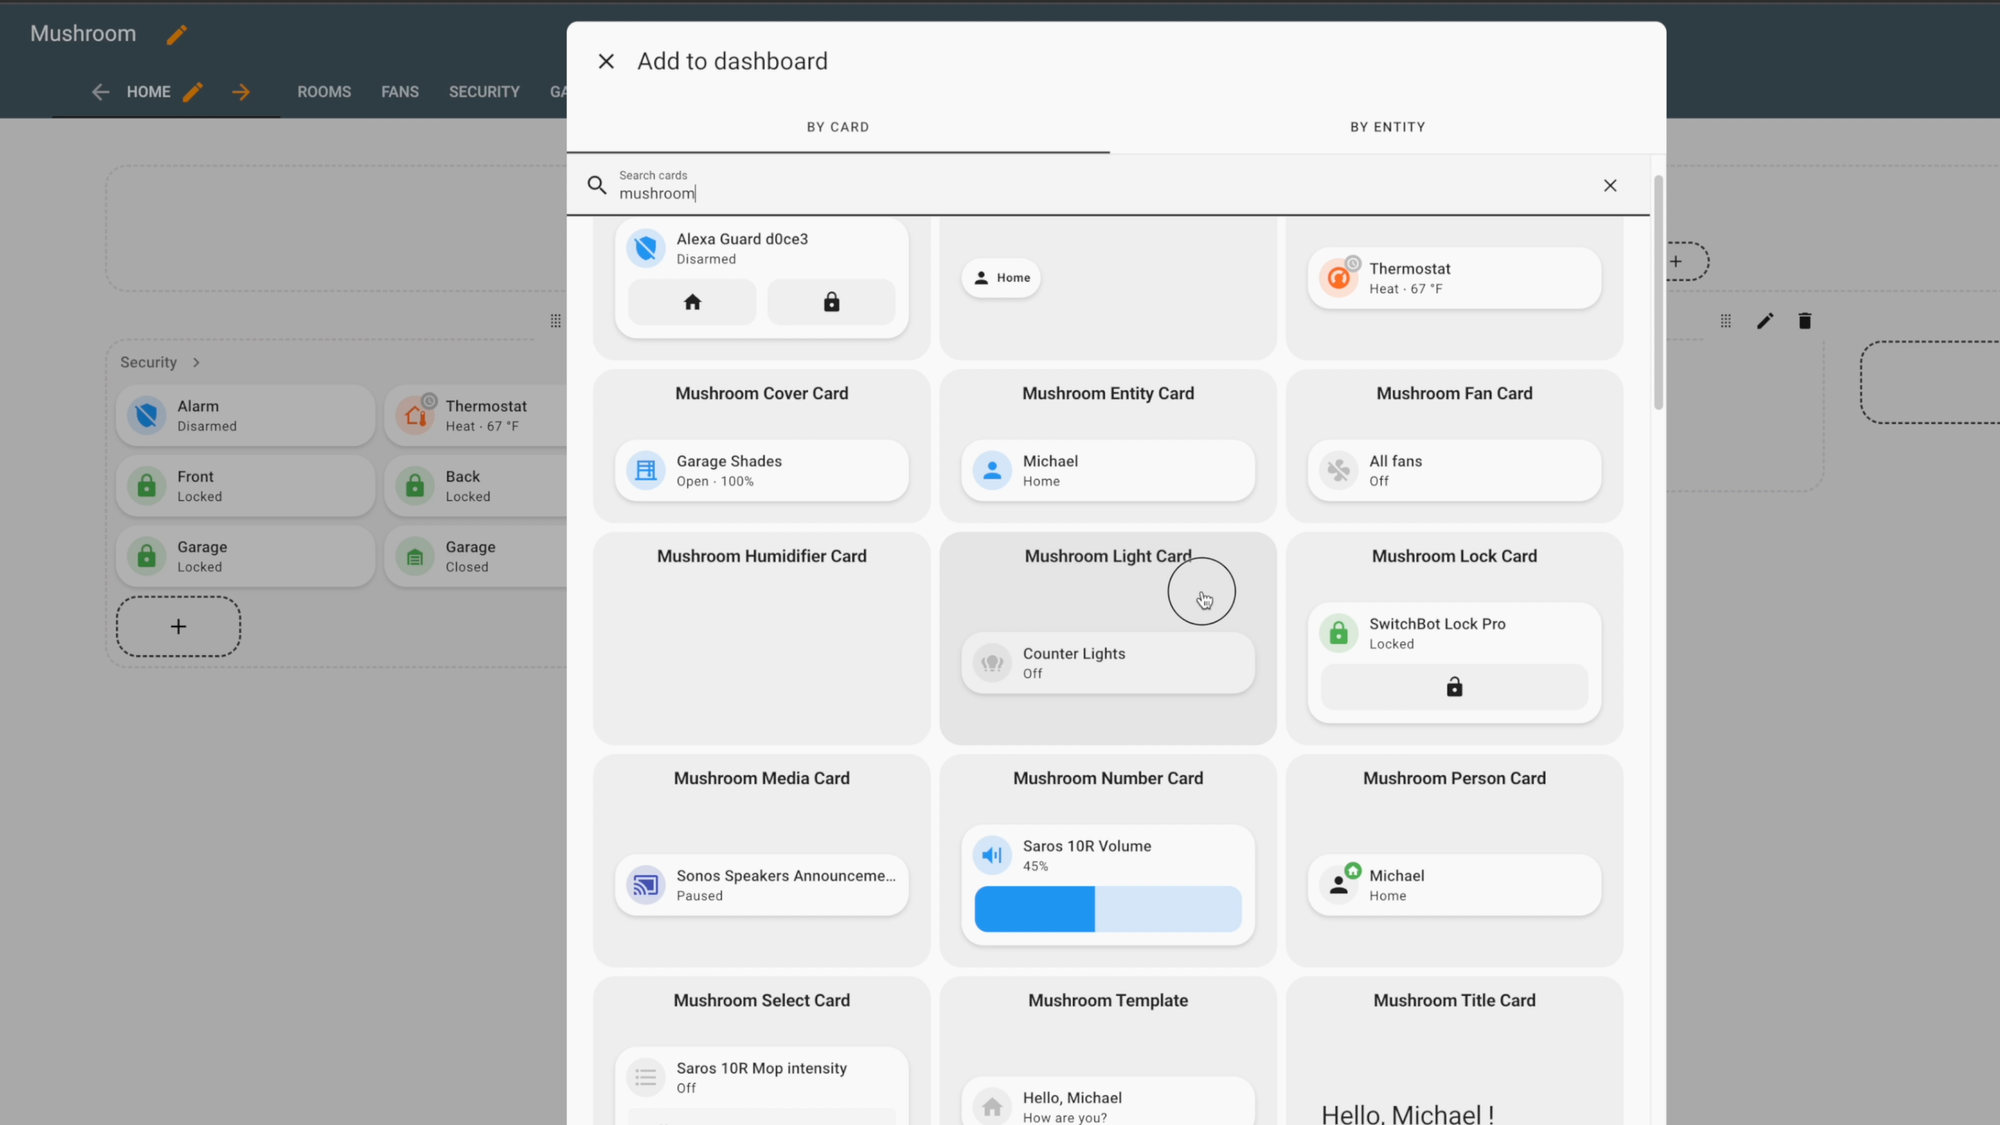
Below this you have the core section of the dashboard where you can add sections with cards. Each section can also be labeled with text. A card could be a button to toggle a light on or off, a way to control media playback, a snapshot of recent activity from a security camera, the state of an entity like a motion sensor, and so much more. Different cards have different functions, but each allows you to customize the layout, such as the card’s height or width, or the card’s visibility. This is particularly interesting. You may have devices that you want to control, but only under certain conditions, like Christmas lights. Rather than have these devices appear all the time, you can create conditions for when they should appear. This concept also applies to badges. You could have a badge with the state of a robot vacuum or washing machine only appear if they are in use.
Enough with the layout — how do you use this thing? I can click on these different cards to control my smart home. I can click to arm or disarm our home’s alarm. I can click to adjust the mode or temperature of our thermostat. I can also click to unlock or lock doors, and to open or close our garage. Pretty cool, right?
I can also see if any lights in our house are currently on by room, along with the current temperature and humidity in that room. There is also a red badge if motion is detected in that rom. I can click once on the room to toggle the light on and off, or I can click twice to turn off the lighting automation for that room. This is how I set the state of a toggle helper to “on” as I talked about earlier. At the top I can see how many lights are on, and I can click it to see all the lights in our house, along with ceiling fans, and motorized shades. If I double tap on a light, I can adjust the brightness, color, or color temperature.
There’s a lot more to cover about dashboards, which could be its own tutorial. You can learn more about my Home Assistant dashboards on a wall-mounted tablet, and dashboards on a mobile phone.


Home Assistant: Dashboards
Voice Assistants
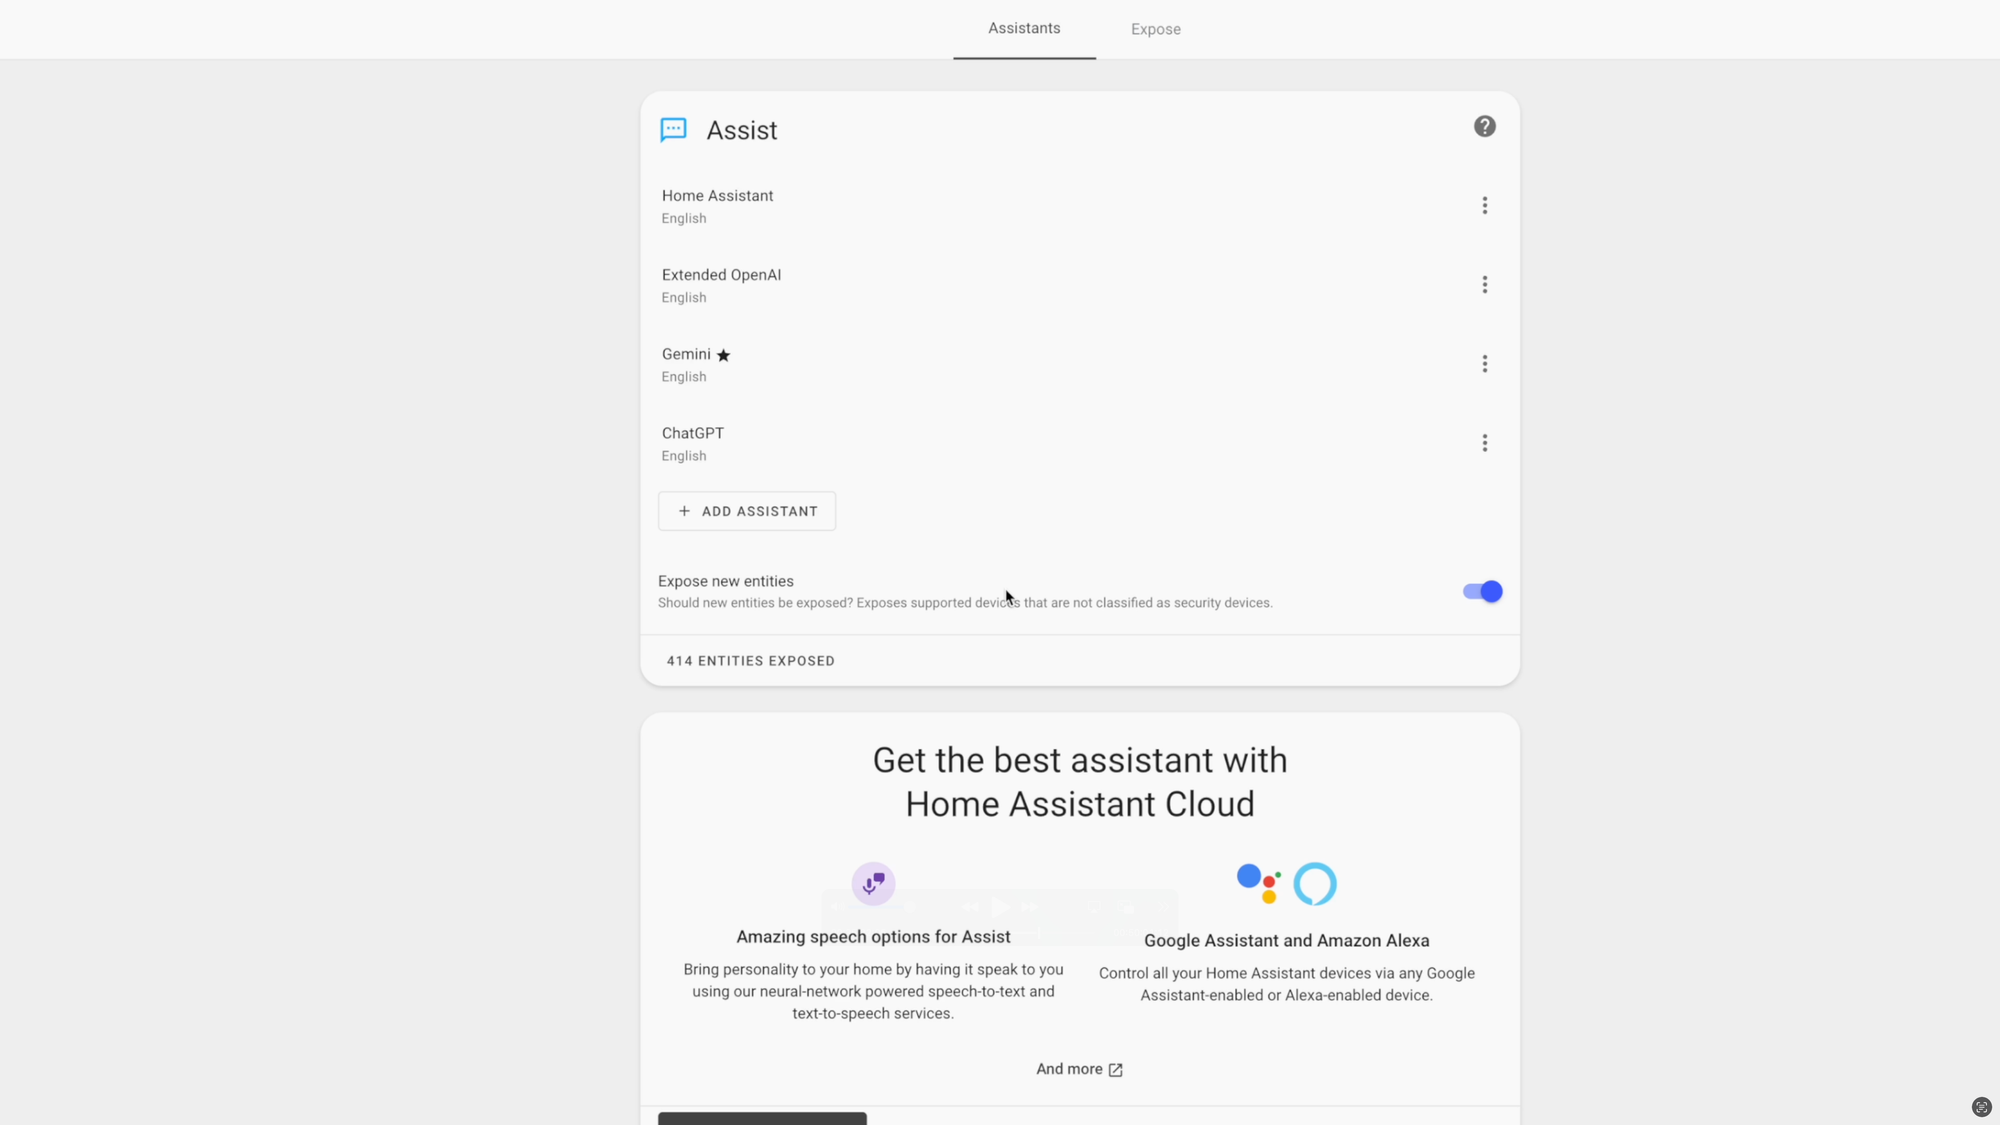
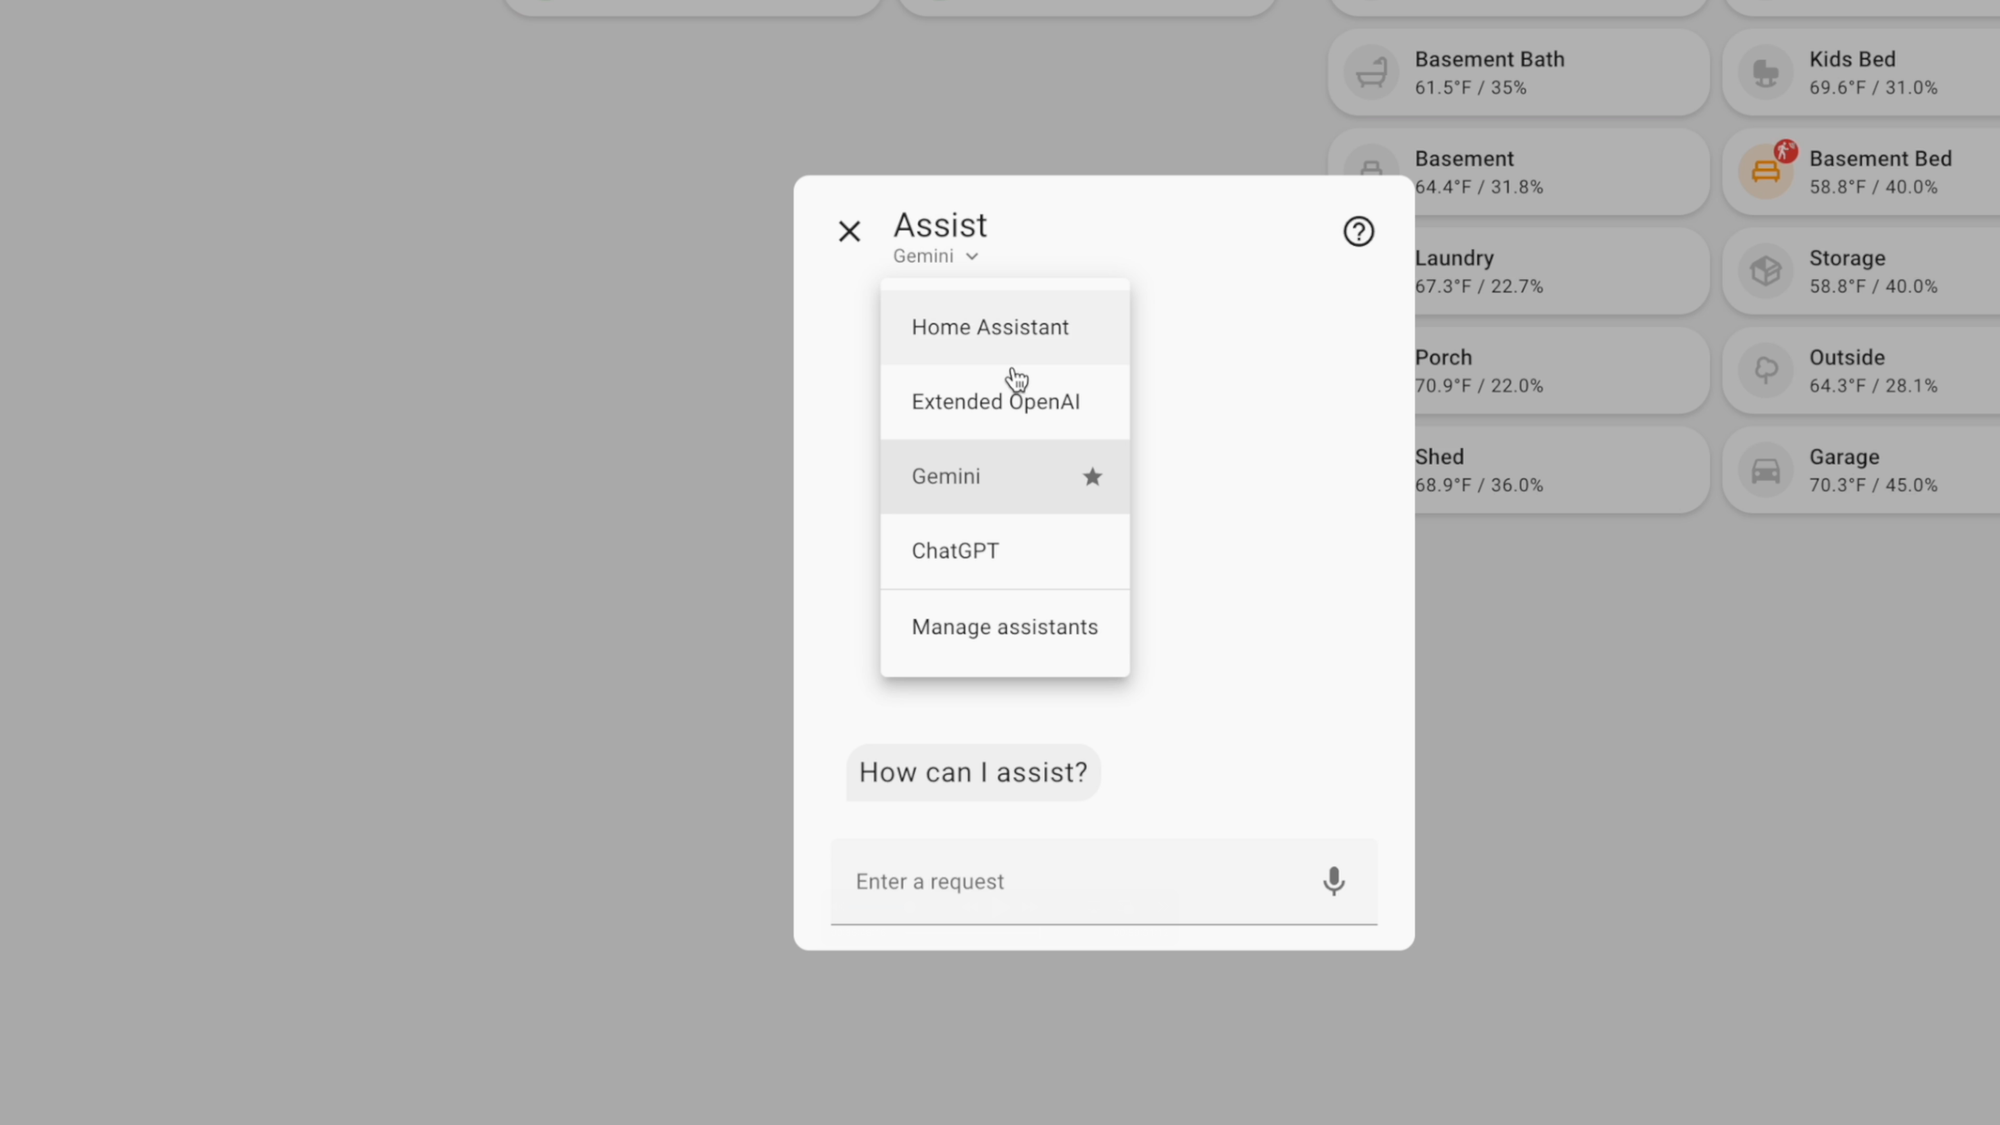
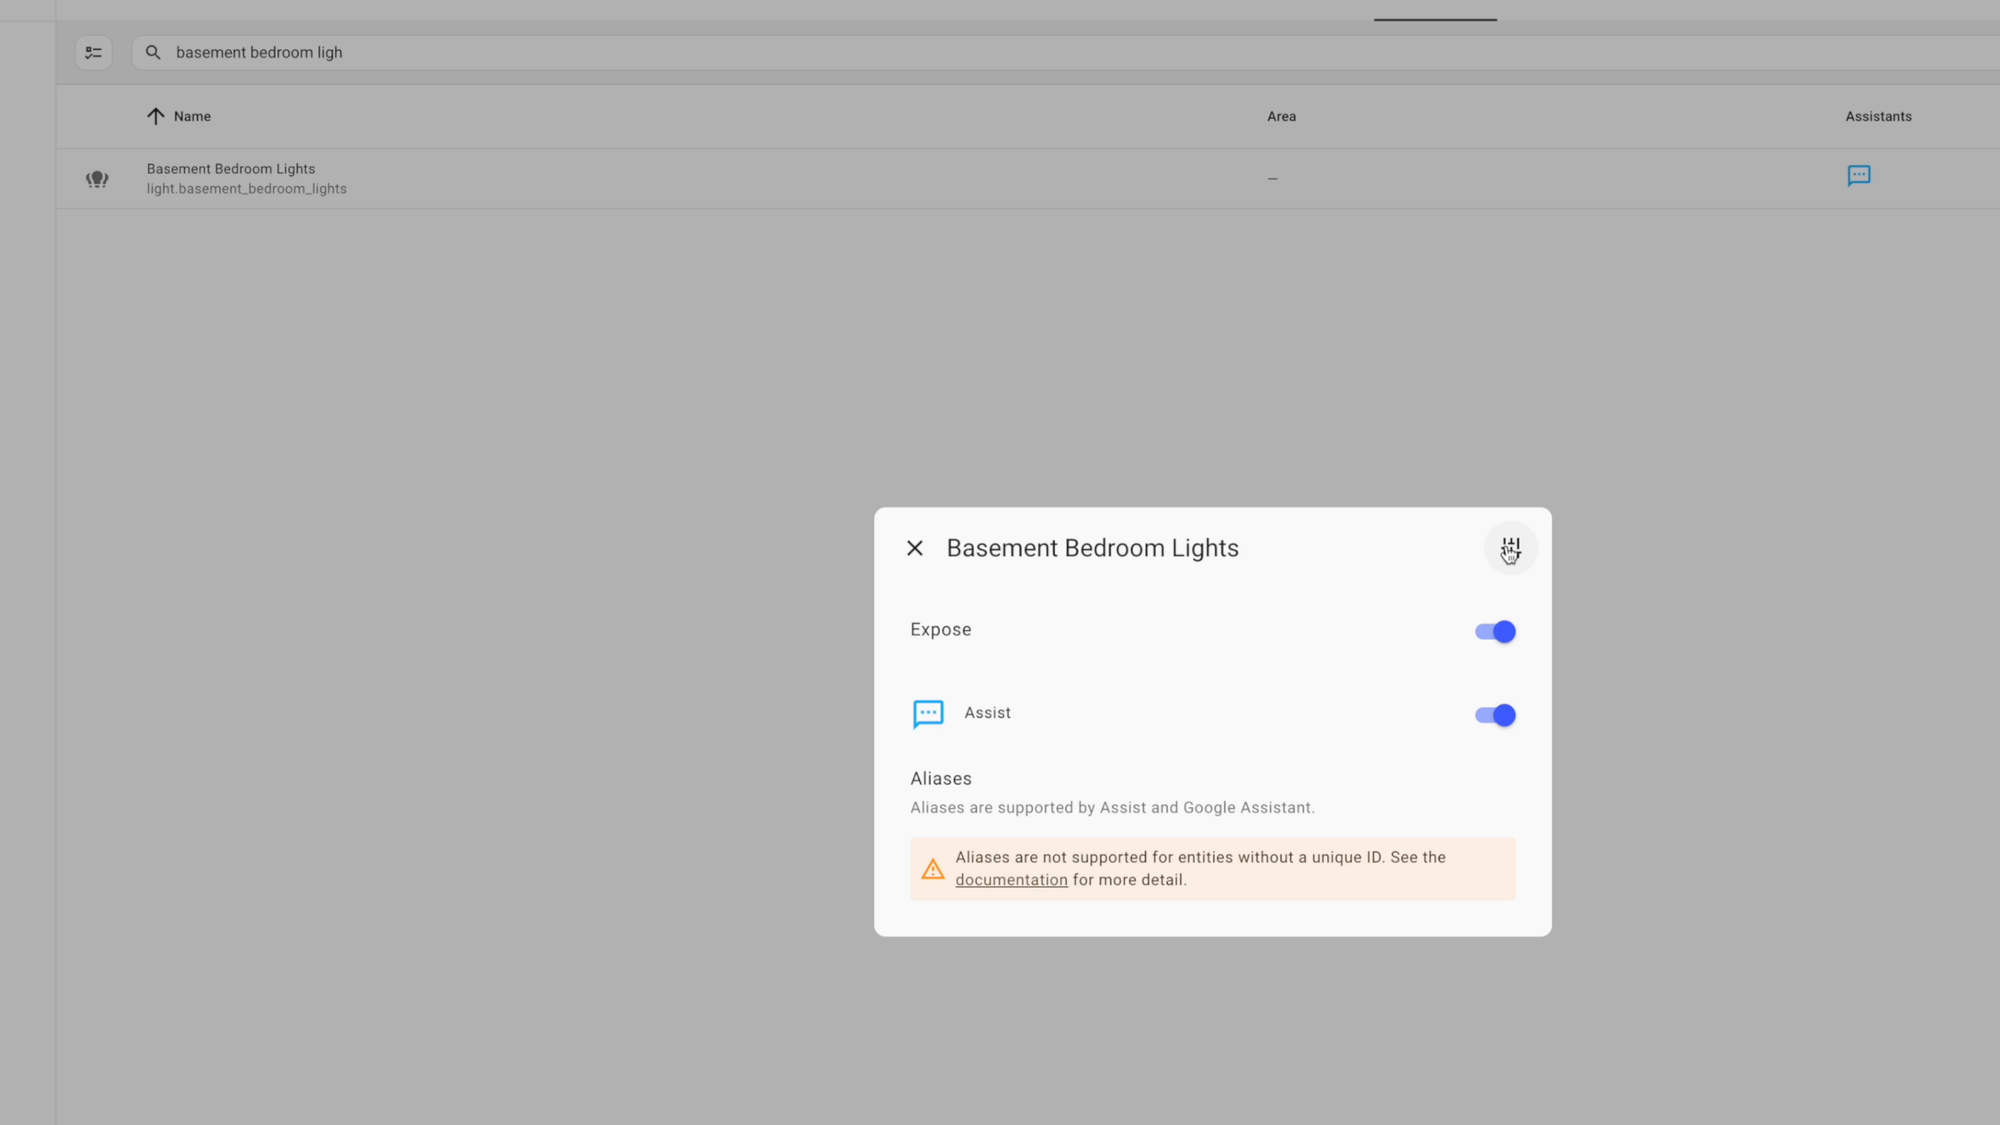
Back on the settings page, you can manage voice assistants. These allow you to control Home Assistant using natural language, either through voice or text-based conversations. You can access the voice assistant at any time by clicking the chat icon from your dashboard. From there, you can select which voice assistant, sometimes called a conversation agent, that you want to interact with.
If you subscribe to Home Assistant Cloud, you can easily integrate voice assistants from Amazon and Google. Anyone can also use Home Assistant’s own voice assistant, known as Assist. Or, you could add a large language model, or LLM, such as ChatGPT or Gemini, right to Home Assistant. Once again, Home Assistant gives you tons of options. You can learn about how to use LLMs to analyze images and videos in Home Assistant, and letting AI take over my smart home. For now, I’ll cover the basic concepts that you should know.
The first thing to understand is that you must expose the entities you want a voice assistant to be able to access. This page will list the number of entities exposed. You can click this, or the “expose” tab at the top, to see everything currently exposed. Exposing an entity means a voice assistant can control it and give you information about it. You can expose more entities by clicking the plus icon.
The second thing is to make sure your devices are assigned to areas, areas are assigned to floors, and that your devices and entities have natural language names or aliases reflecting how you would refer to them. This way, when you say something like, “Turn off the basement bedroom lights,” it knows which devices to control, instead of the request failing because the device is called, “slwf_03” and is not assigned to an area.
The third thing to understand is that you’ll need go add speech-to-text, and text-to-speech pipelines. These turn voice commands into text, and conversation text into audio, respectively. From the add-on store, you can add Whisper for speech-to-text, and Piper for text-to-speech. Once you do this, they will be auto-discovered on the integrations page for you to add. Then, you can select these as your speech-to-text and text-to-speech engines when adding a voice assistant.
The fourth thing to know is that you can tell Home Assistant to prioritize Assist for local control, but then tell it to fallback to another conversation agent that relies on the cloud, like an LLM, only when local Assist is unable to fulfill your request. This is a powerful feature since it allows you to get the best of both worlds: private, local voice control, while seamlessly falling back to the cloud only when more information is needed.
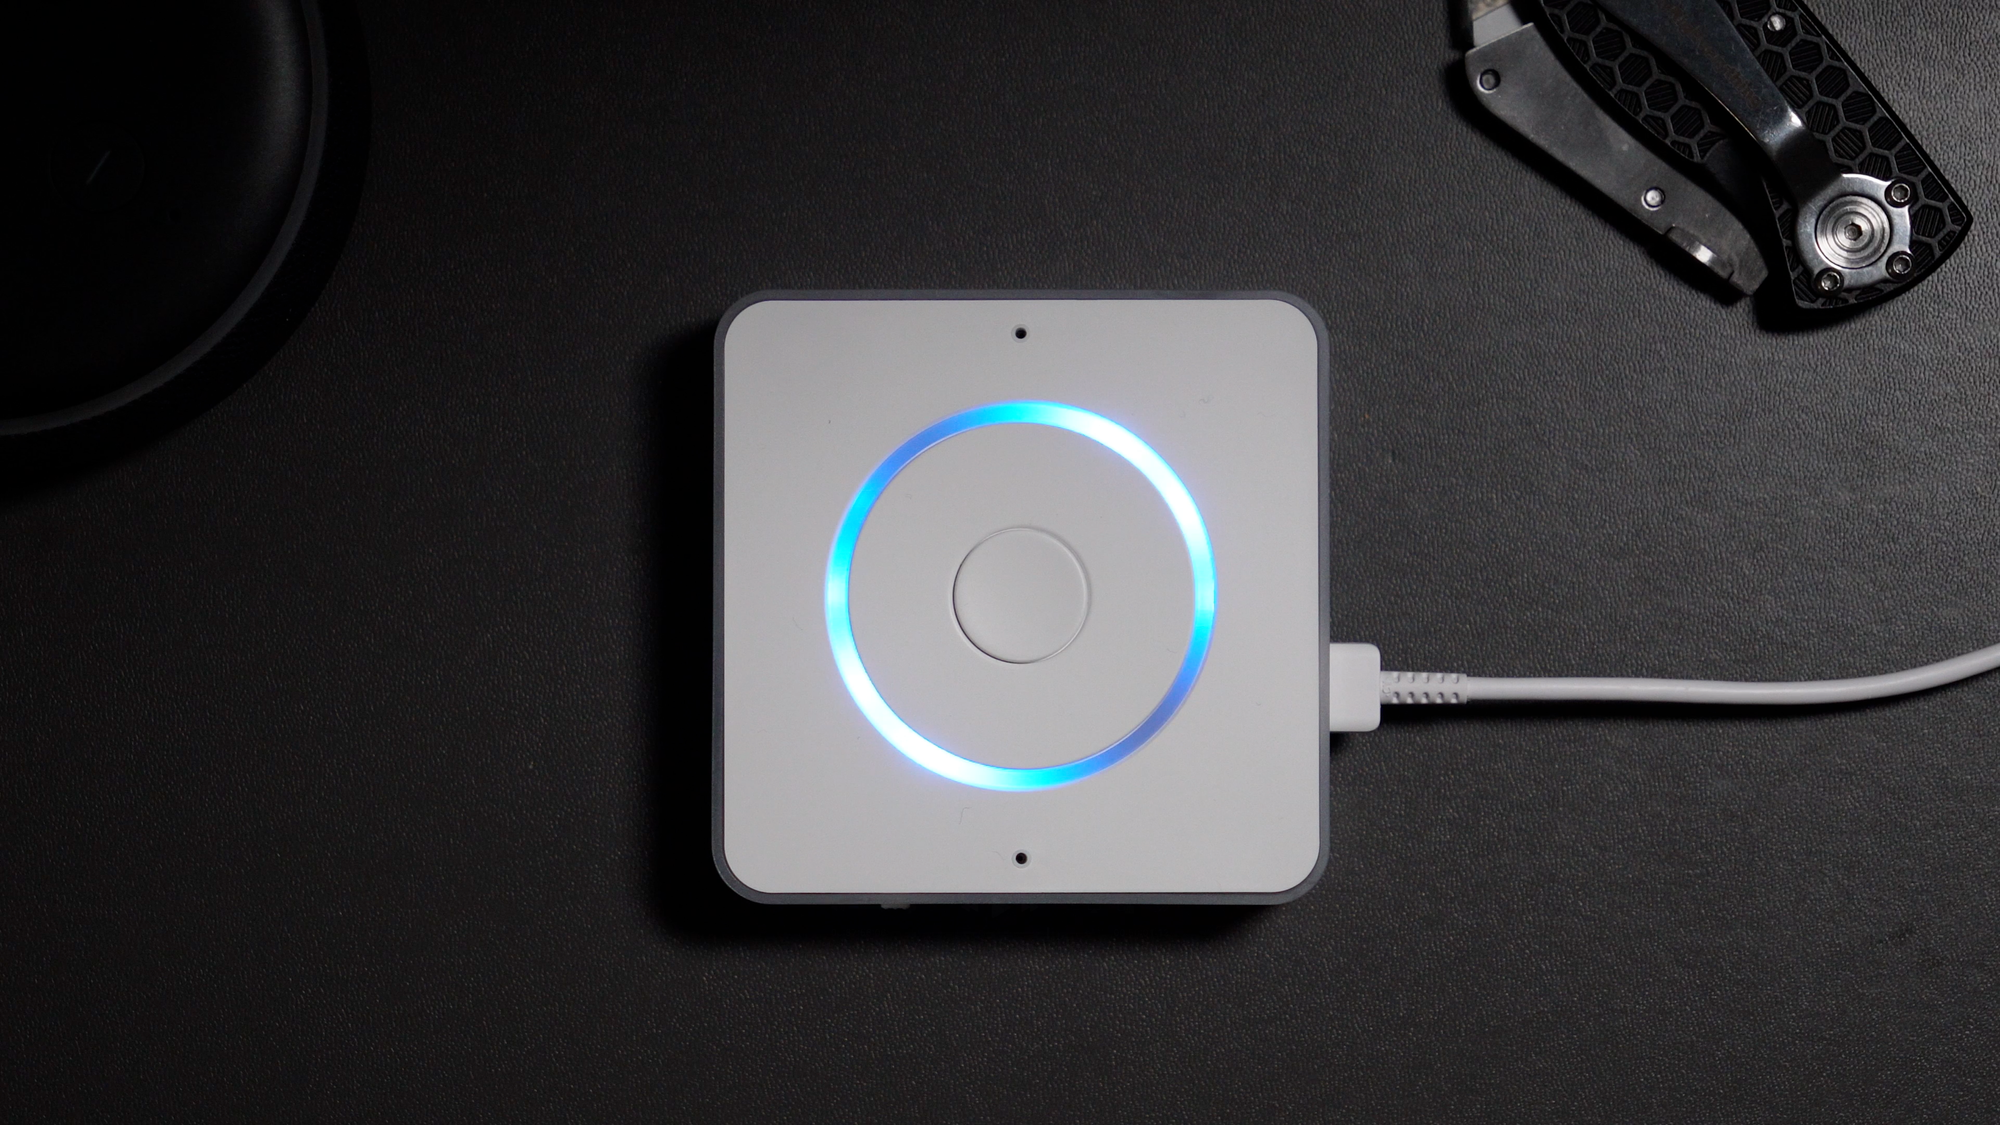
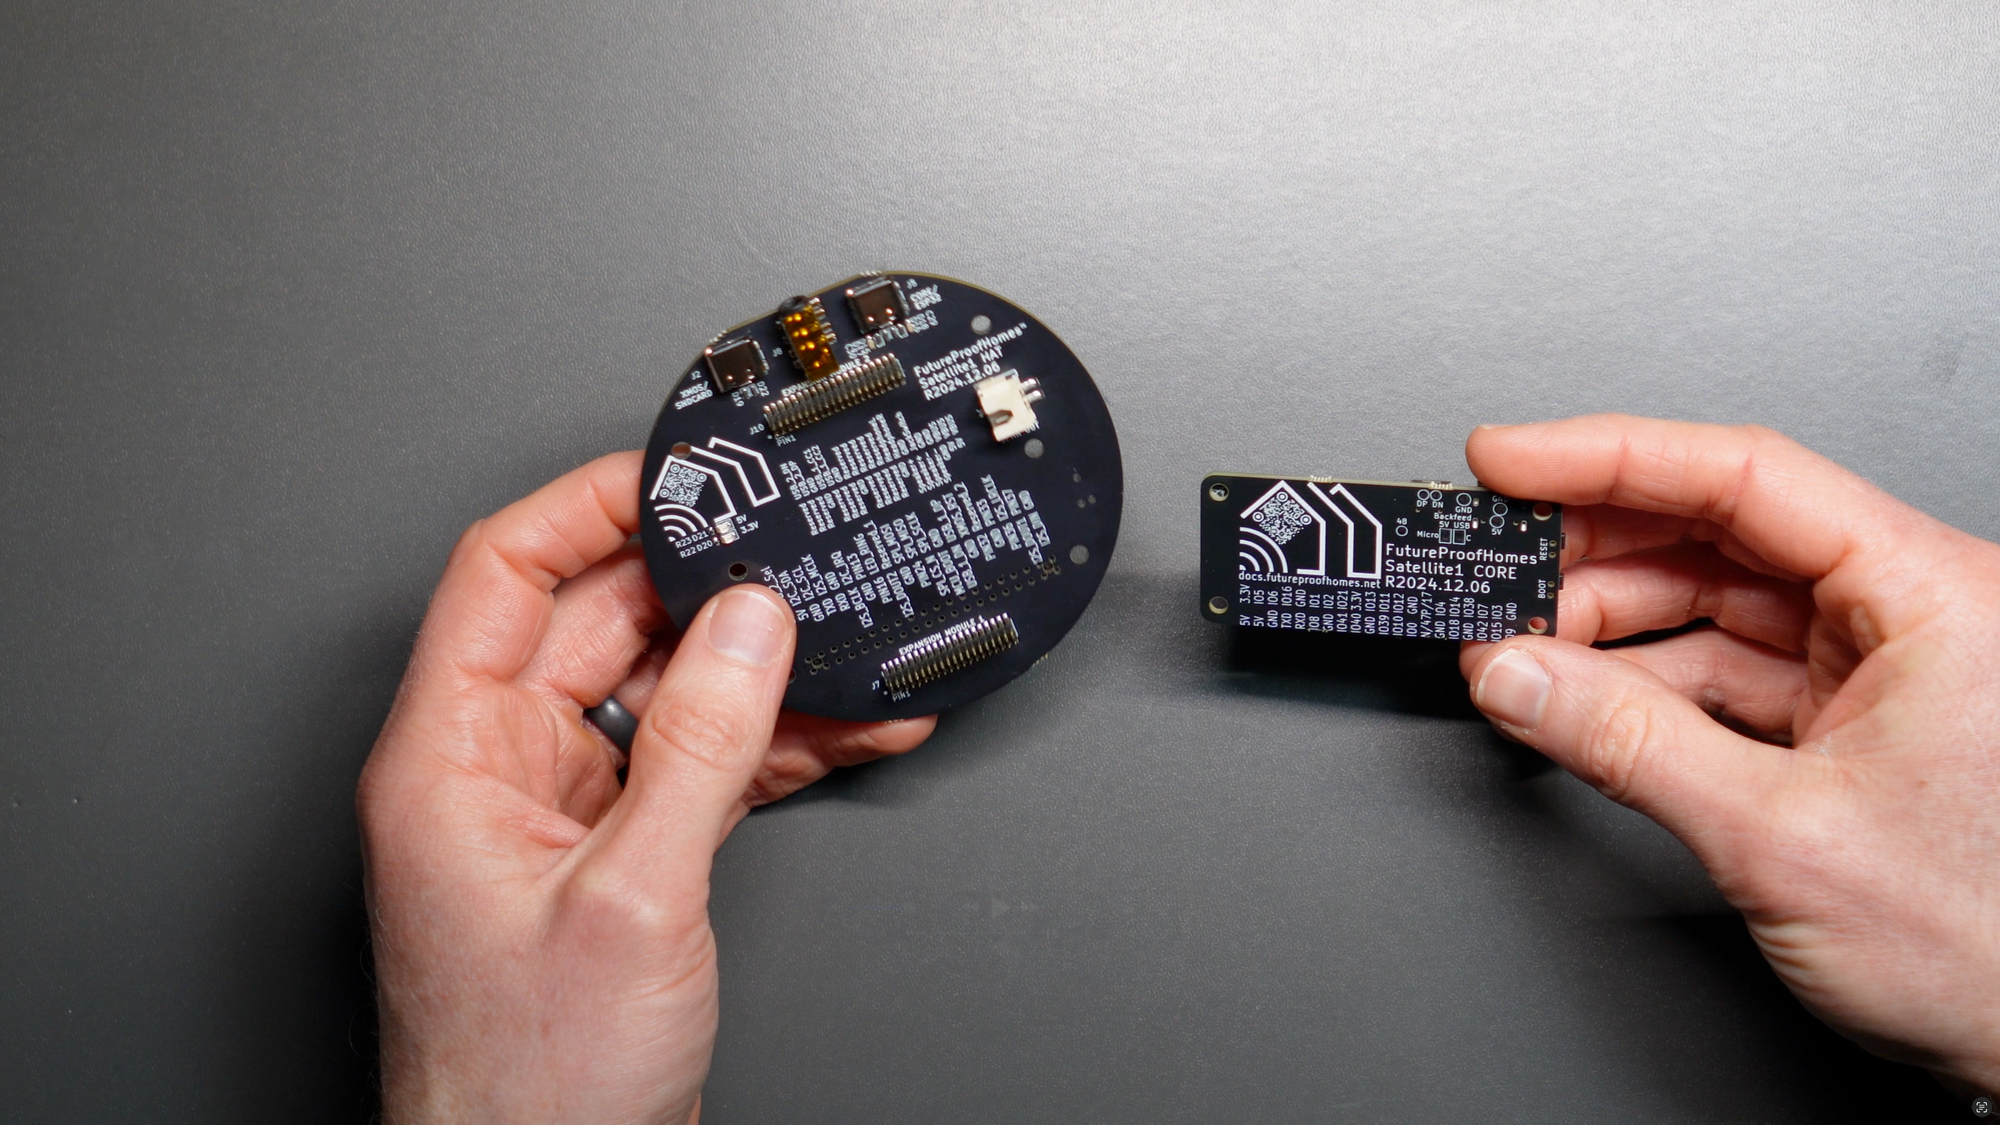
Home Assistant offers its own hardware that you can place in your home, similar to an Amazon Echo, Apple HomePod, or Google Nest. You can speak with it using a wake word just like any of those other smart speakers. And others are developing similar hardware for Home Assistant that also enables this.


Home Assistant: Voice Assistants
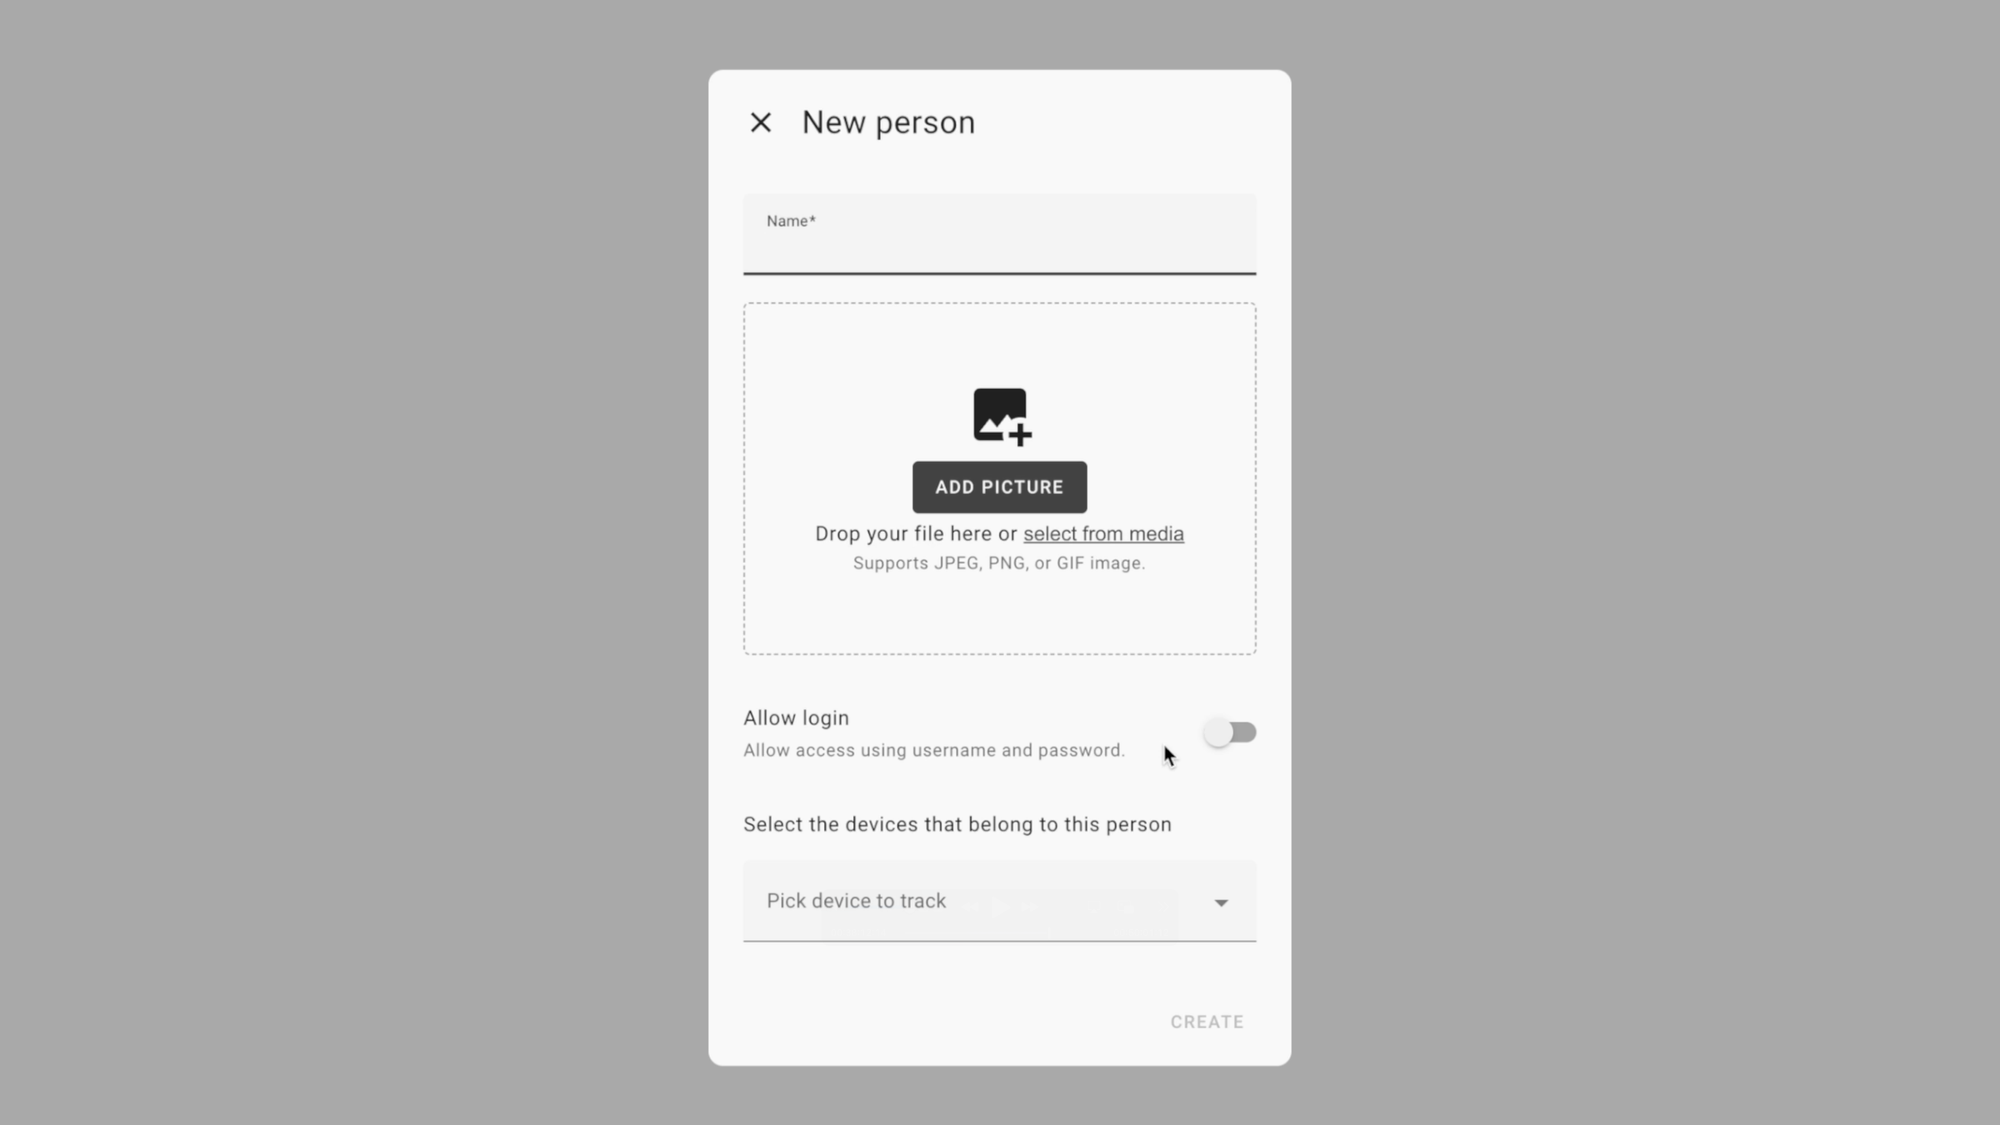
People
If you have other people that you’d like to be users of your Home Assistant, you can add them in the people section by clicking the plus icon. You can them give them a name, add an image, and determine if they are allowed to log-in. If they cannot log-in, then they do not get a user account and cannot have their own dashboard, but then can be used for device tracking, show up on a map, and be used in automations.
If the other person installs the Home Assistant companion app on their phone, they must grant location access for zone presence detection. This will create a device_tracker entity for that person’s device. You can then use this entity in automations and conditions, similar to what I covered earlier when discussing zones.
My wife and I are both added as users in our Home Assistant, and we each of the Home Assistant companion app installed on our phones with location access enabled. This makes it easy to create automations like sending us an actionable notification when we’re away from home and forgot to arm the alarm system, or sending us an actionable notification when we return home asking if we’d like to disarm the alarm.

Home Assistant: People and Device Tracking
File Editor
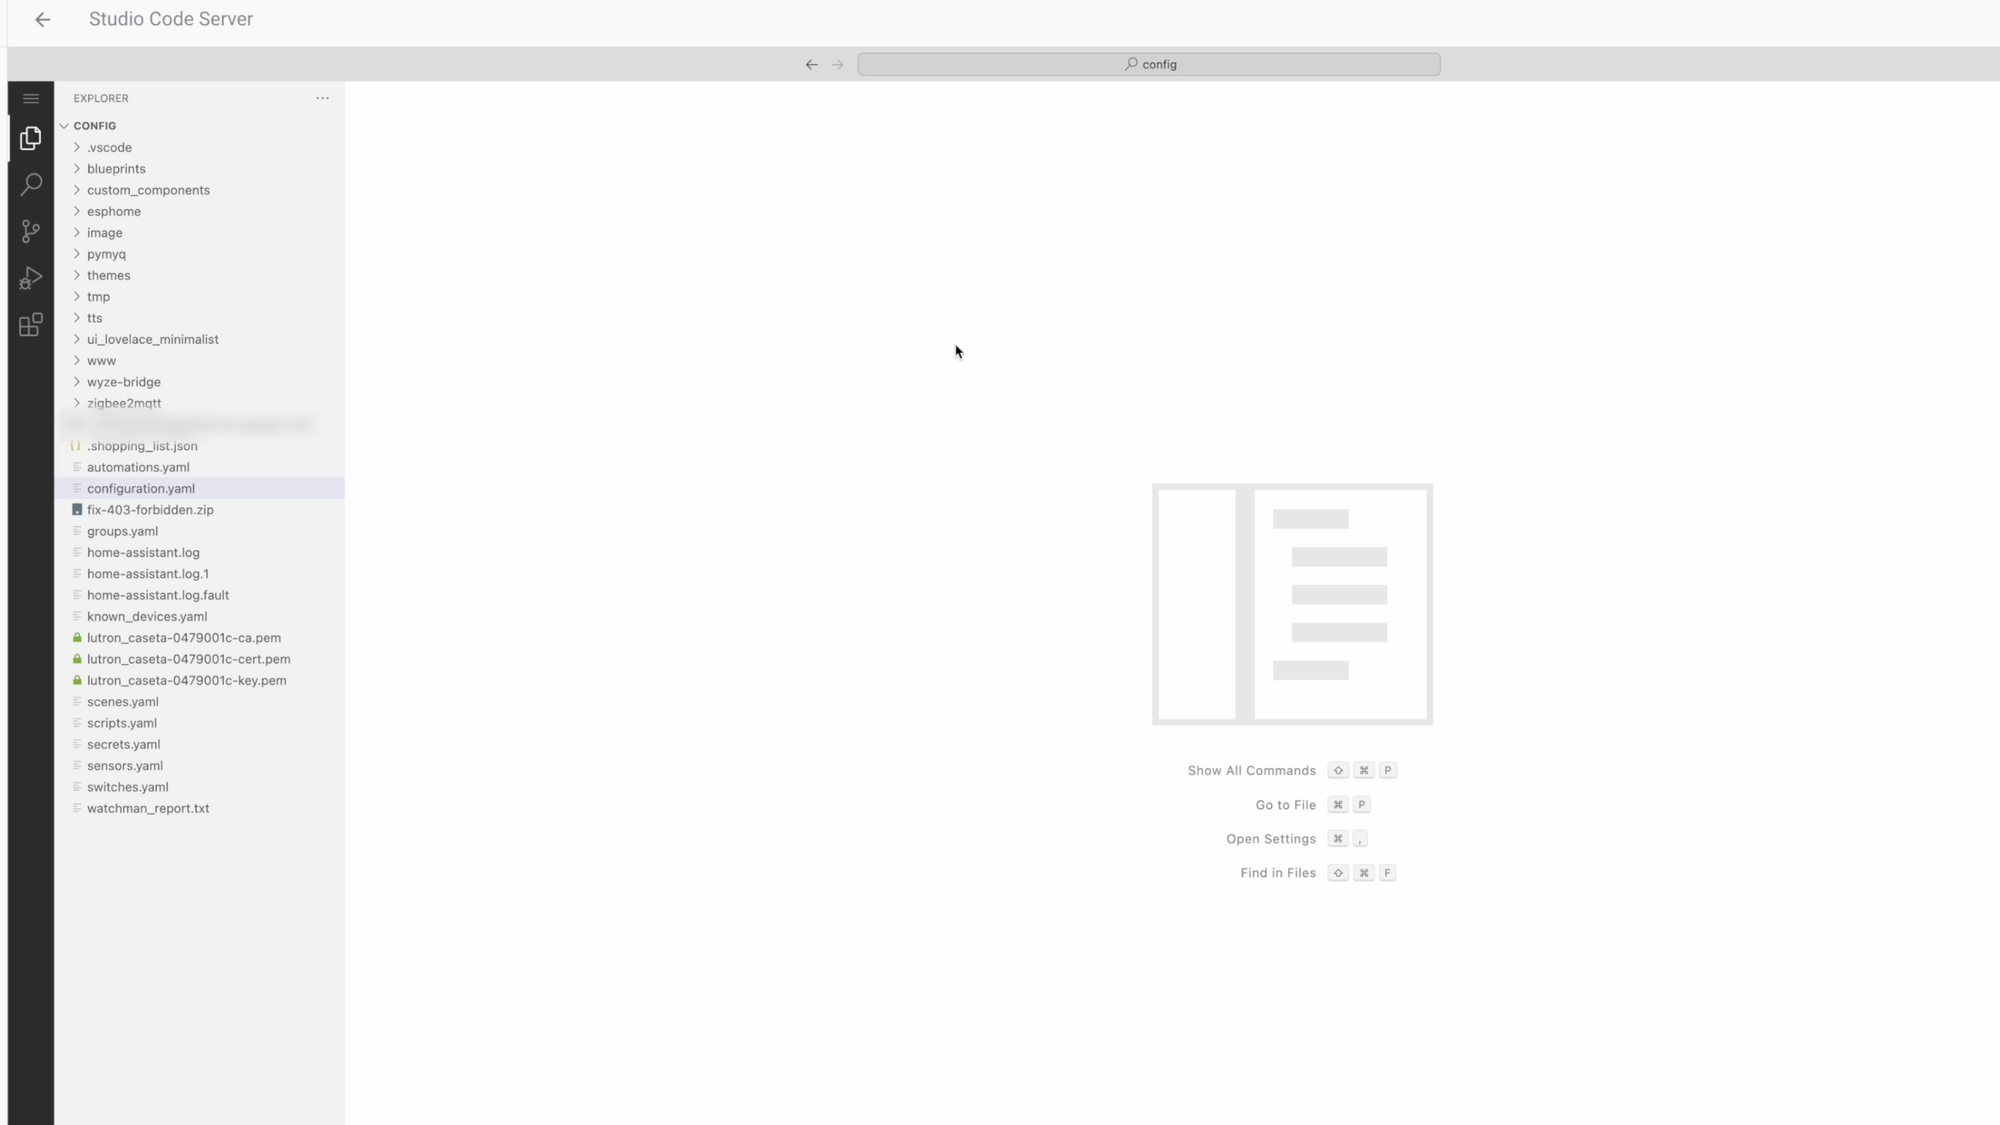
While you can configure most things in Home Assistant from the user interface, at some point you may need to access and edit your configuration.yaml file. Some integrations require it. To do this, you’ll need a file editor, which can be installed as an add-on, like I covered earlier. The basic option is an add-on called File Editor, but I recommend using the Studio Code Server add-on. This is because it offers live syntax checking and auto-fill of Home Assistant entities, which help you avoid errors and make changes faster.
By default, the configuration.yaml file is located in the /config folder of your installation. You can access it be opening your file editor add-on. I recommend enabling the option to show the add-on in the sidebar, that way you can easily and quickly access it later.
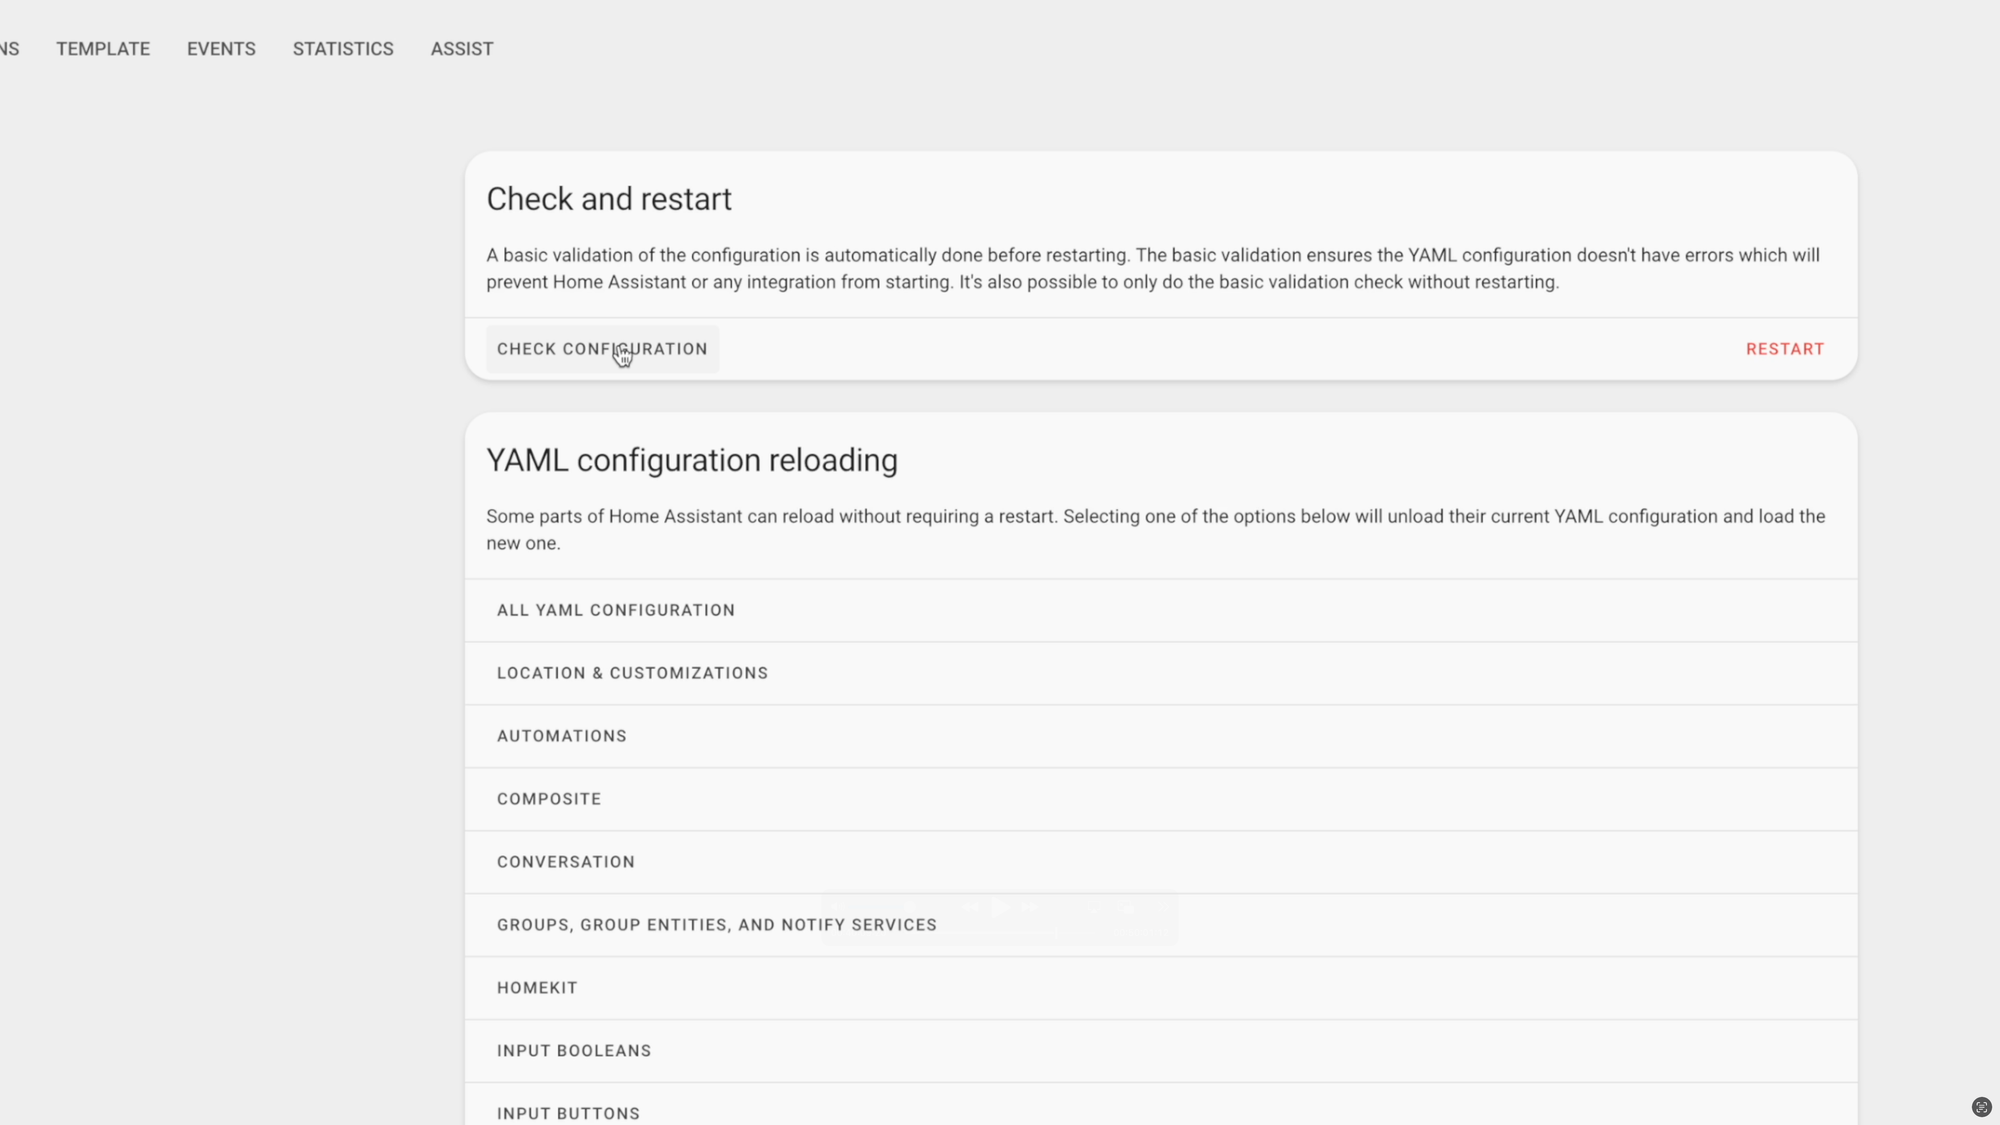
After making any changes to your config file, you should check to make sure the configuration is valid. To do this, go to Developer Tools > click “check configuration.”
Home Assistant: File Editor
Developer Tools
Despite the name, Developer Tools is not just for software developers. It’s a place for anyone to quickly test things out, or get information. I’ll cover three sections in Developer Tools that you are likely to use most often.
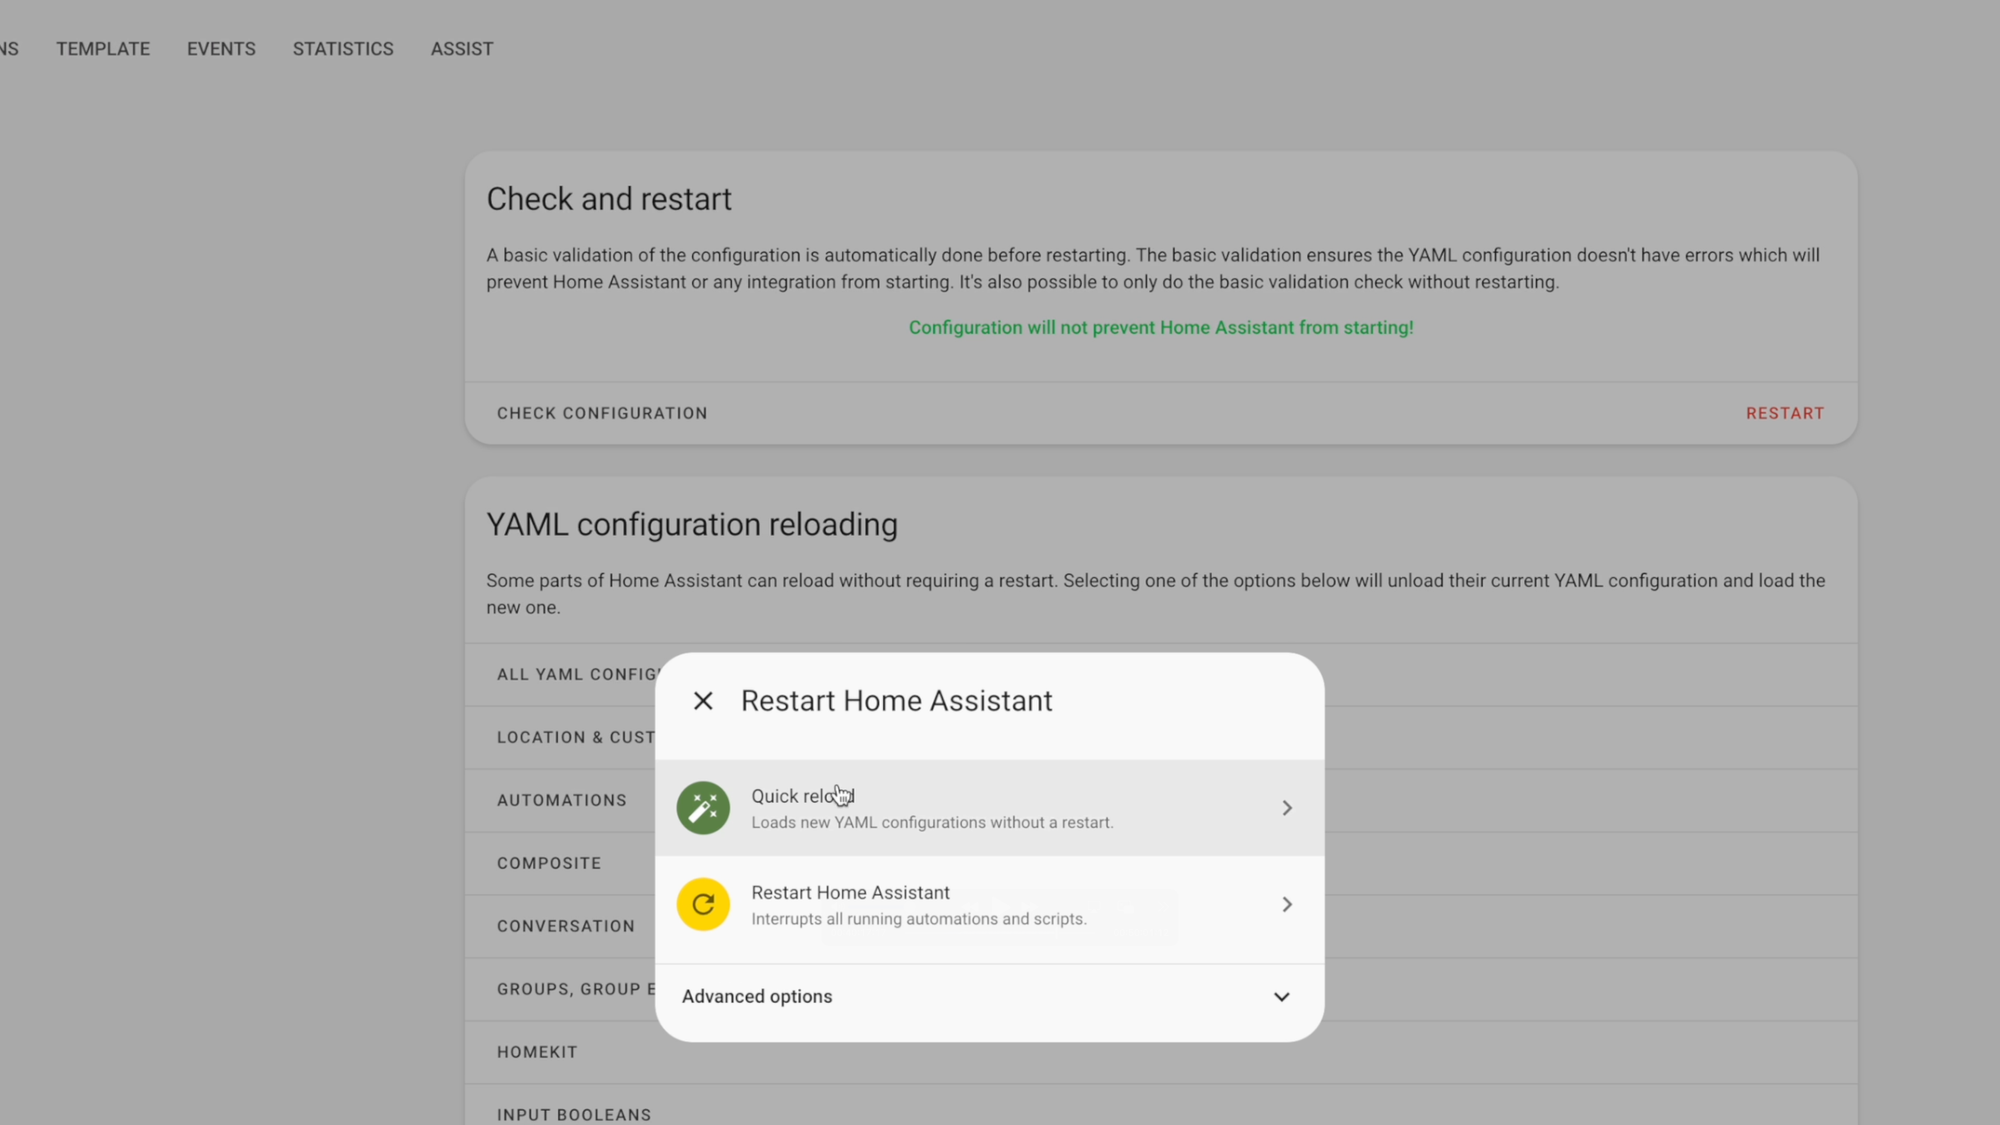
YAML: The YAML tab allows you to check your configuration, as I just showed. It also allows you to reload the configuration in order to apply changes. You can reload one specific configuration at a time, or you can click Restart > Quick Reload to reload all of the configurations at once. From the same place, you can choose to fully restart Home Assistant, which will stop all running automations and scripts. A full restart is necessary after updating the Home Assistant Operating System, and after updating custom components that you installed from HACS.
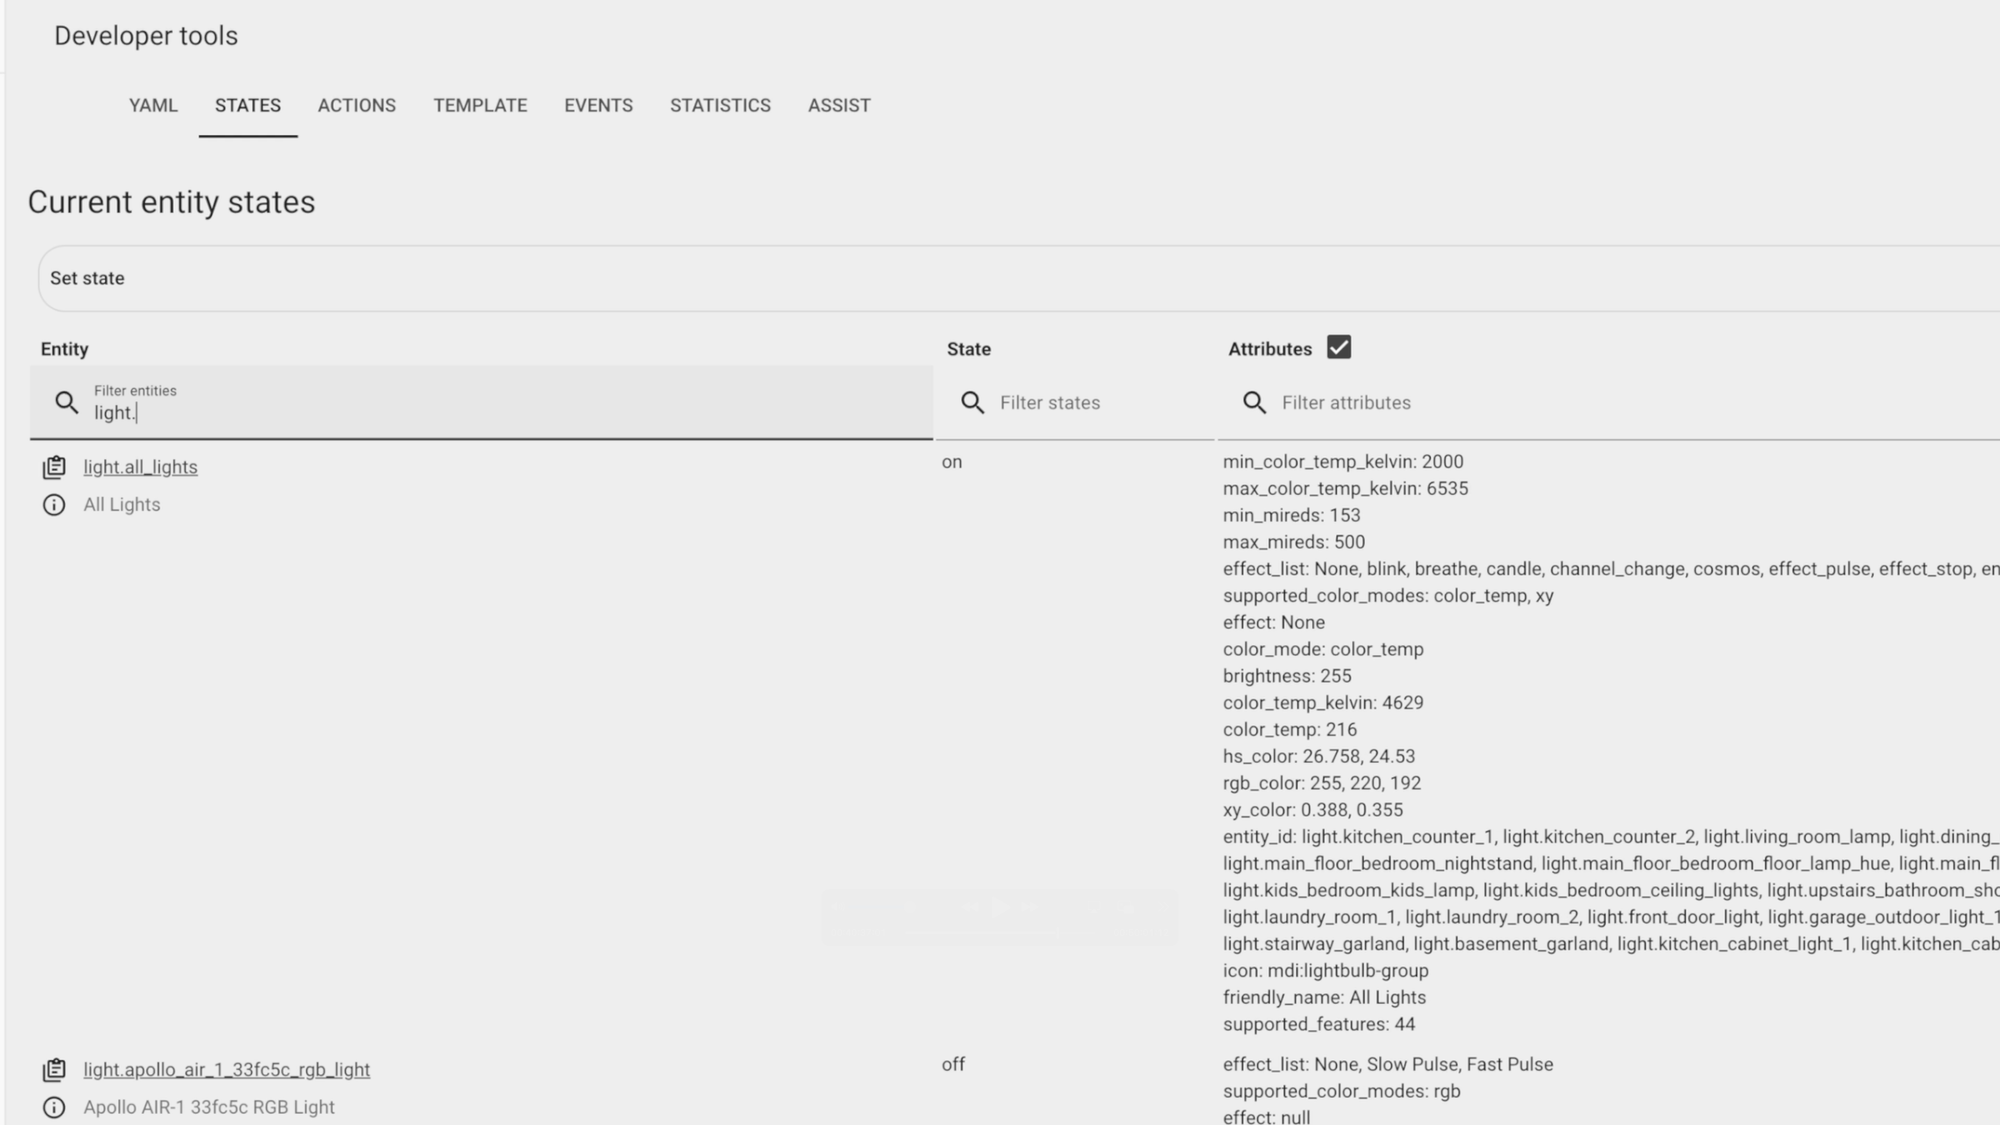
States: The states tab shows all of your entities and their corresponding states and attribute values. In the rare event that Home Assistant reports the incorrect state, you can update it here. Updating a state though does not communicate with the device itself — it only reflects what Home Assistant sees.
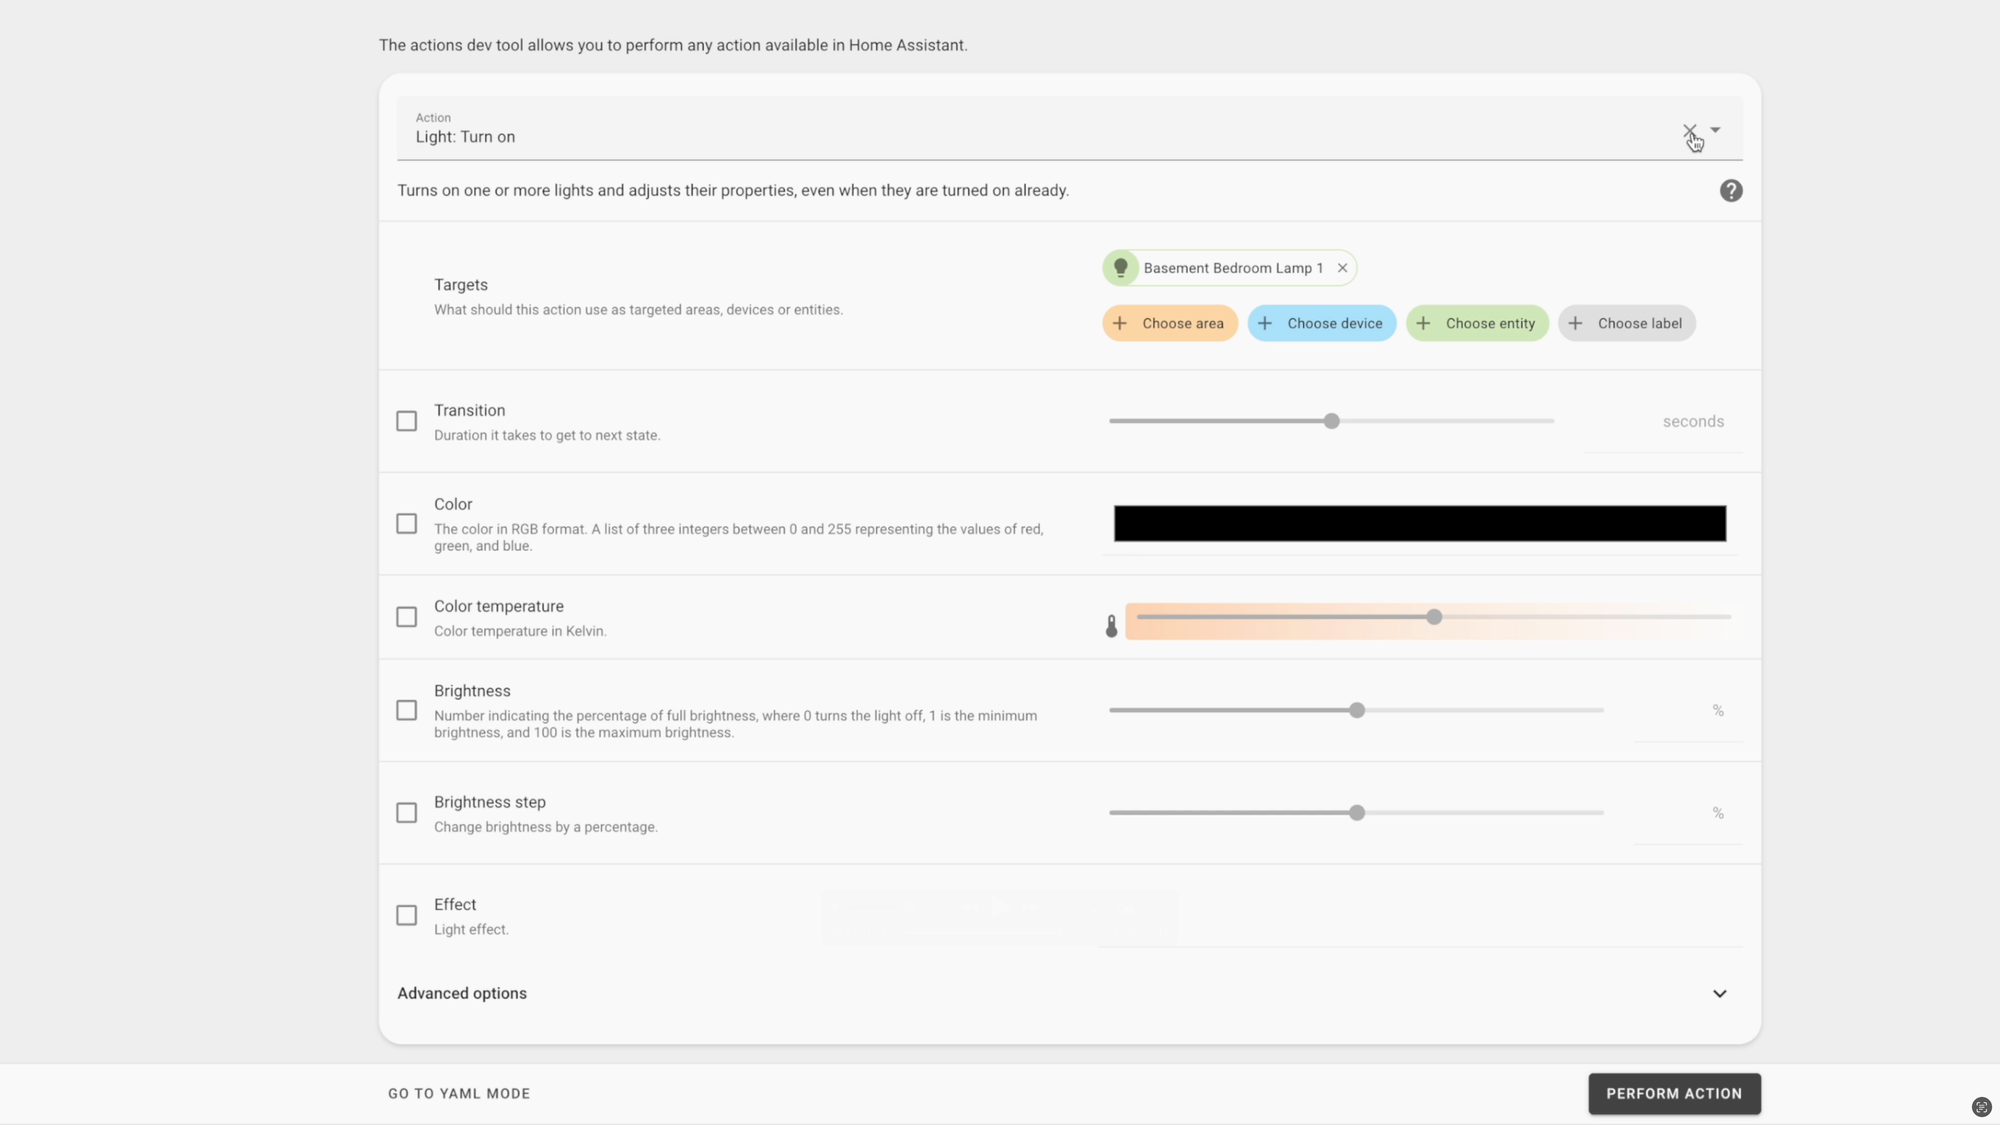
Actions: To communicate with the actual device, you’ll want to visit the actions tab. Older documentation or tutorials may refer to this as the services tab. The actions you can perform will auto-populate based on the integrations you have installed. This is a great place to test something out before you put it into an automation. Going back the lighting automation from earlier, I can test out the action right here in Developer Tools. I can choose “Light: Turn on” for the action, and then the target light entity that I want to turn on. You’ll see that even more options populate after selecting the entity, in this case, color and brightness control, among others. I can then click “perform action” to test this out and confirm it is working as intended, without needing to create an automation just to test something.
Home Assistant: Developer Tools
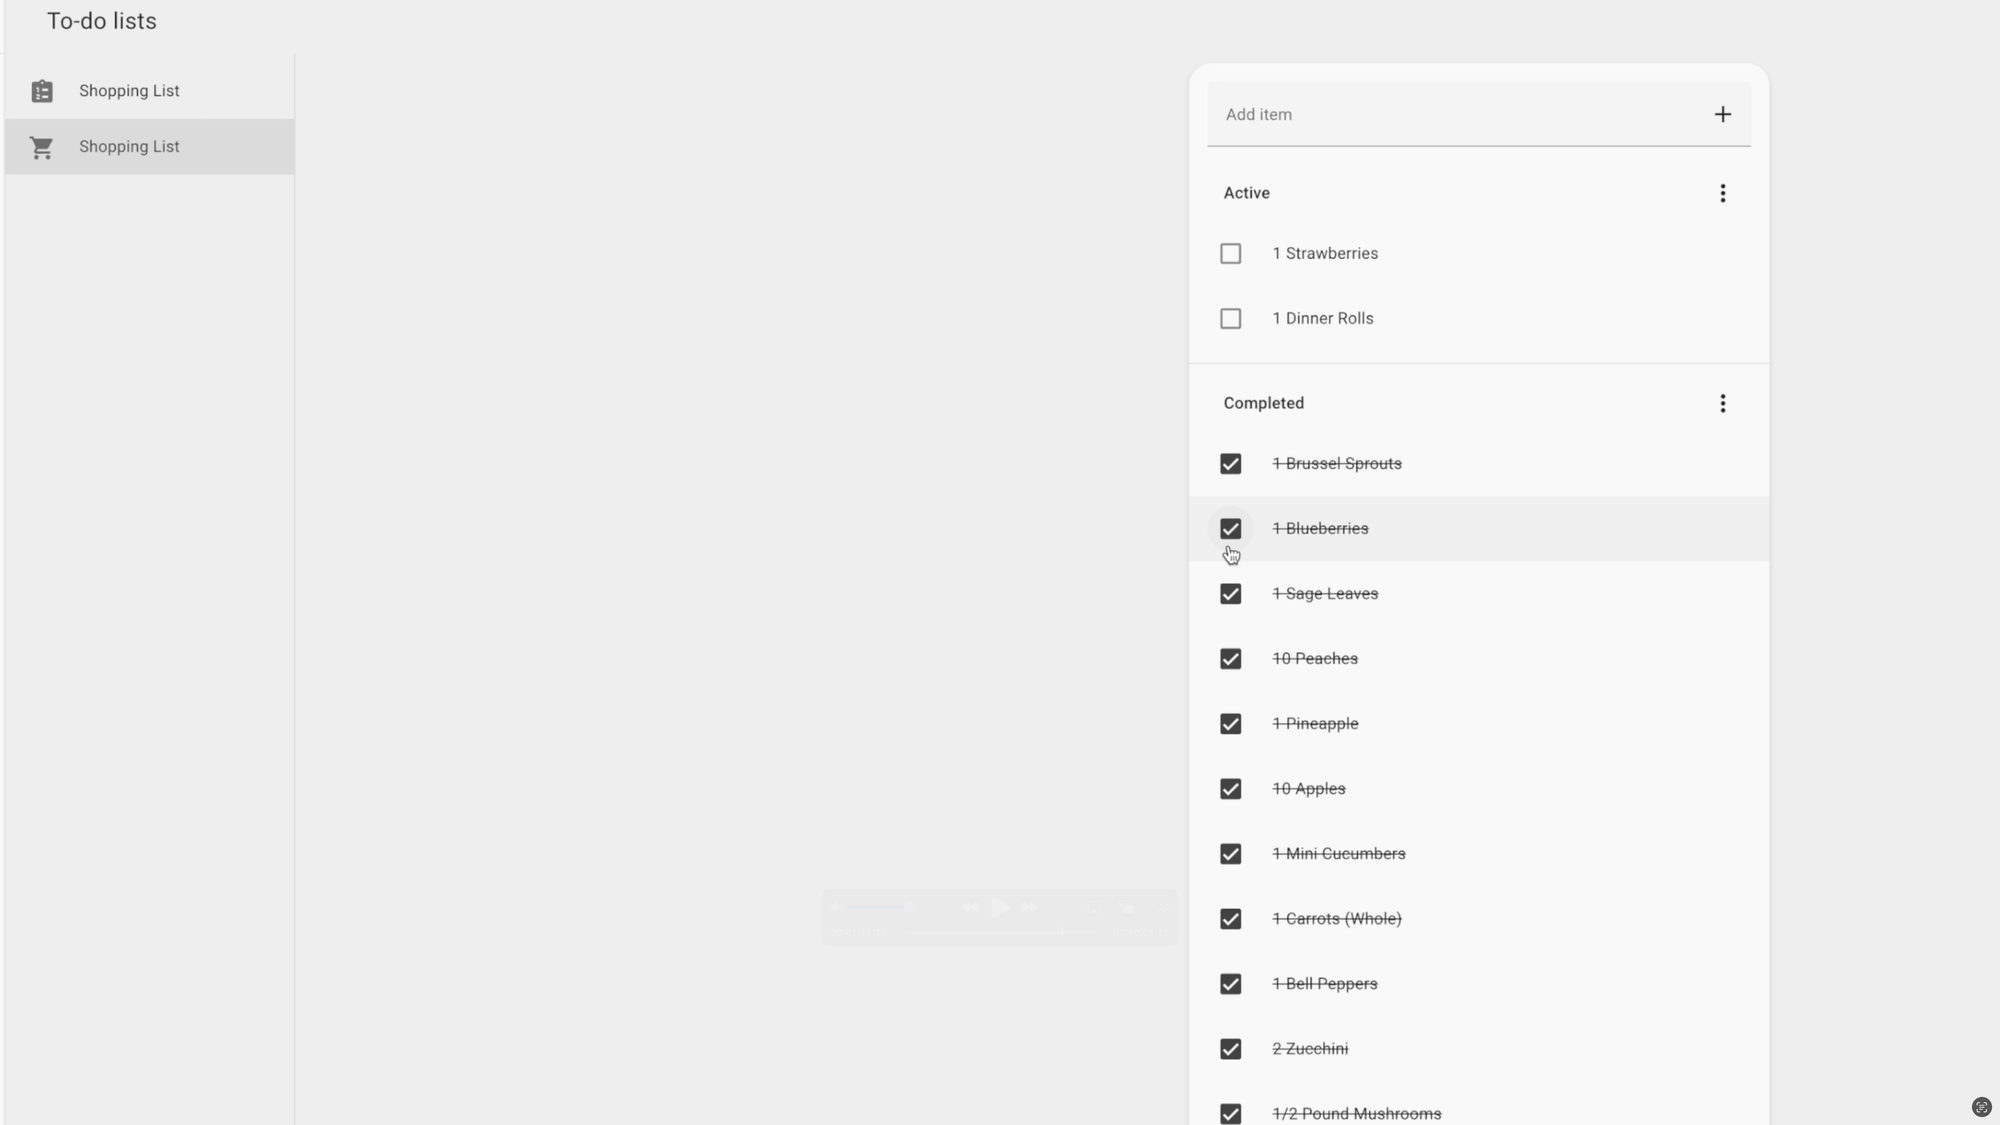
To-do Lists
Above Developer Tools in the sidebar navigation menu is the to-do list. You can add items to your list by clicking the plus icon, or by using voice commands. You can also create multiple to-do lists to track different things, like a shopping list separate from personal tasks.
My wife and I manage our shopping list in Home Assistant. We can tick off items as we walk through the grocery store. An automation sends a push notification to our phones when we enter a zone around our grocery store, allowing us to open our shopping list with just a tap from the home screen of our phones. I made a whole tutorial on different ways to add items by voice to your shopping list in Home Assistant.
Home Assistant: To-Do Lists
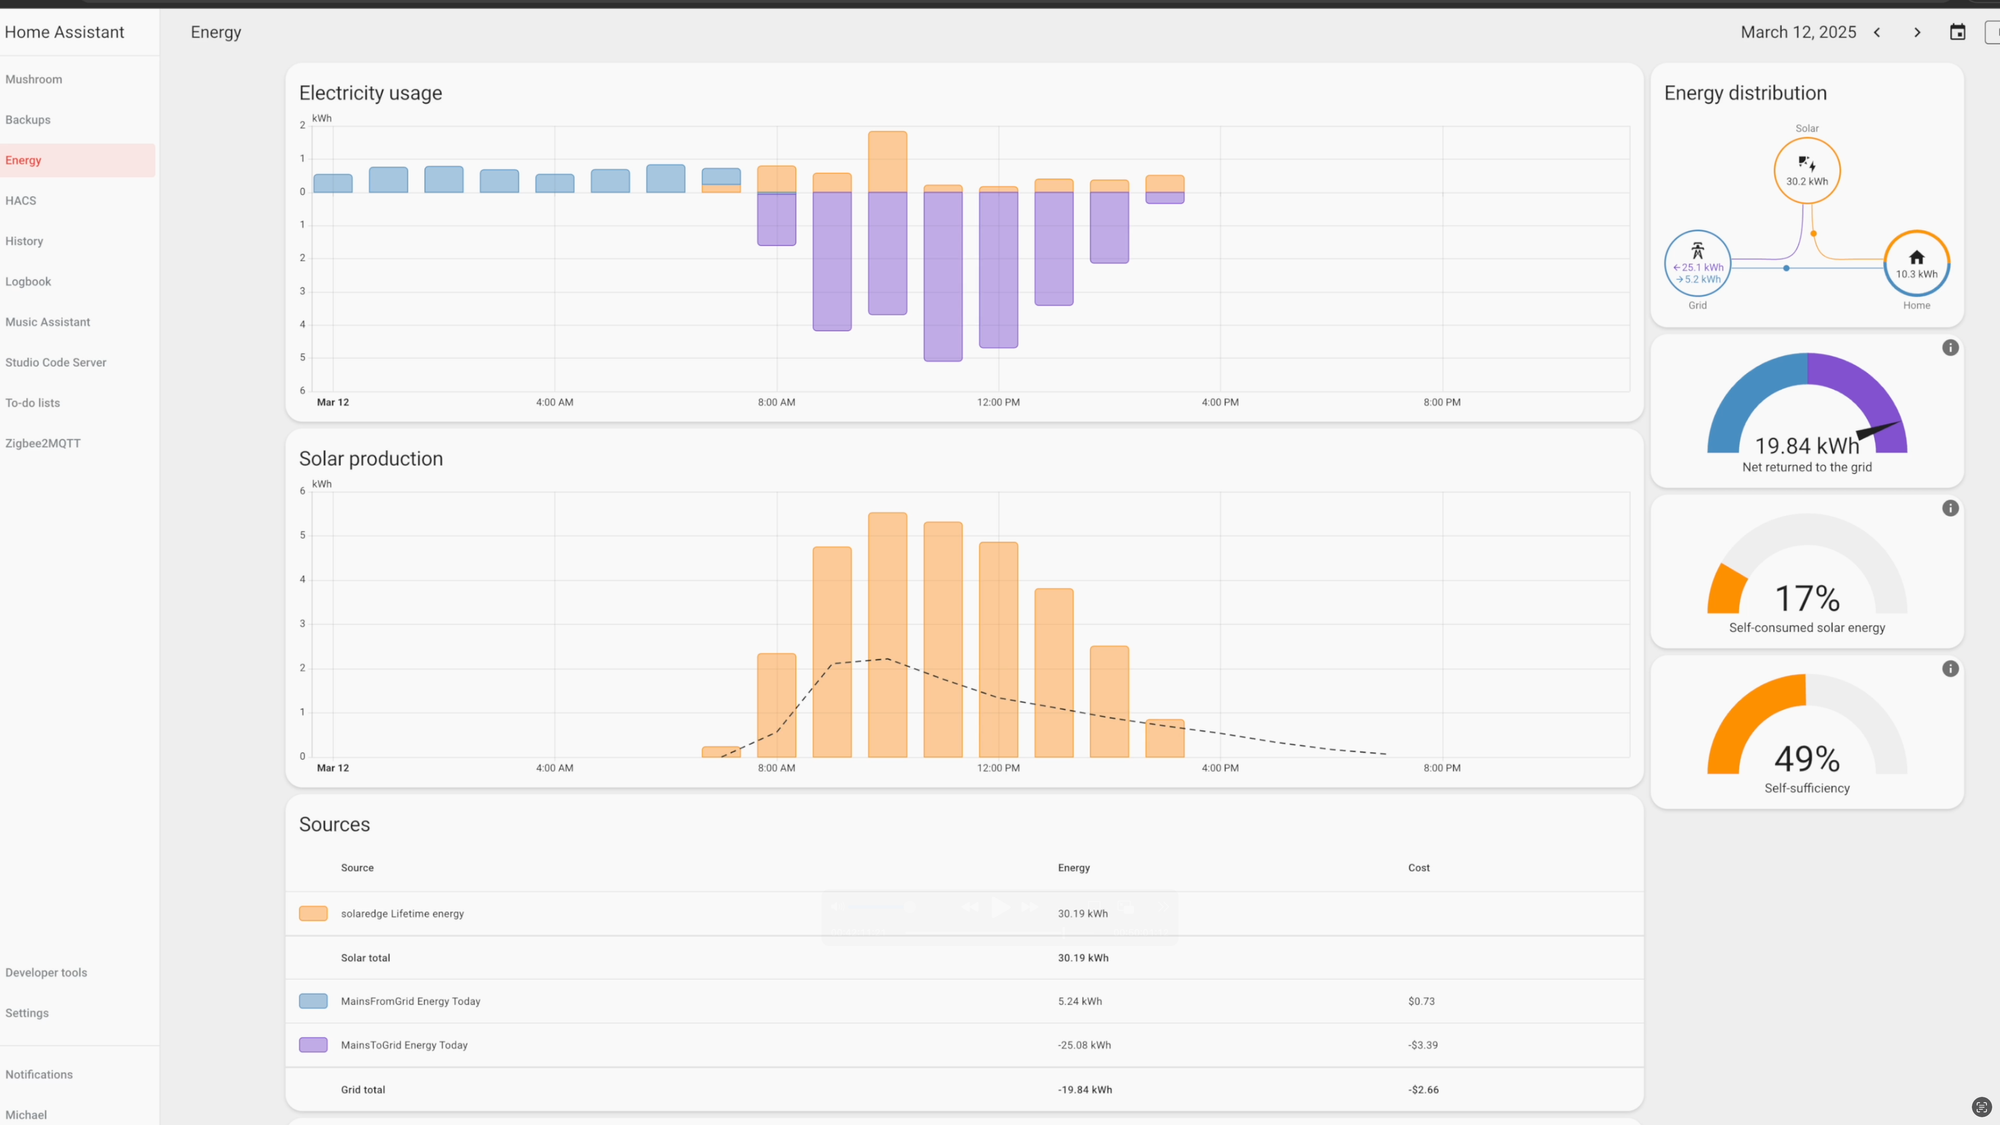
Energy Monitoring
Home Assistant can monitor all of your home’s energy, including electricity grid usage, solar panel production, battery storage, gas consumption, water consumption, and individual device usage. To do this, you’ll need energy monitoring hardware that integrates with Home Assistant. I’ll walkthrough a few examples to give you an idea.
To monitor electricity consumption from the electrical grid, I installed an Emporia Vue energy monitor onto our home’s electrical panel, or circuit breaker. This allows me to see not only the energy coming in from the grid, but the energy used by individual appliances, like a refrigerator or dryer. For appliances that do not directly tie back to a single circuit breaker on my electrical panel, I use a smart plug with energy monitoring to understand their energy consumption.
We also have solar panels on the roof of our home. Because the inverter integrates with Home Assistant, I’m also able to see the amount of solar energy our home produces each day. Combining the energy we consume from the grid and energy we produce from the sun, I’m able to get a complete picture of our home’s electrical energy usage. All of this is visualized in helpful graphs and charts. If you’re a nerd for data like me, you’ll love this.
There are alternative ways to monitor energy from the electrical grid, plus water and gas consumption, depending on where you live and the type of utility meters you are using.
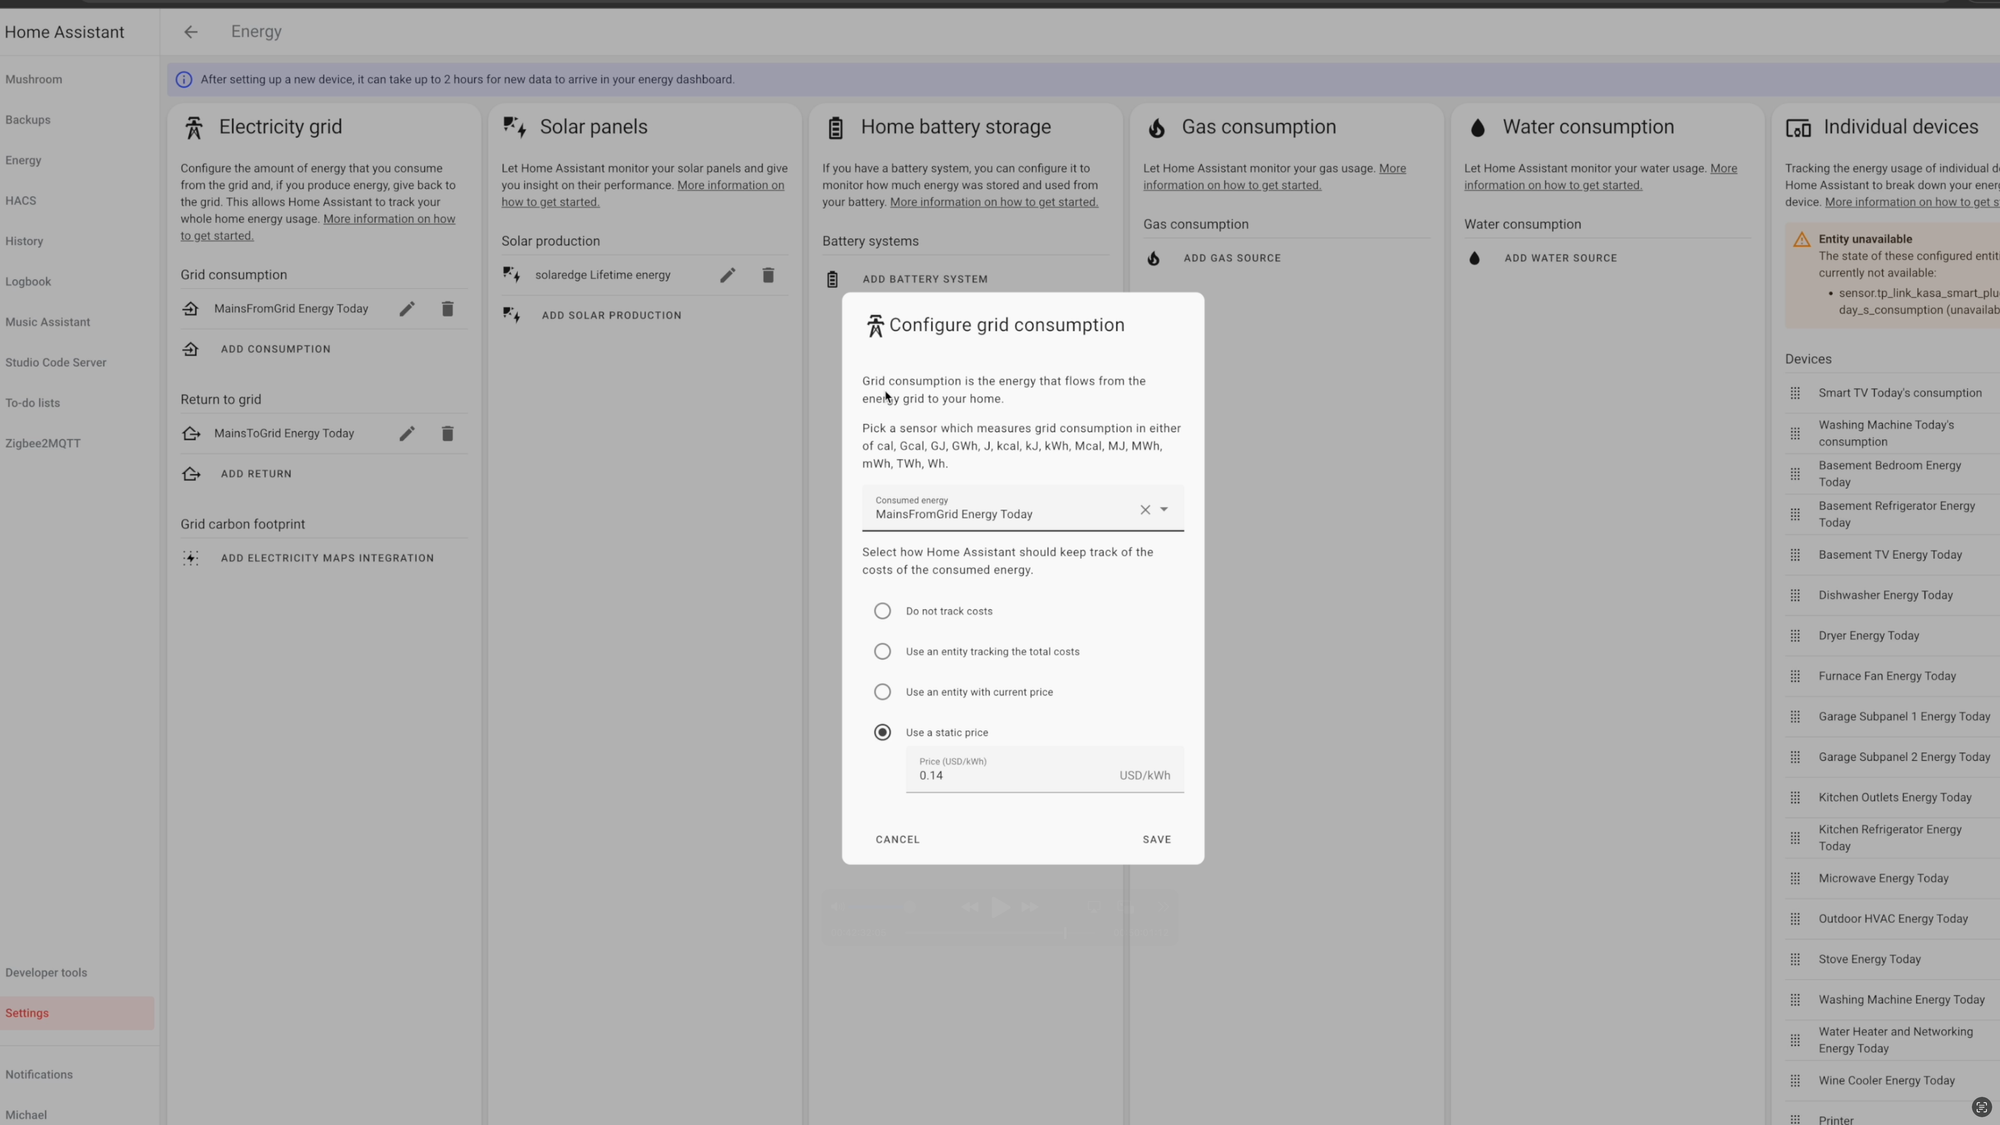
Home Assistant: Energy Monitoring
History and Logbook
If you want data on what’s happening with any of the entities in your Home Assistant, you can use the History and Logbook, both of which appear in the sidebar navigation by default.
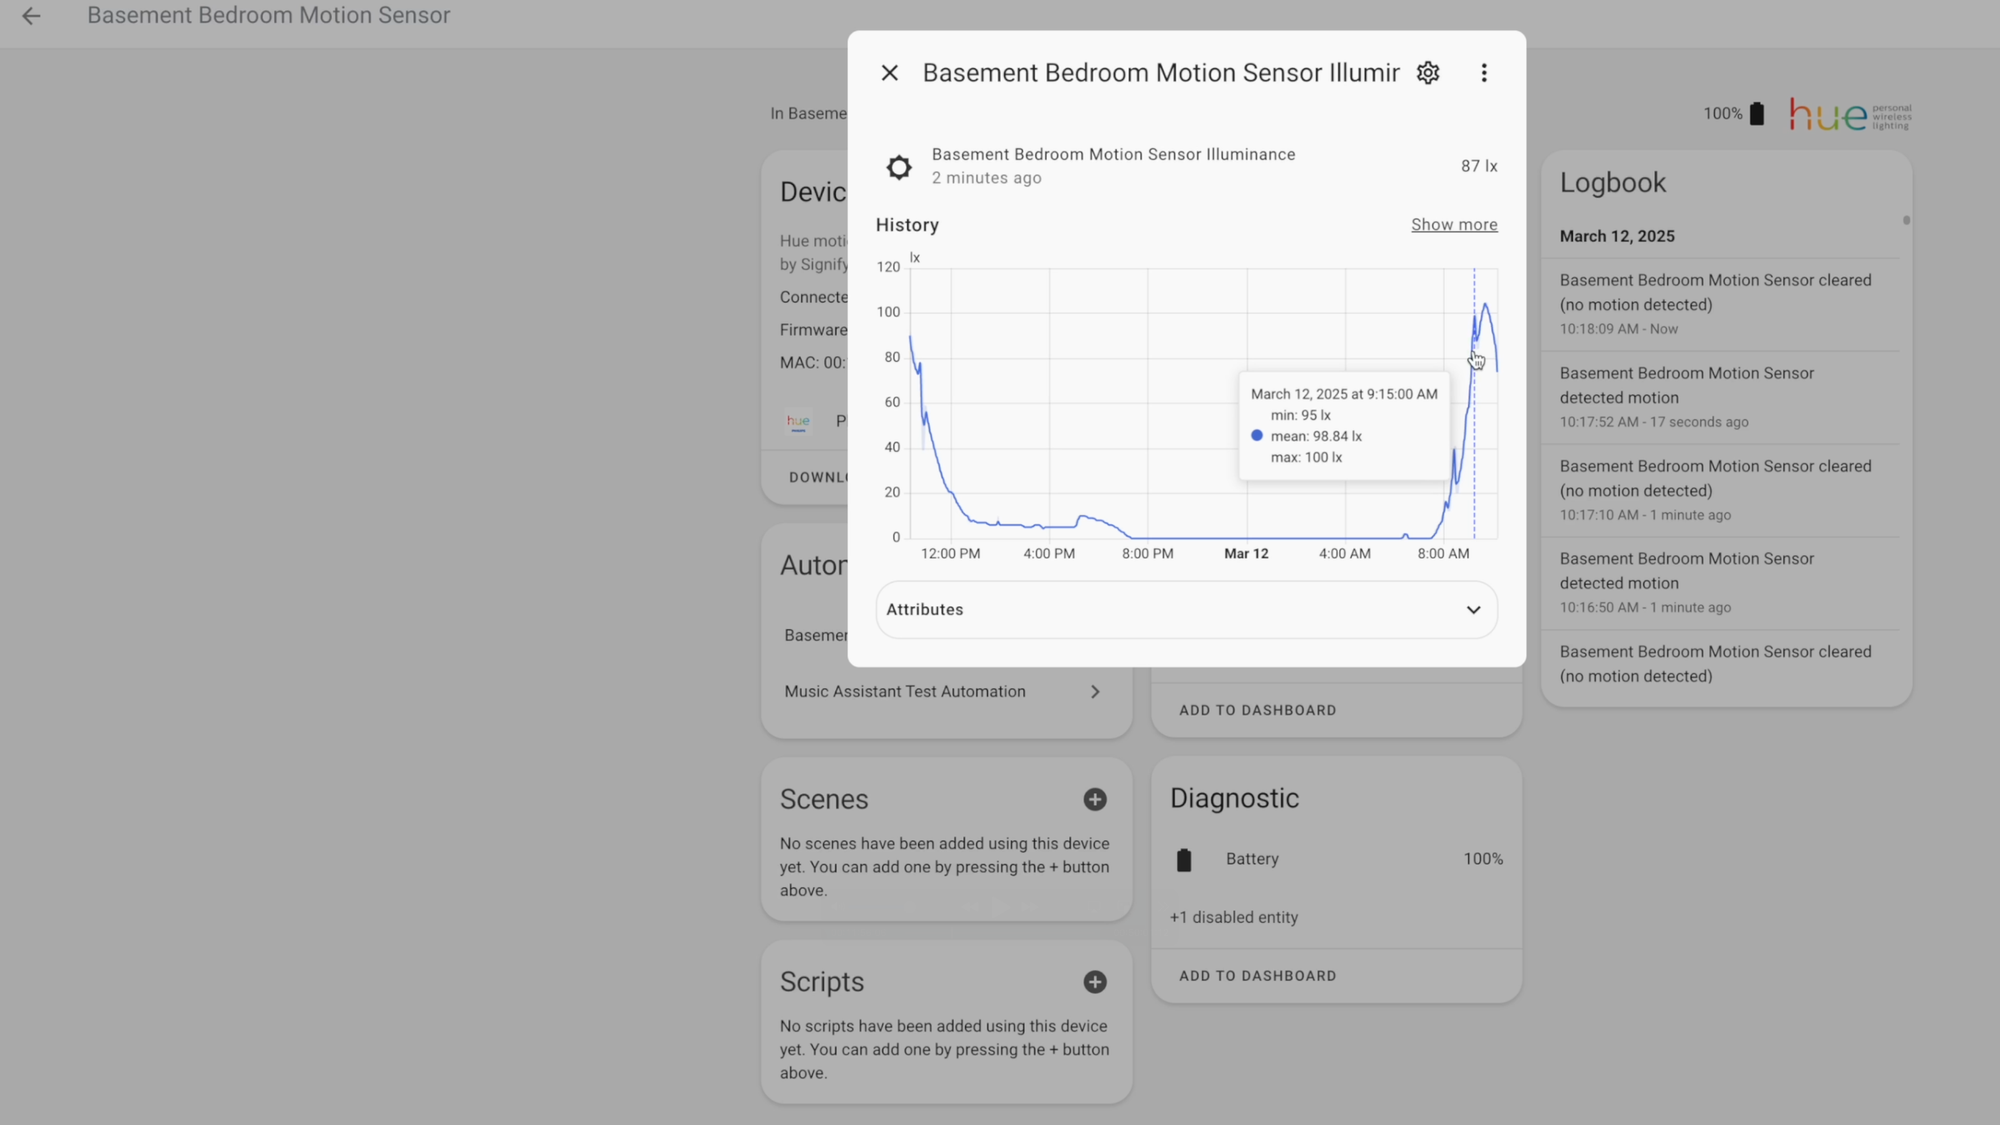
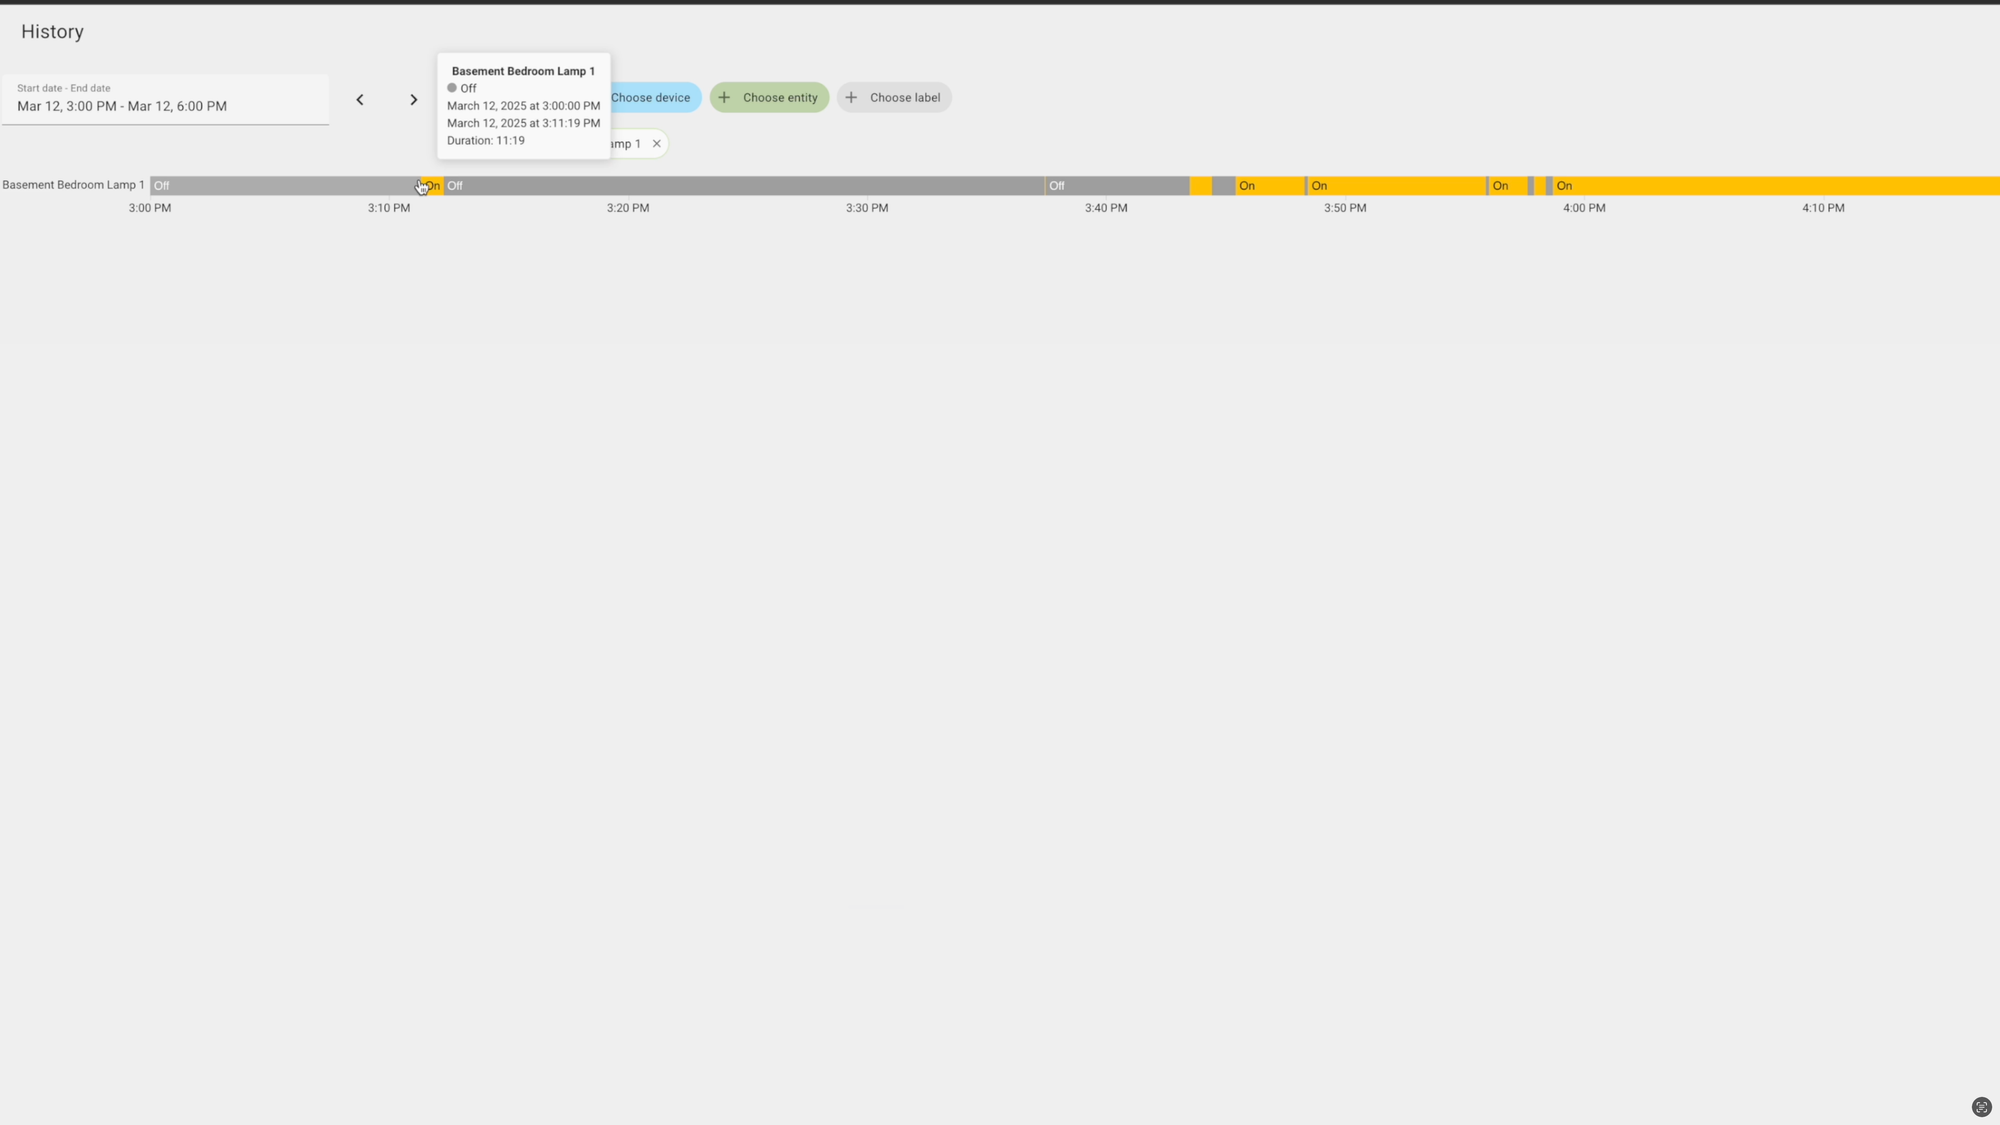
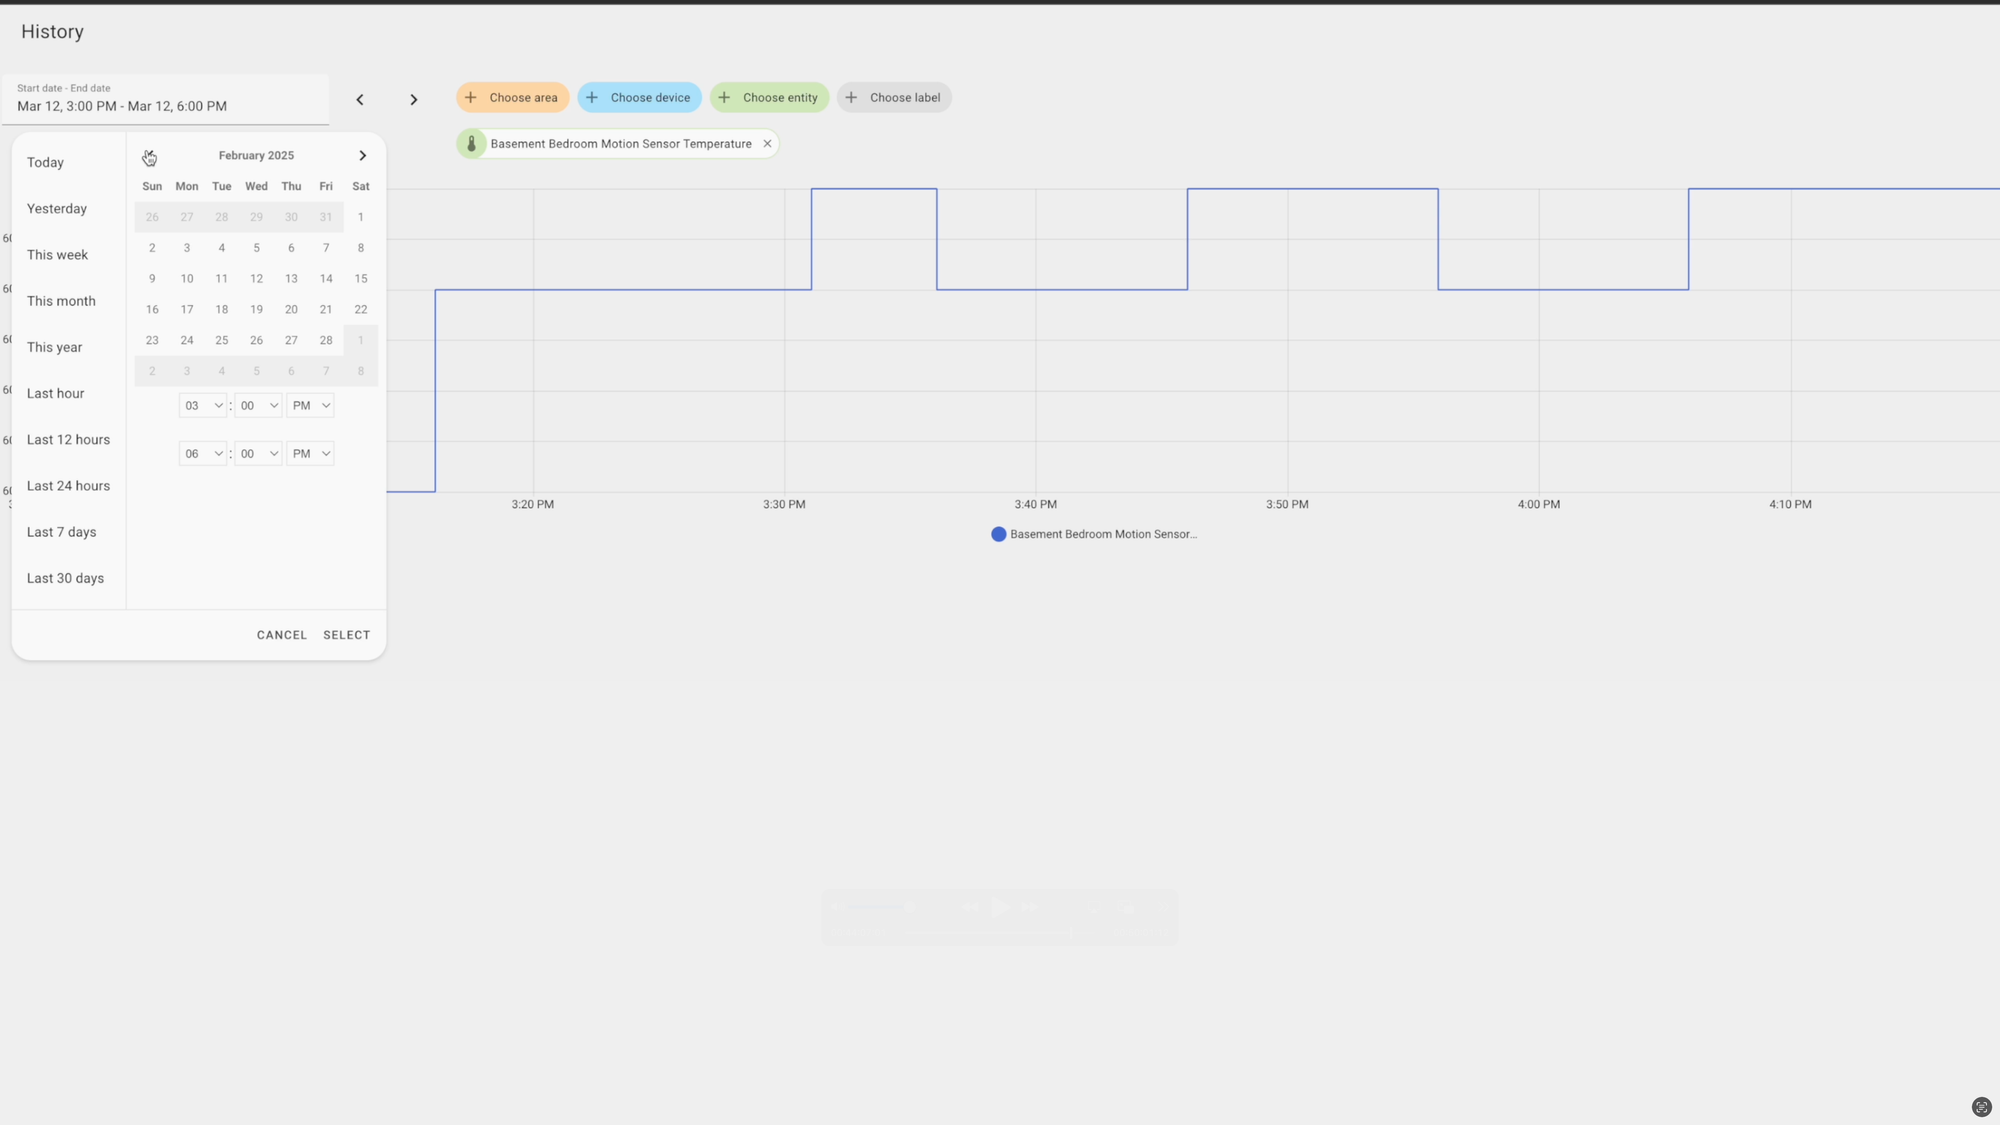
History: History tracks everything happening within Home Assistant. You can filter by date and time, plus areas, devices, entities, and labels. You can can also download your data as a CSV file. By default, the recorder stores sensor data for 10 days, and older data is purged. If you select a time frame that goes beyond 10 days, it will show you results from the long term statistics table, which is sampled and stored every hour.
But how might you use this data? One way is to achieve the desired result in a home automation. Going back to the lighting automation example from earlier, you can look at the history of the light level, or illuminance, and how it trends over the 24 hours in a day. This can help you understand its behavior on sunny vs. cloudy days, in addition to looking at the data in real-time.
Another example is creating an automation based on an appliance’s energy usage. Let’s say you want to get a notification when your washing machine is done. By adding a compatible smart plug to your washing machine with Home Assistant, you can track the energy used by the appliance before, during, and after a laundry cycle. You can use this data to set the right numeric state thresholds in your automation.
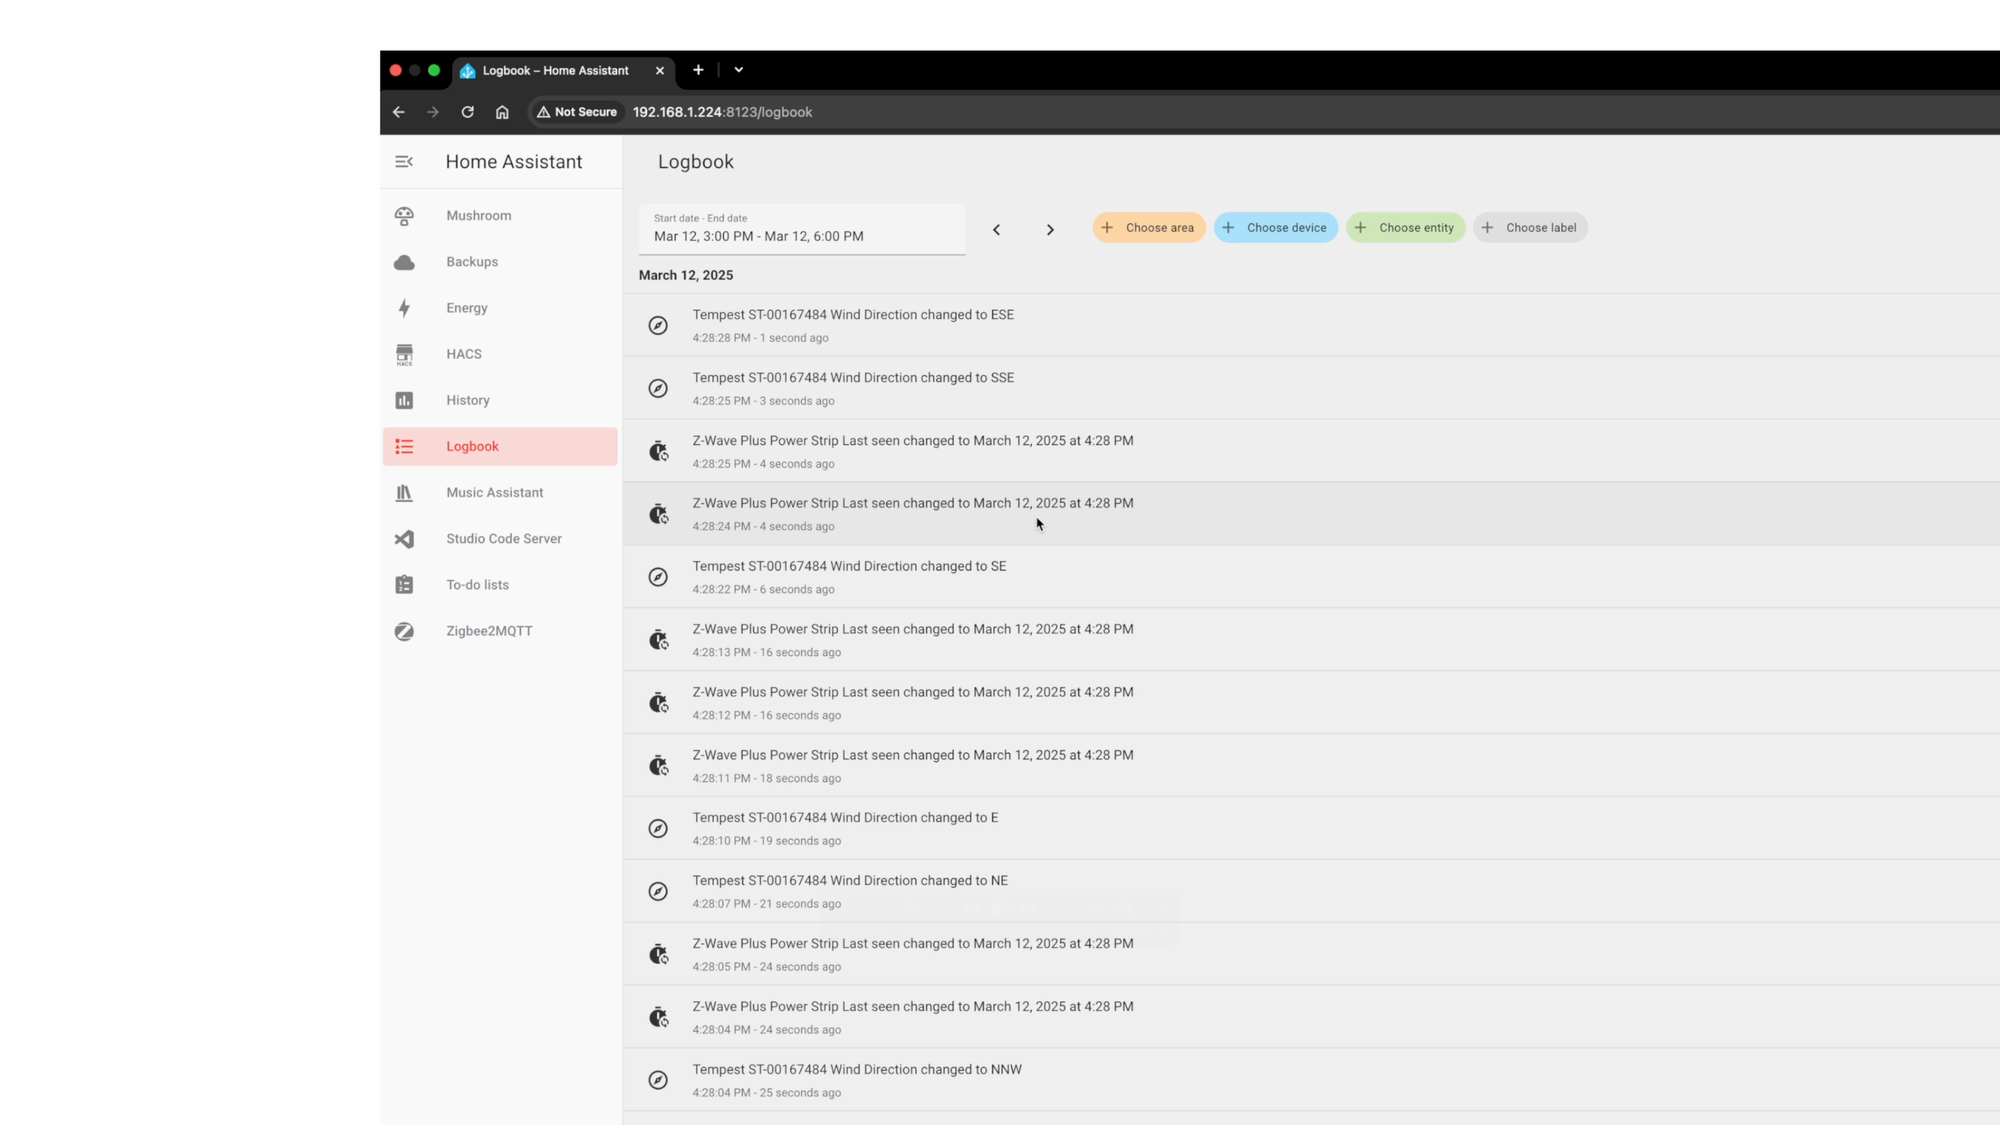
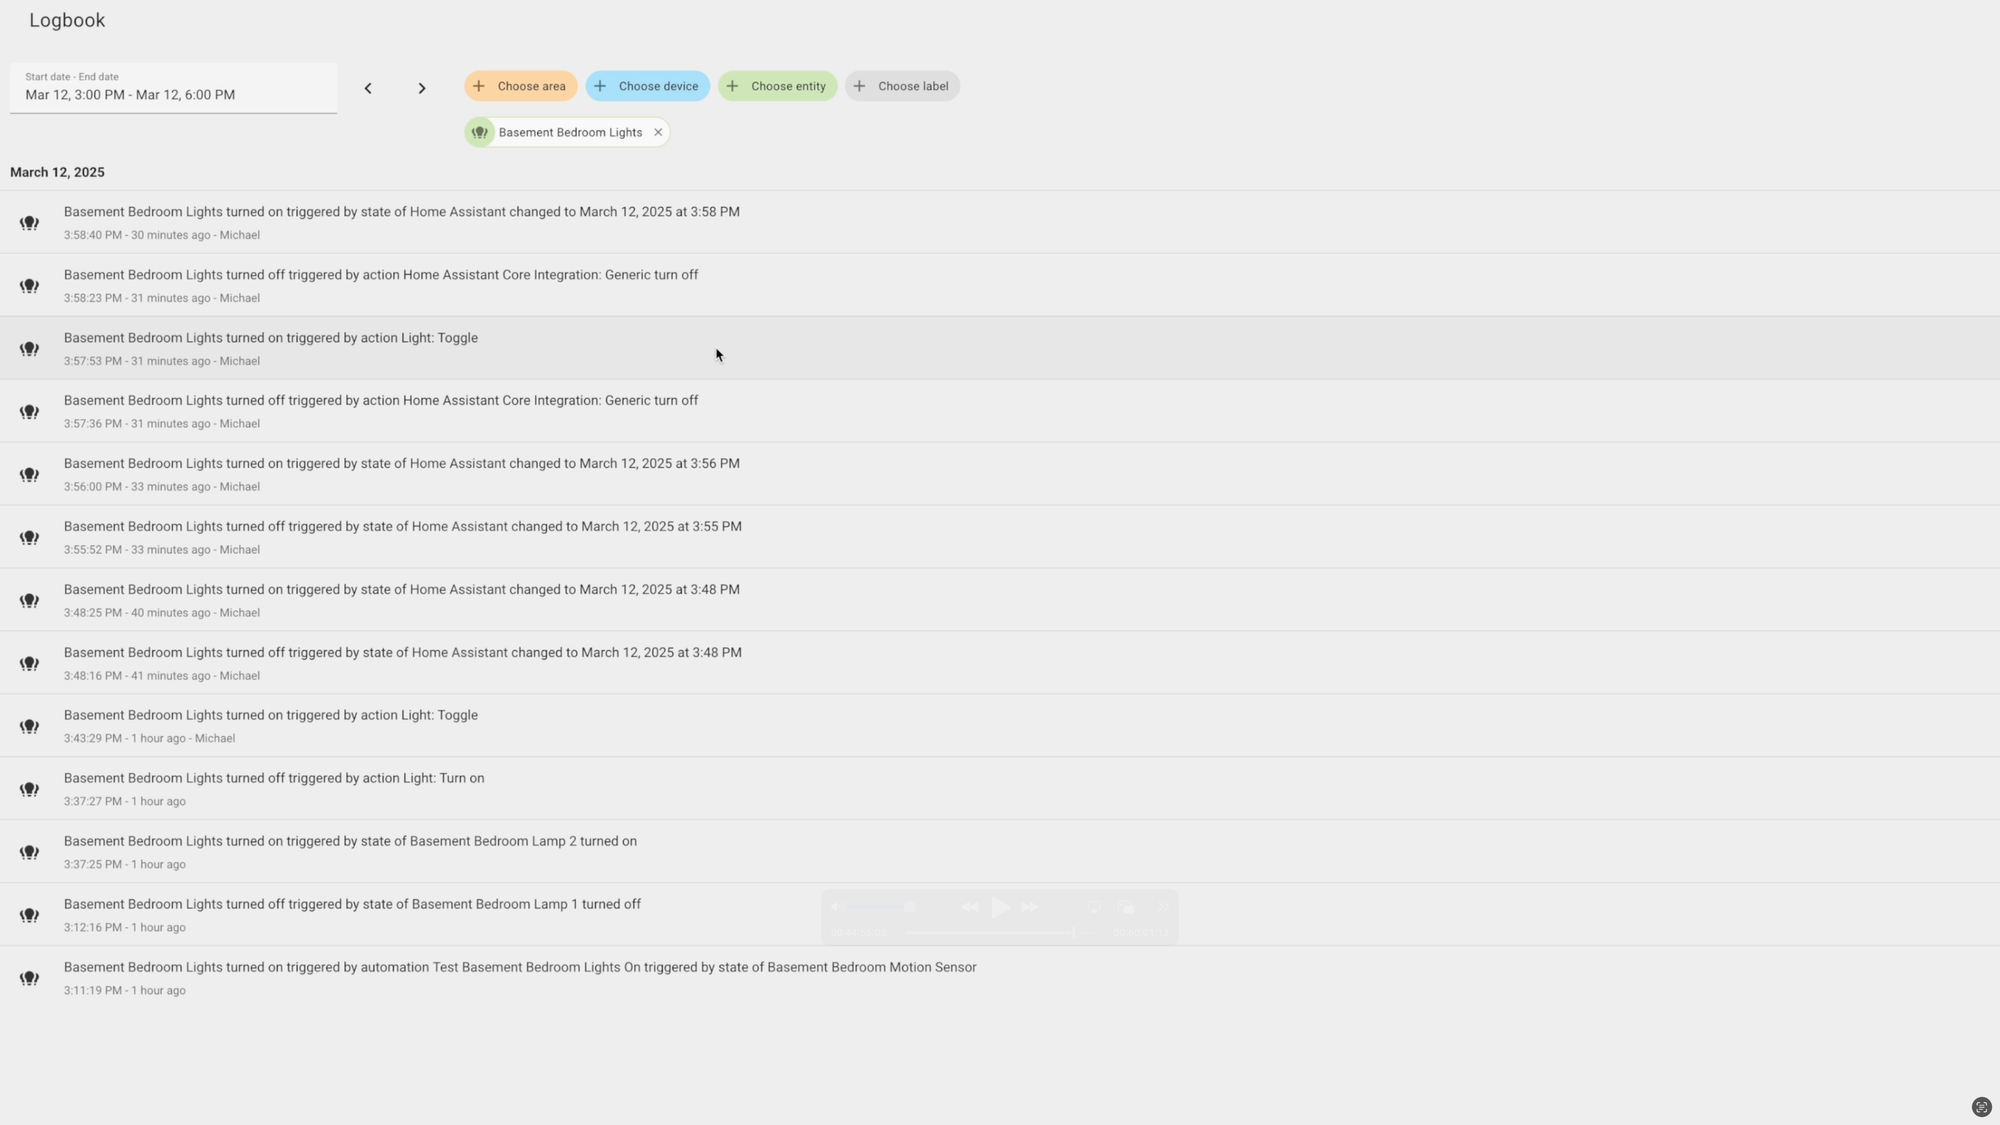
Logbook: The logbook is a real-time display of all of the entity state changes in Home Assistant. If you have thousands of entities like I do, you can watch as the Logbook continuously displays updates, like motion detected from a squirrel outside on a security camera, wind changing direction on an outdoor weather station, and more. Like History, you can also filter by date and time, plus areas, devices, entities, and labels. If an automation runs, you’ll see it reported in the logbook. If a device or entity changes state because of an automation, you’ll see it reported in the logbook.

Home Assistant: History and Logbook
Troubleshooting
Both the history and logbook can be super useful in troubleshooting your home automations, since they allow you to see what happened and when across everything in your Home Assistant. If a device tracker did not update its zone when you expected, the history will show you. If an automation triggered something to turn on or off, the logbook will show you.
You can also review the system log, which is different from the logbook, by visiting Settings > Systems > Logs. Here, you can see all logged errors and warnings in Home Assistant. Note that only the 50 most recent errors and warnings are stored.
And like I spoke about earlier, you can review traces for additional automation troubleshooting insights. You can use the trace timeline to understand at what point in the automation did it fail to proceed, for example, if it failed on the first condition or the second condition, or anywhere else.
History, logs, and traces are the underrated superpowers of Home Assistant. Inevitably something will go wrong — an automation will not perform as expected. A light may appear to randomly turn on when you didn’t expect, for example. No, it’s not a ghost. There is always a reason for this. It may be something as innocuous as a device changed to an “unavailable” state in Home Assistant, and then once it came back online, the device turned on. This can happen. Reviewing the device’s history and logs, along with that of other relevant entities, can help you troubleshoot what’s going on.
Home Assistant: Troubleshooting
Backups
Like most things in your digital life, it’s good to backup your Home Assistant data on a recurring basis. It is possible, though rare, that a future update could break something in your configuration. Backups allow you to restore your data as it was before. Backups also make it easy to move your Home Assistant to new hardware, like going from a Raspberry Pi to a mini PC. Rather than having to set up everything again, you can simply restore from a backup.
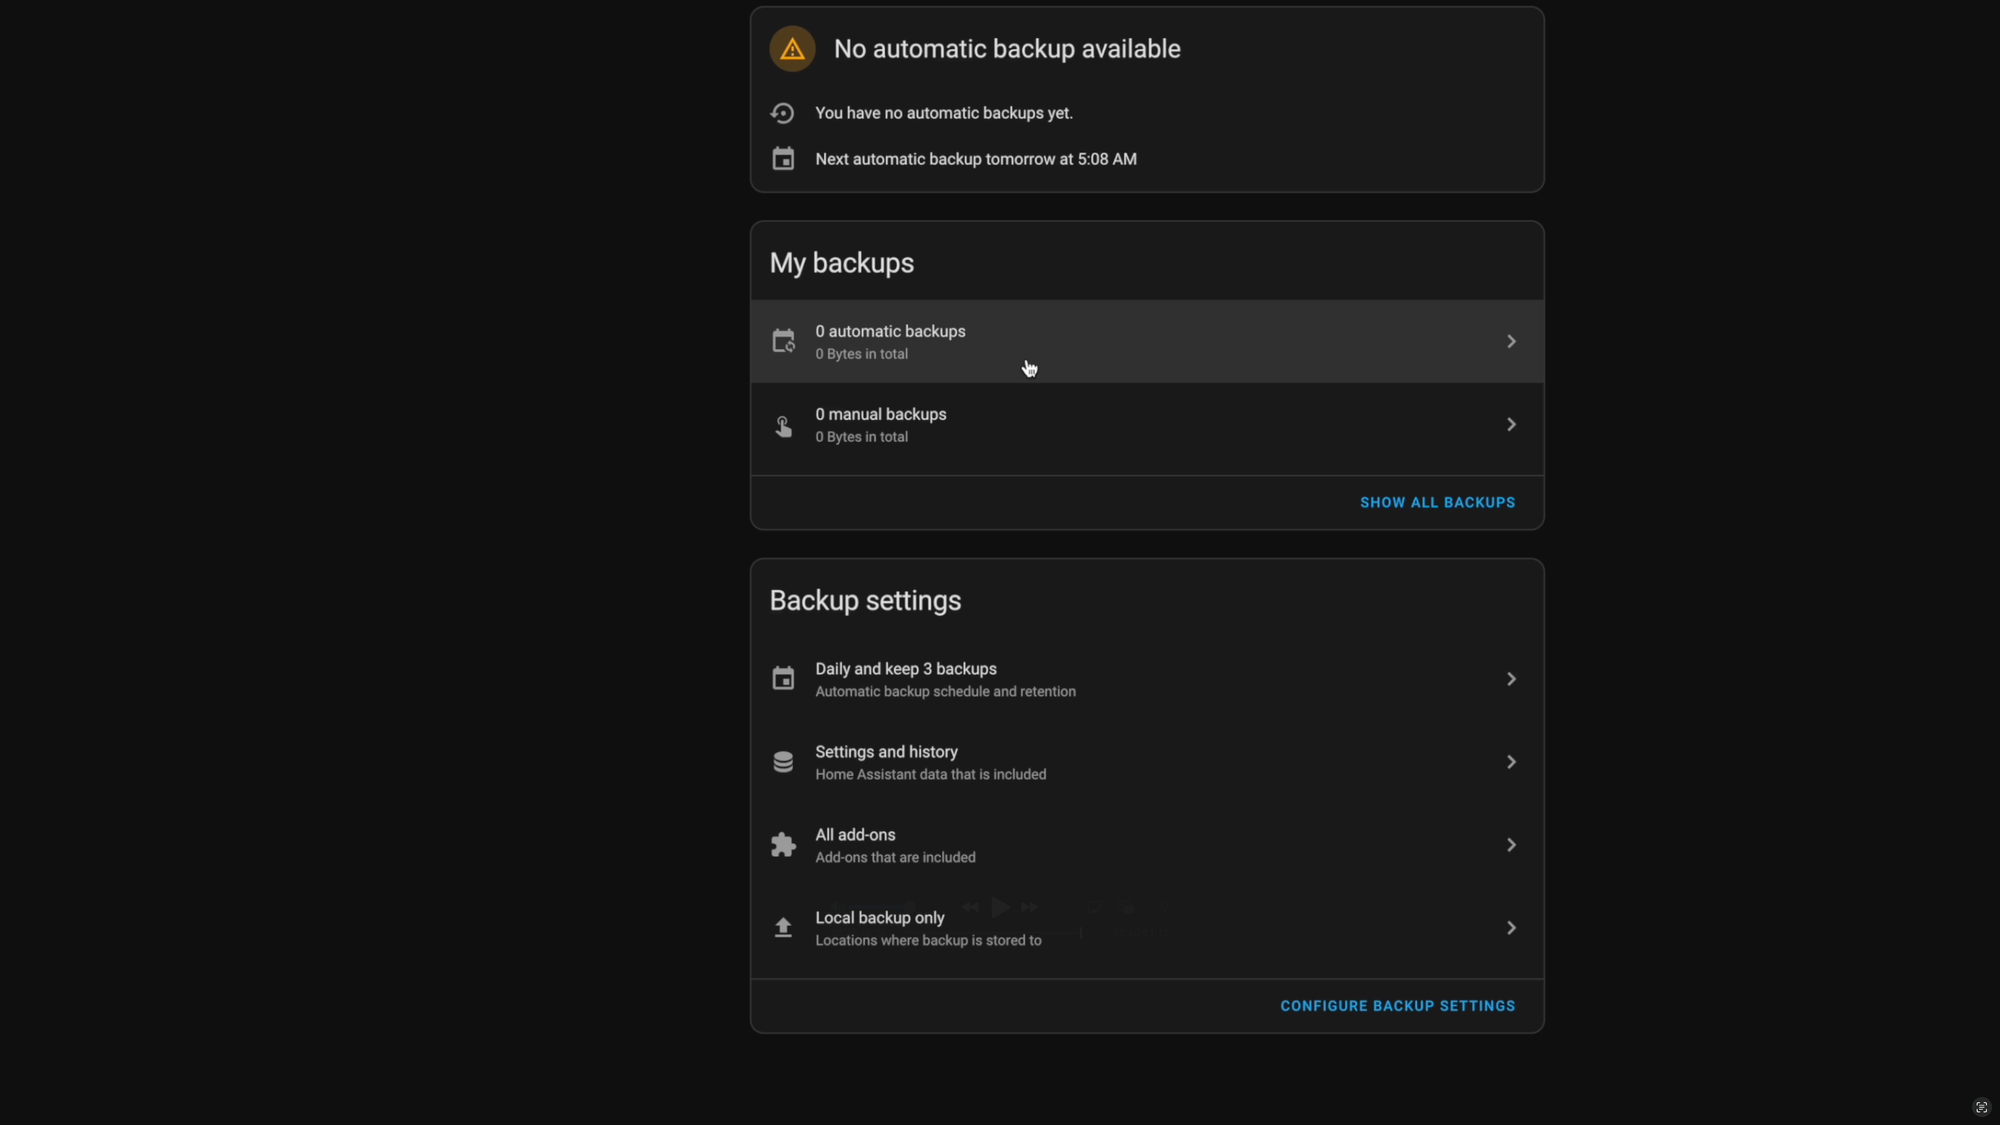
You can set up an automatic backup of your Home Assistant by going to Settings > System > Backups. Select “set up backups,” and download the emergency kit if you ever need to restore an encrypted backup. Then, you can define the backup schedule, such as at 5 AM every day. You can define how many backups to keep to manage storage space. Older backups will be deleted. You can also choose which data to backup, and then pick the location for backups. This could be a network attached storage, or NAS, on your local network, or a cloud provider, like Google Drive. If you subscribe to Home Assistant Cloud, you can store a maximum backup of 5GB.

Home Assistant: Backups
Remote Access
On the topic of Home Assistant Cloud, the final section to cover is remote access. When you first install Home Assistant, it is accessible on the local network when connected to your home’s WiFi. But if you want to manage and control your Home Assistant when away from home, then you’ll need a way to access your Home Assistant remotely. And it wouldn’t be Home Assistant if you didn’t have multiple options to choose from.
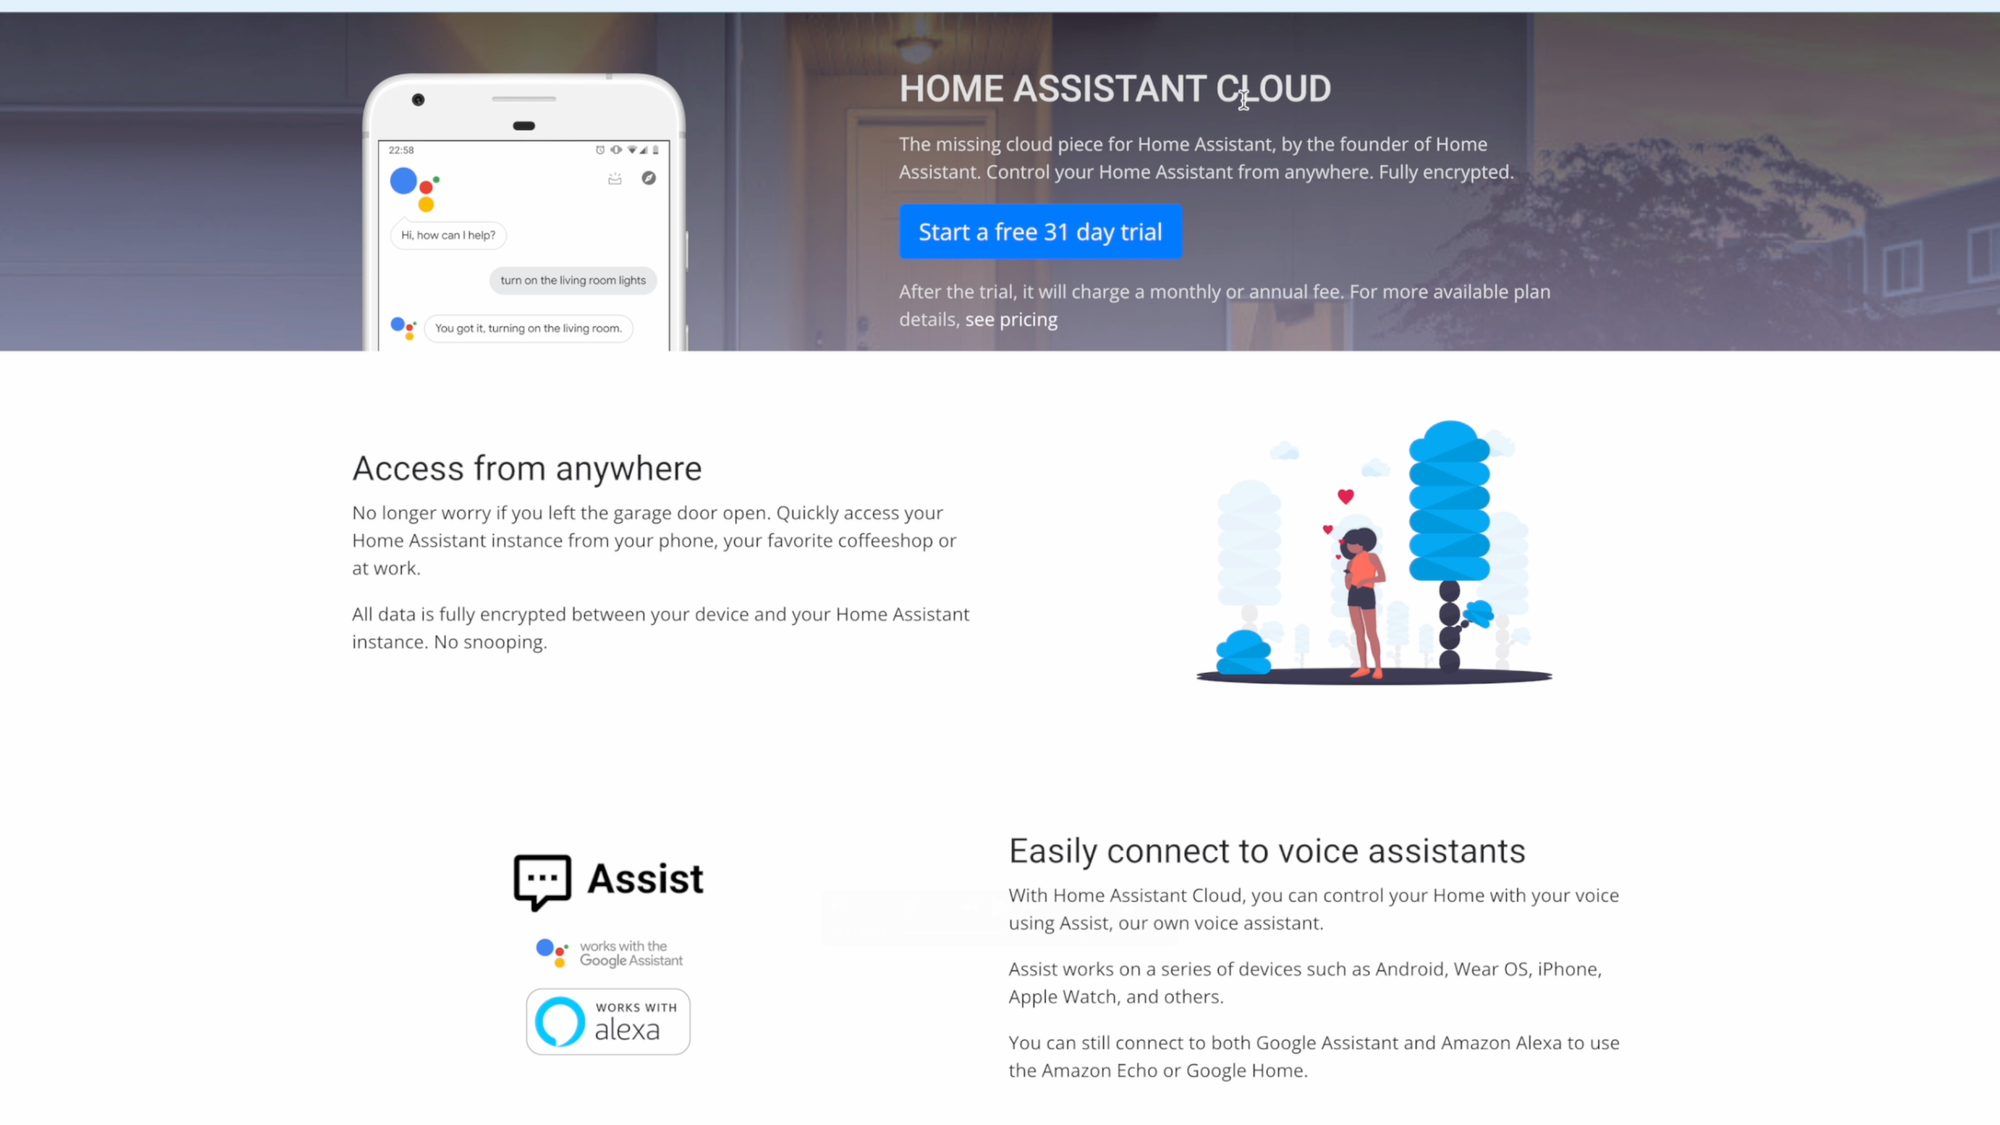
The easiest way to enable this is to subscribe to Home Assistant Cloud. It will generate a remote URL along with a certificate so all of your traffic to Home Assistant is encrypted automatically. Subscribing to Home Assistant Cloud also makes it easy to integrate Amazon and Google voice assistants, as I covered earlier. Your subscription also funds the developer work of Home Assistant, which is a great thing.
But there are alternative ways to access Home Assistant remotely that require a more DIY approach, and that may be free.
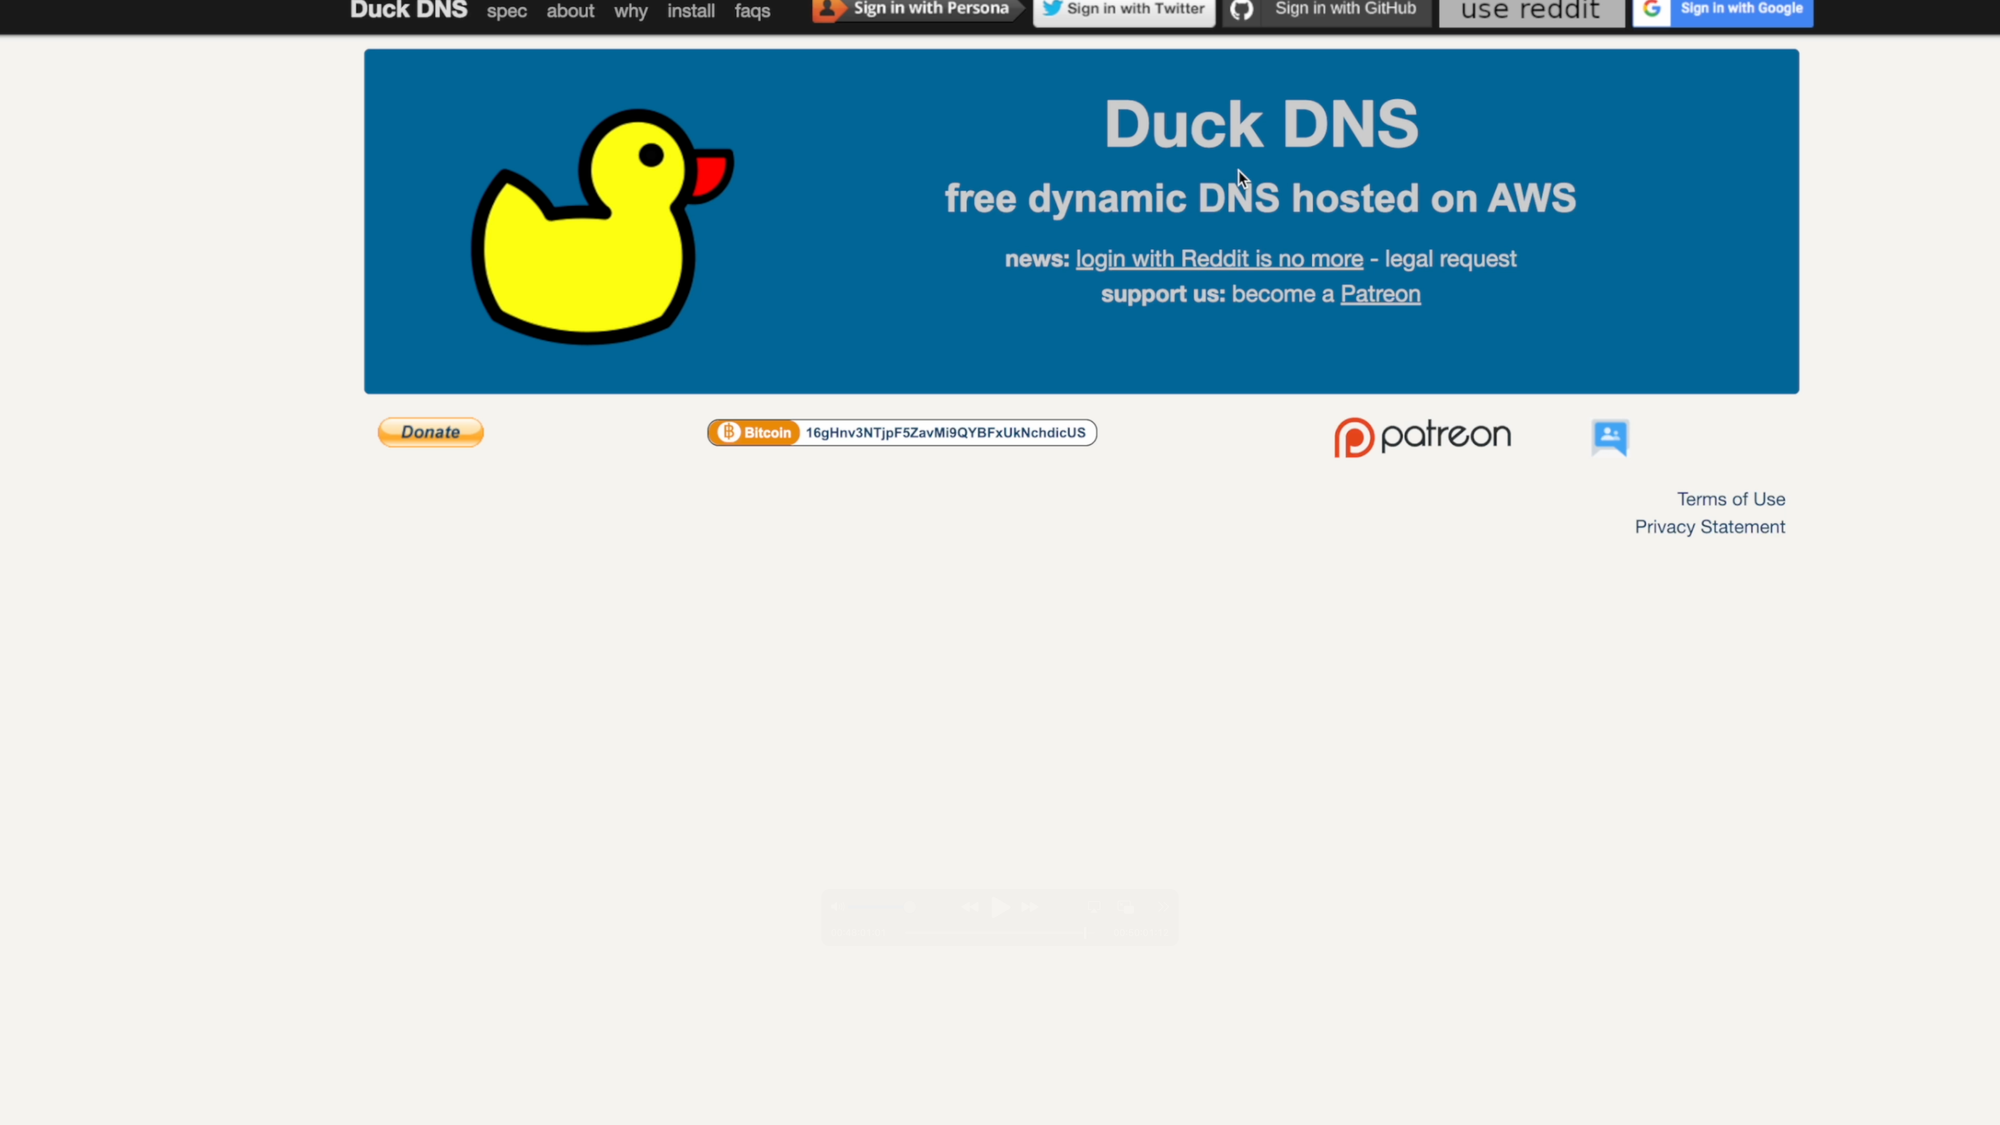
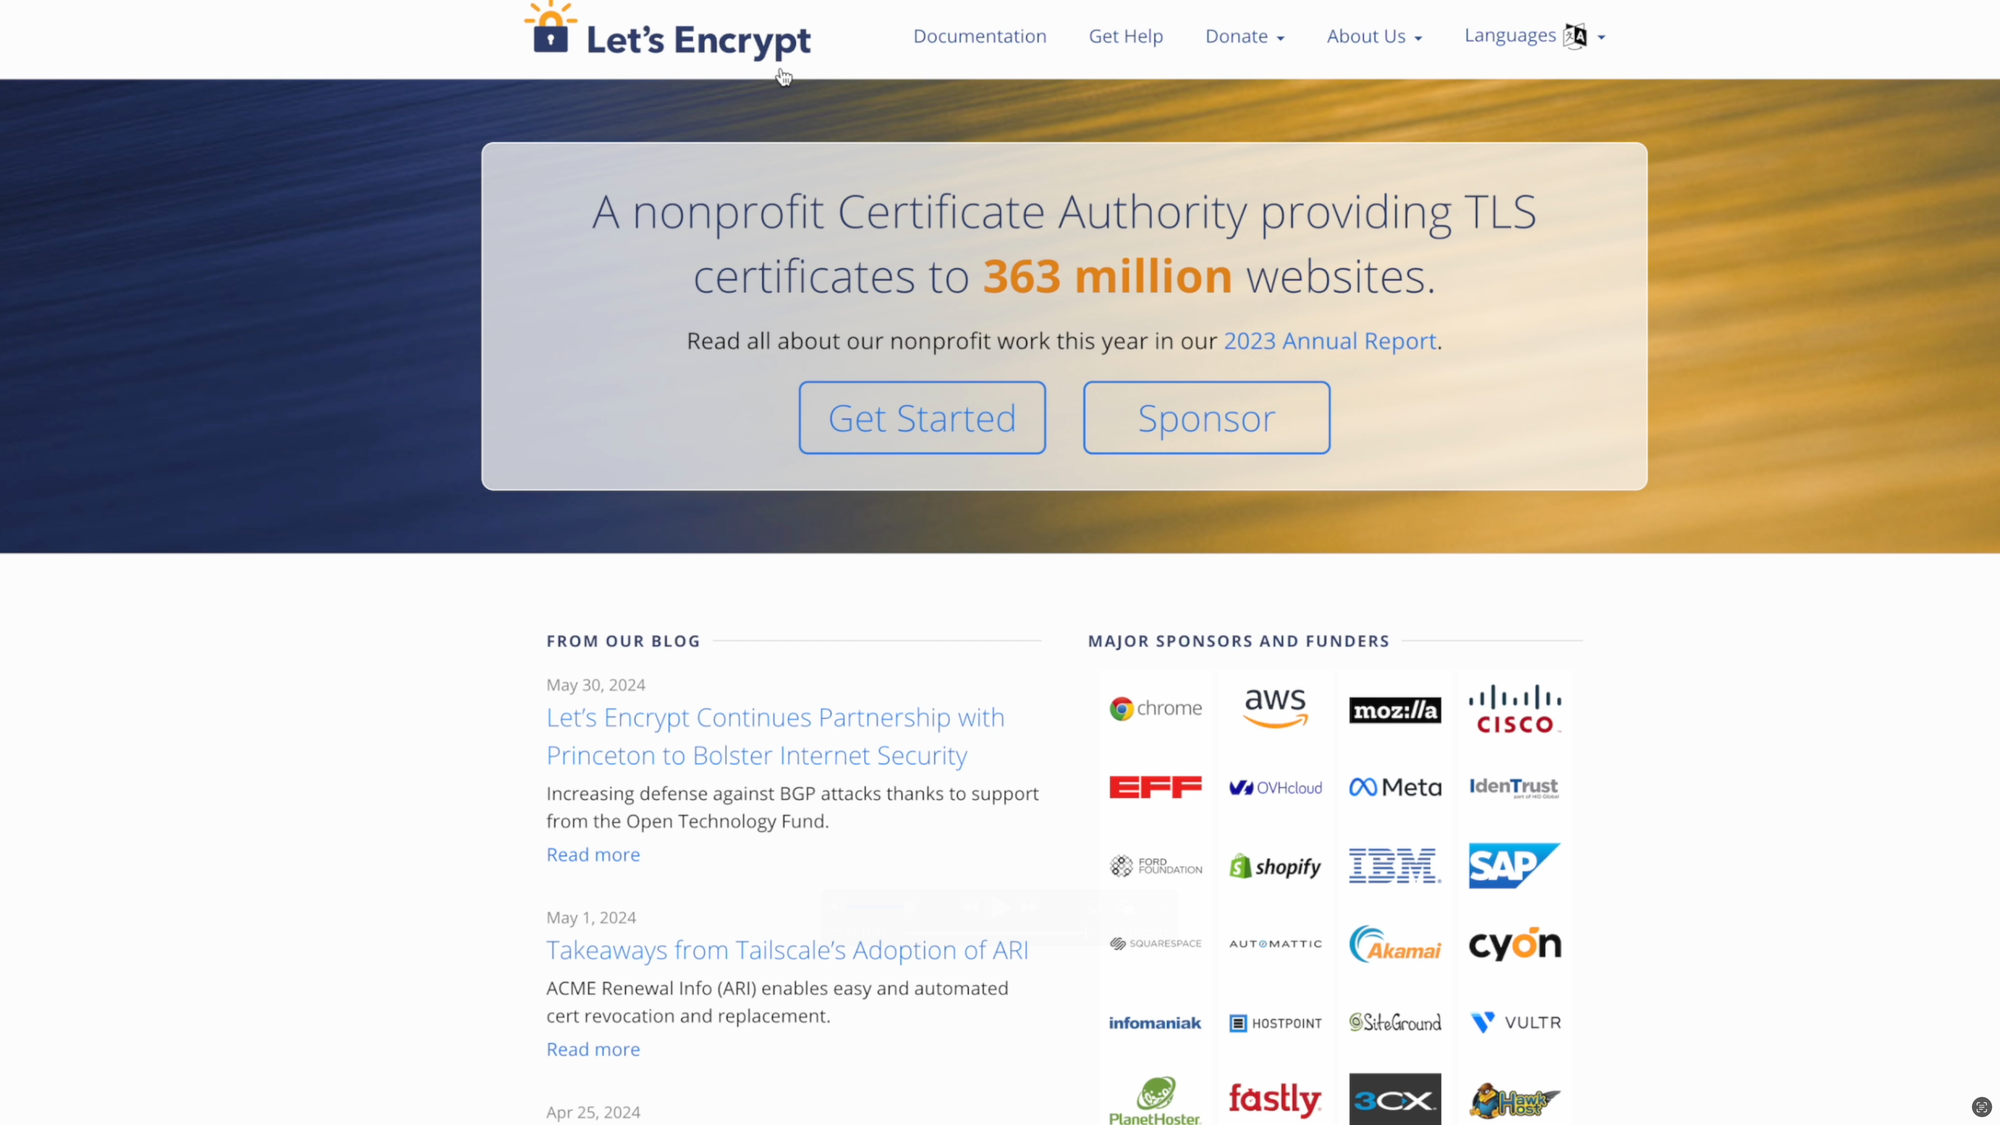
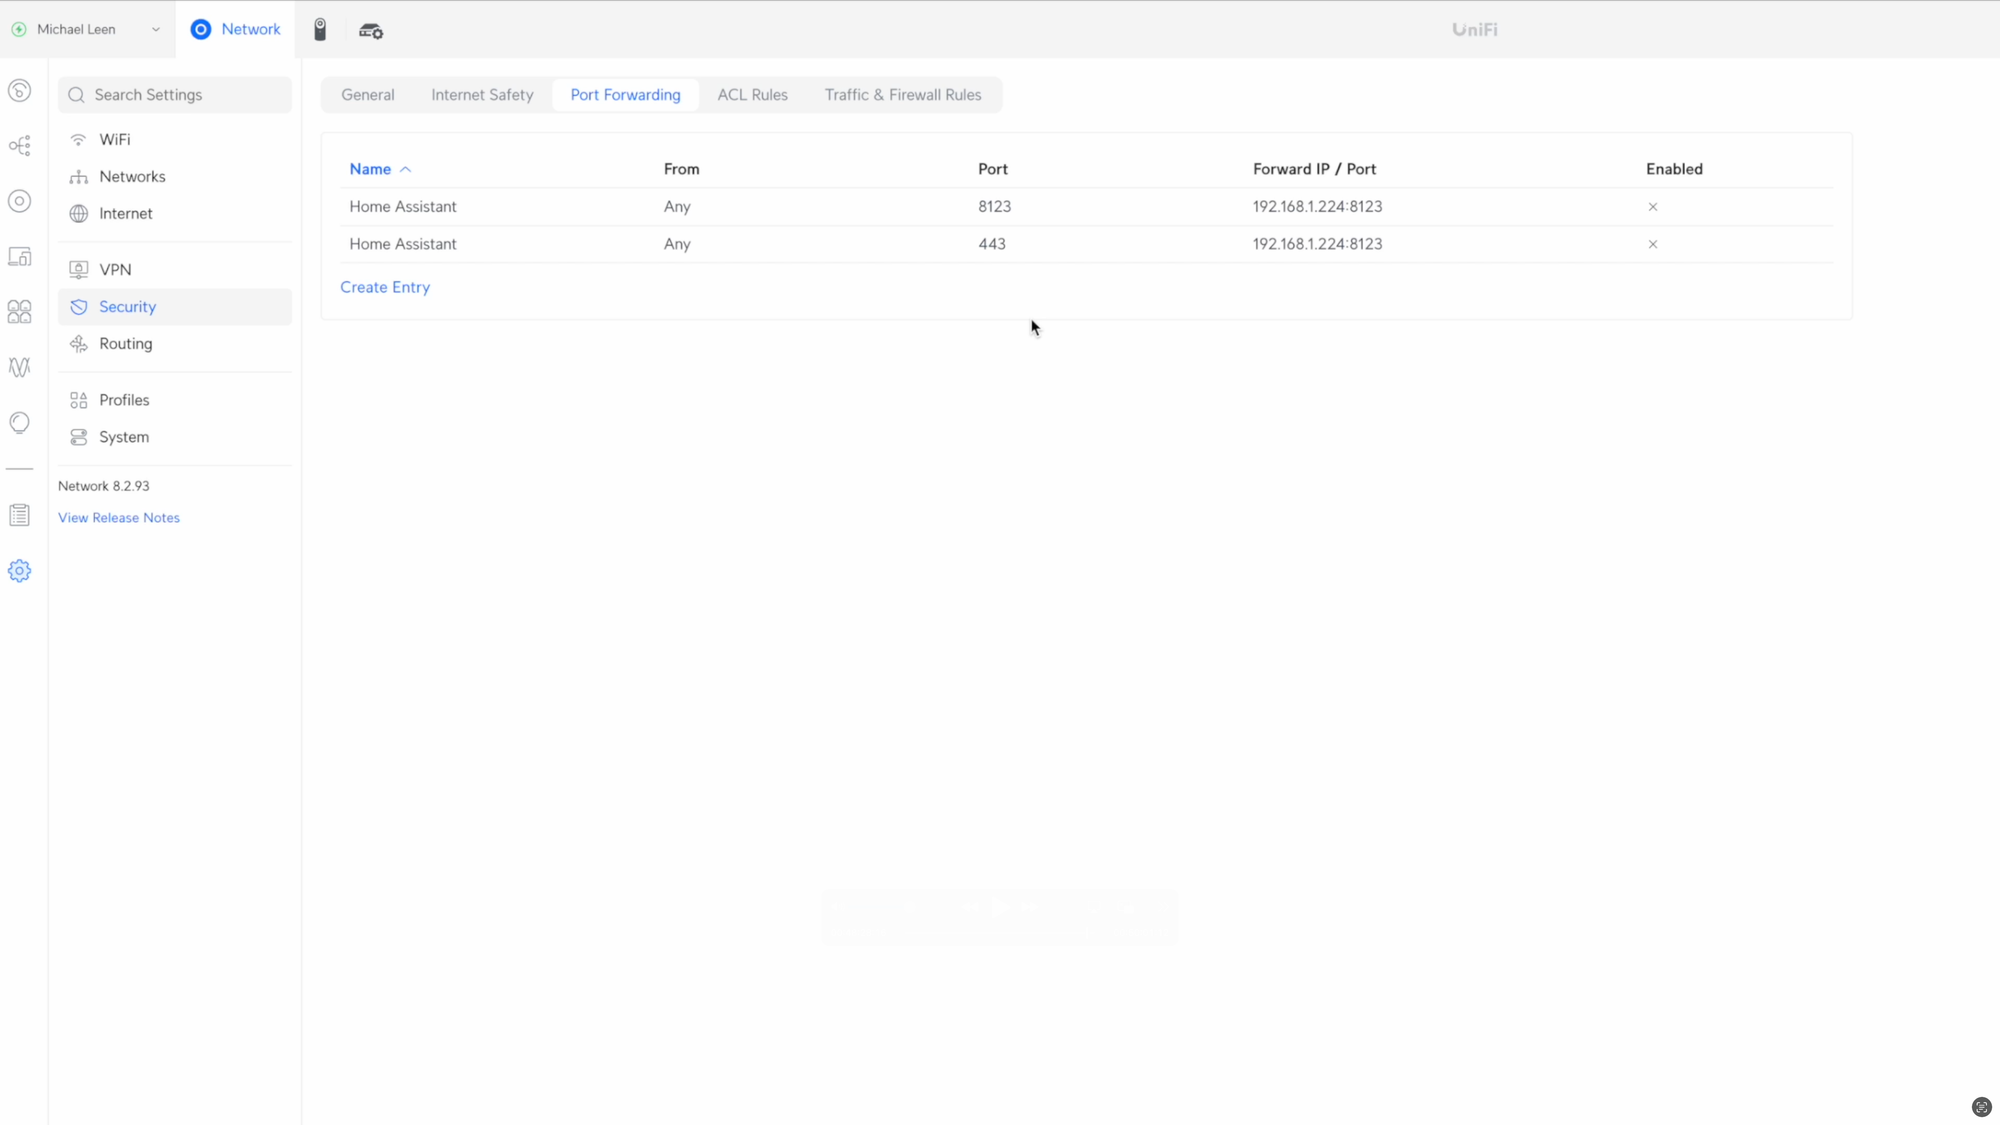
When I got started with Home Assistant and needed to enable remote access, I first used port forwarding. To do this, I got a free domain through DuckDNS, an SSL certificate from Let’s Encrypt, and then configured port forwarding on my router to my Home Assistant server. This method was completely free. However, port forwarding may pose some security concerns, since it means your router is allowing outside devices to initiate connections to devices on your network. And you have other ways of enabling remote access.
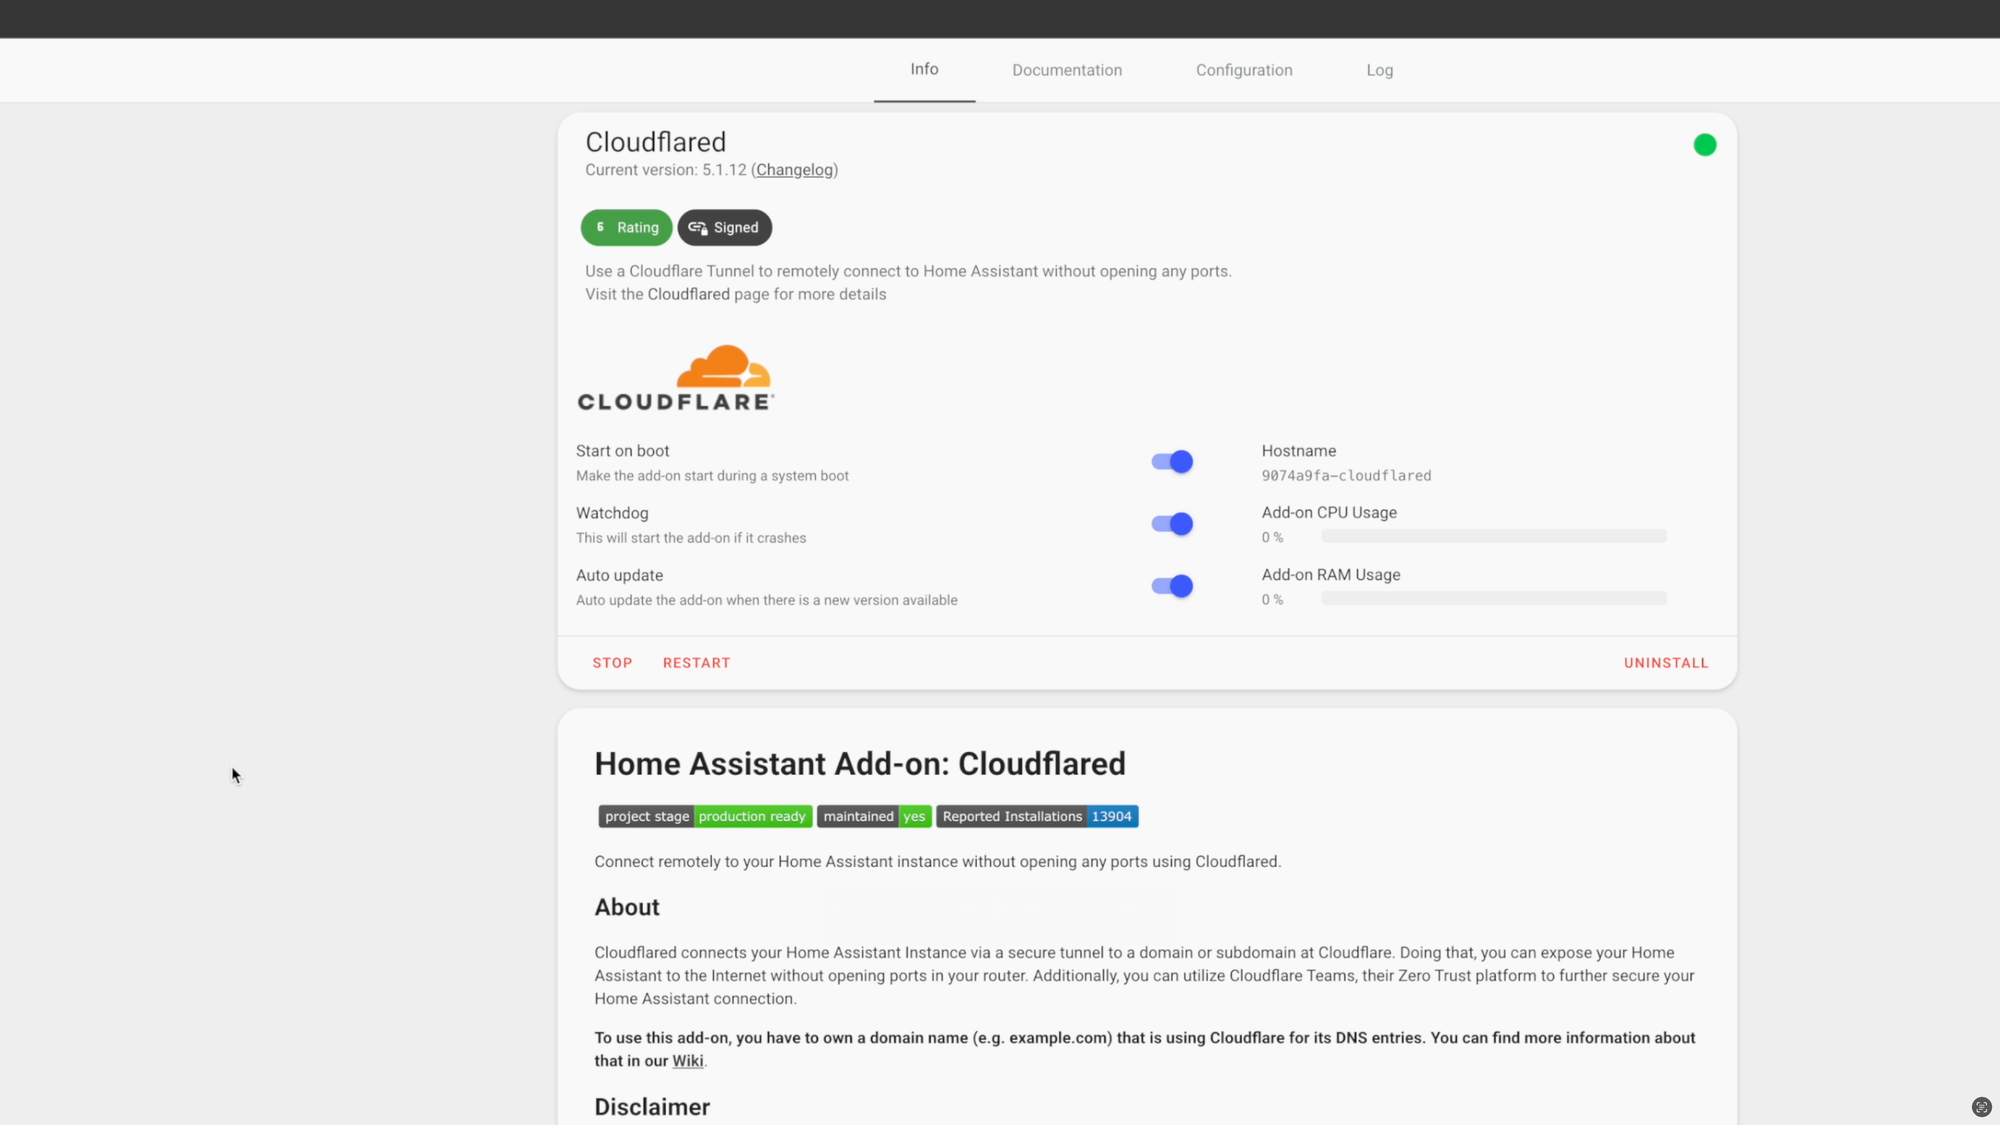
Because of this, I decided to setup a Cloudflare tunnel for my remote access to Home Assistant. I chose this because it is more secure than port forwarding, does not require connecting to a VPN, works with Amazon and Google’s smart home platforms, and allows me to continue to access my Home Assistant server remotely from anywhere. It’s also completely free, and Cloudflare is a company that I know and trust. You can follow my step-by-step guide on how to install a Cloudflare tunnel on Home Assistant.
Another option is a VPN, or virtual private network. This requires a VPN connection to be established before connecting to Home Assistant, and services for this include Tailscale and Wireguard, among others.
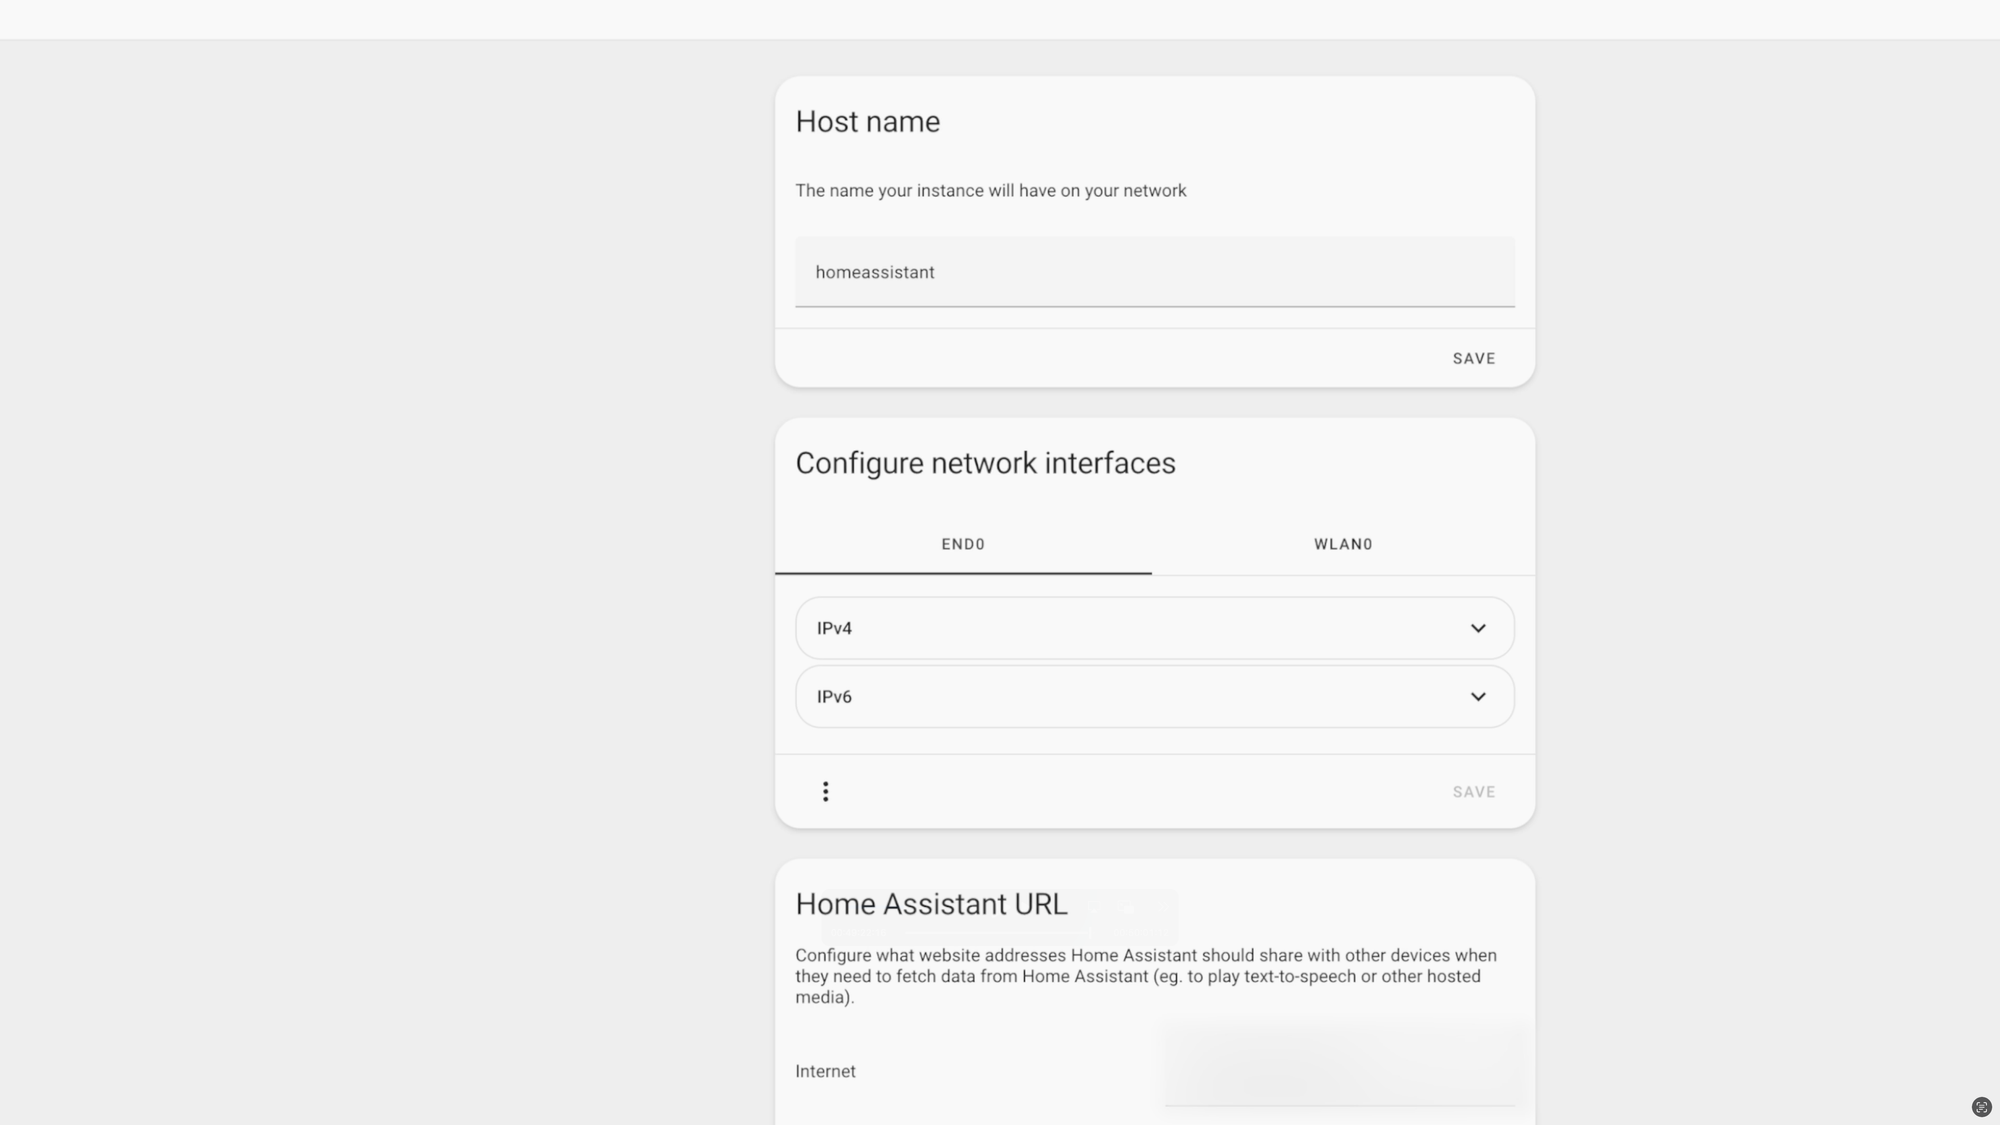
Once you determine your remote access option and configure it, you’ll need to specify the URL for remote access. Select your username in the bottom left, and make sure “advanced mode” is enabled. Then, go to Settings > System > Network. Under Home Assistant URL, enter the external URL that you set up for your Home Assistant.

Home Assistant: Remote Access
Final Thoughts
My hope is that this tutorial makes Home Assistant more approachable for beginners, and helps existing users learn something new. I have been working on this for so long, and I hope you found it helpful.
If you want to go even deeper with Home Assistant, including home automation ideas, how to integrate generative AI into your smart home, creating more advanced automations, and add-ons and integrations that can take your smart home to the next level, you’re in the right place. That’s what I cover, and there are tons of videos on this channel for you to explore. So, consider subscribing so you don’t miss out when a new one drops.
Let me know what else you’d like to learn about Home Assistant, or any tips you have for others, down in the comments.
Watch on YouTube
Featured Tech