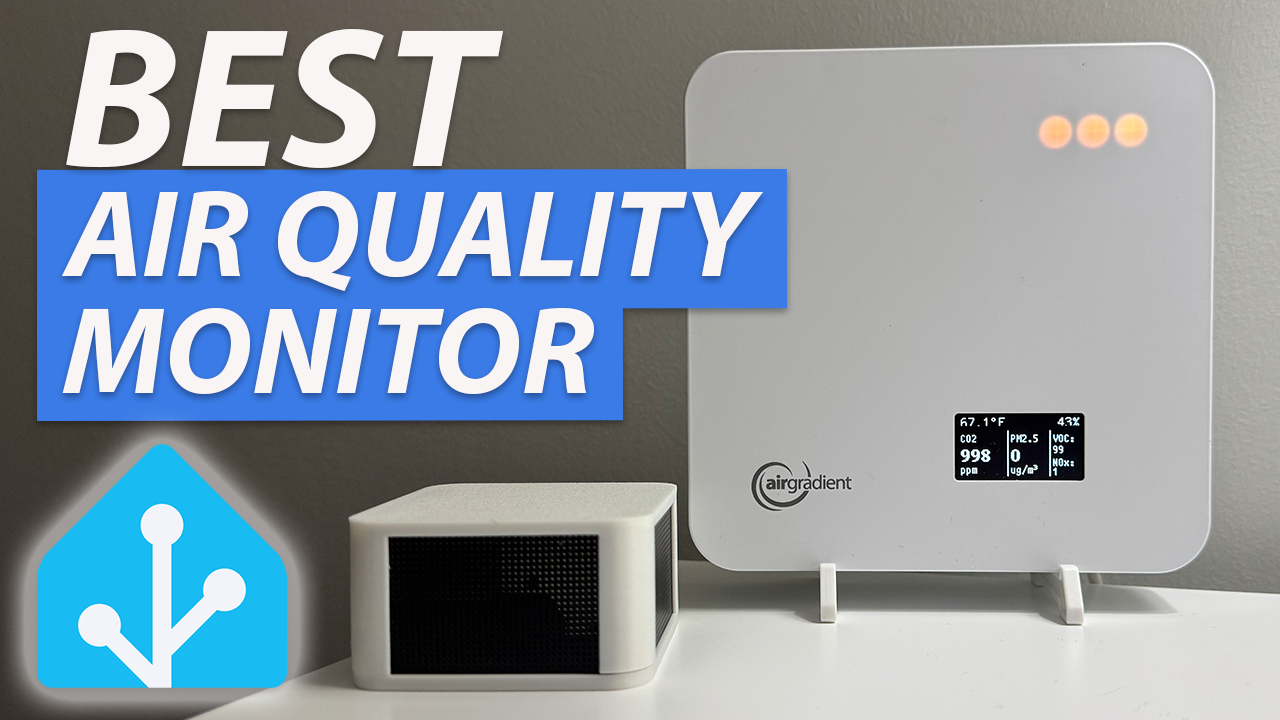
Best Air Quality Monitor for Home Assistant? Apollo AIR-1 vs AirGradient One
Review comparing the AirGradient One and the Apollo Automation AIR-1, two indoor air quality monitors for Home Assistant.
Introduction
I’m going to compare two indoor air quality monitors for Home Assistant: The AirGradient One and the Apollo Automation AIR-1. I will score these two devices on 10 dimensions to help you decide which one is best for you.
I’ll cover device setup in Home Assistant, hardware, features, and actual air quality data. I’ll also talk about why you might want an indoor air quality monitor, and what you should know about the health of your home’s indoor air.
Main Points
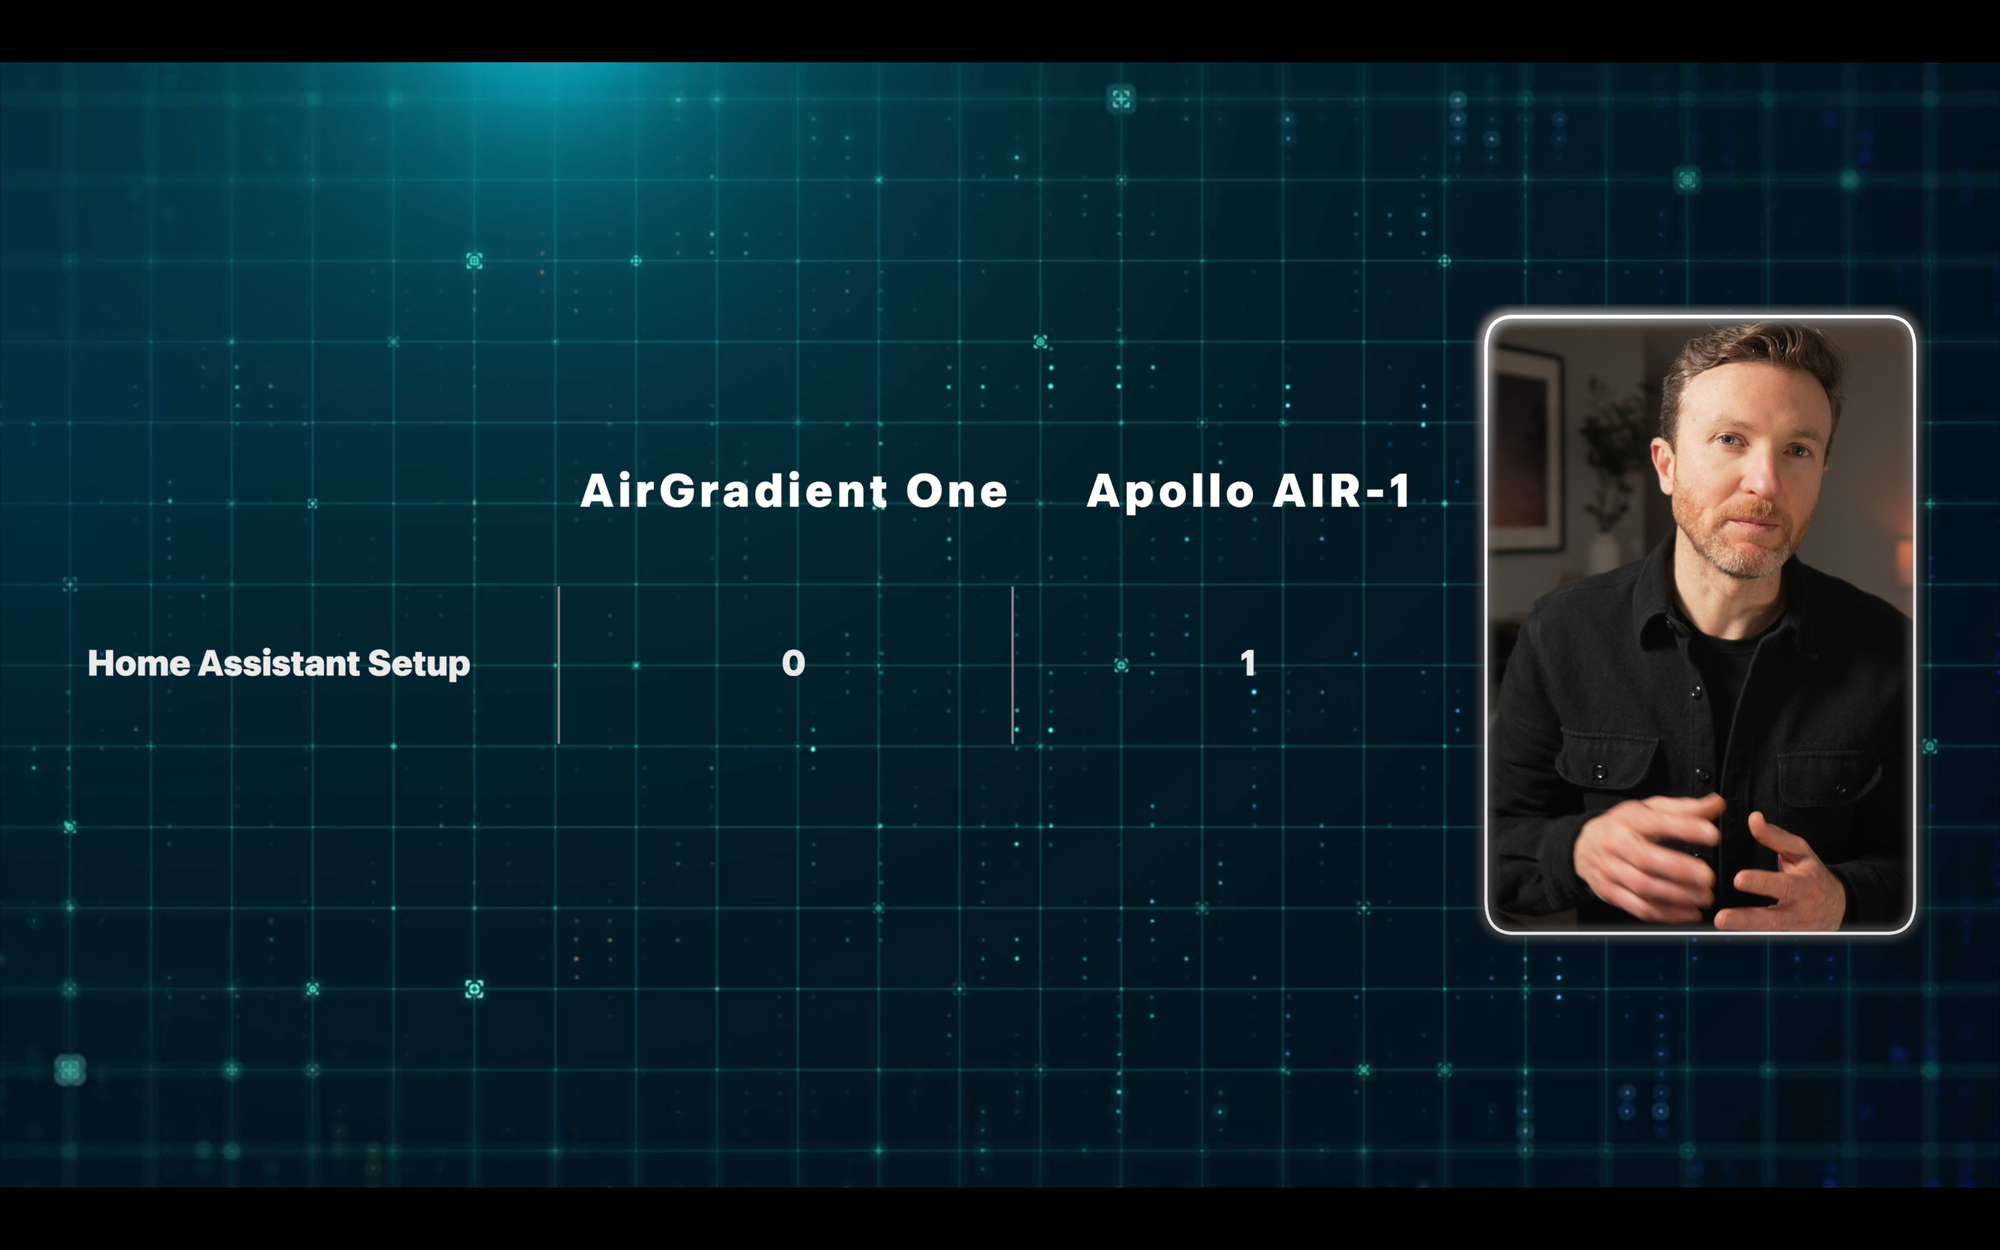
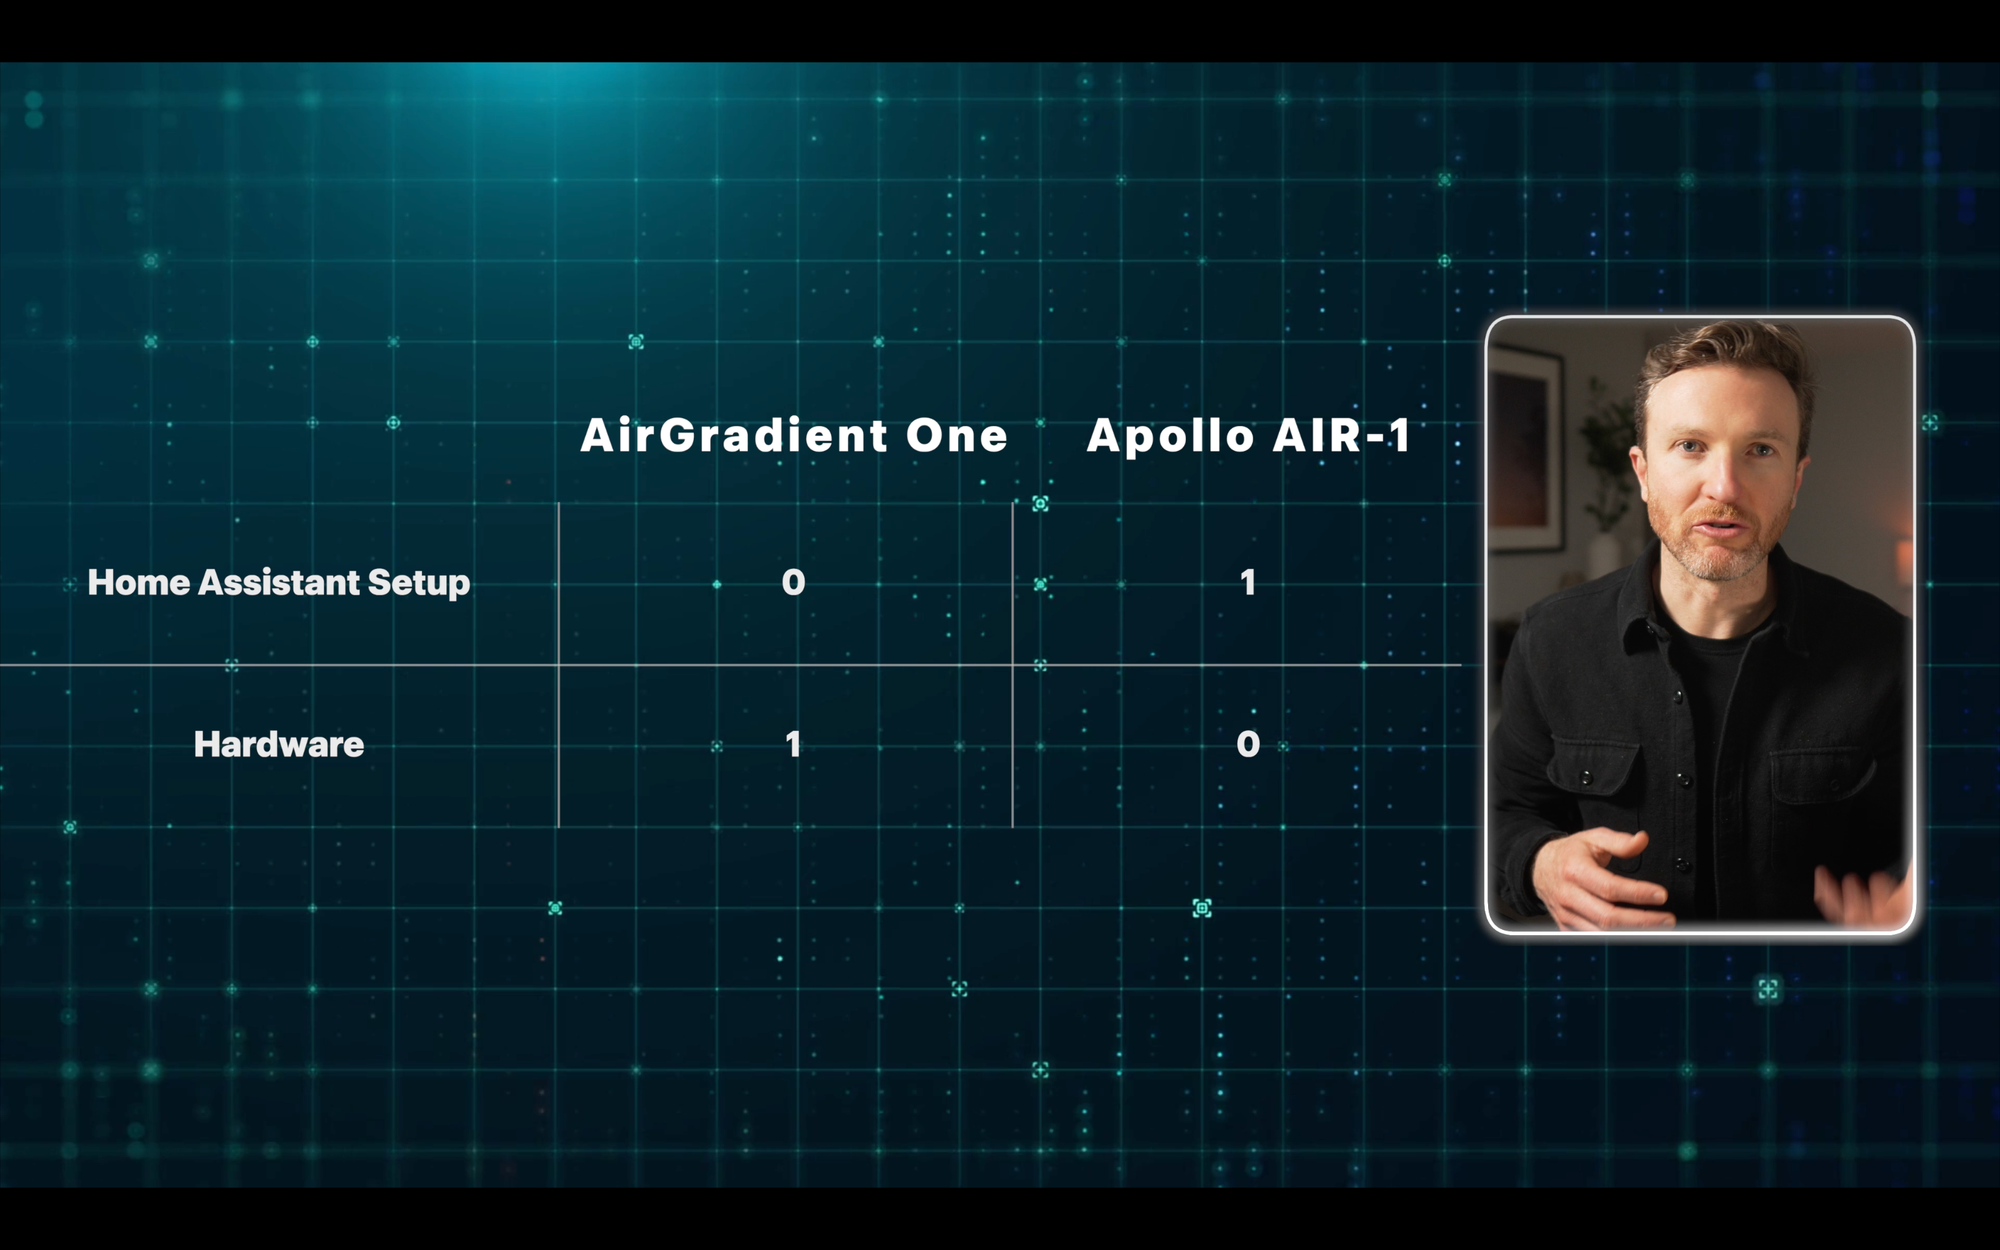
Home Assistant Setup
Both brands sent me these devices to test out, but no one is sponsoring this video.
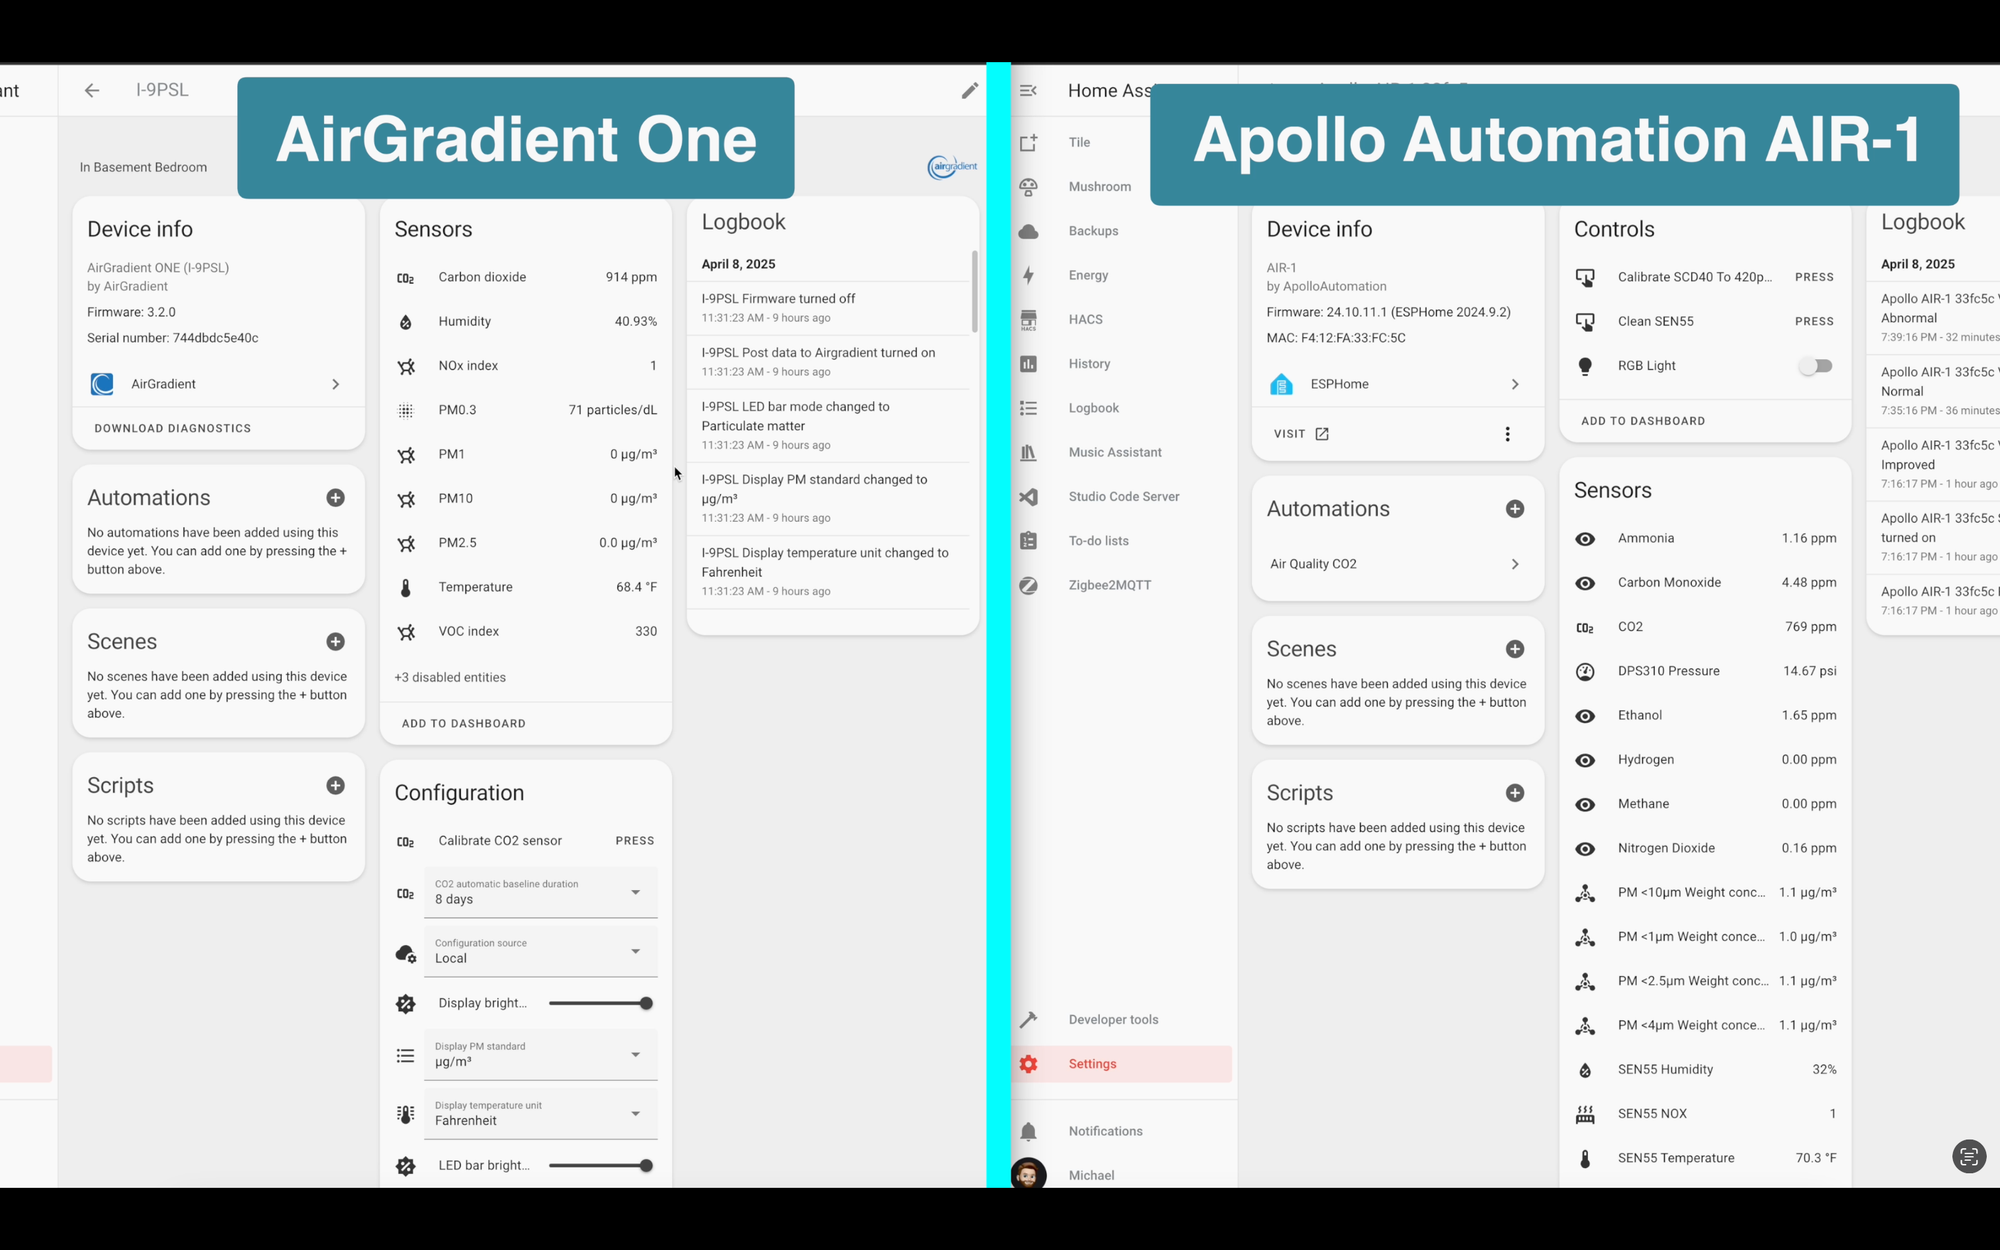
The AirGradient One and Apollo AIR-1 both offer local Home Assistant support with auto discovery, making them easy to set up. The difference is the AirGradient achieves this using its own Home Assistant integration, whereas the Apollo uses ESPHome.
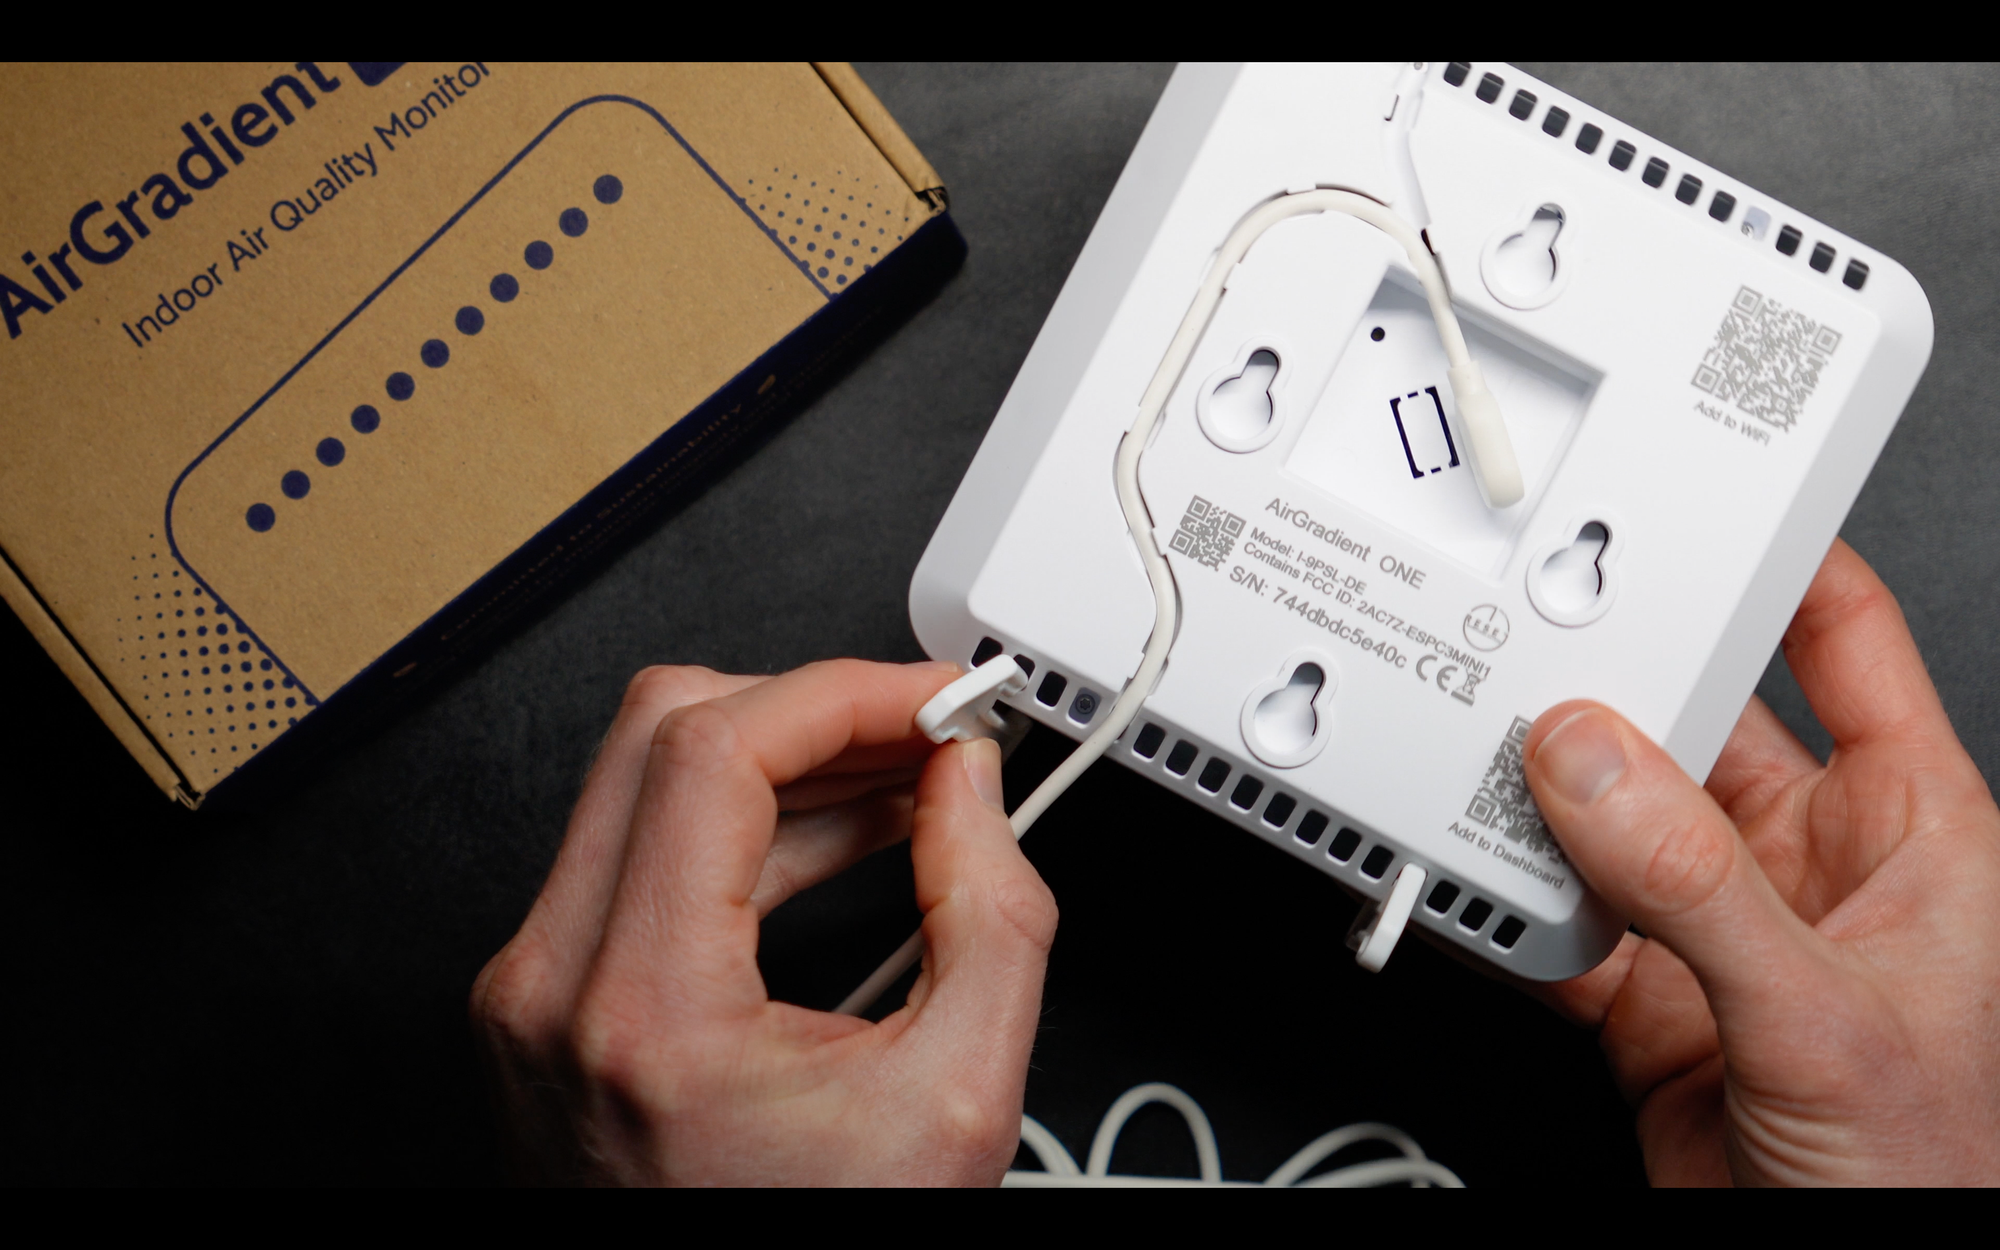
To set up the AirGradient, plug it into power using the provided USB-C to USB-A cable. Then, scan the “Add to WiFi” QR code printed on the back of the device, and join the network that appears.
During this step, I kept getting an “unable to join network” message but it eventually connected and brought up the WiFi Manager. From there, click Configure WiFi, select your 2.4GHz WiFi network, enter the login credentials, and click Save.
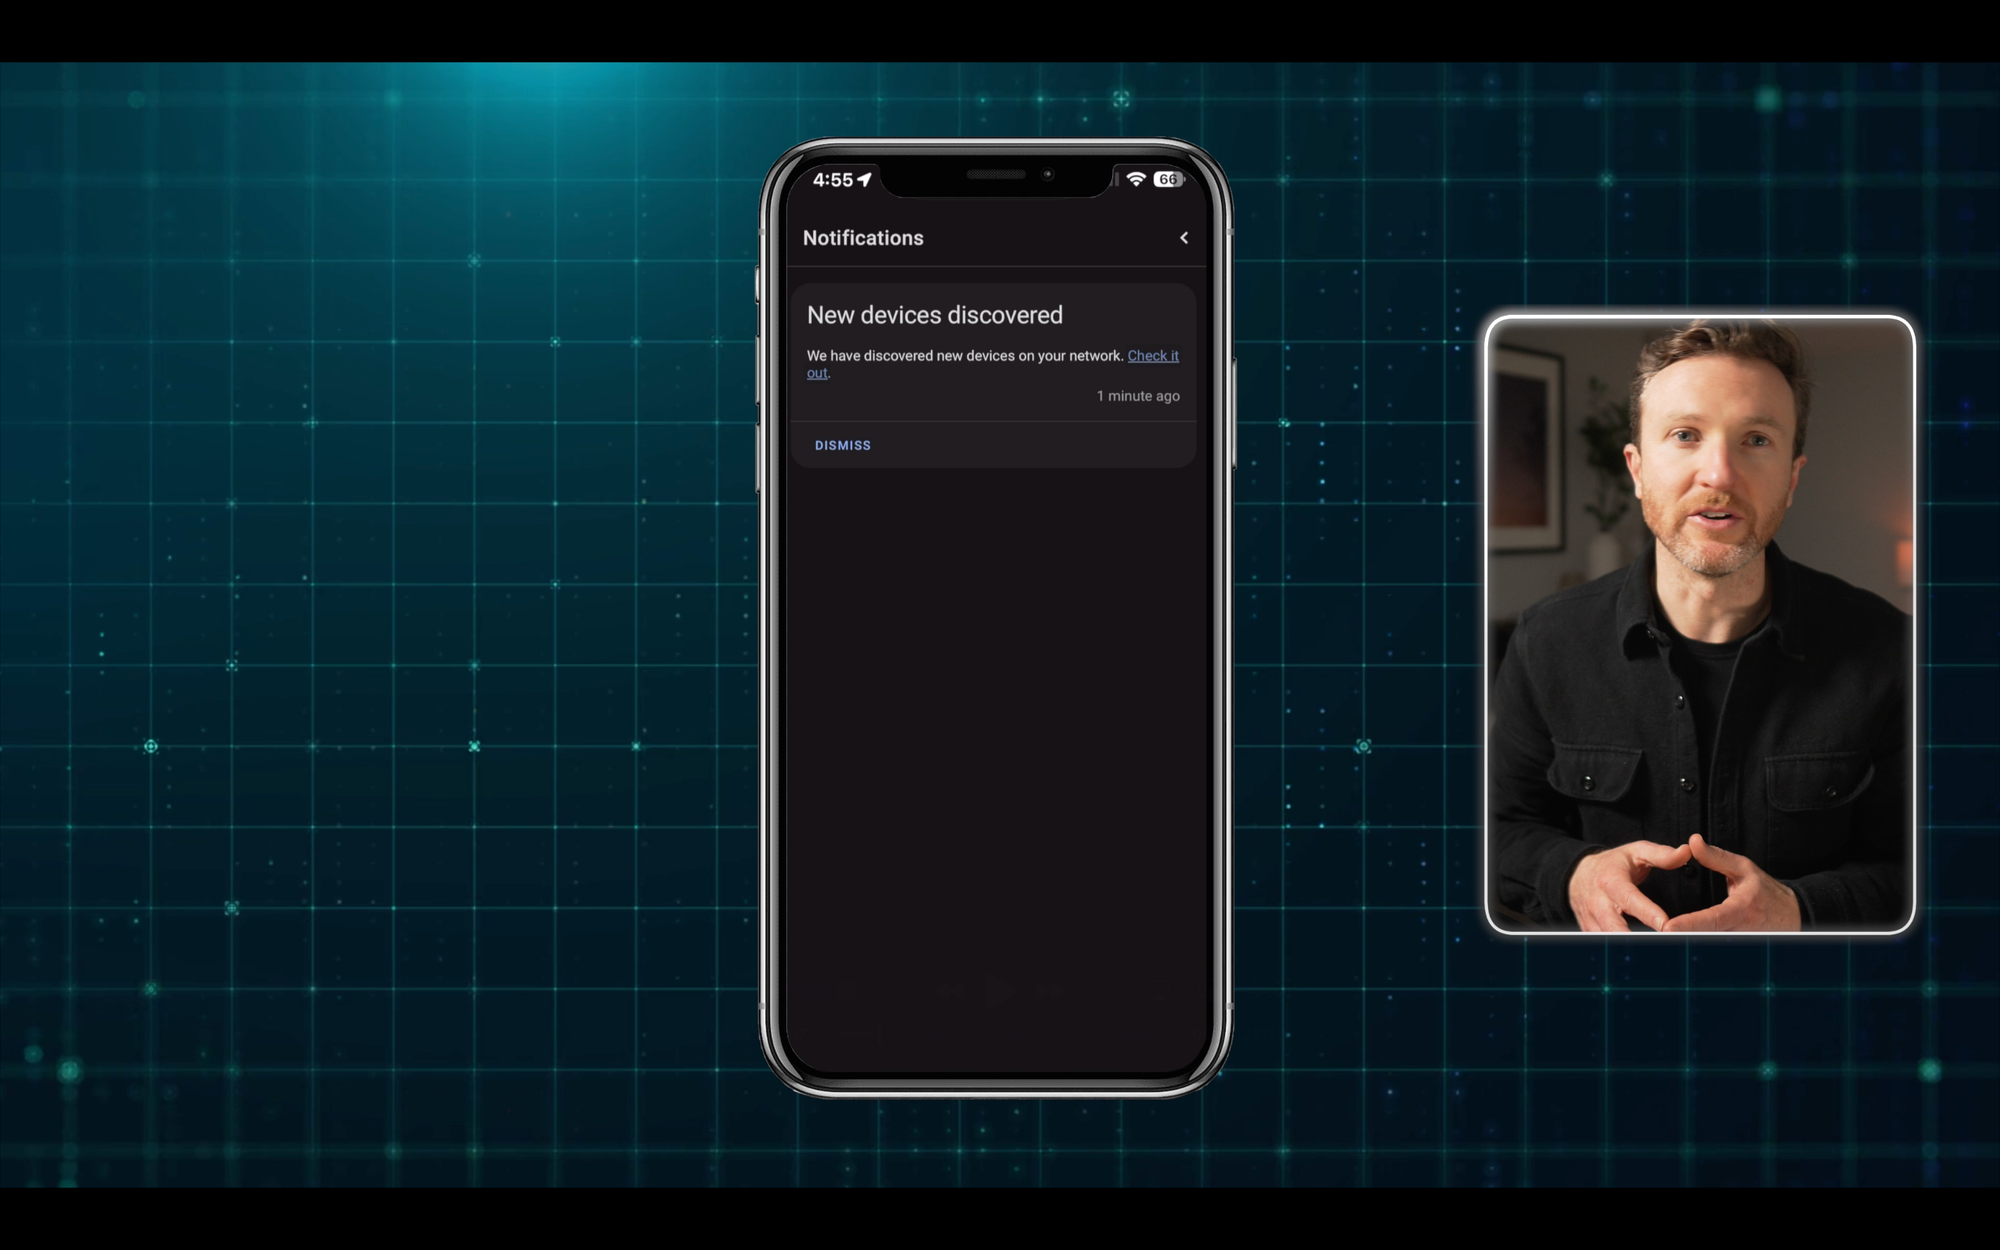
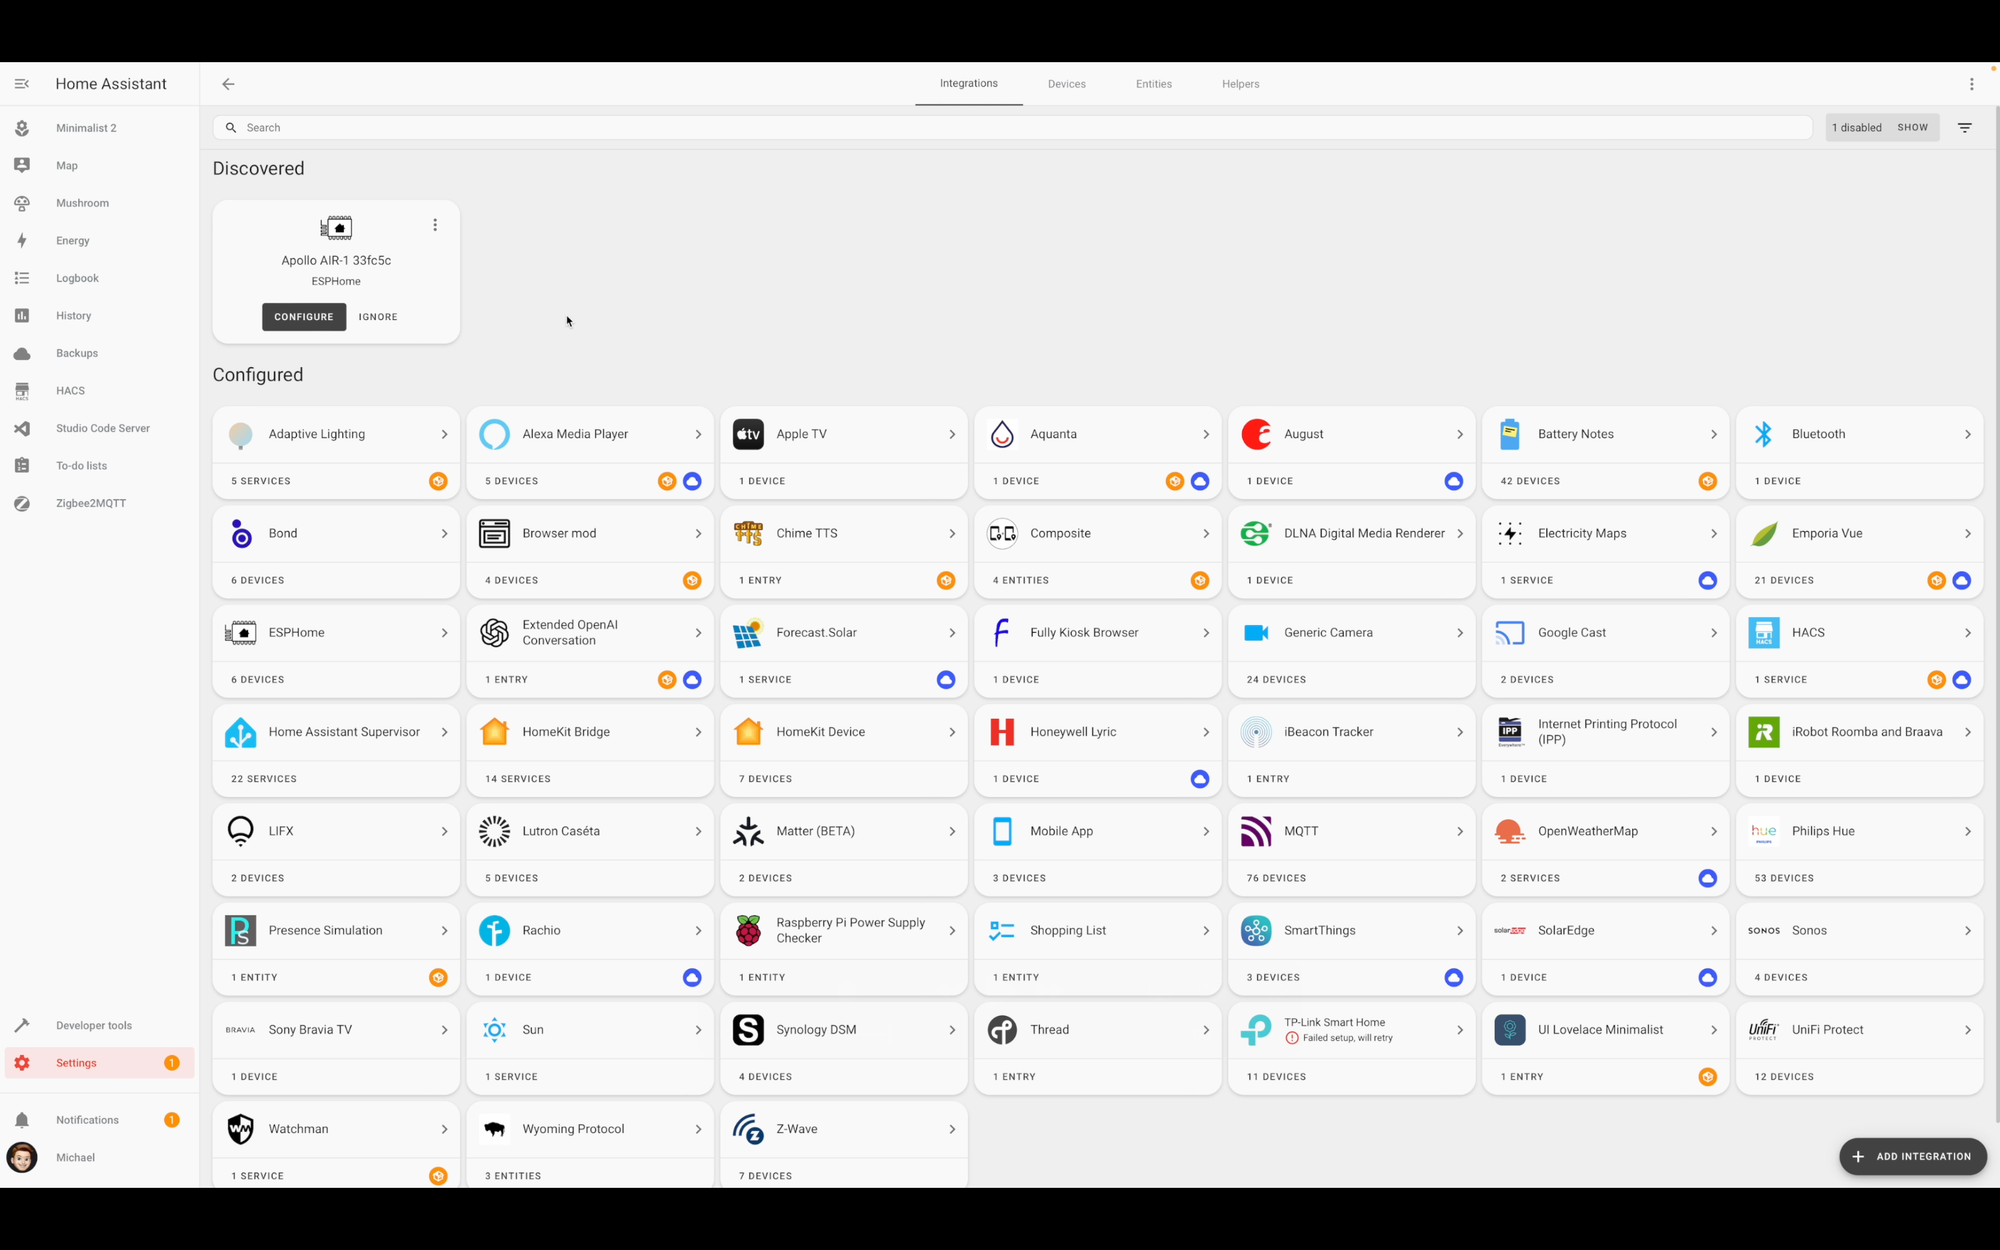
Then, open Home Assistant, and you’ll see a notification that a new device was discovered. Click to add it, and then you can assign it to an area, and AirGradient setup is complete.
To set up the Apollo, connect it to USB-C power using a cable that you already have or that you purchased as an optional $3 add-on, and join the device’s WiFi hotspot from your phone or computer. Select your 2.4GHz WiFi network, enter the login credentials, and click Save.
Once again, you’ll see a notification in Home Assistant that a new device was discovered. Click to add it, and then you can assign it to an area, and Apollo setup is complete.
Setup for both devices is quite similar, but I’ll give the point to Apollo since I didn’t have any issues connecting to the hotspot like I did with the AirGradient.

Best Air Quality Monitor for Home Assistant: Setup
Hardware
Before we get into the features, let’s take a look at the hardware, since this is the biggest area where these two devices differ.
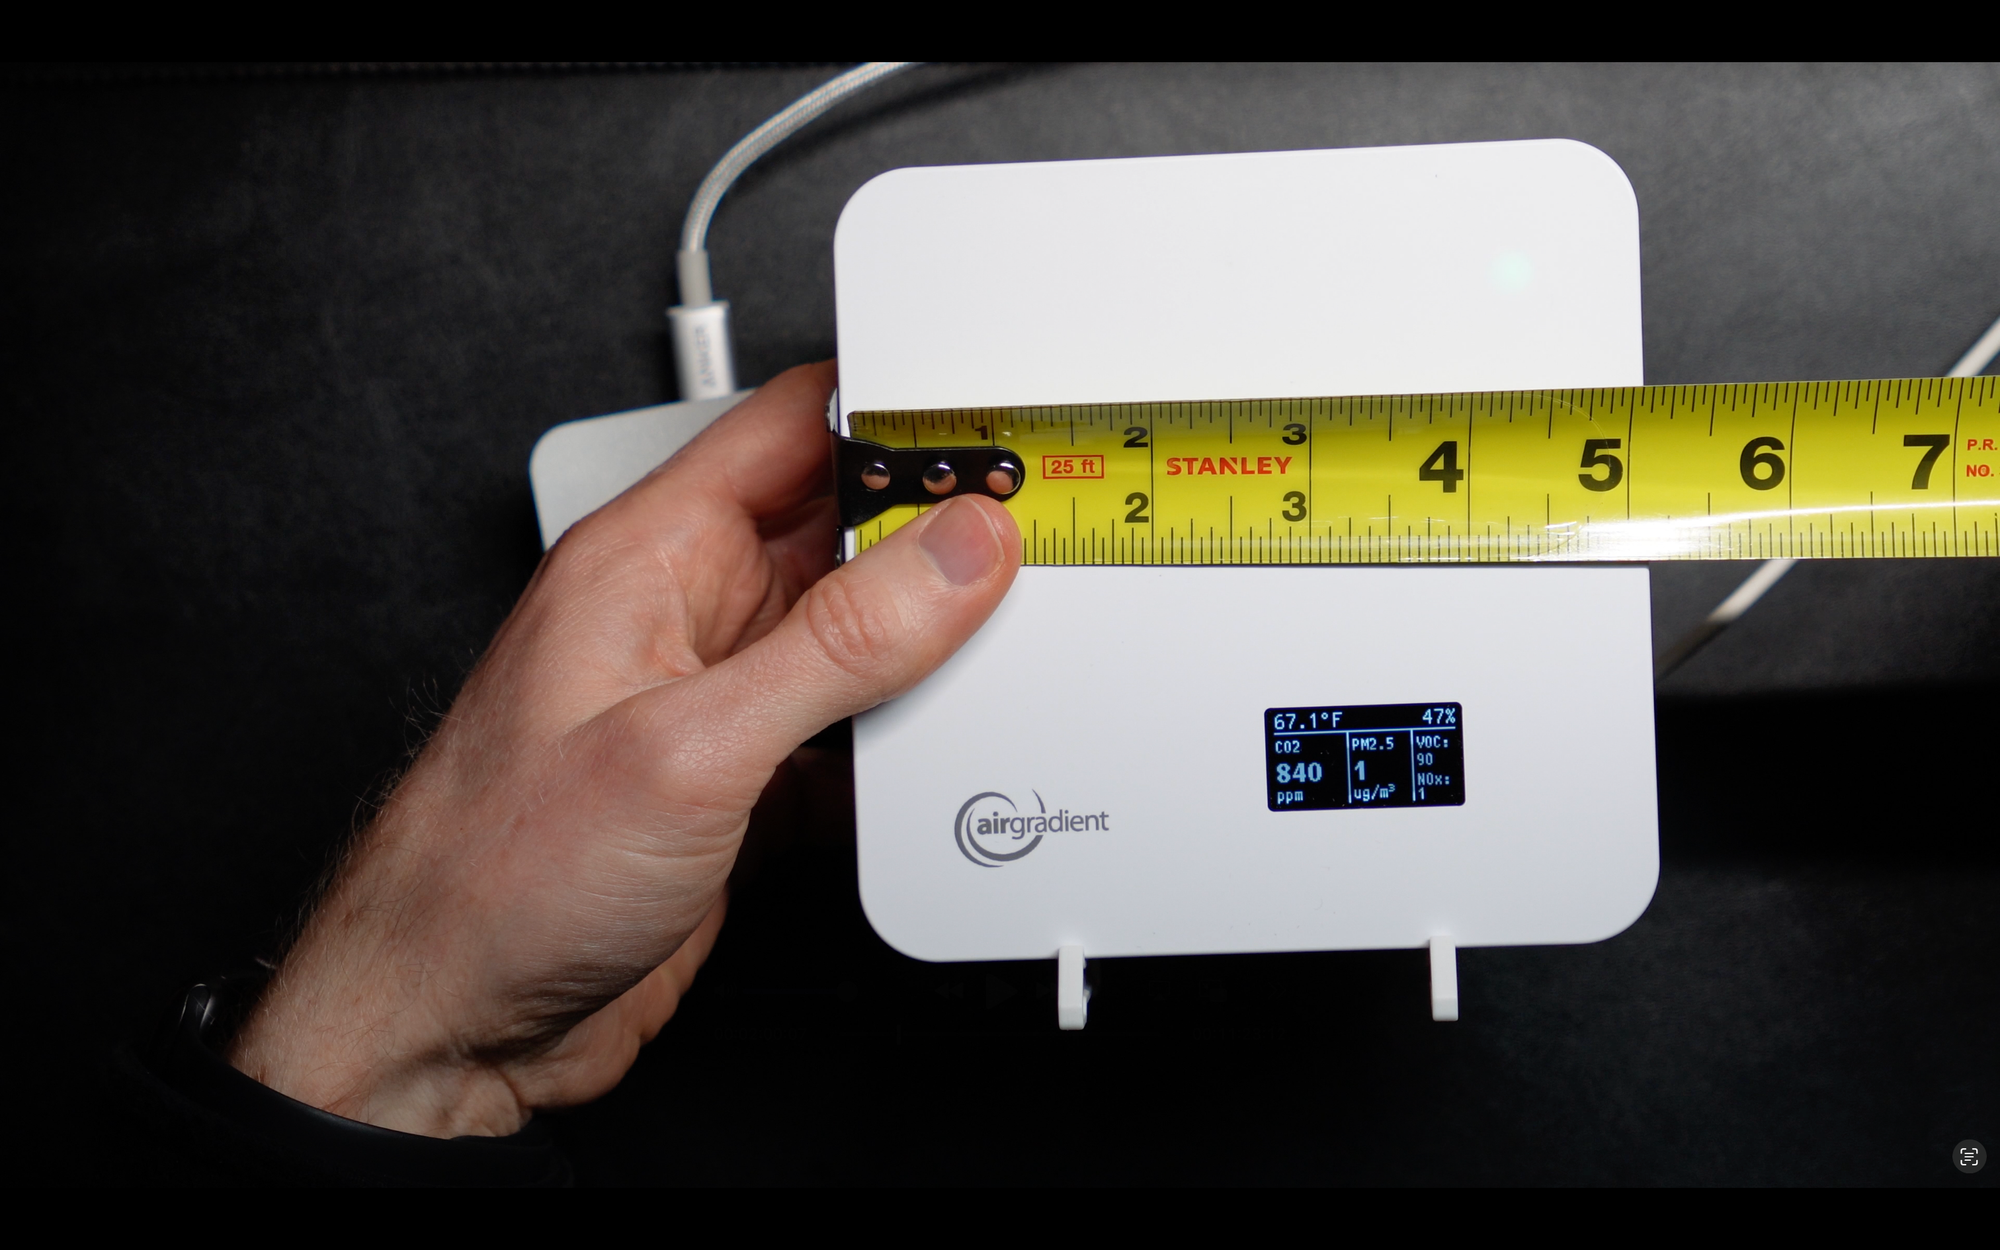
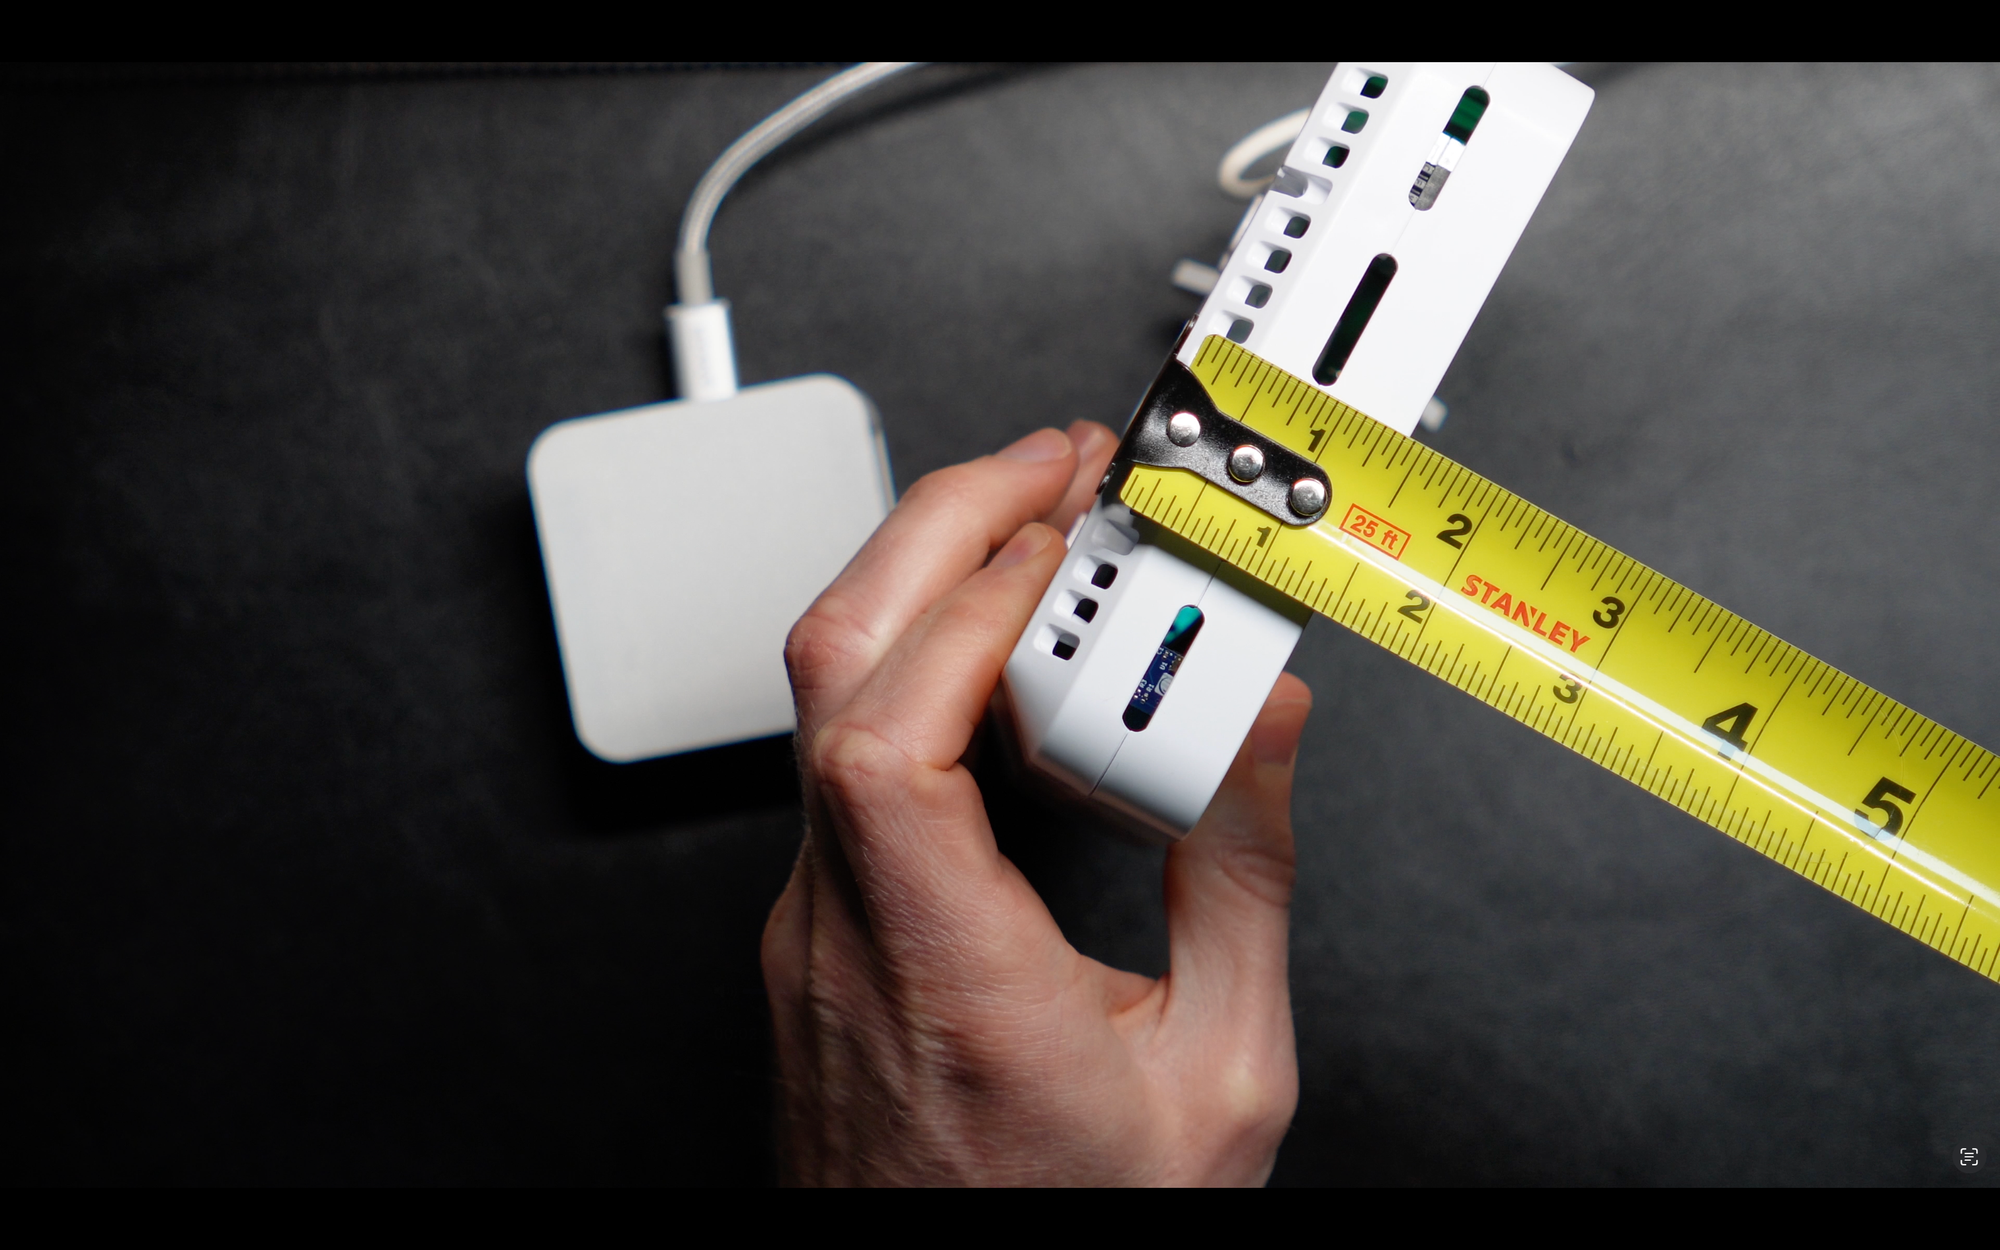
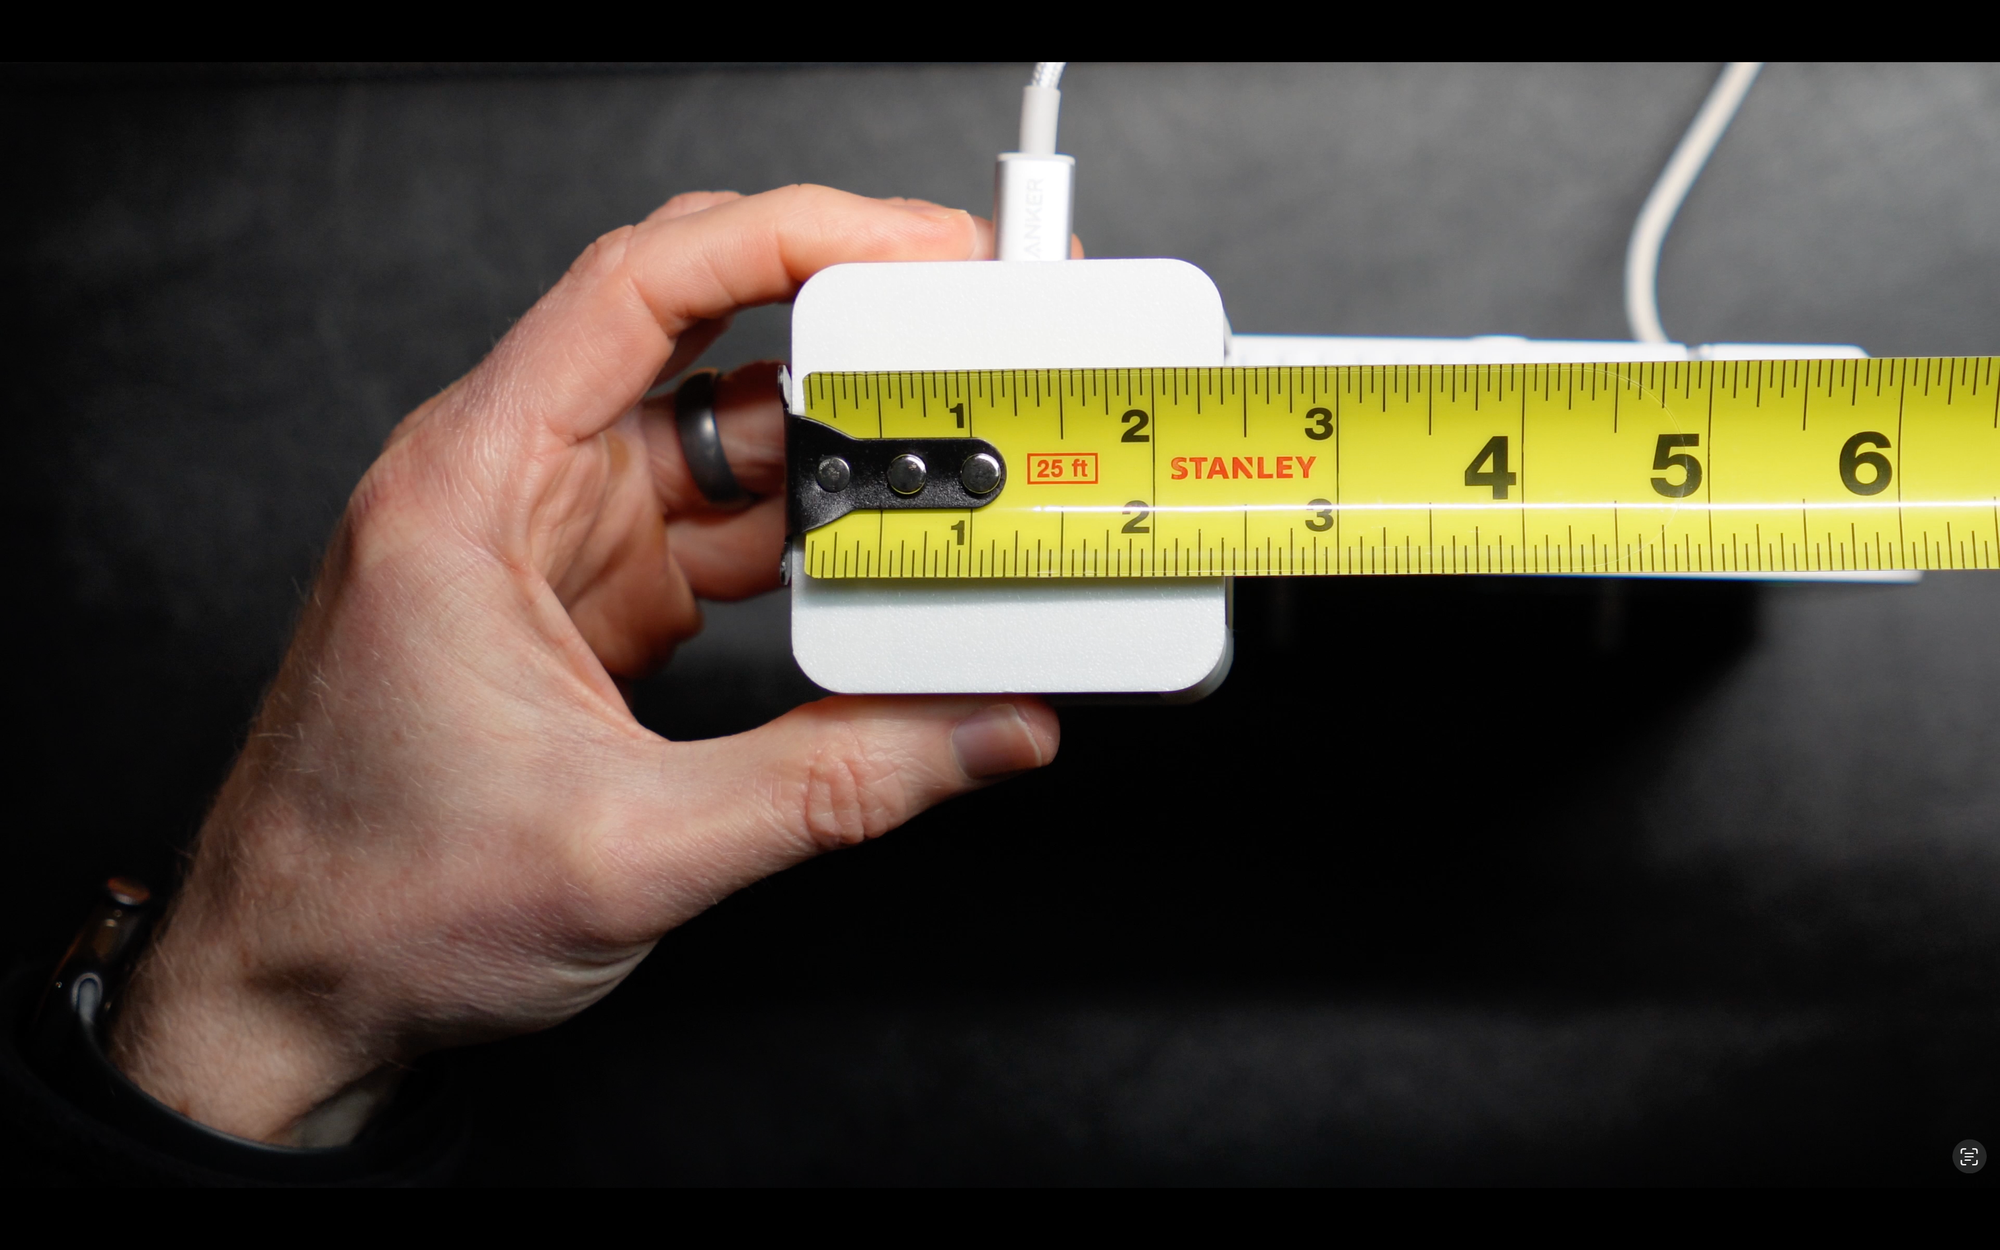
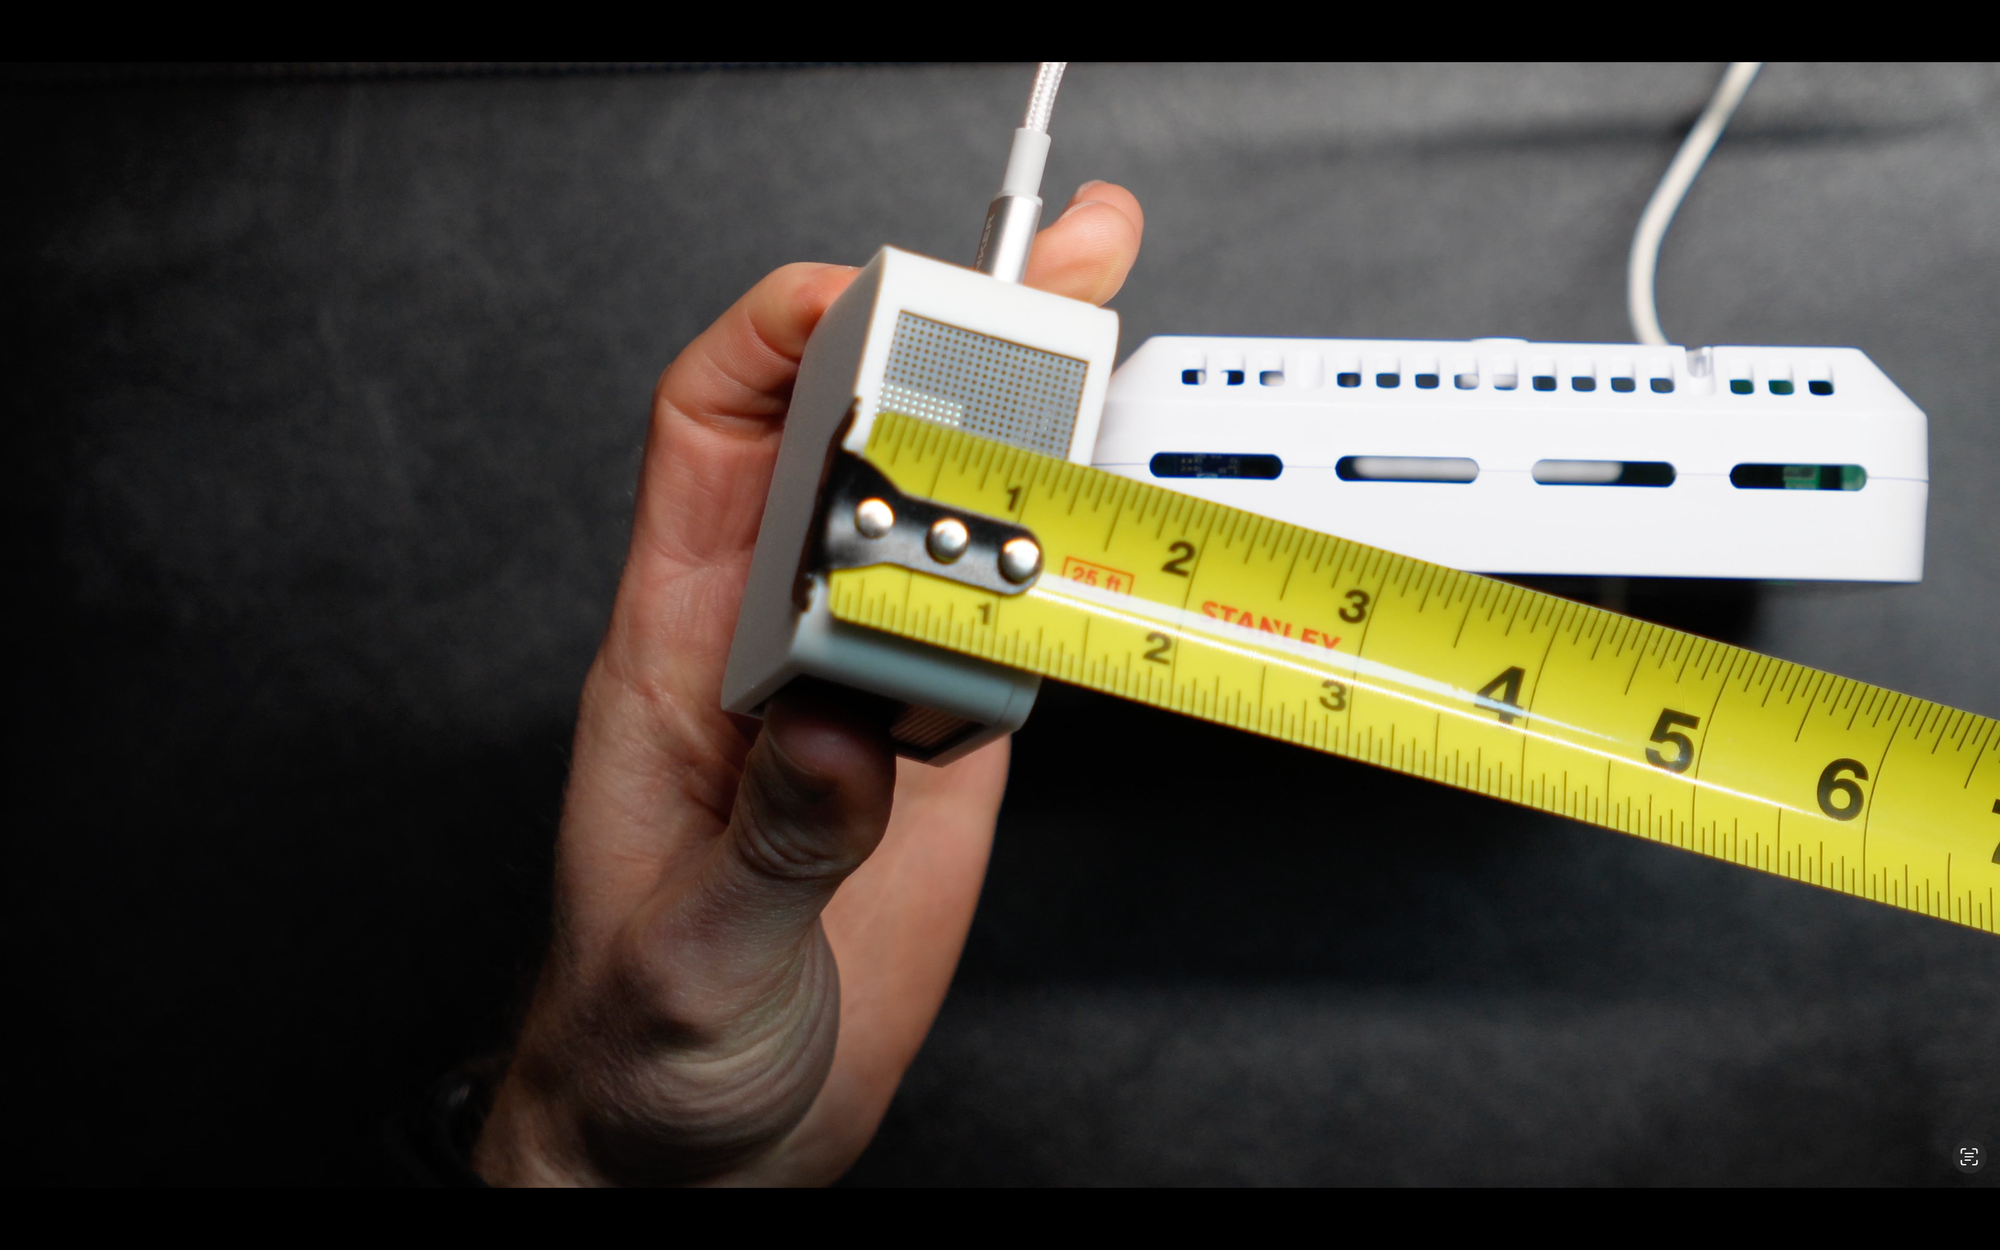
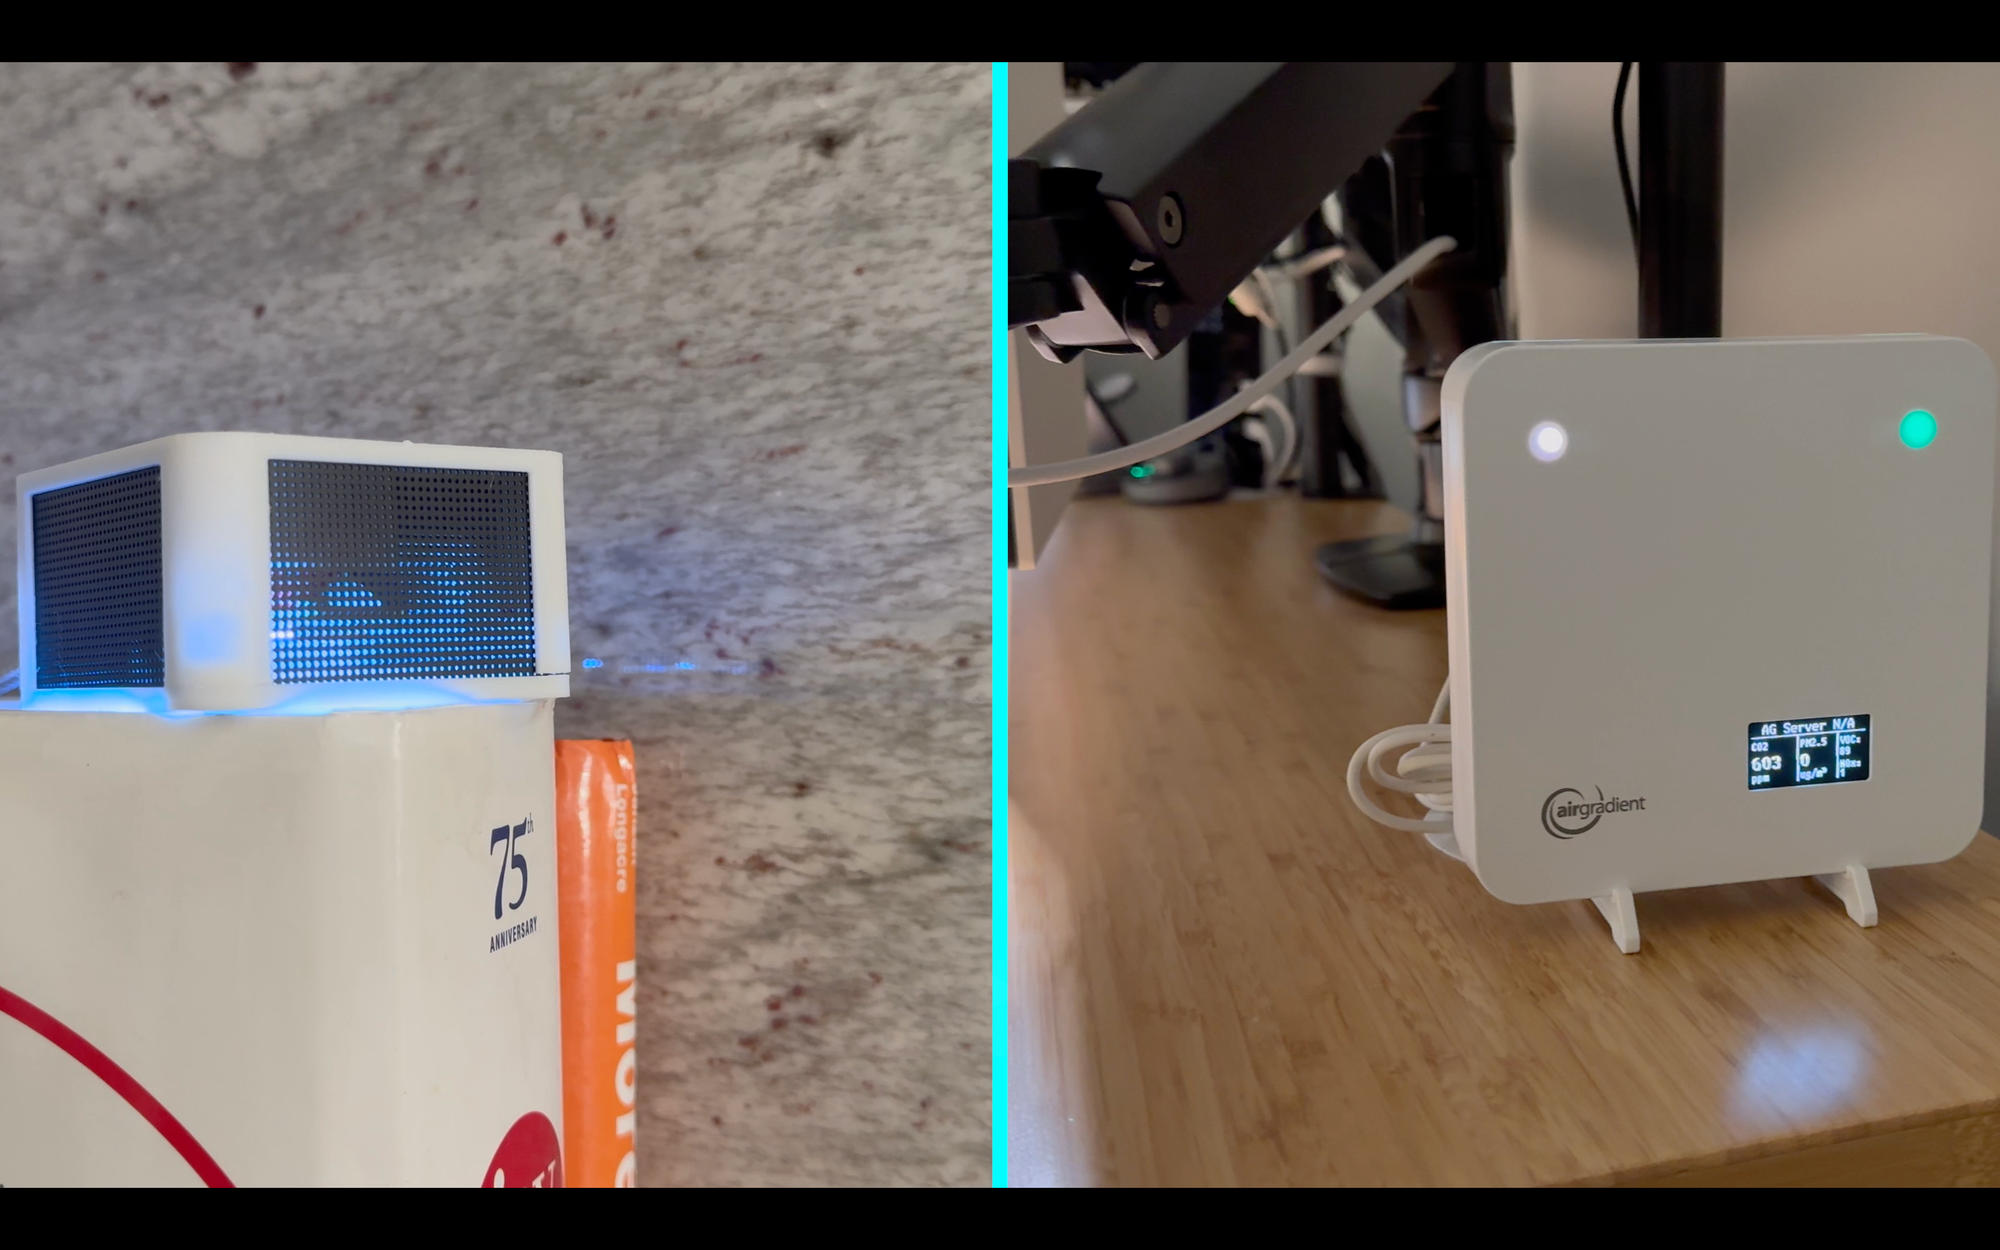
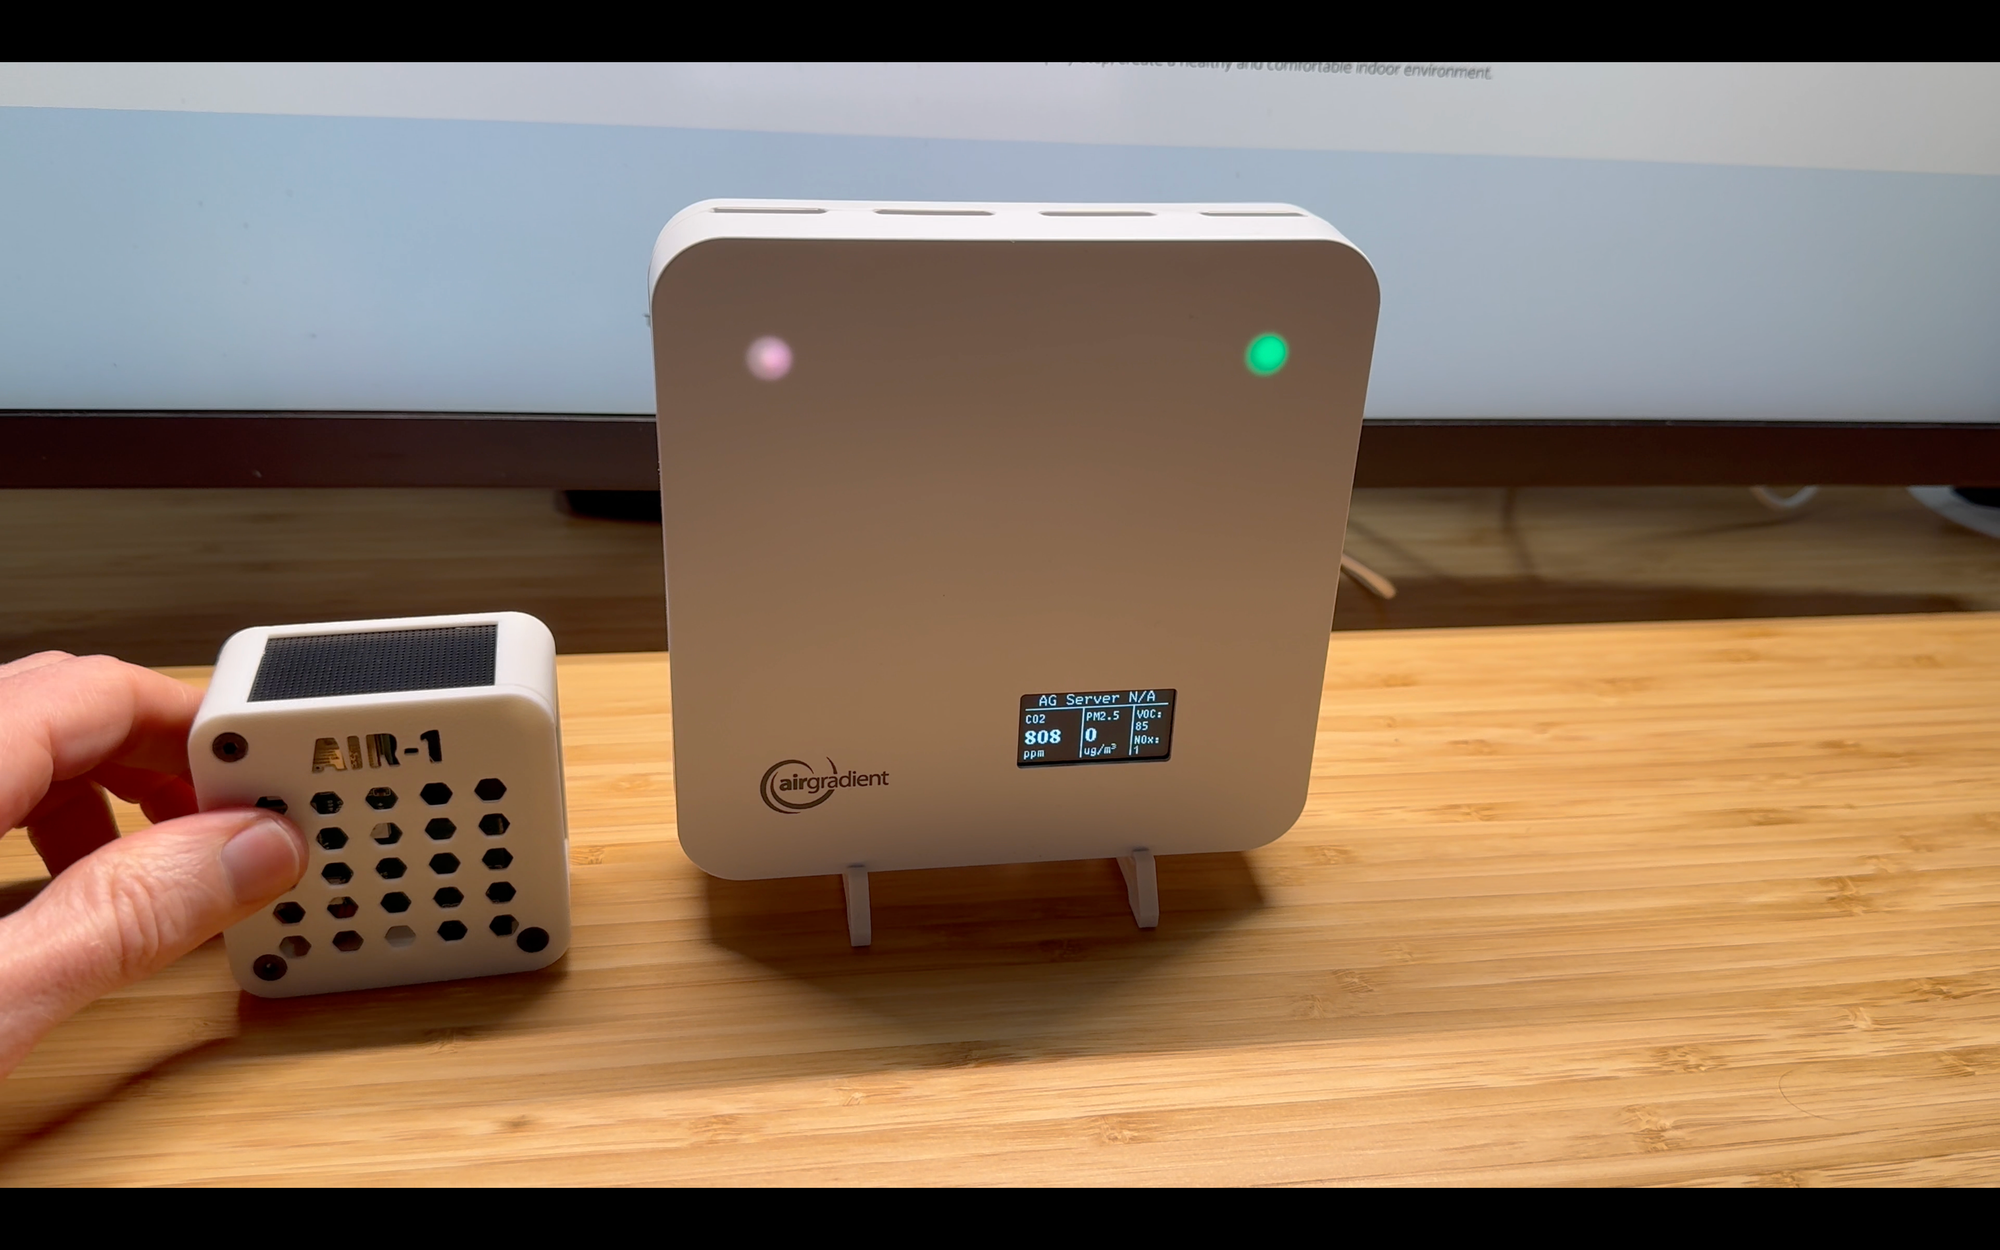
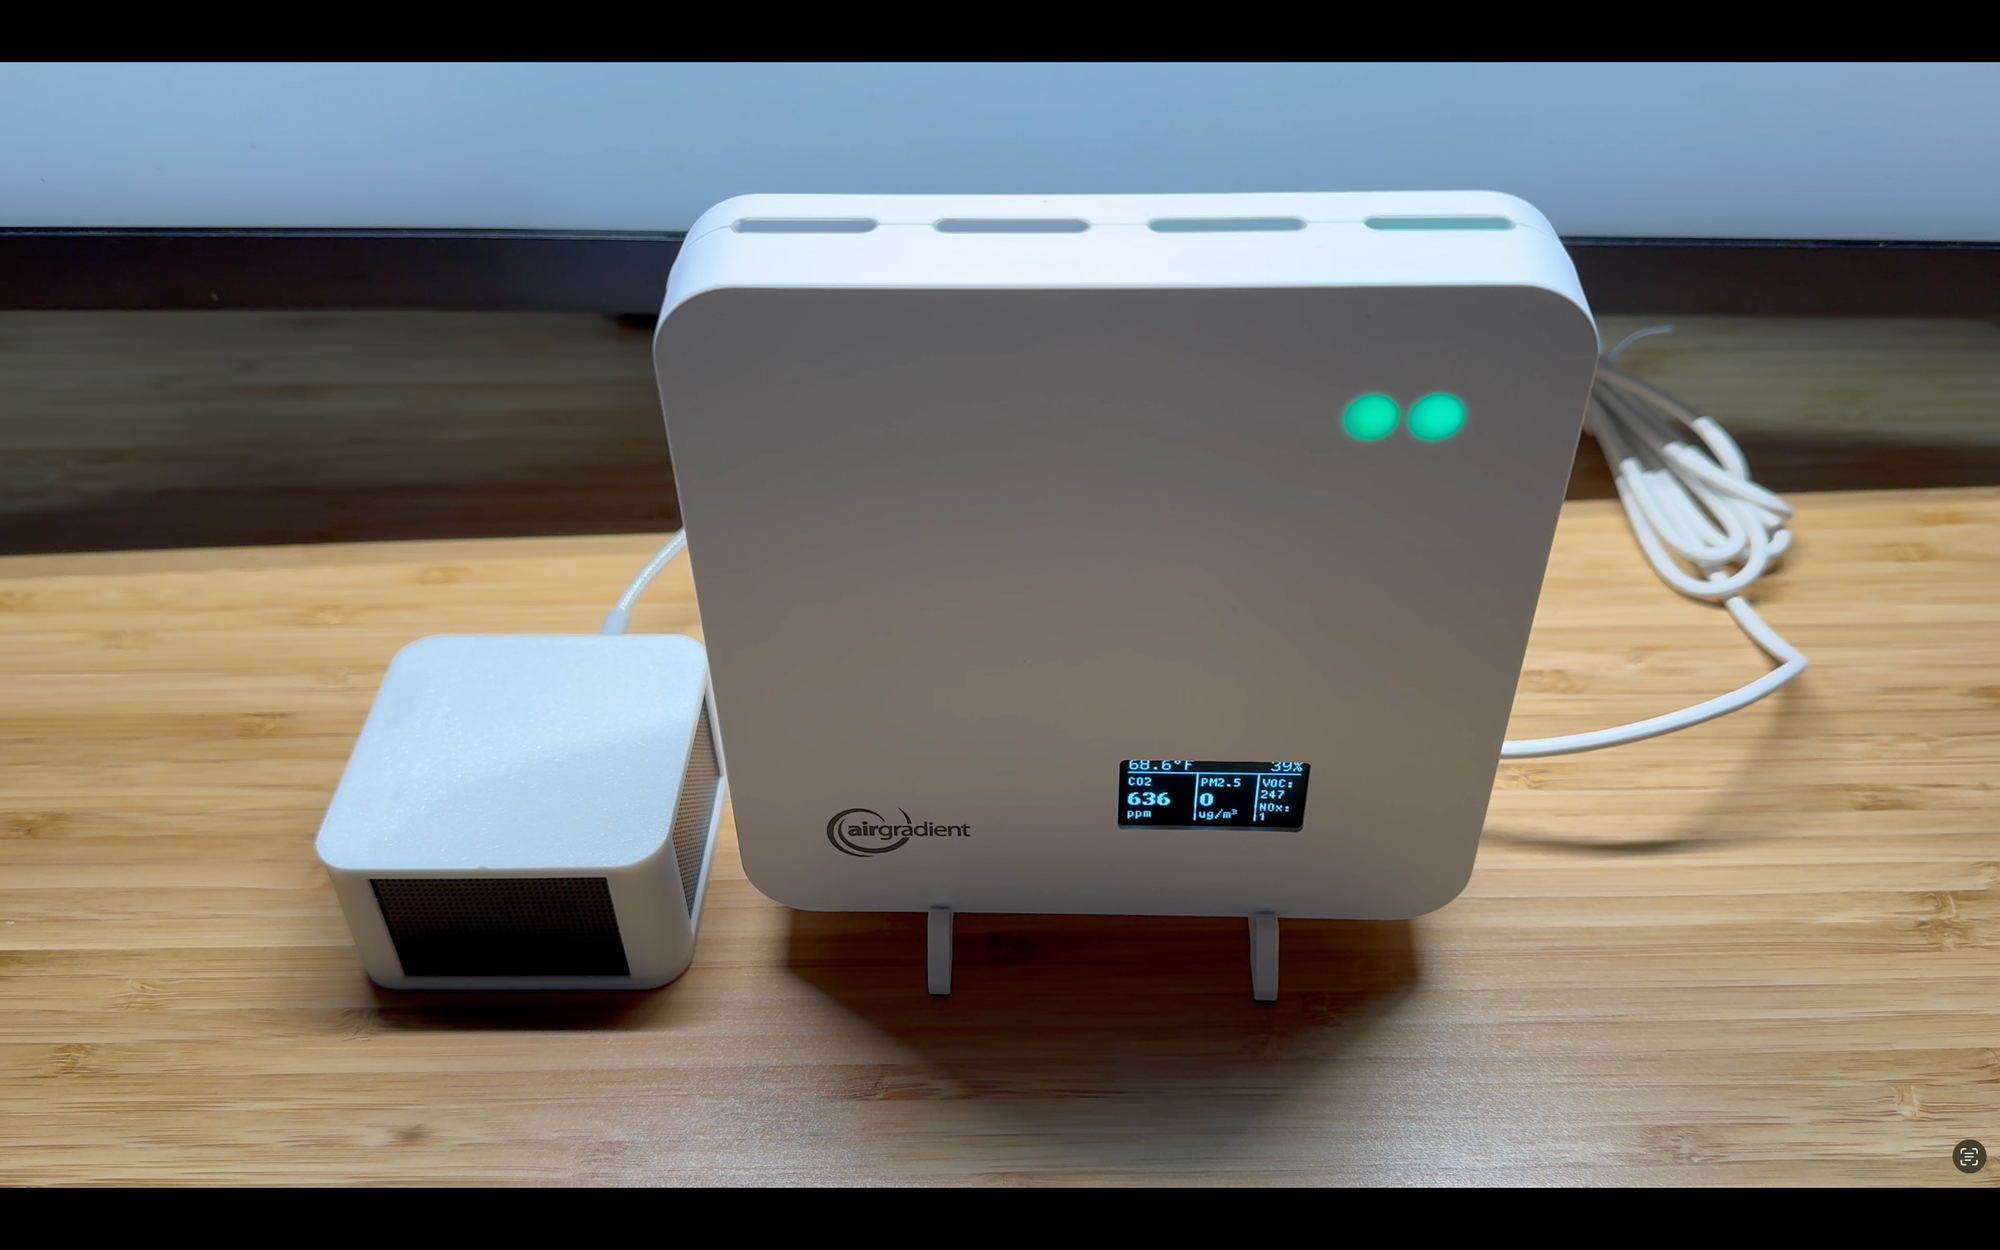
The AirGradient is significantly larger at roughly 5.1 x 5.1 x 1.4 inches (130 x 130 x 36 mm), compared with just 2 3/8 x 2 3/8 x 1 1/4 inches (61 x 61 x 30 mm) for the Apollo. In other words, the Apollo is less than half the length and width of the AirGradient.
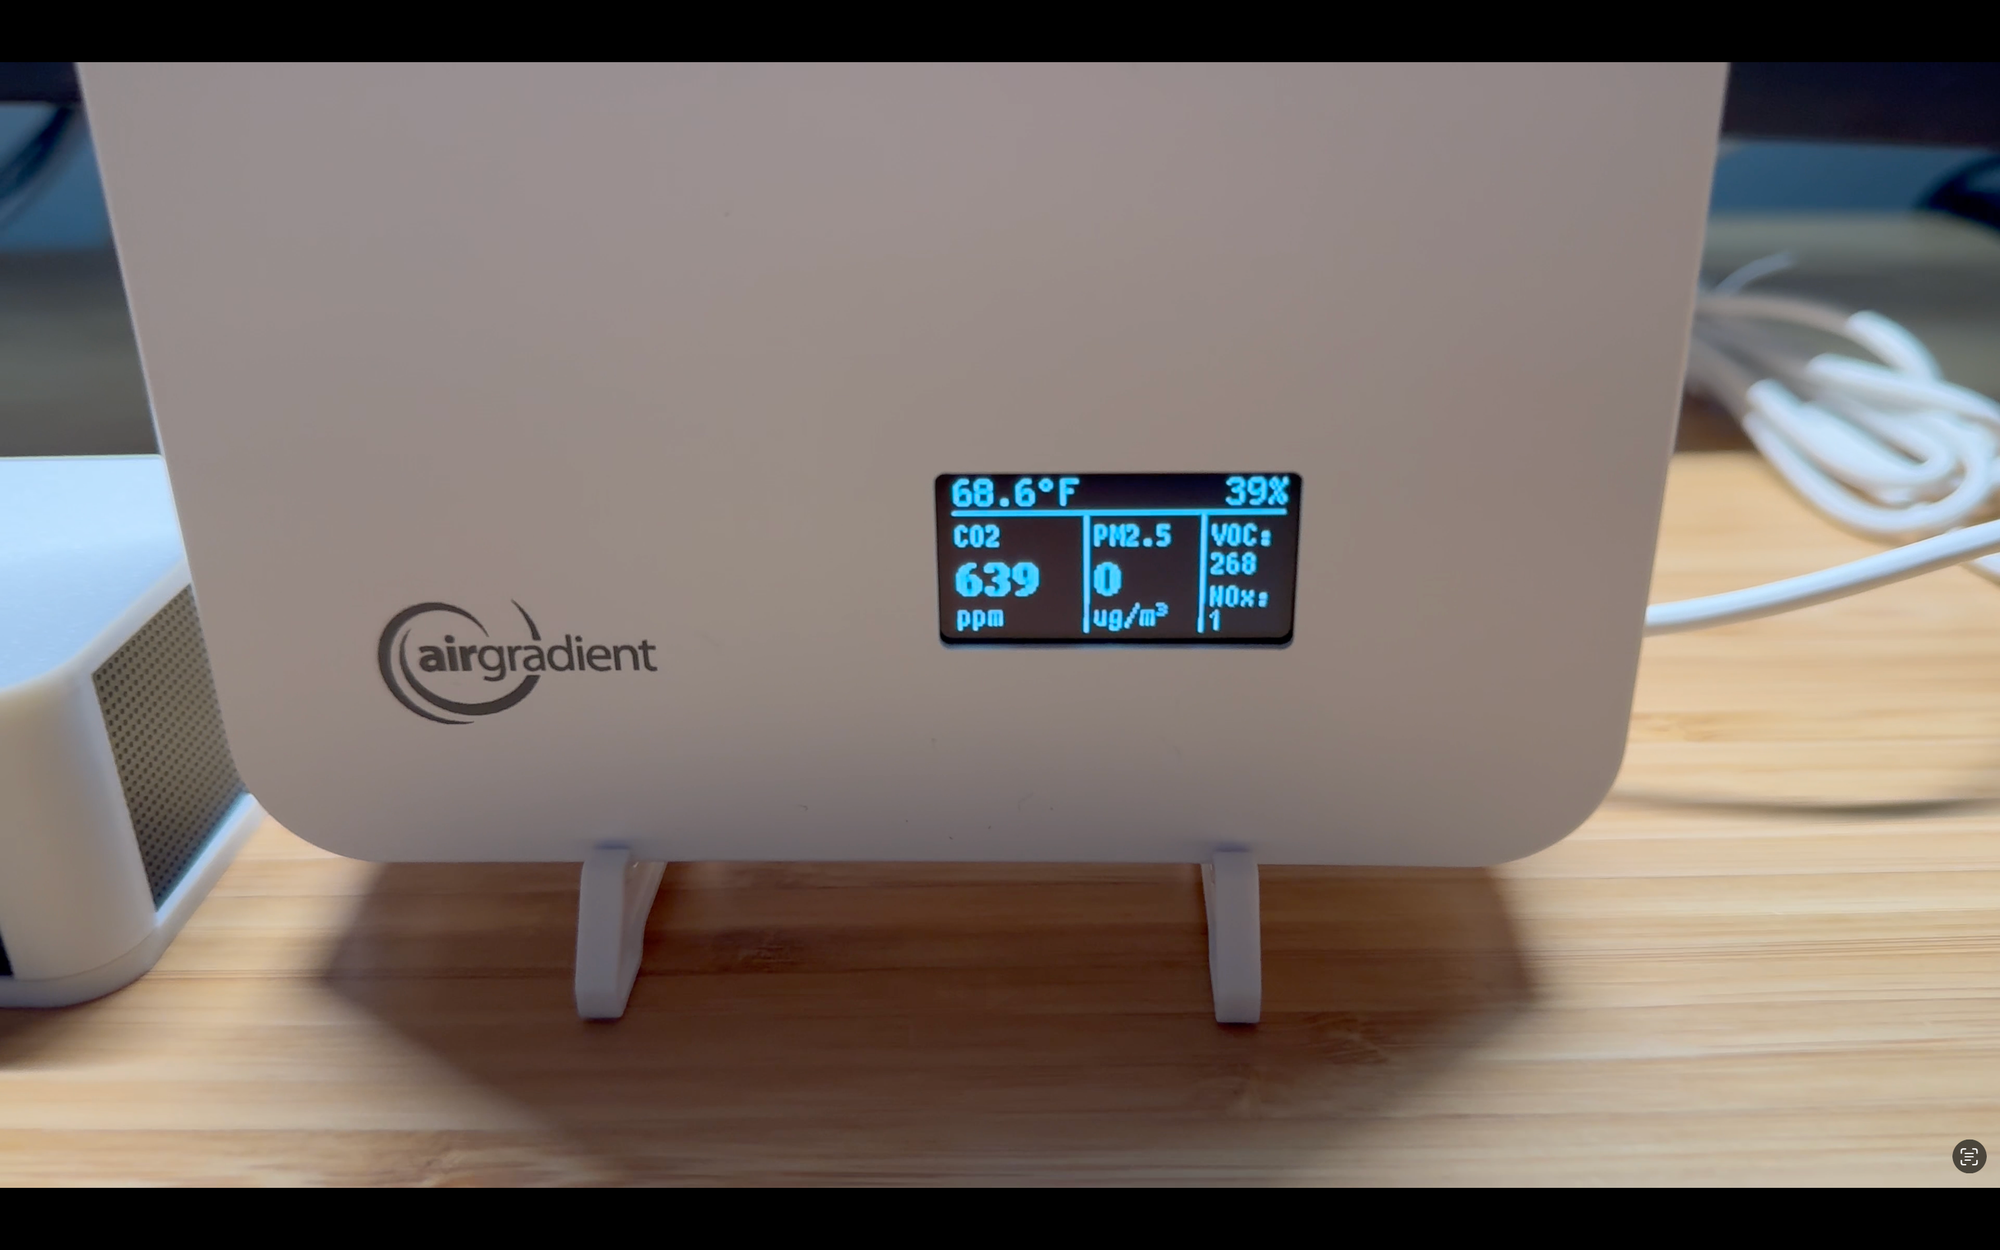
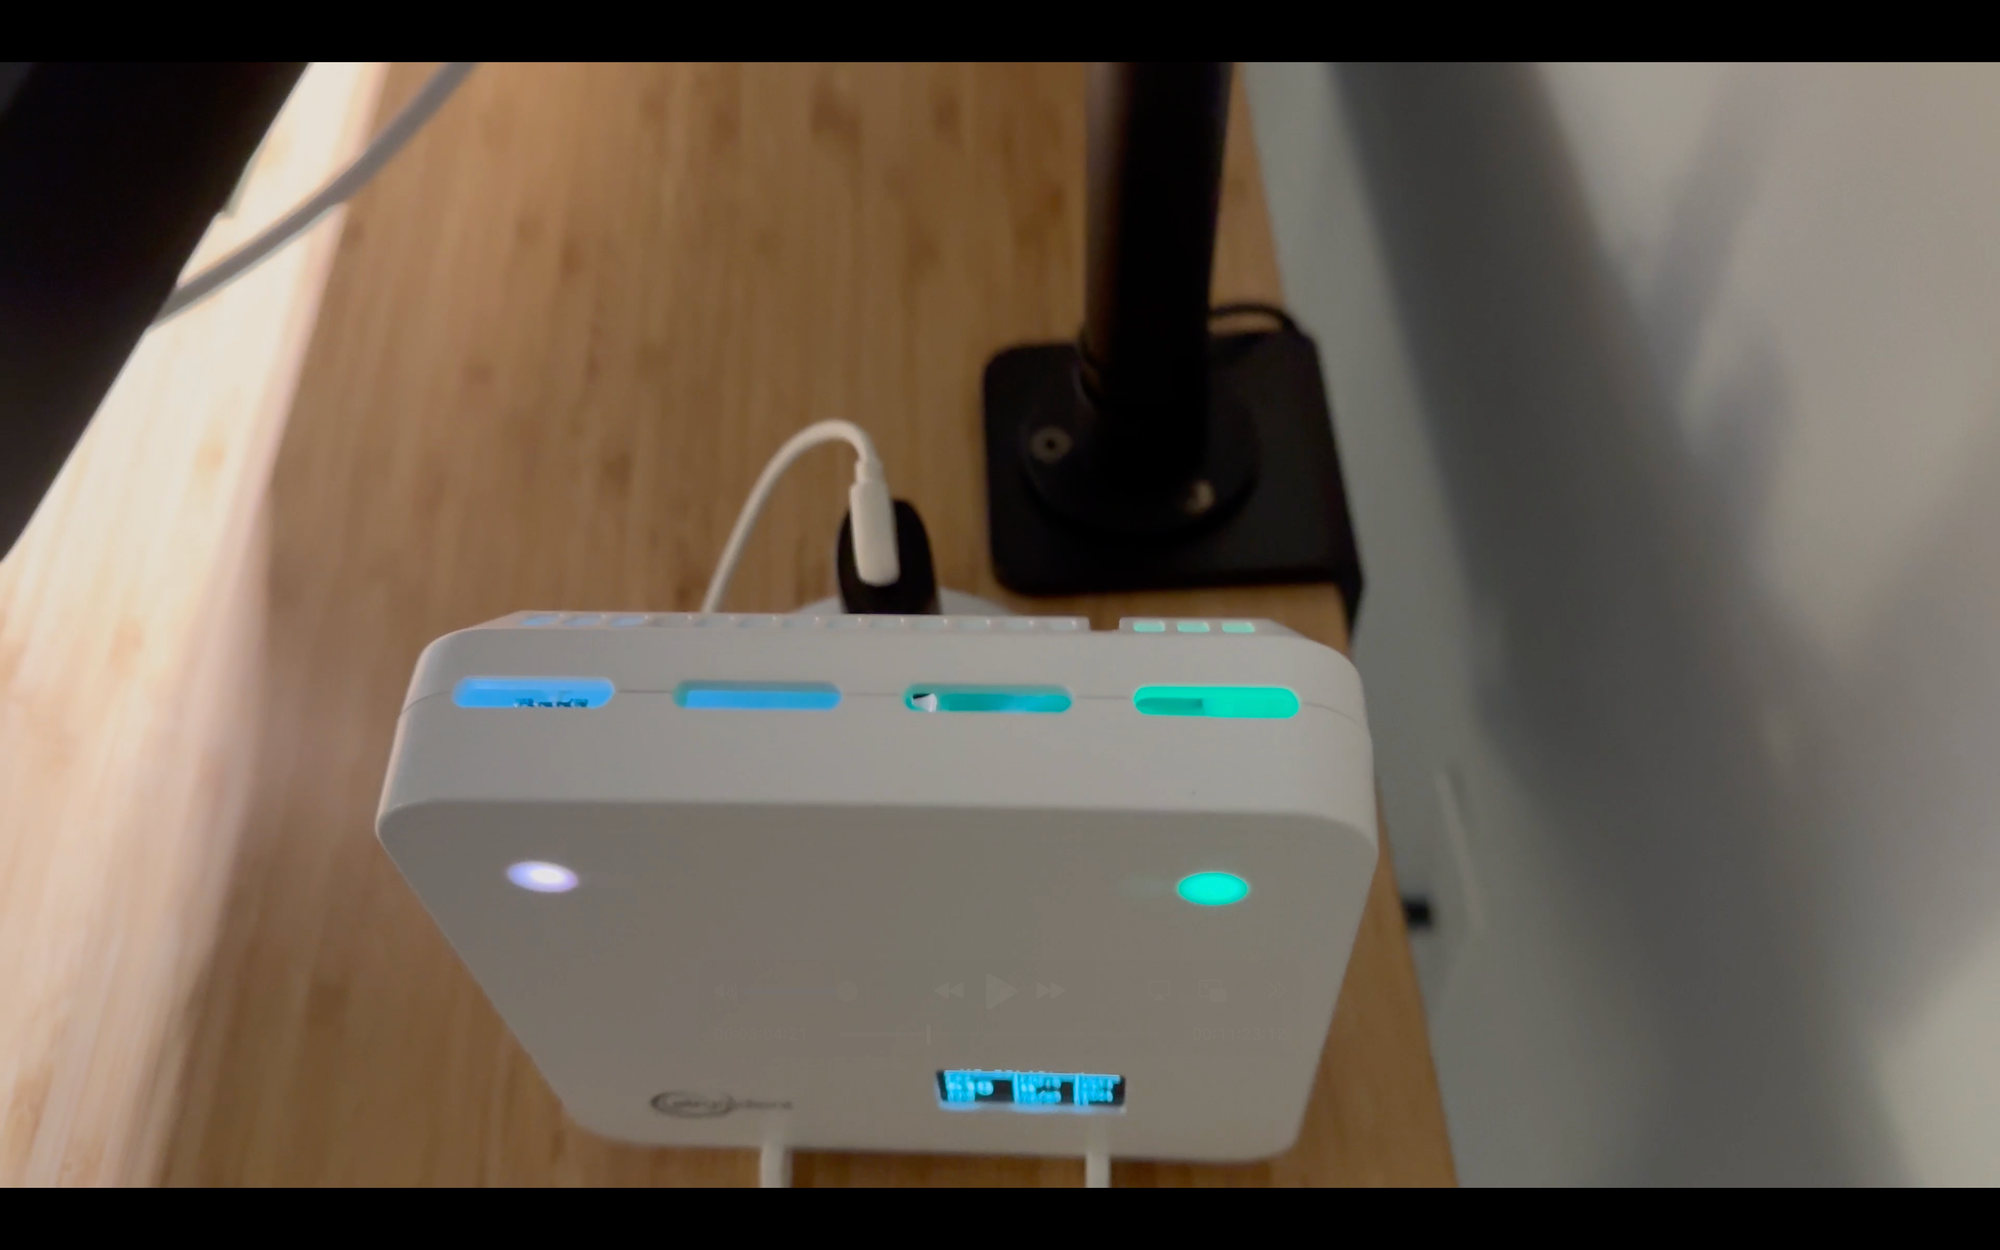
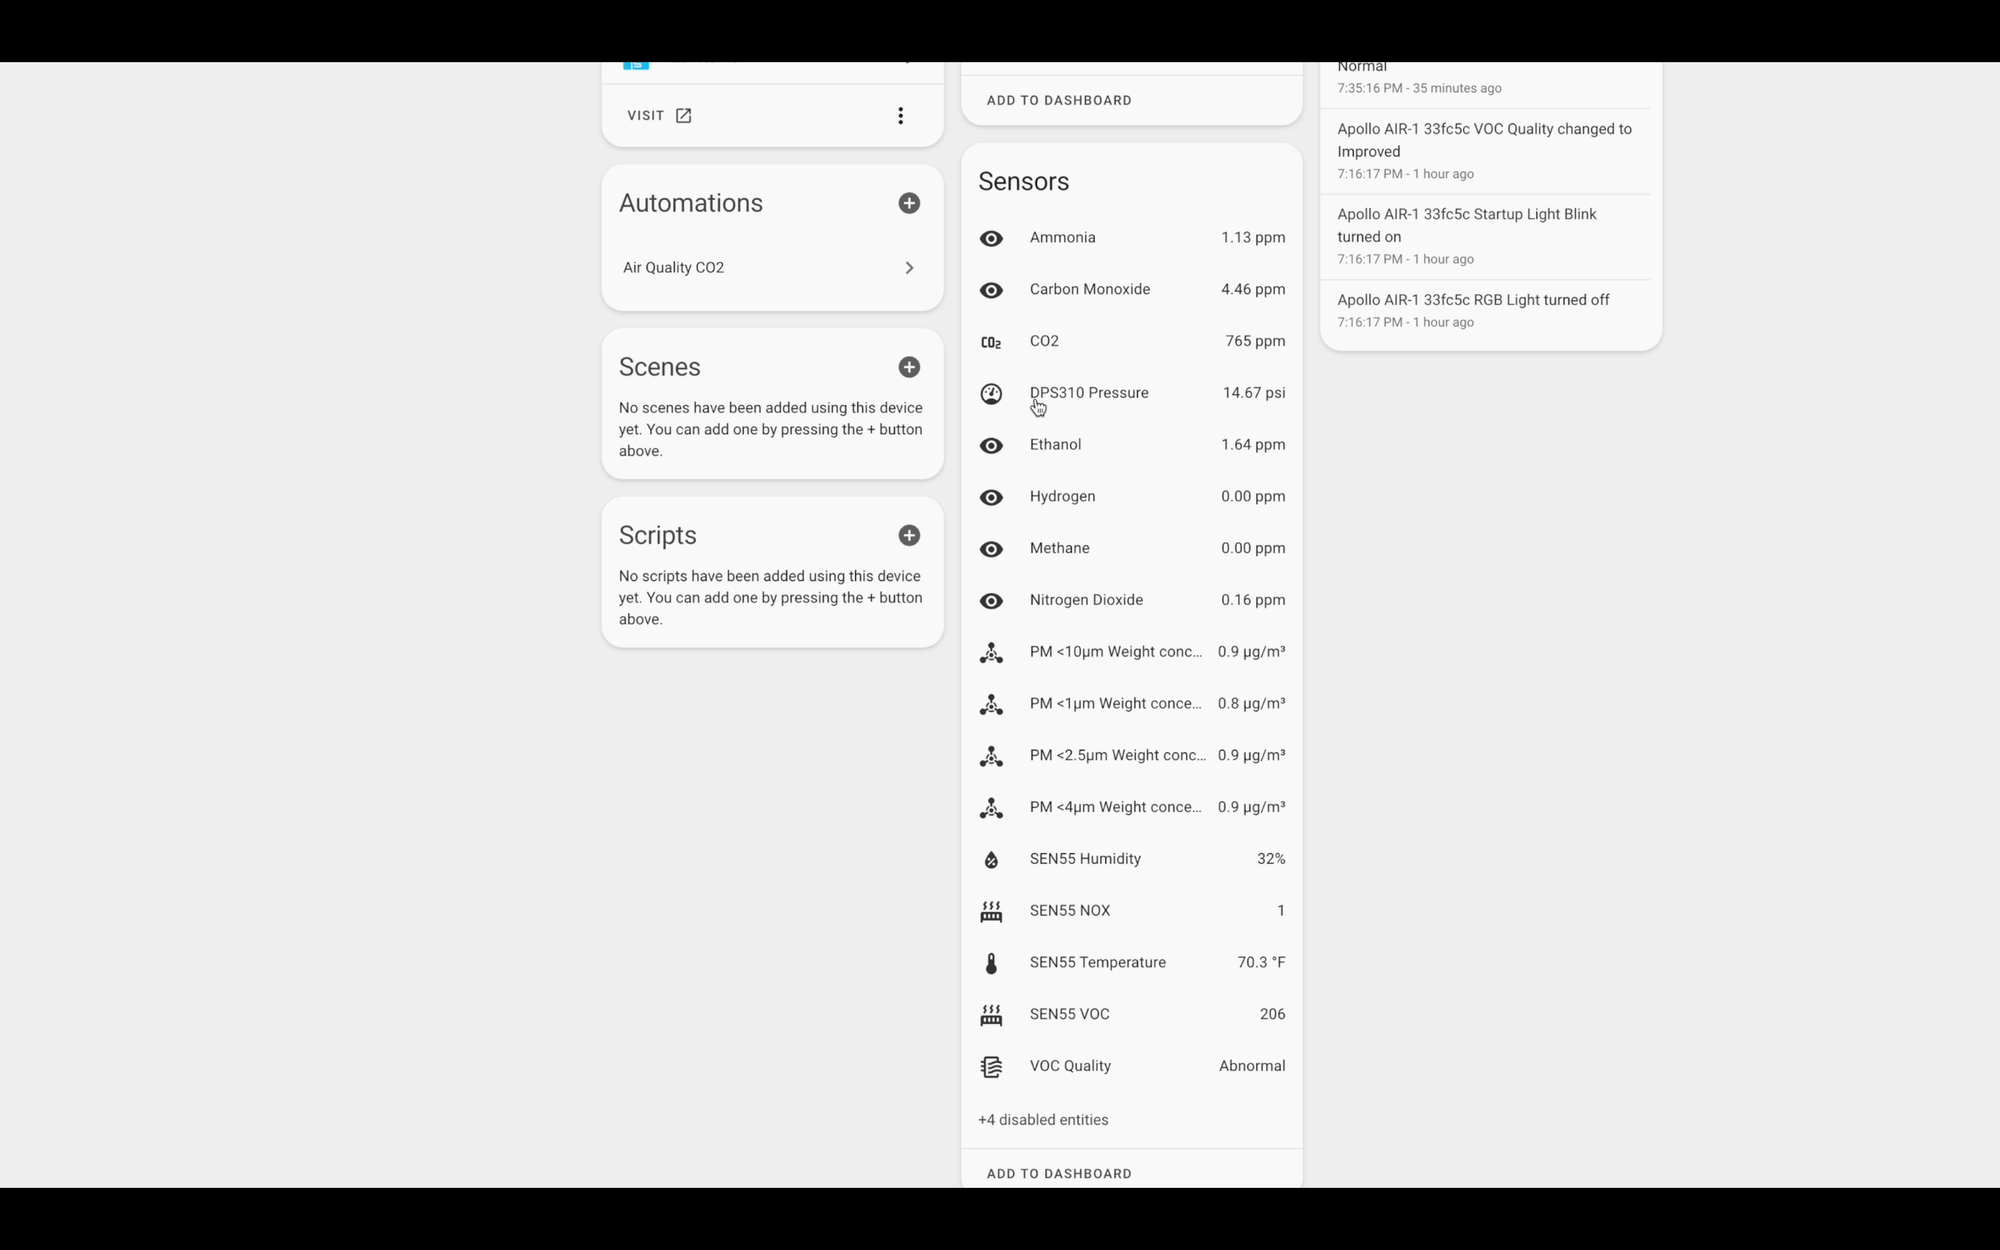
The other notable difference — and perhaps the biggest thing that may matter to you in this entire comparison — is that the AirGradient has a 1.3 inch (33 mm) OLED display for real-time, visible readings of temperature, humidity, CO2, particulate matter, volatile organic compounds, and nitrogen oxides. There is no display on the Apollo, so you’ll need to view the readings in Home Assistant.
Other hardware differences include the option to wall-mount the AirGradient, or place it on a table using the included legs, whereas the Apollo is just meant to sit flat on a surface.
Additionally, the Apollo makes a persistent, low humming noise, which is easy to hear in a quiet room, and I find it a bit annoying.
Also, the temperature and humidity sensors are isolated on the AirGradient to avoid impact from the microcontroller’s heat, whereas the Apollo uses configurable software offsets to account for this heat transfer.
Finally, while both devices measure many of the same things related to air quality, they use different sensors to get the job done, which may contribute to different readings.
While I like the small form factor of the Apollo, I’m going to give the hardware edge to the AirGradient due to the convenience of the OLED display, flexible mounting options, quiet operation, and sensor isolation.
Best Air Quality Monitor for Home Assistant: Hardware
Particulate Matter
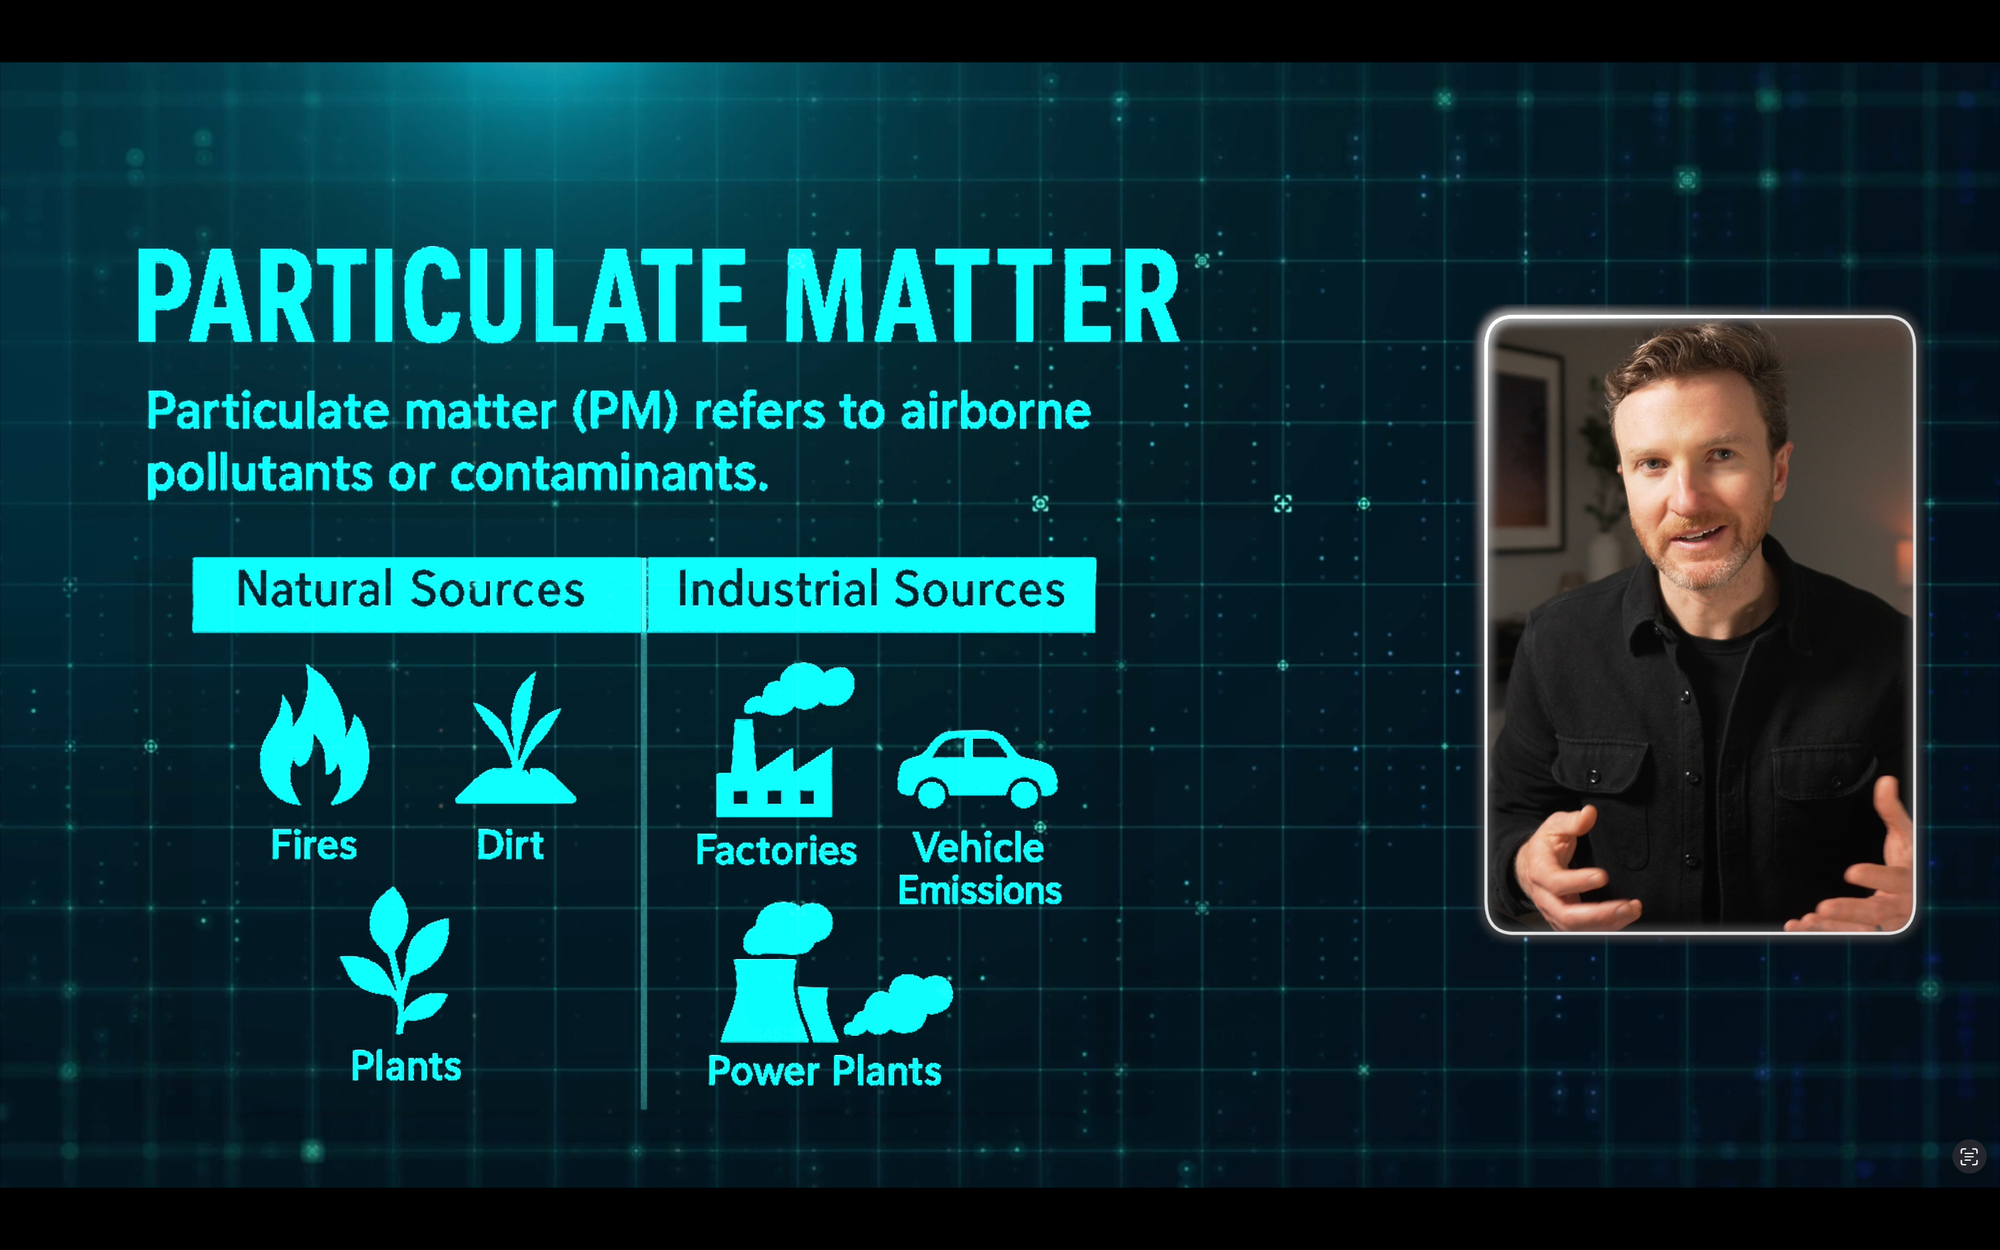
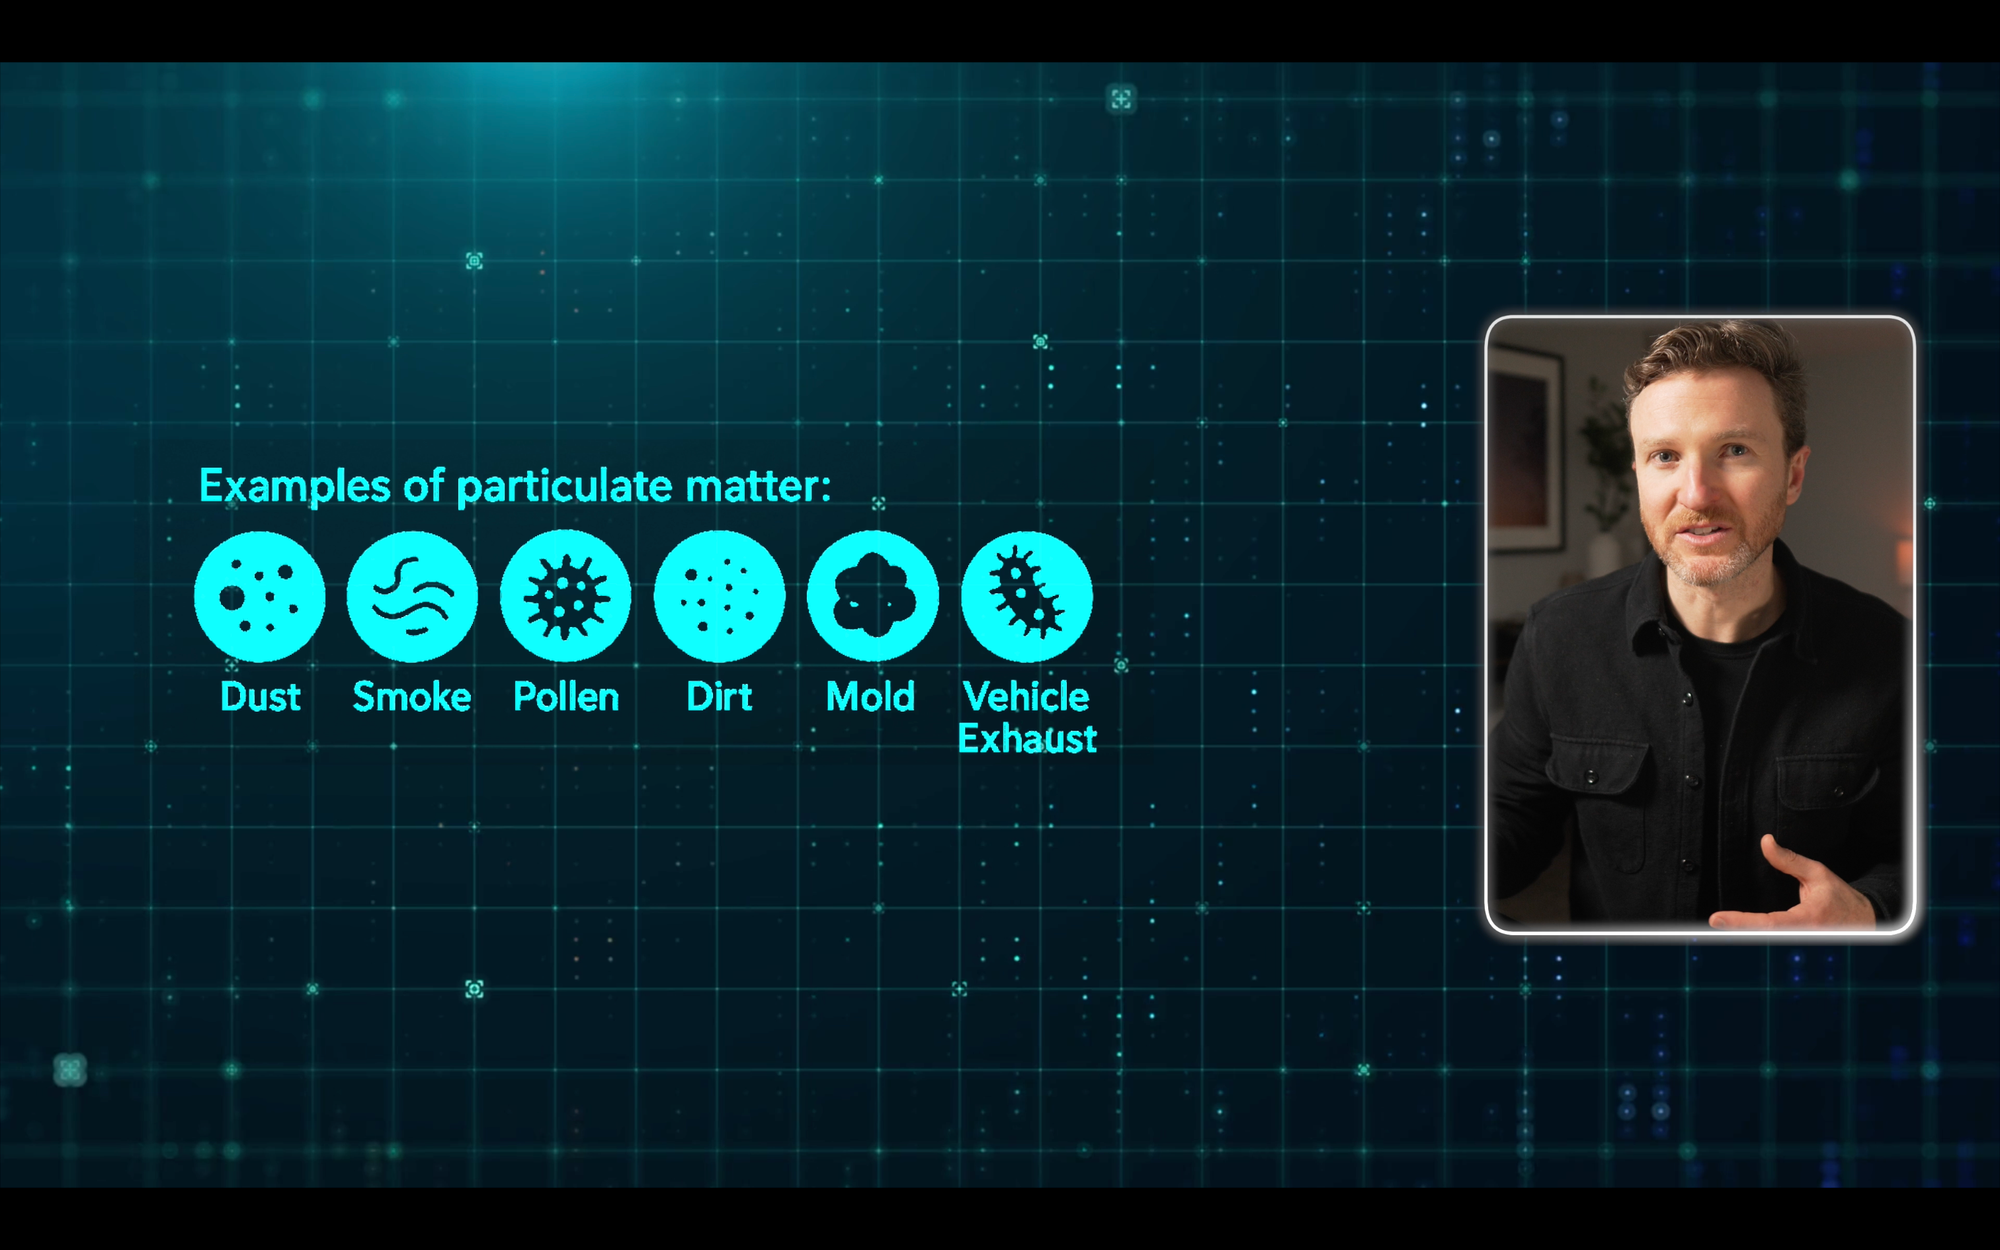
Let’s get into the actual air quality monitoring features of both devices, starting with particulate matter. Particulate matter (PM) refers to airborne pollutants or contaminants. These come from natural sources, like fires, dirt, and plants, and industrial sources, like factories, power plants, and vehicle emissions.
Dust, smoke, pollen, dirt, mold, vehicle exhaust, bacteria, and viruses are all examples of particulate matter, and these can have negative effects on your health.
Particulate matter is classified by particle size. For example, PM10 refers to particles that are 10 microns or smaller. As a point of reference, a strand of human hair is 50 to 70 microns. PM2.5 would be anything 2.5 microns or less in diameter, and so on and so forth.
The thing to know is that smaller particles are considered more dangerous since they can more easily penetrate your lung tissue, get into your bloodstream, and circulate to your brain.
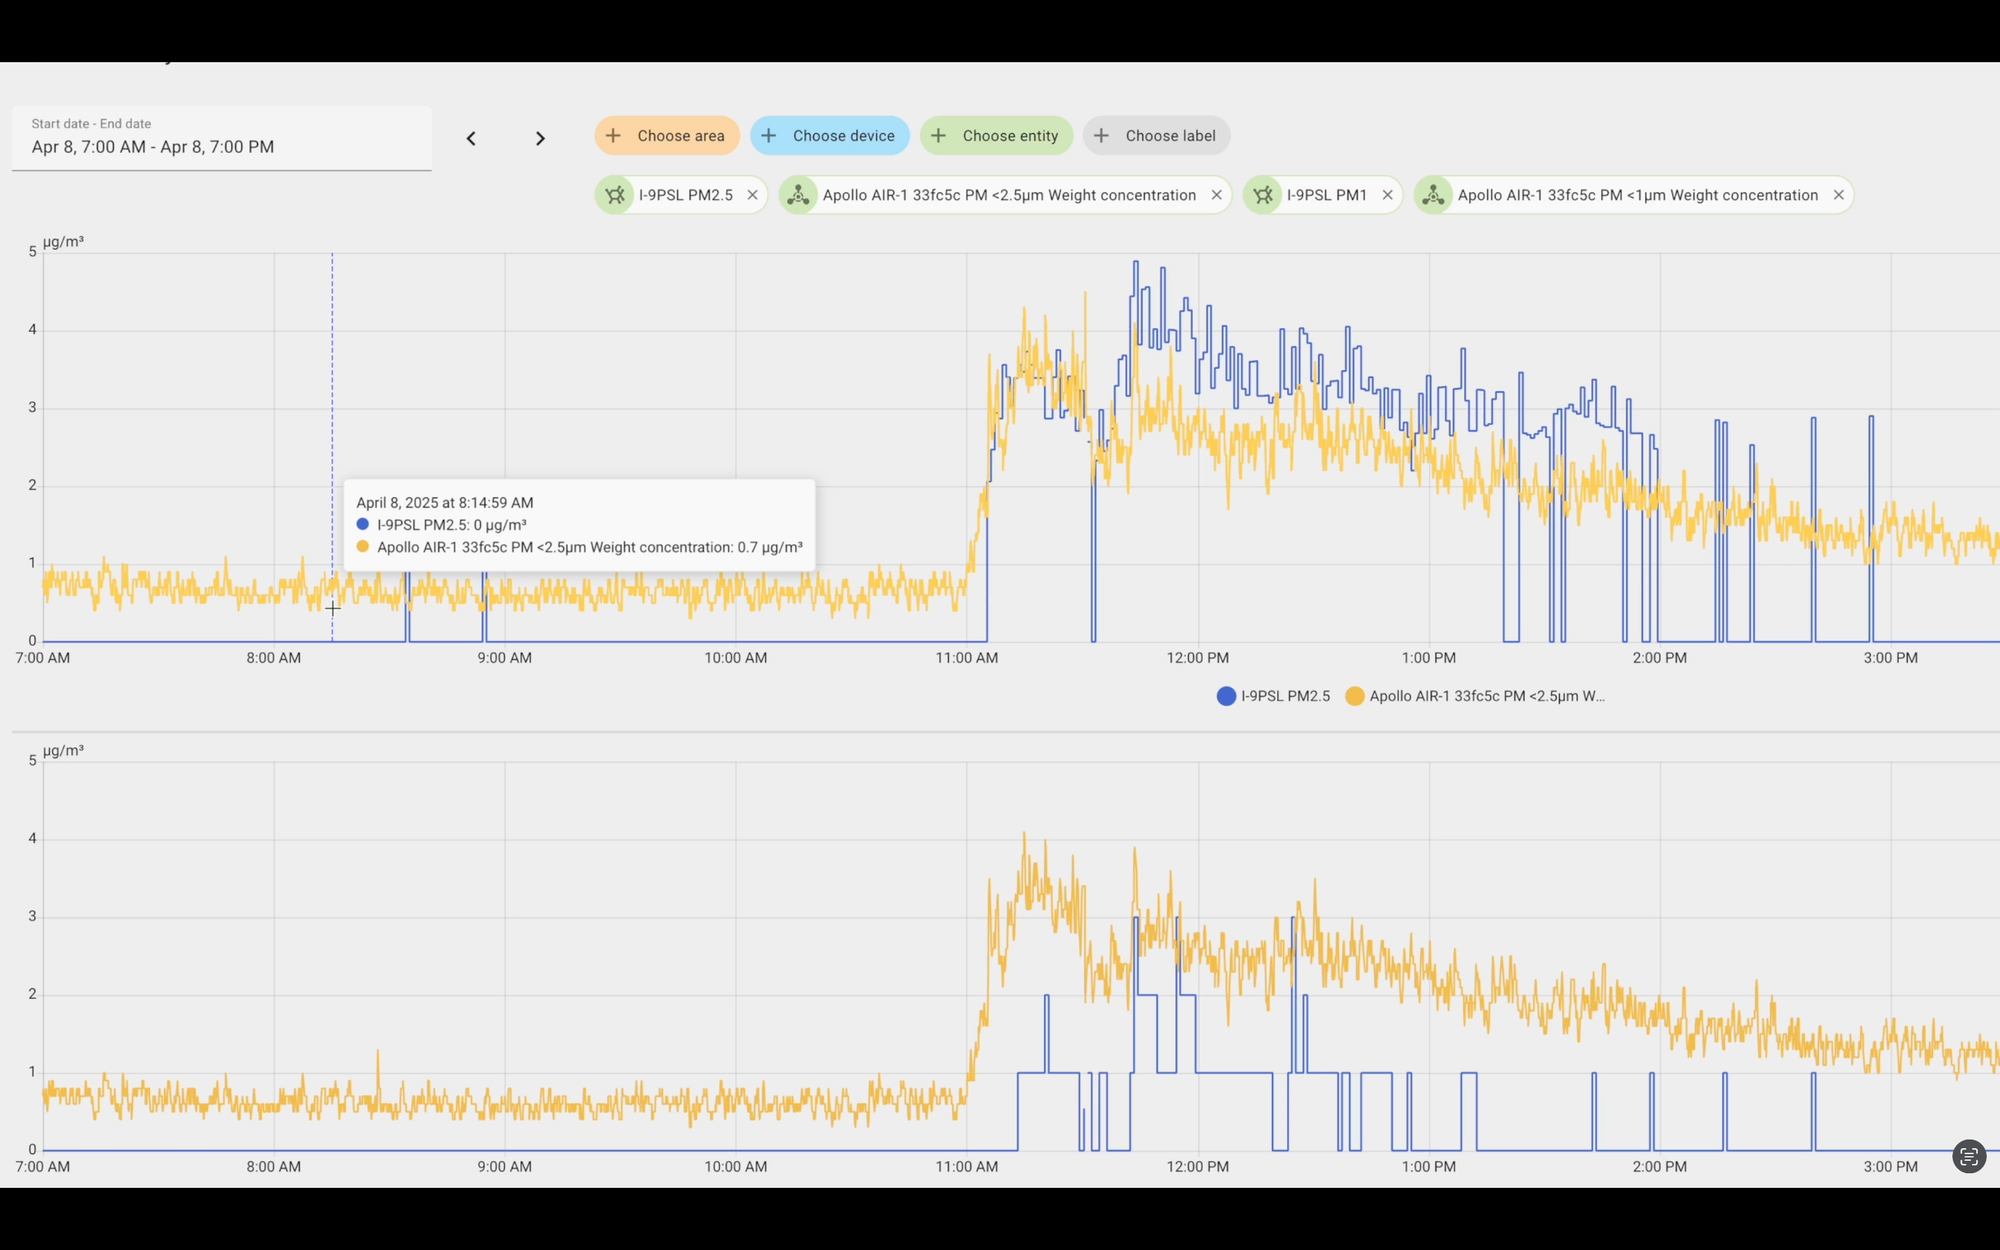
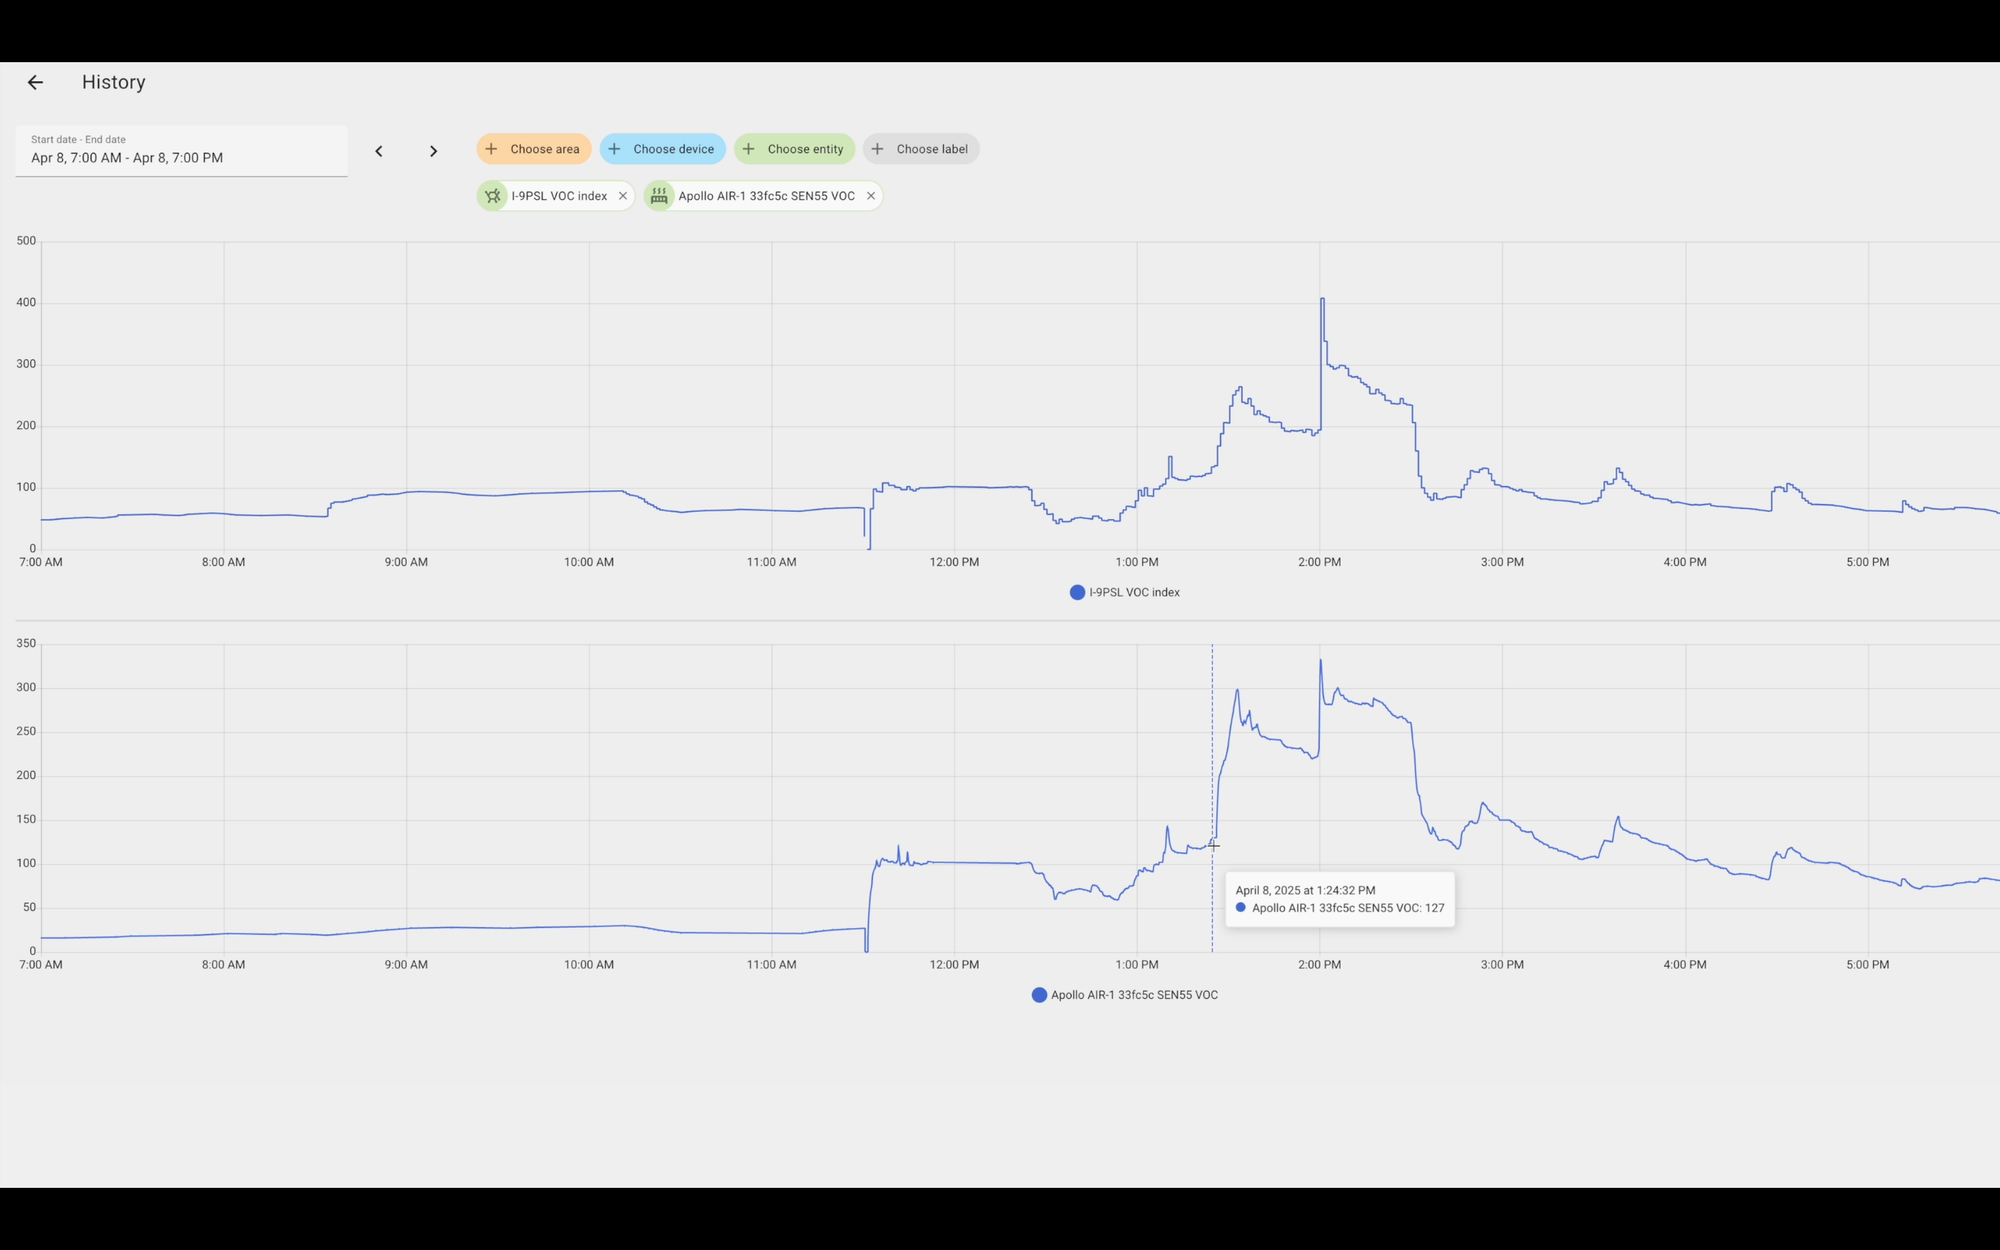
Both devices measure at least four categories of particulate matter, but only the AirGradient measures down to PM0.3. I compared the data from both devices for PM2.5 and PM1. Note that “I-9PSL” refers to the AirGradient on this and all subsequent history graphs.
Both sensors generally moved in the same direction, but the AirGradient data was much spikier, and did not report the same level of granularity in changes as the Apollo. Both entities were set to the same default precision in Home Assistant.
For context, the period of elevated PM levels coincided with when I had the door closed during meetings.
I like that the AirGradient measures down to PM0.3, but prefer the granularity and smoother data from the Apollo. To be clear, for this and any of the readings, I do not have another means to validate which device is more accurate. I’m calling this one a tie, and not awarding any points.
Best Air Quality Monitor for Home Assistant: Particulate Matter
Volatile Organic Compounds
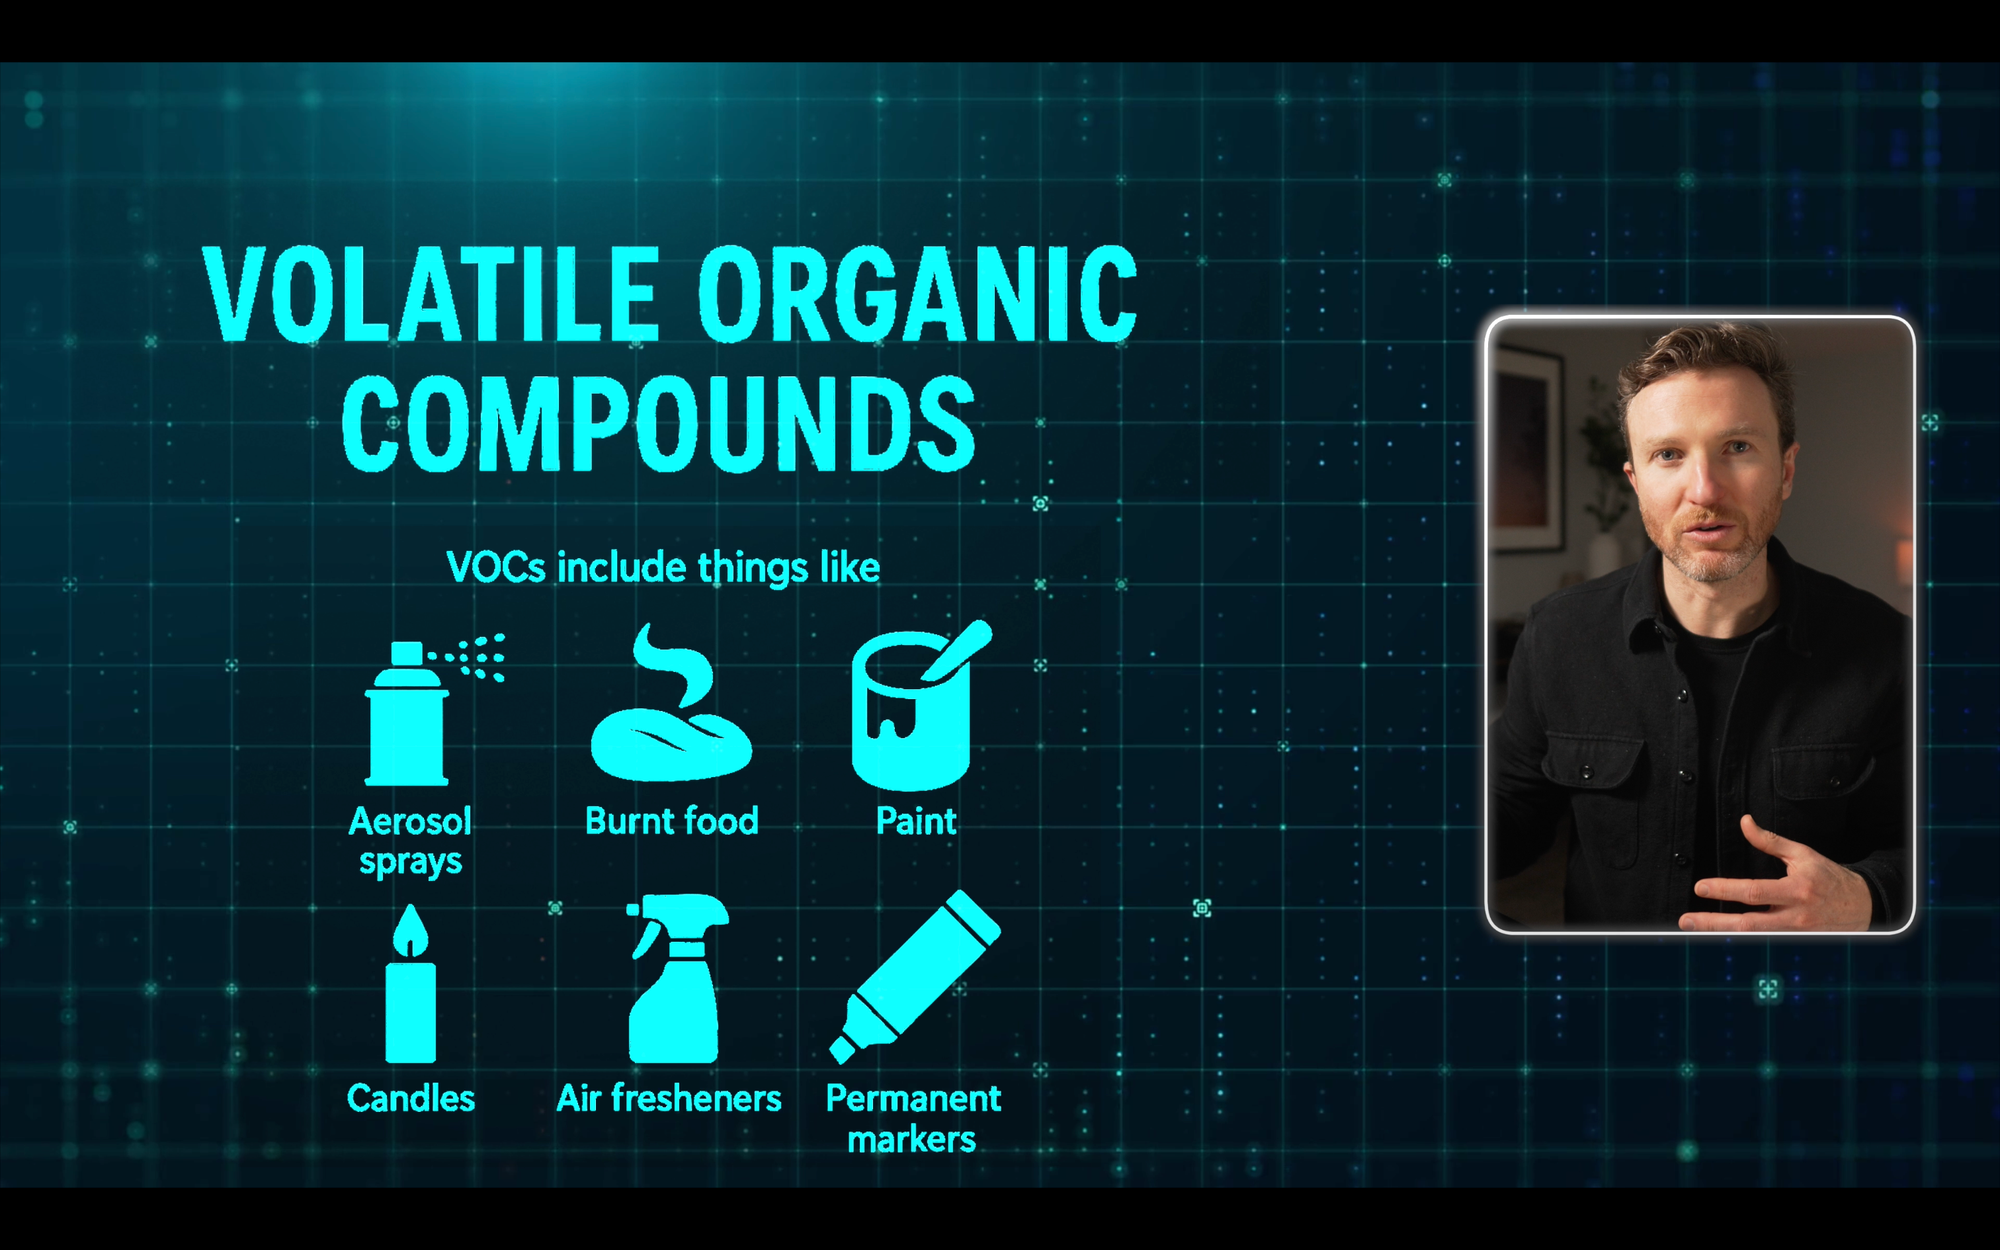
Volatile Organic Compounds (VOCs) are also in the air and can be harmful…or harmless. VOCs include things like aerosol sprays, burnt food, paint, candles, air fresheners, permanent markers, and much more.
Both devices measure for VOCs and provide a VOC index, but only the Apollo provides a human readable description of VOC quality, such as “Normal,” “Improved,” or “Abnormal.”
Looking at the data, both sensors move in the same direction and are generally of a similar value, though at times this did fluctuate. Since only Apollo provides a description of the VOC quality to help make sense of the data, I’ll give the point to Apollo.

Best Air Quality Monitor for Home Assistant: Volatile Organic Compounds (VOCs)
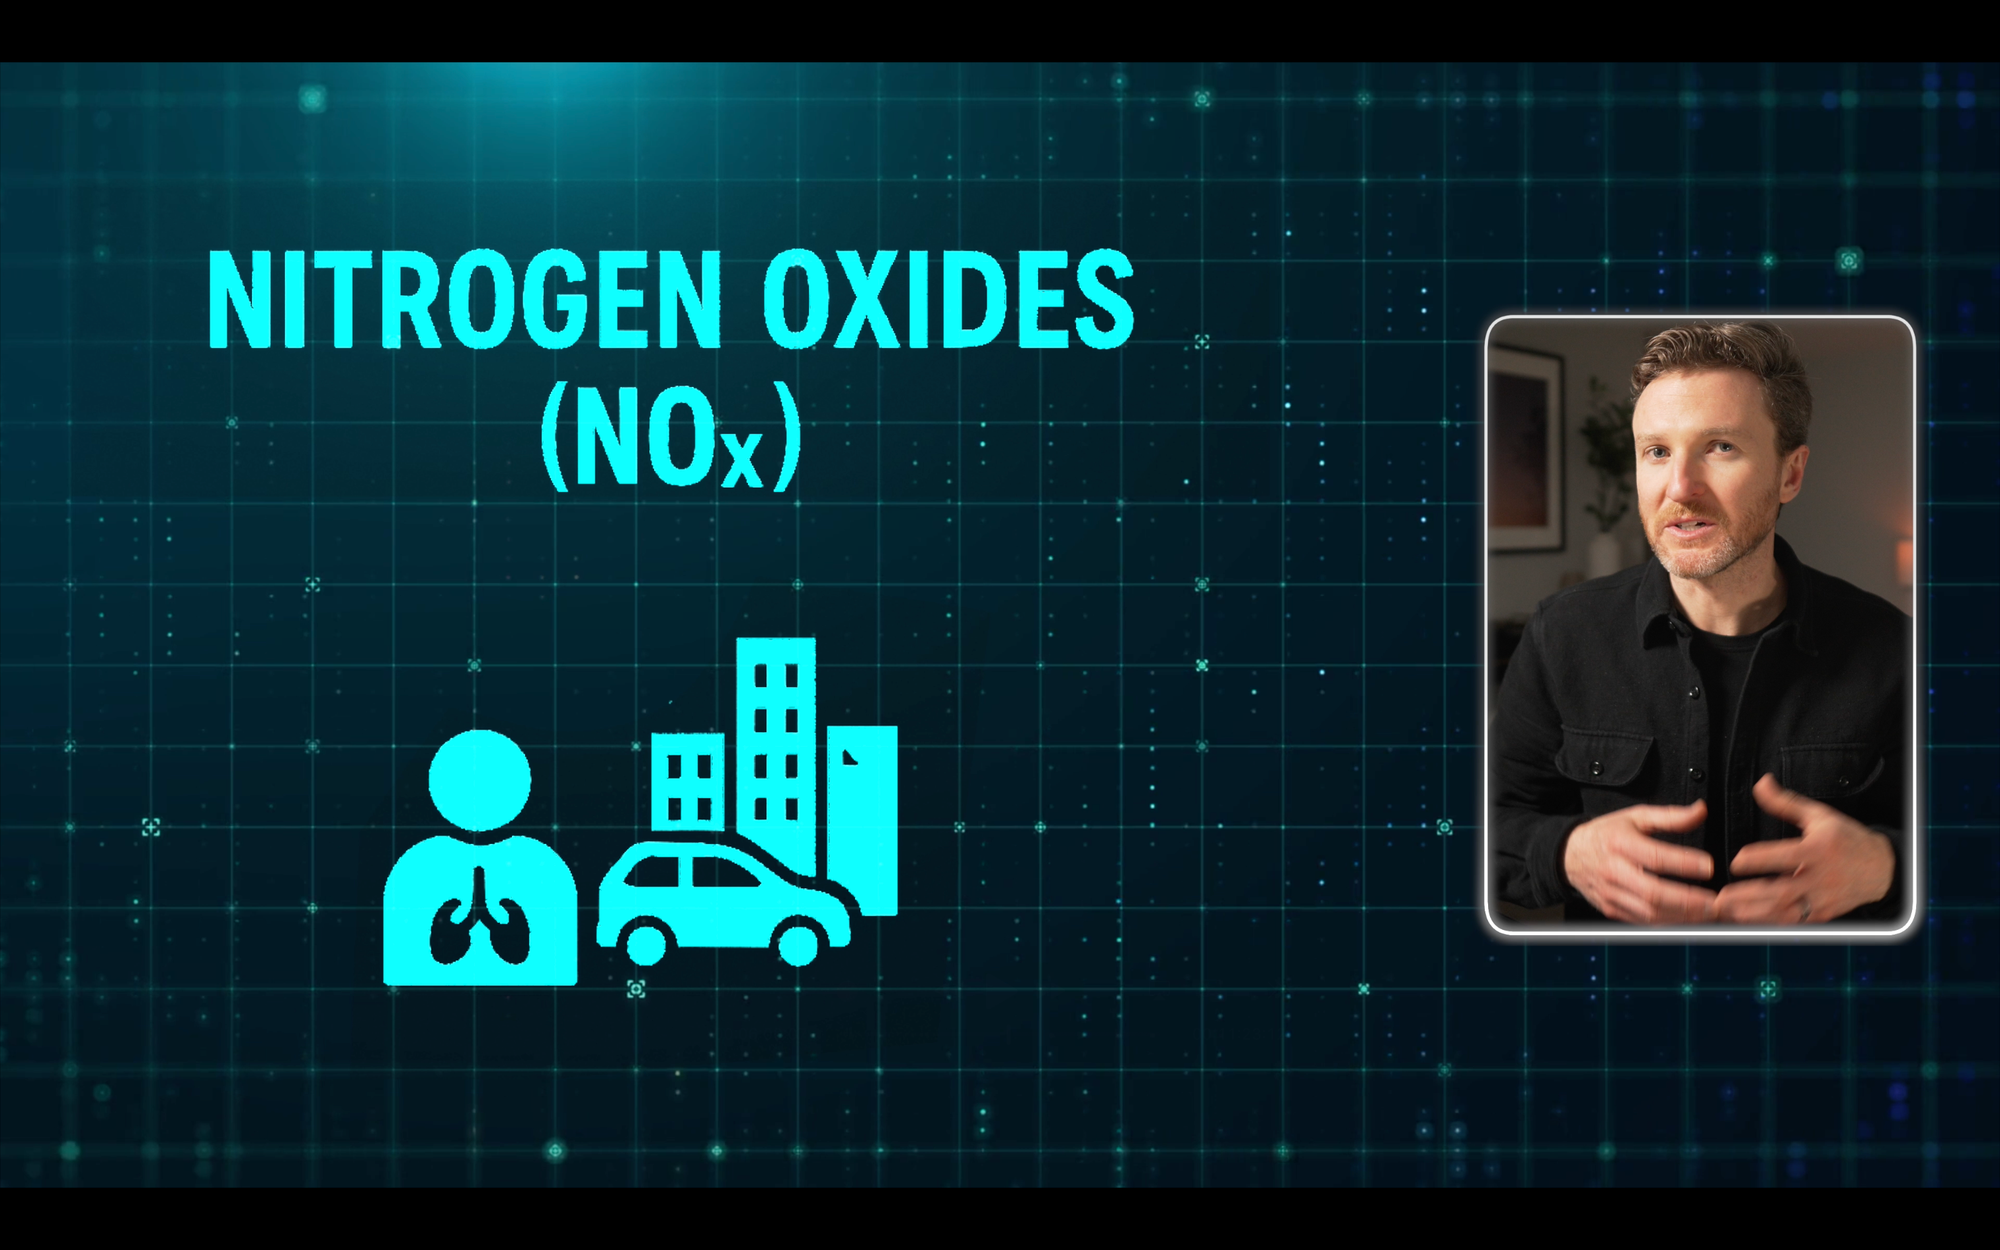
Nitrogen Oxides
Both devices also measure for nitrogen oxides (NOx), which is the sum of nitric oxide (NO) and nitrogen dioxide (NO2). Nitrogen oxides can contribute to cardiovascular disease, asthma, and more, and is a particular problem in dense, urban settings since it is produced by combustion engines.
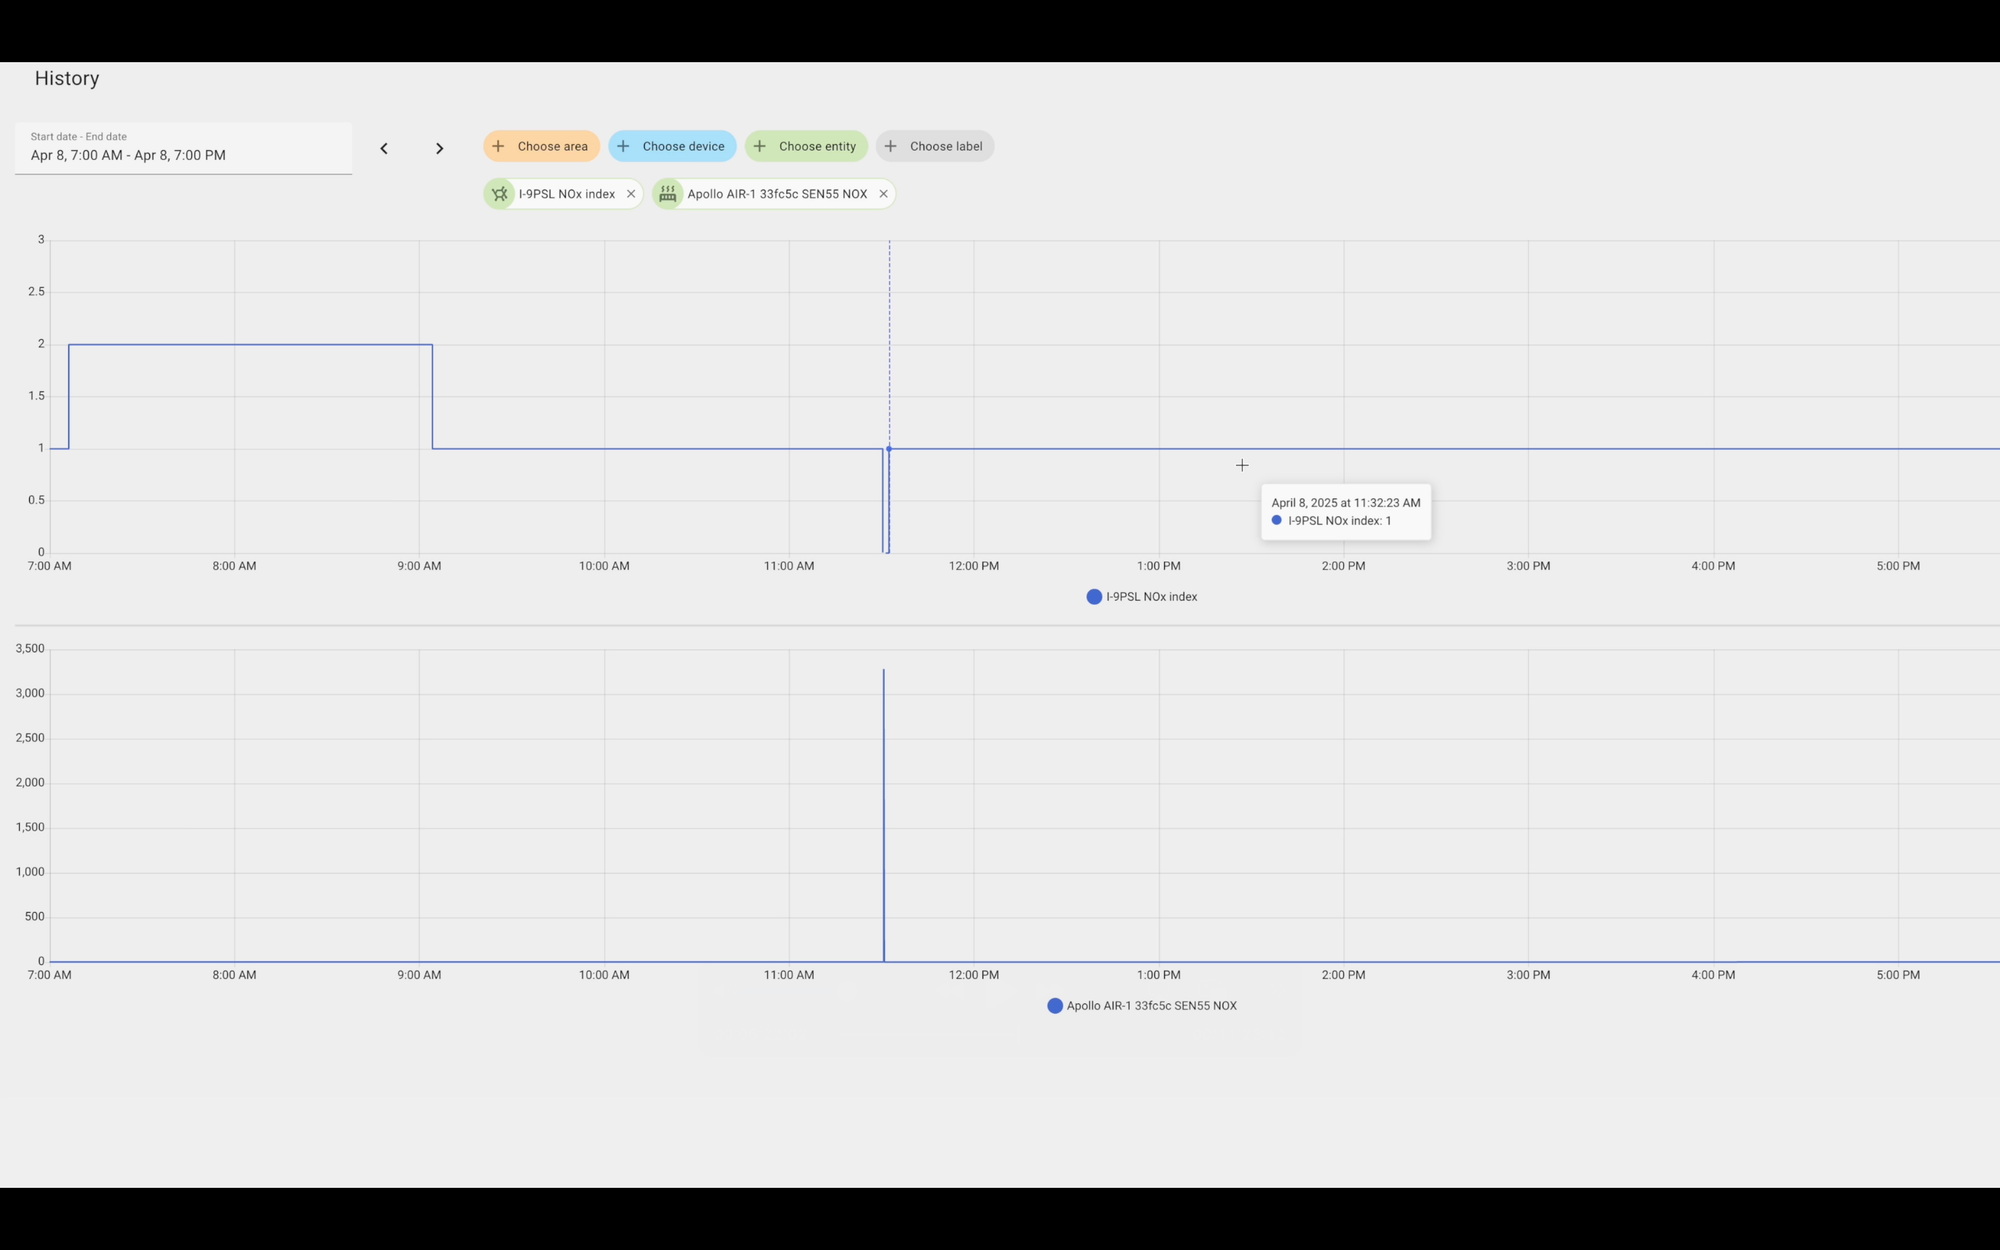
While both devices show a nitrogen oxide index, only the Apollo shows nitrogen dioxide as a separate reading.
Looking at the data, both devices generally reported a level of 1 or 2 throughout the day, but the Apollo randomly jumped to over 3,000, oddly at the same moment that the AirGradient came down.
Aside from that anomaly, data from both devices was largely in agreement, though it’s hard to see that because the scale of both charts is quite different due to that one spike.
Since the Apollo offers nitrogen dioxide as a separate reading, I’ll give the edge to Apollo.
Best Air Quality Monitor for Home Assistant: Nitrogen Oxides (NOx)
Temperature and Humidity
Both devices provide ambient temperature and humidity readings. However, as noted before, the AirGradient isolates the temperature and humidity sensors to avoid impact from internal heat, whereas the Apollo includes offsets to account for the internal heat buildup from the ESP32-C3.
While it’s nice to have the option, I’m not a big fan of temperature and humidity offsets since it’s not always clear how much of an offset should be applied.
Looking at the temperature data, the story is a bit murky. The AirGradient generally reported a lower temperature, and the data would spike up and down quite a bit. The Apollo was smoother overall, except for one massive, inexplicable upward spike of 9° F instantly, only to come right back down.
Switching to the humidity data, this time the AirGradient consistently reported a higher humidity level, with up to a 10-point swing between the two devices. Once again, we can see the random spike from Apollo, this time in the downward direction.
Since the AirGradient isolates the temperature and humidity sensors without the need for offsets, I’ll give the point to AirGradient.

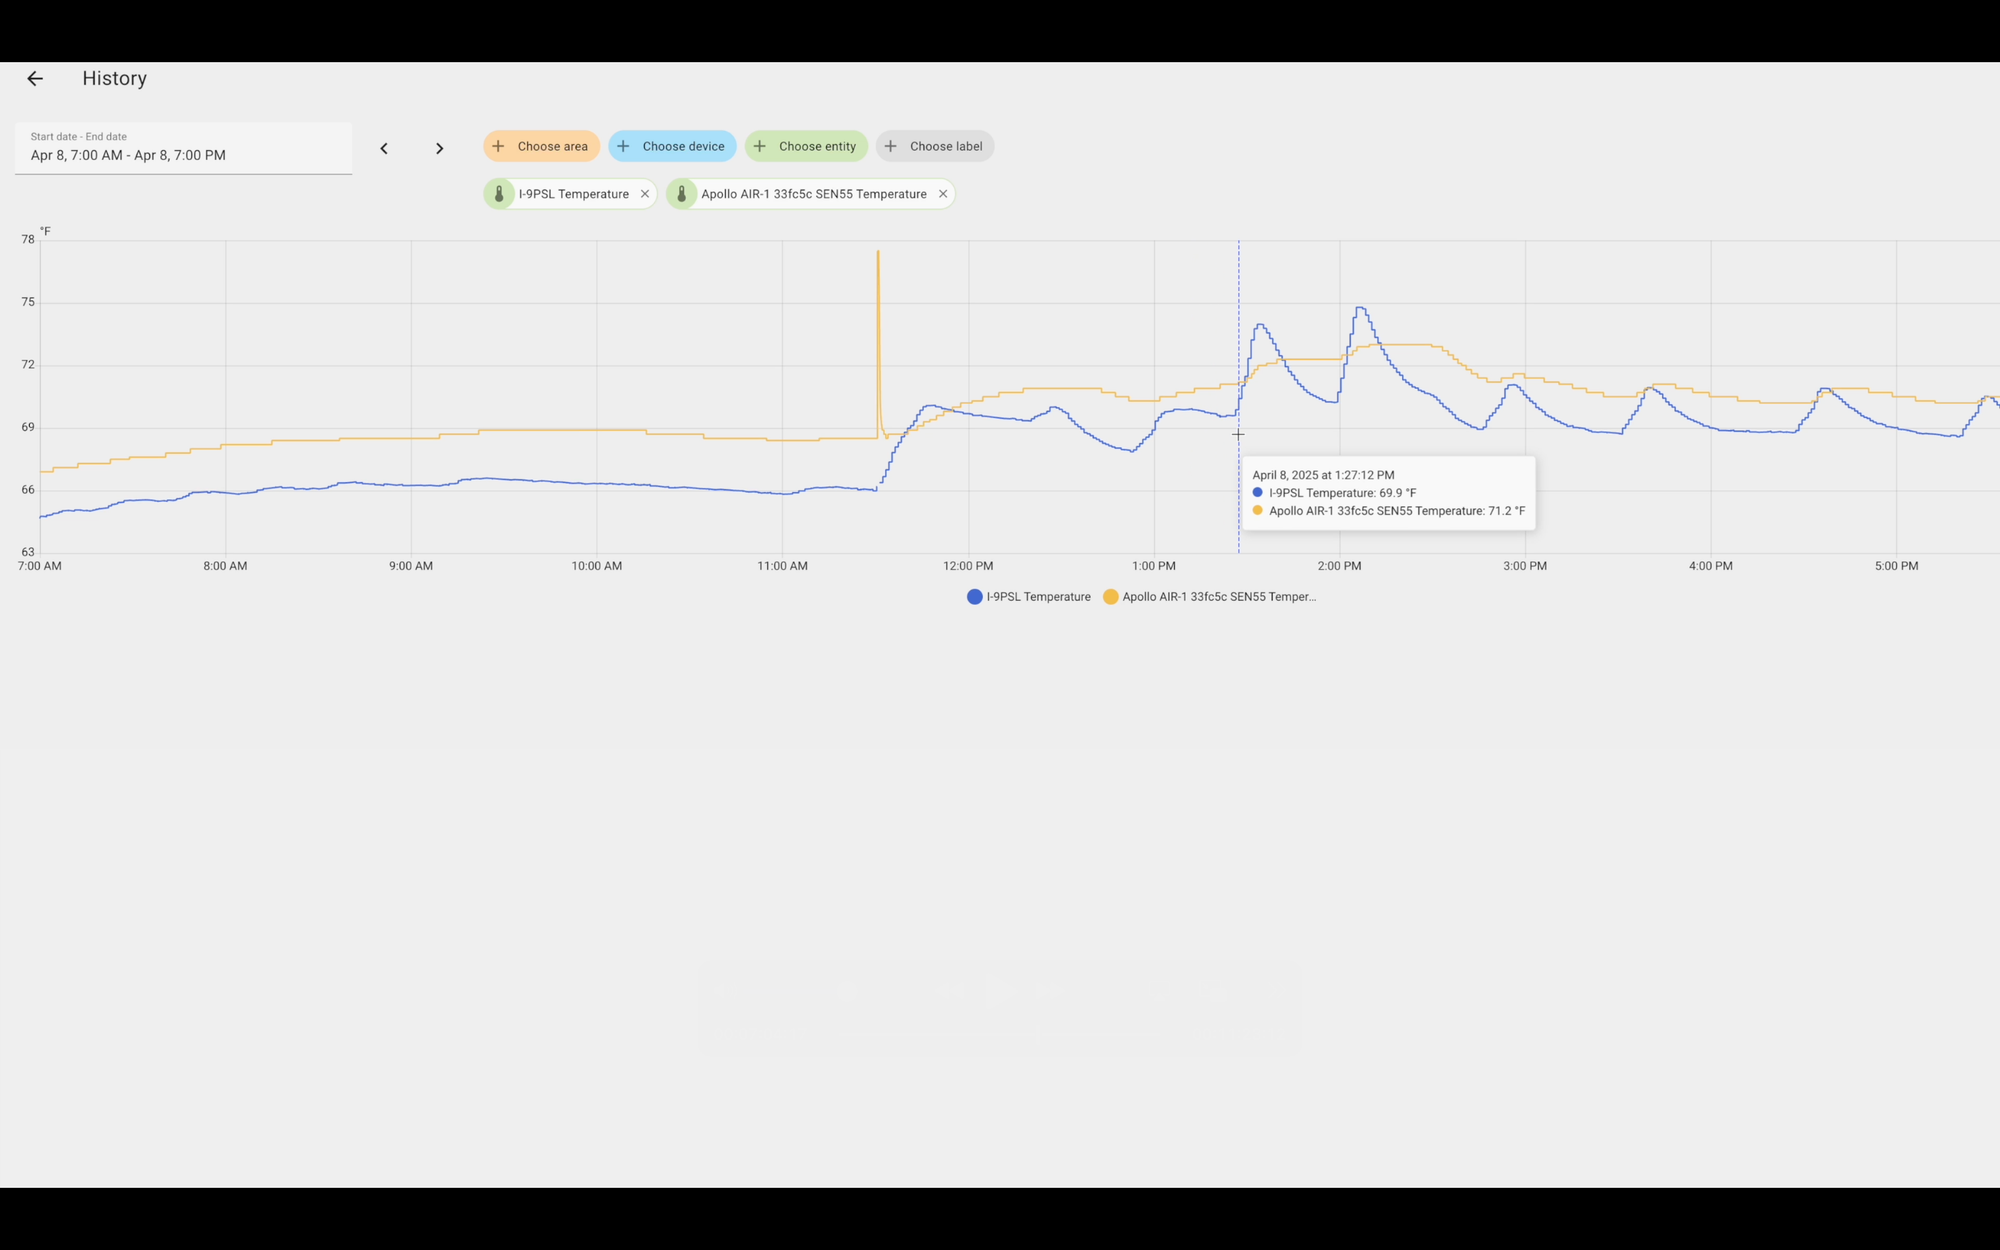
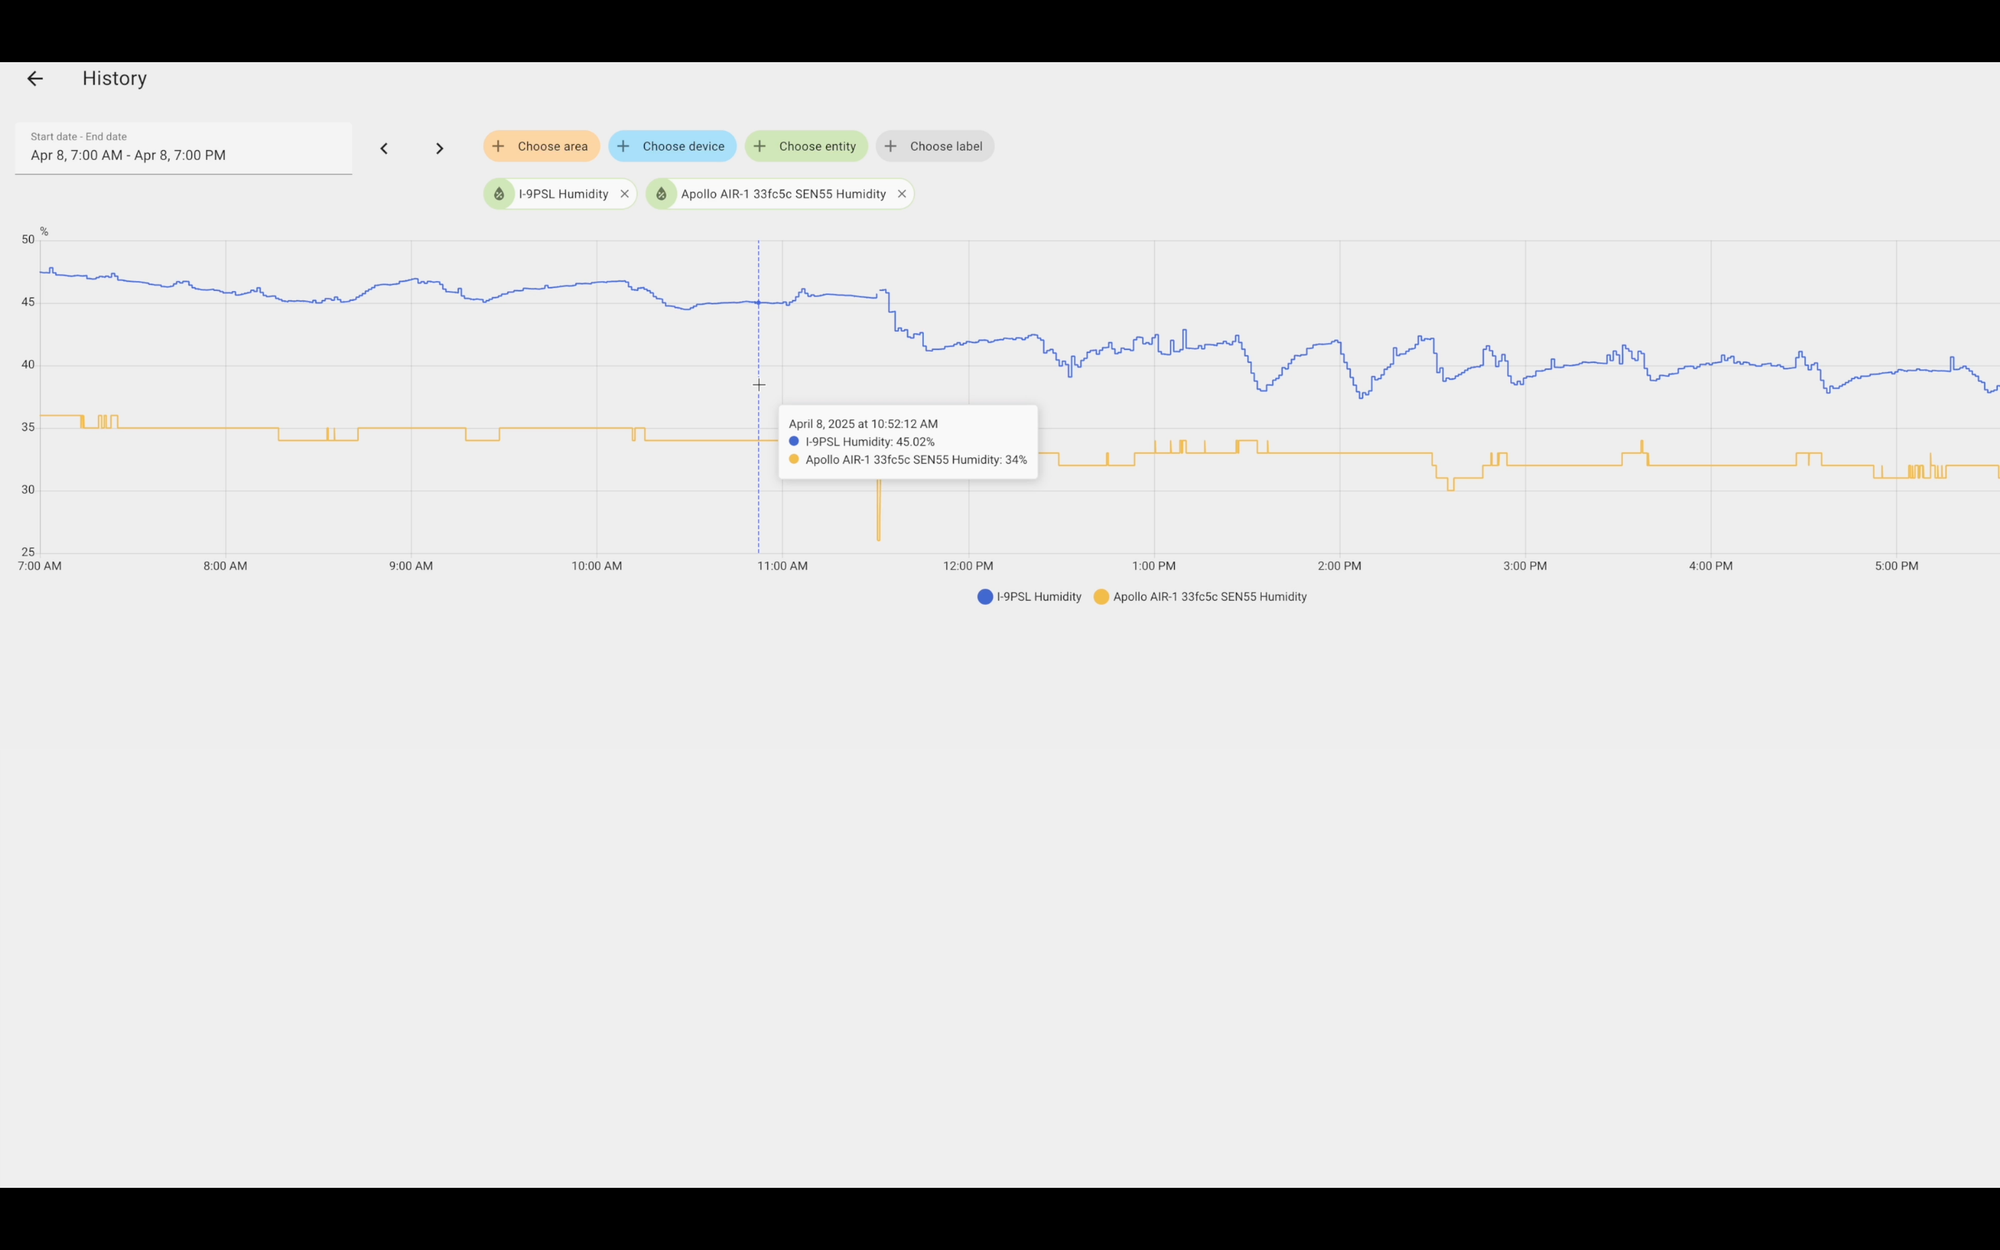
Best Air Quality Monitor for Home Assistant: Temperature and Humidity
Gases
The Apollo allows you to add an optional gas sensor, so you can monitor the individual gas percentages for carbon monoxide, ethanol, hydrogen, nitrogen dioxide, ammonia, and methane. This is not possible with the AirGradient.
However, Apollo Automation notes that these readings do not meet the requirements for gas safety monitoring, so the precision of this data is debatable. But, since Apollo at least offers this, it gets the point.

Best Air Quality Monitor for Home Assistant: Gases
Carbon Dioxide
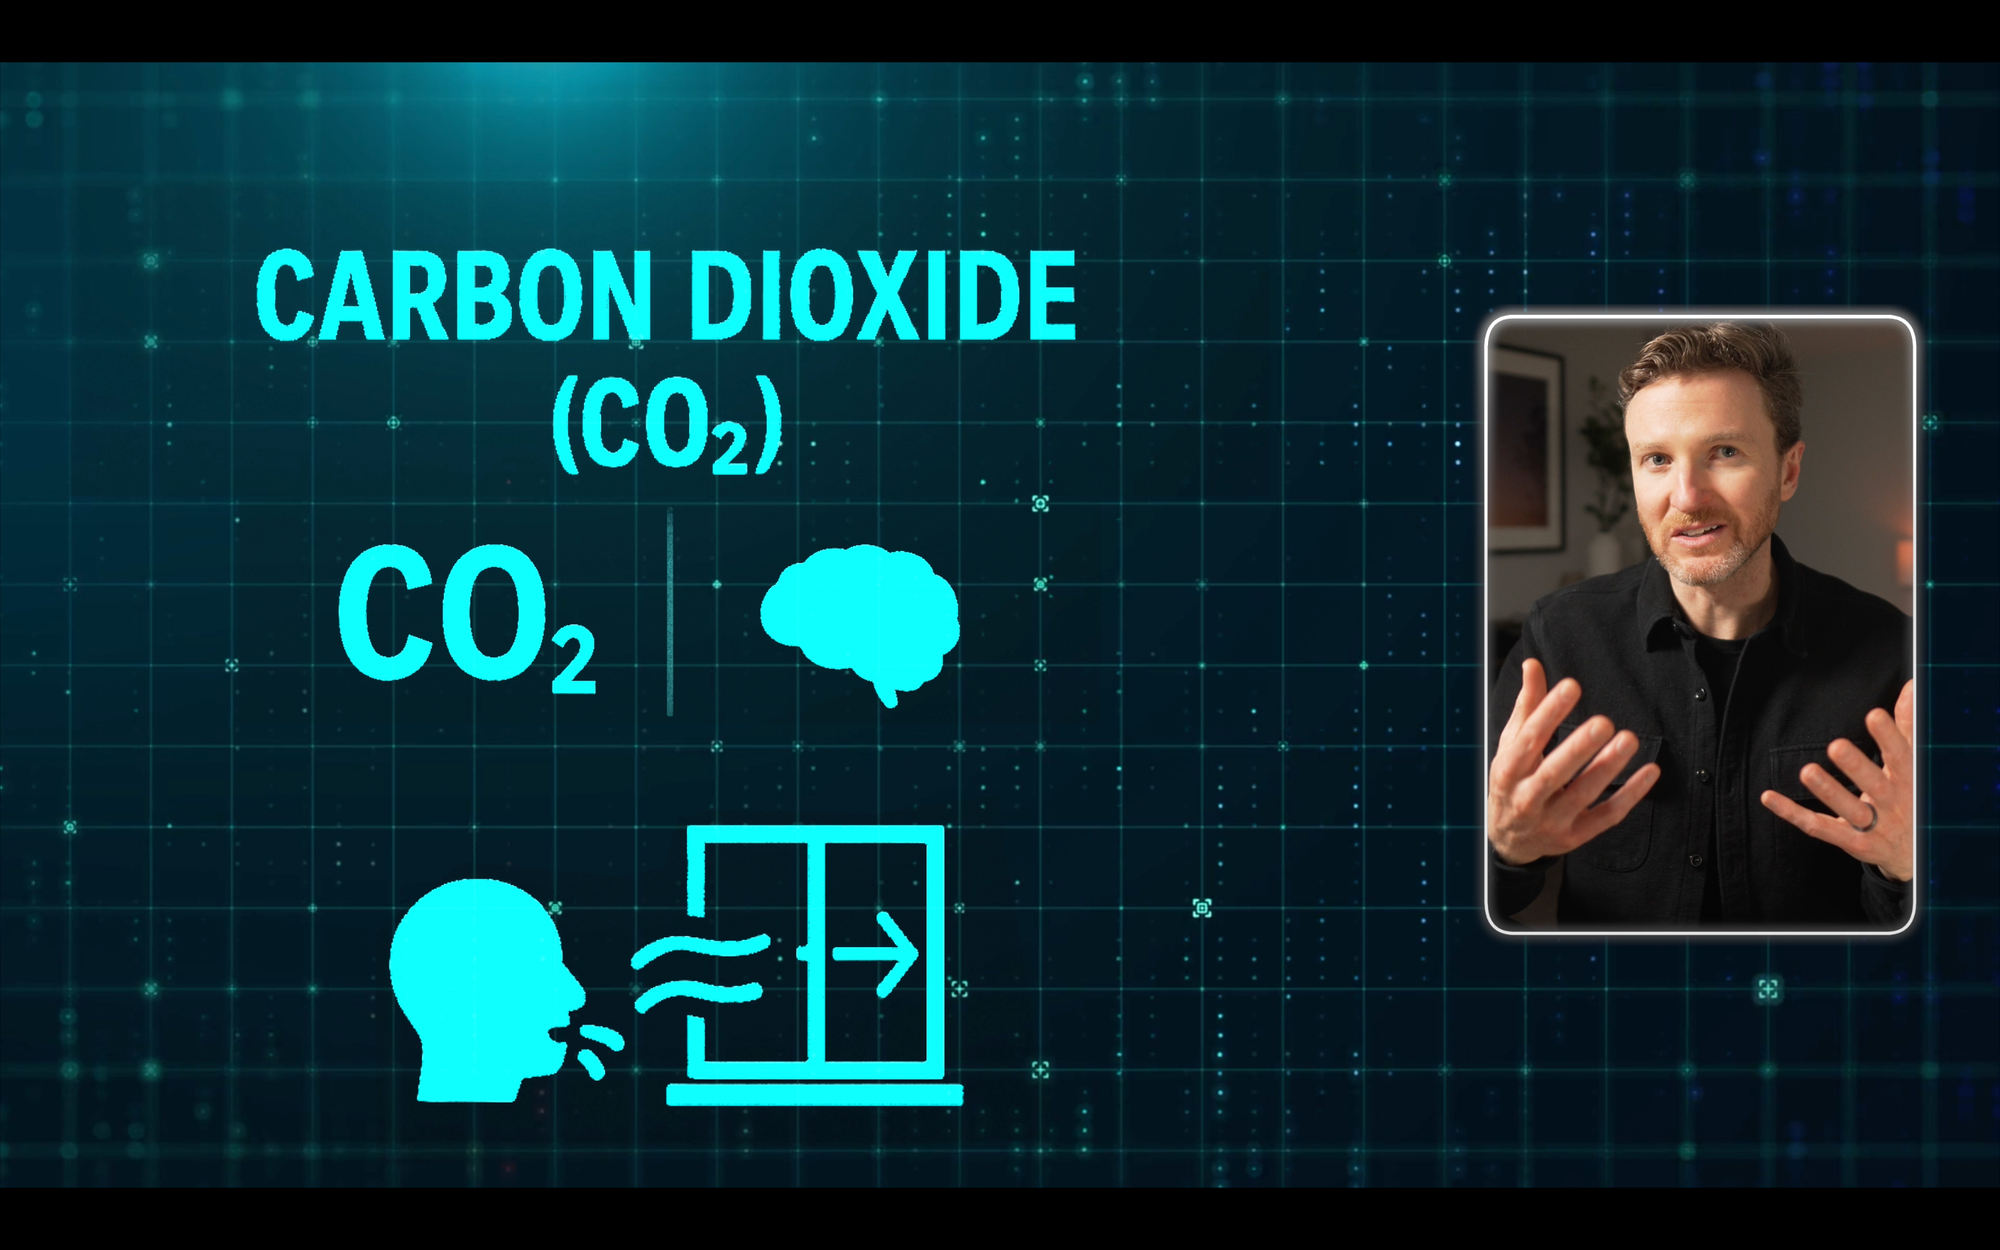
Carbon dioxide (CO2) is a gas in the atmosphere typically around 430 parts per million (ppm) outdoors. Indoors, anything below 800 ppm is considered excellent, and anything less than 1,000 is considered acceptable.
When we breathe, we exhale CO2. So, if you sit in a room with the door closed, the level of CO2 will rise, and faster than you might think. The problem with this is high levels of CO2 are associated with headaches and negative impacts on the brain. To address this, you can open a window or run the HVAC.
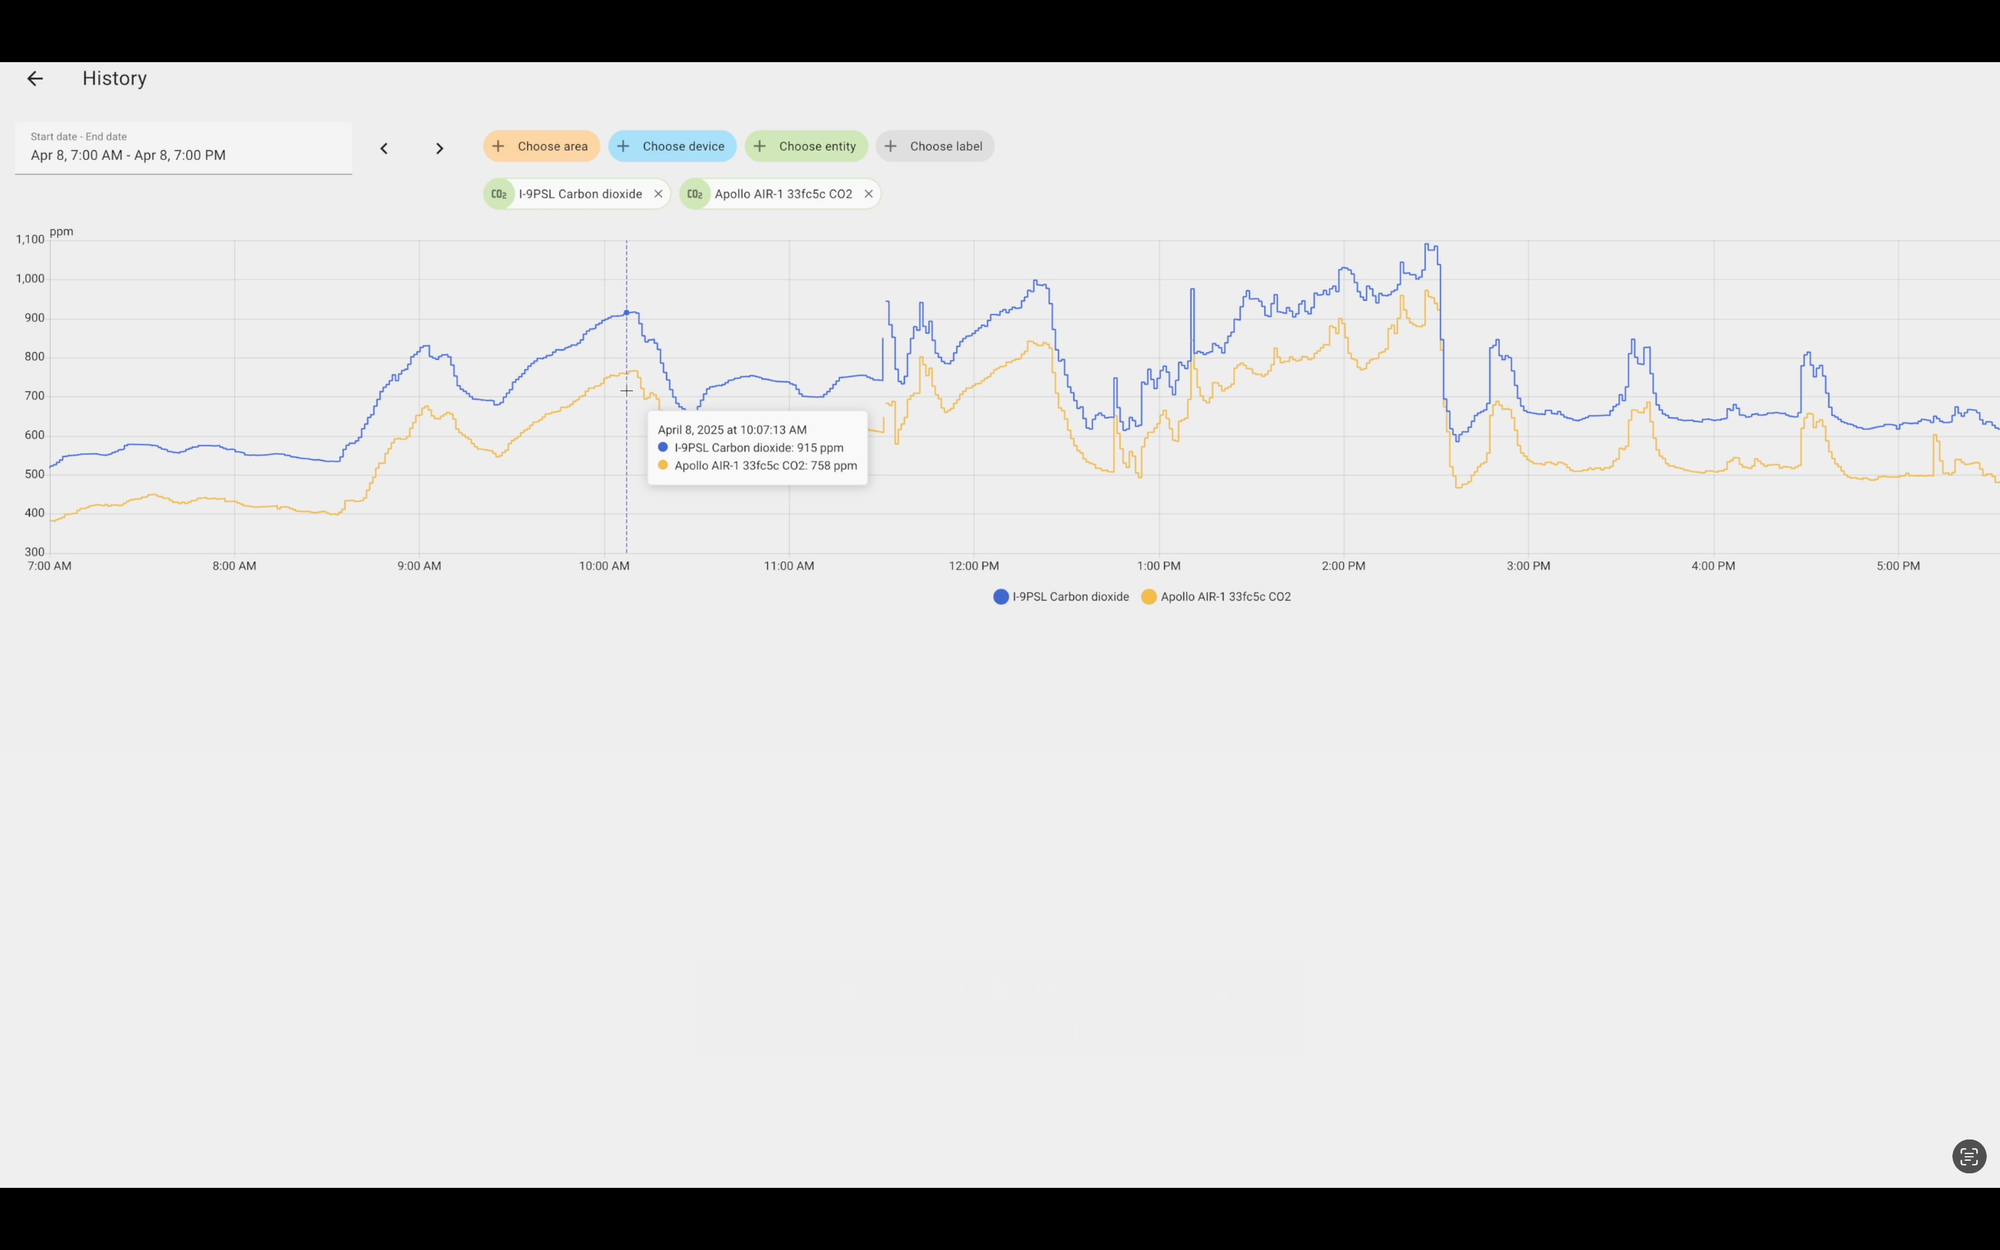
Both devices offer CO2 readings, though it’s an optional add-on with the Apollo. Looking at the data, the Apollo is consistently lower than the AirGradient, often by over 100 ppm. But, both devices move in the same direction at the same time.
From 1:00 pm to 2:30 pm I was in virtual meetings with the door closed, and you can see that the CO2 levels steadily rose throughout the period, climbing from around 600 ppm to about 1,000 ppm. When I opened the door to the room, the levels more or less instantly dropped back down to around 600 ppm, so it really shows the impact a closed room has on CO2 levels.
I’ll call this one a tie with no points awarded since they both offer CO2, both move in the same direction at the same time, and I’m unable to confirm if one is more accurate than the other.
Best Air Quality Monitor for Home Assistant: Carbon Dioxide (CO2)
Extra Features
Both devices feature RGB LEDs which can be used as indicators, but they function differently. On the AirGradient, you can choose for the LEDs to represent particulate matter, carbon dioxide, or just turn it off.
On the Apollo, you can use its RGB Pixel for any notification you’d like, whether it’s related to air quality, or some other alert, like if you forgot to close the garage door. I really like this flexibility.
The Apollo also features a sensor for measuring the barometric pressure, and it can function as a Bluetooth Tracker in Home Assistant. This means it can track Bluetooth devices in your home, letting you know which devices are closest to the sensor, which can be helpful for presence detection automations.
Those are a lot of great extra features from the Apollo. But, the Apollo is really meant to be used with something like Home Assistant, whereas the AirGradient works equally well with Home Assistant or as a standalone device in two ways.
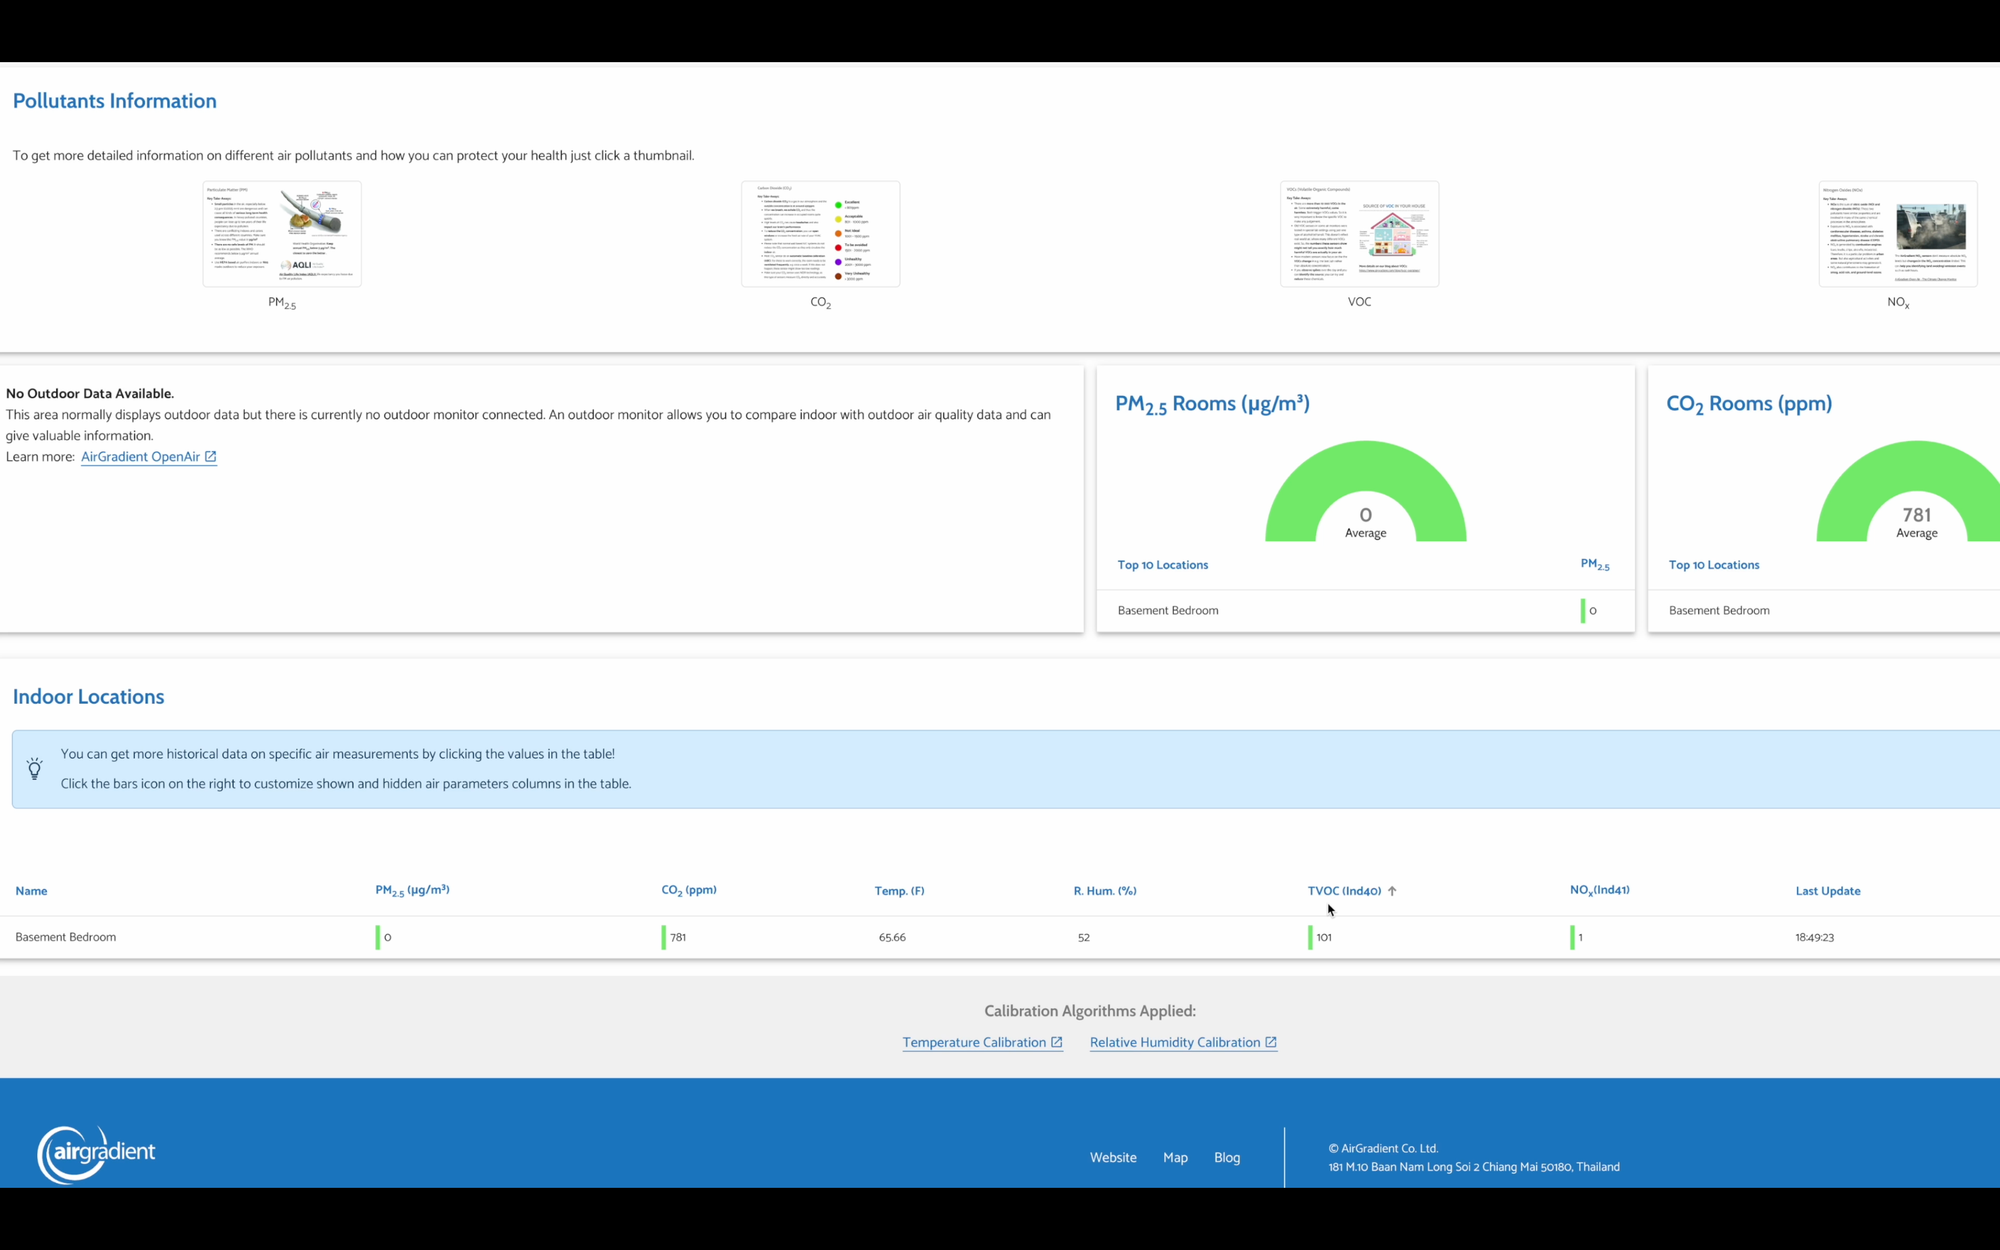
First, you can read the air quality values directly on the device’s screen. Second, you can view all of your data from app.airgradient.com, with some really nice visuals showcasing all of the historical data. It’s nice that you have the option to use the AirGradient in this way.
Both devices have some unique extra features, so I’ll call this category a tie.
Best Air Quality Monitor for Home Assistant: Extra Features
Cost
The AirGradient One is available fully assembled as I have it for $195, and includes a 2 meter USB-C cable. You can save $57 by buying the kit version, which has the same hardware but requires you to assemble it.
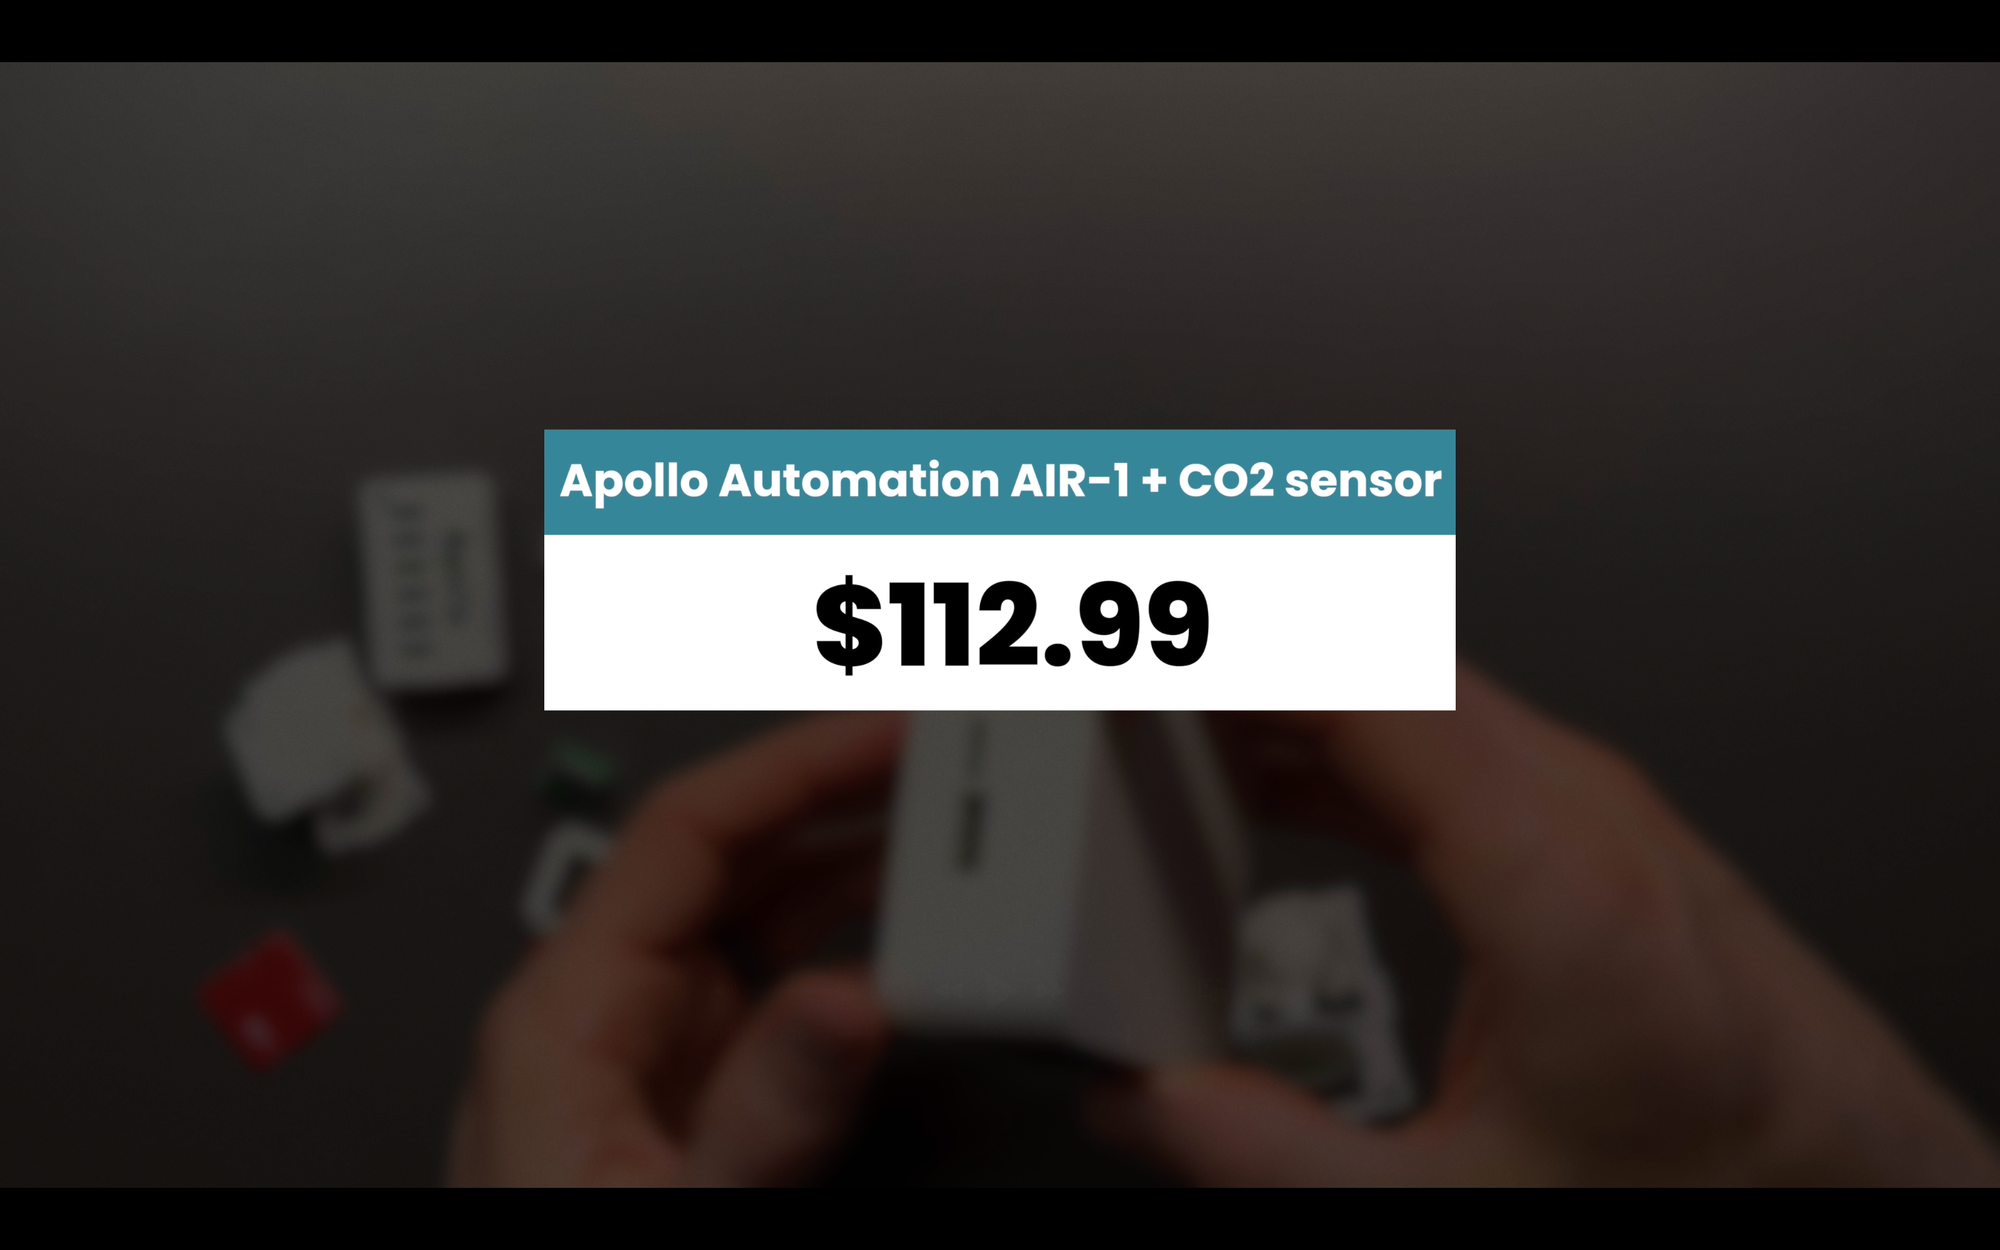
The Apollo starts at $92.99. You have the option to add on a CO2 sensor for an additional $20 making the price $112.99. Additionally, you can add a gas sensor, bringing the price up to $156.99.
That midpoint price though is the best comparison between the two devices in terms of features, making the Apollo up to $82 cheaper. Apollo gets the point on cost.

Best Air Quality Monitor for Home Assistant: Cost
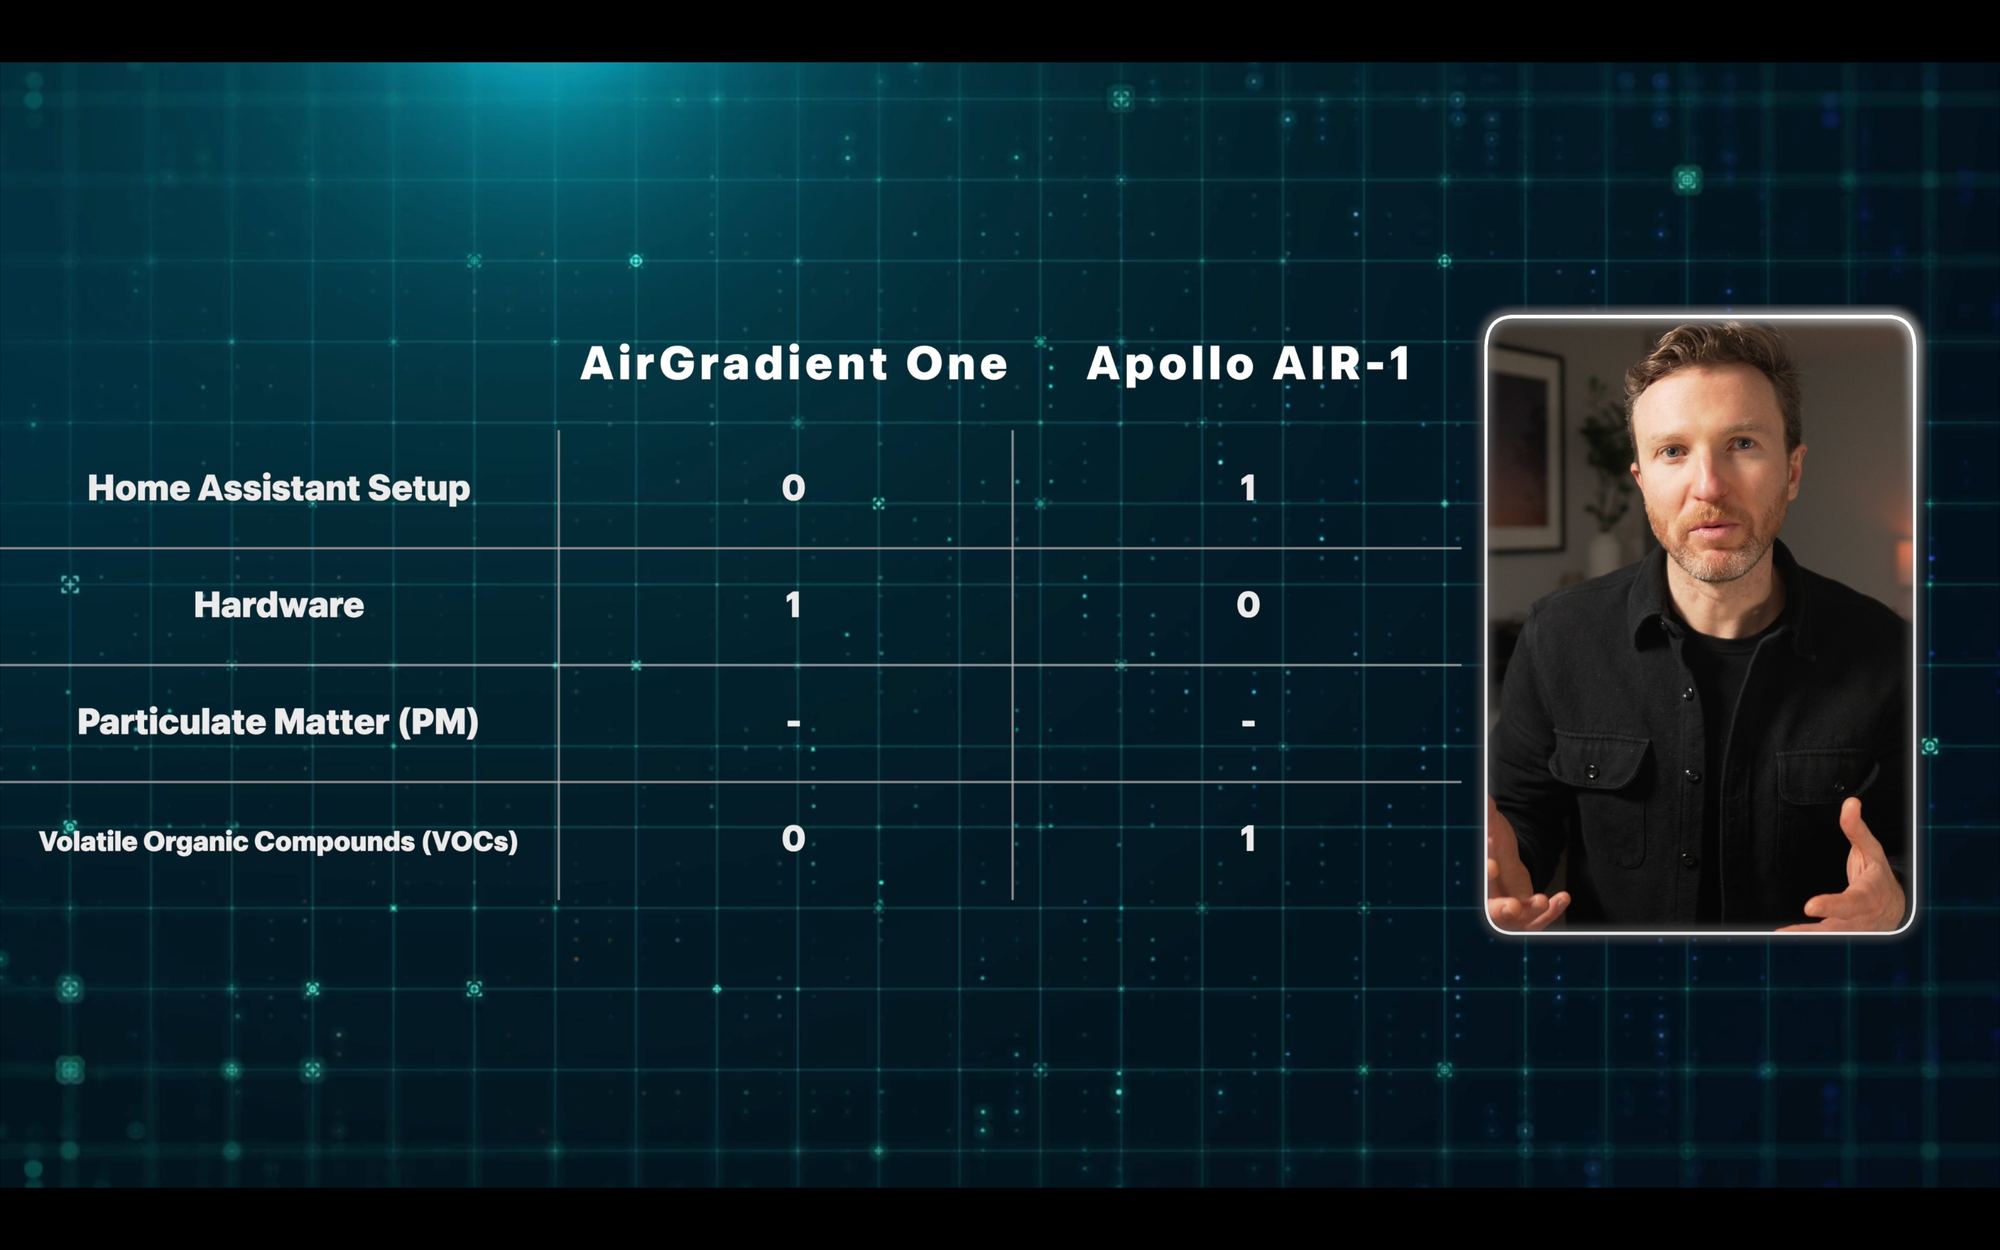
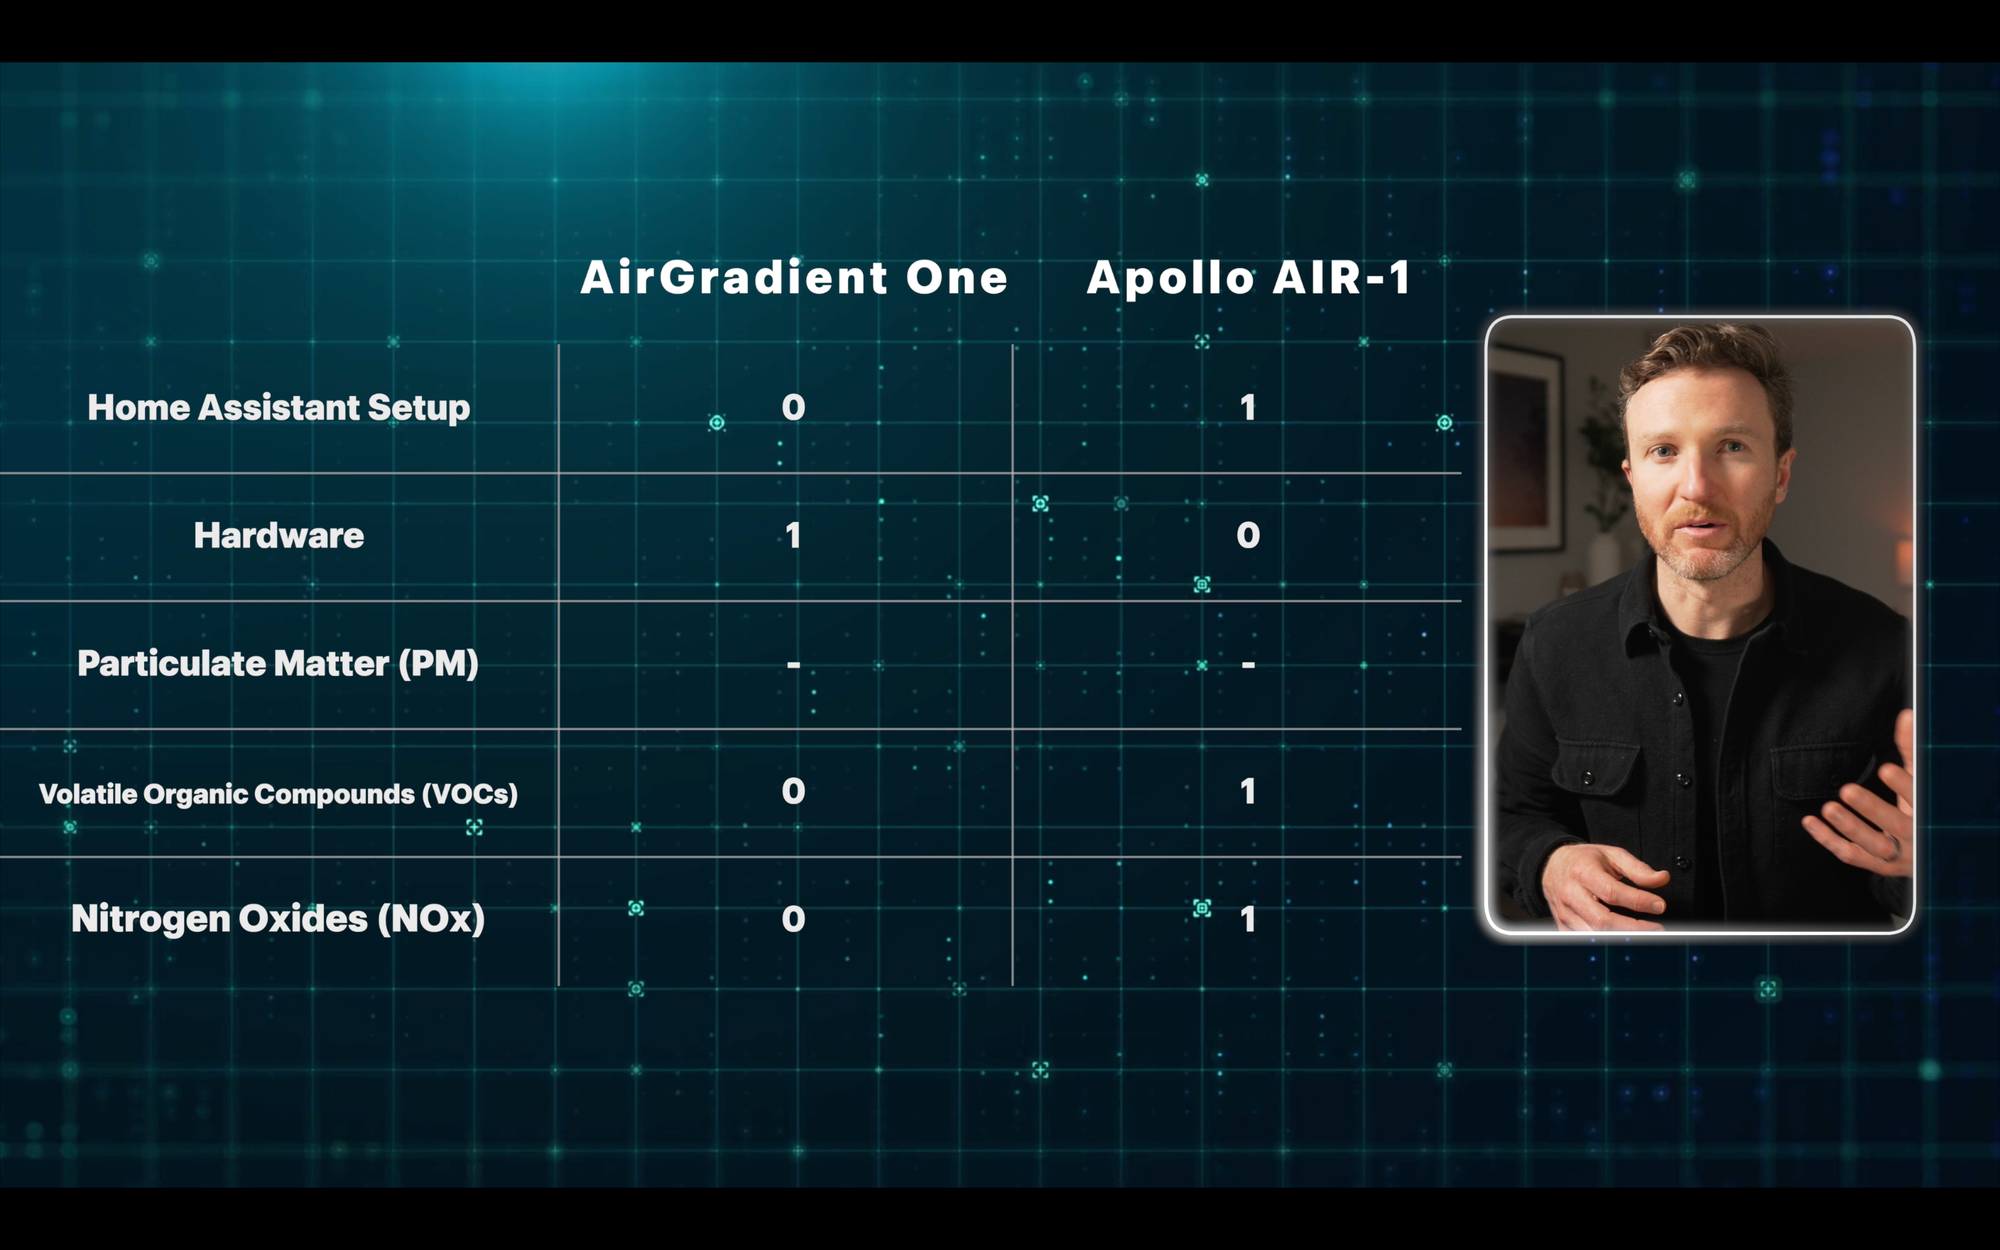
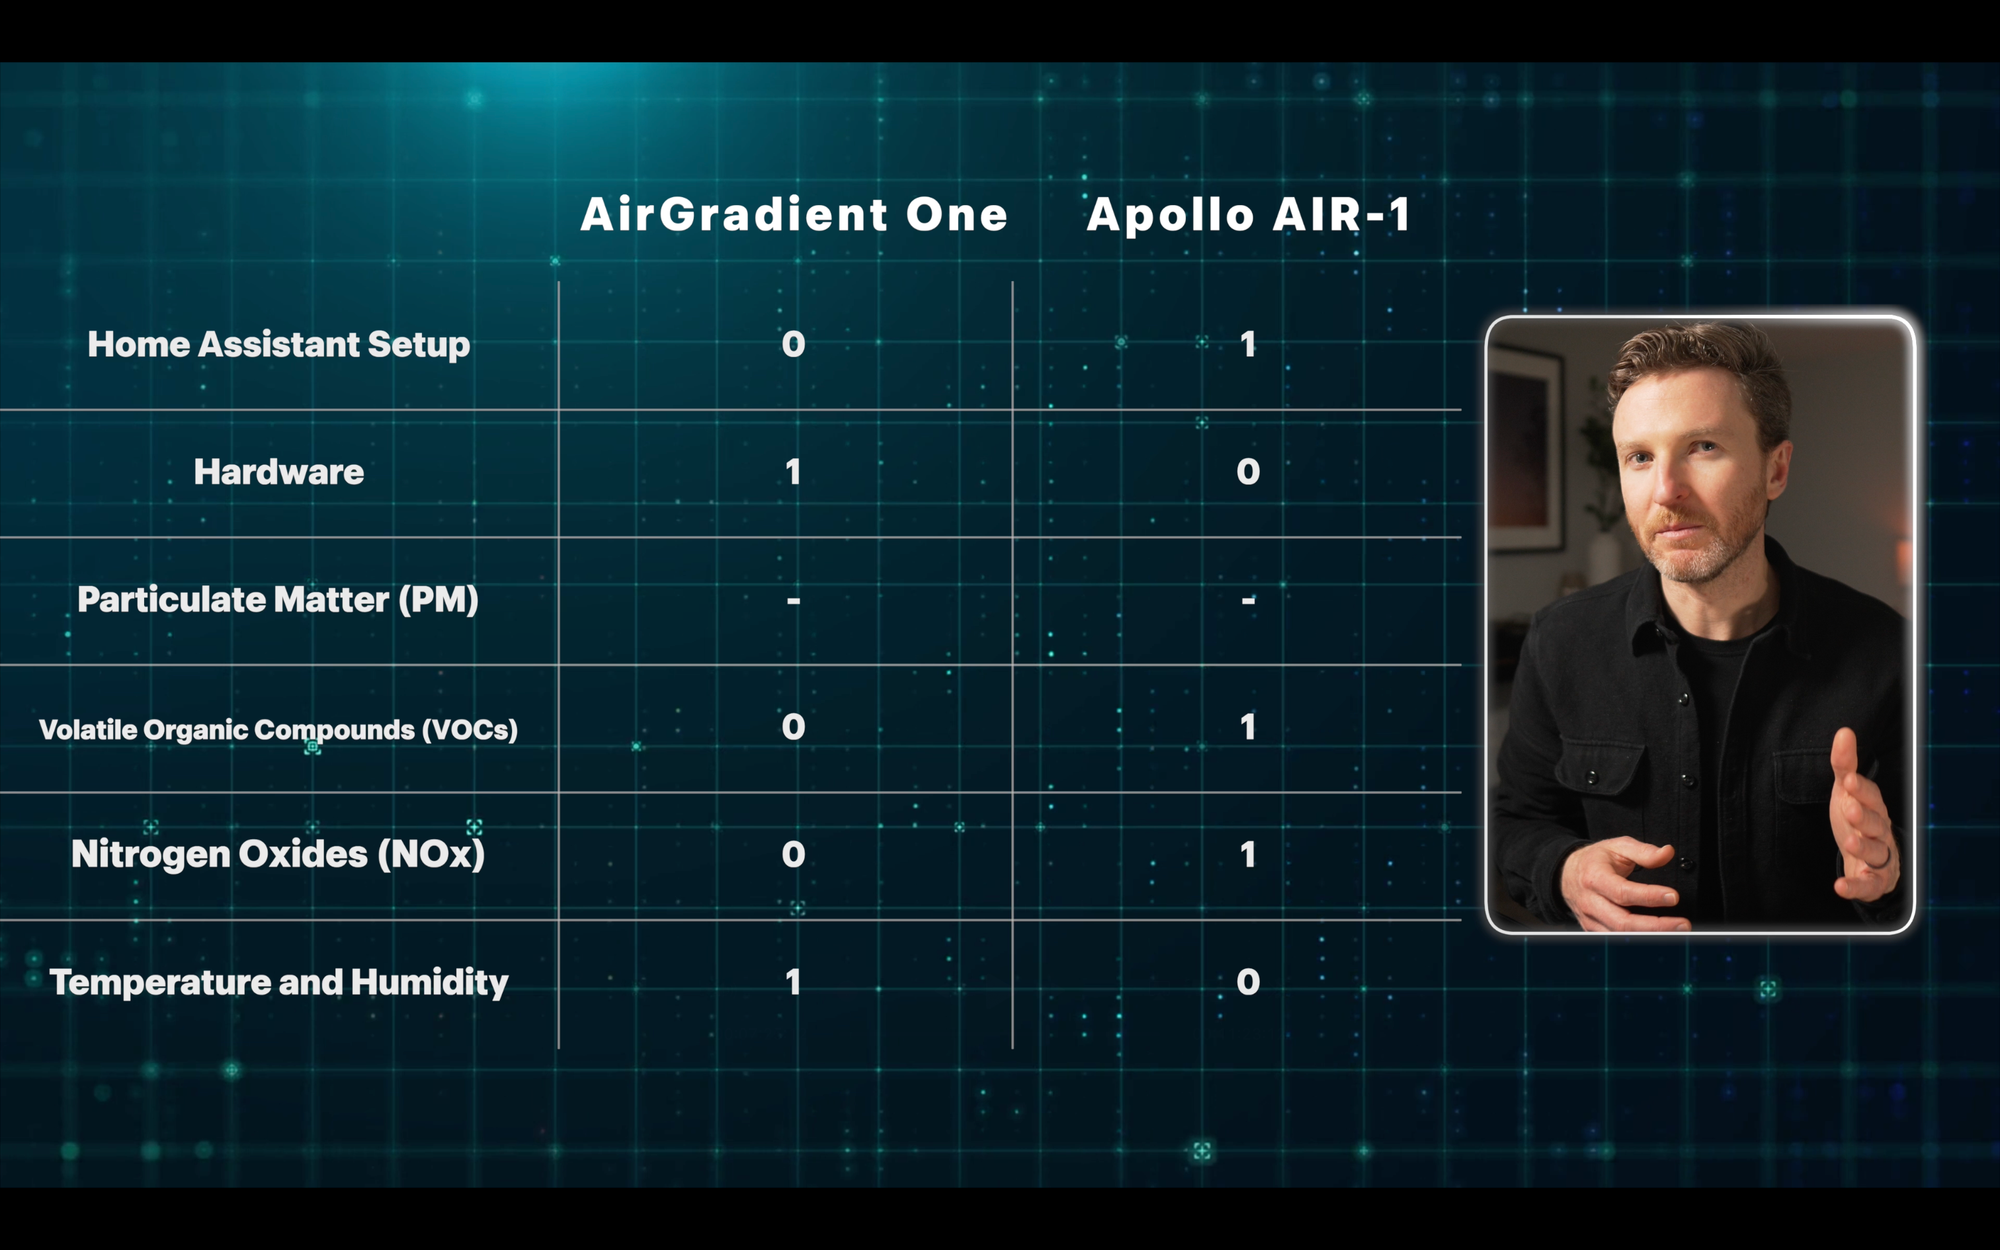
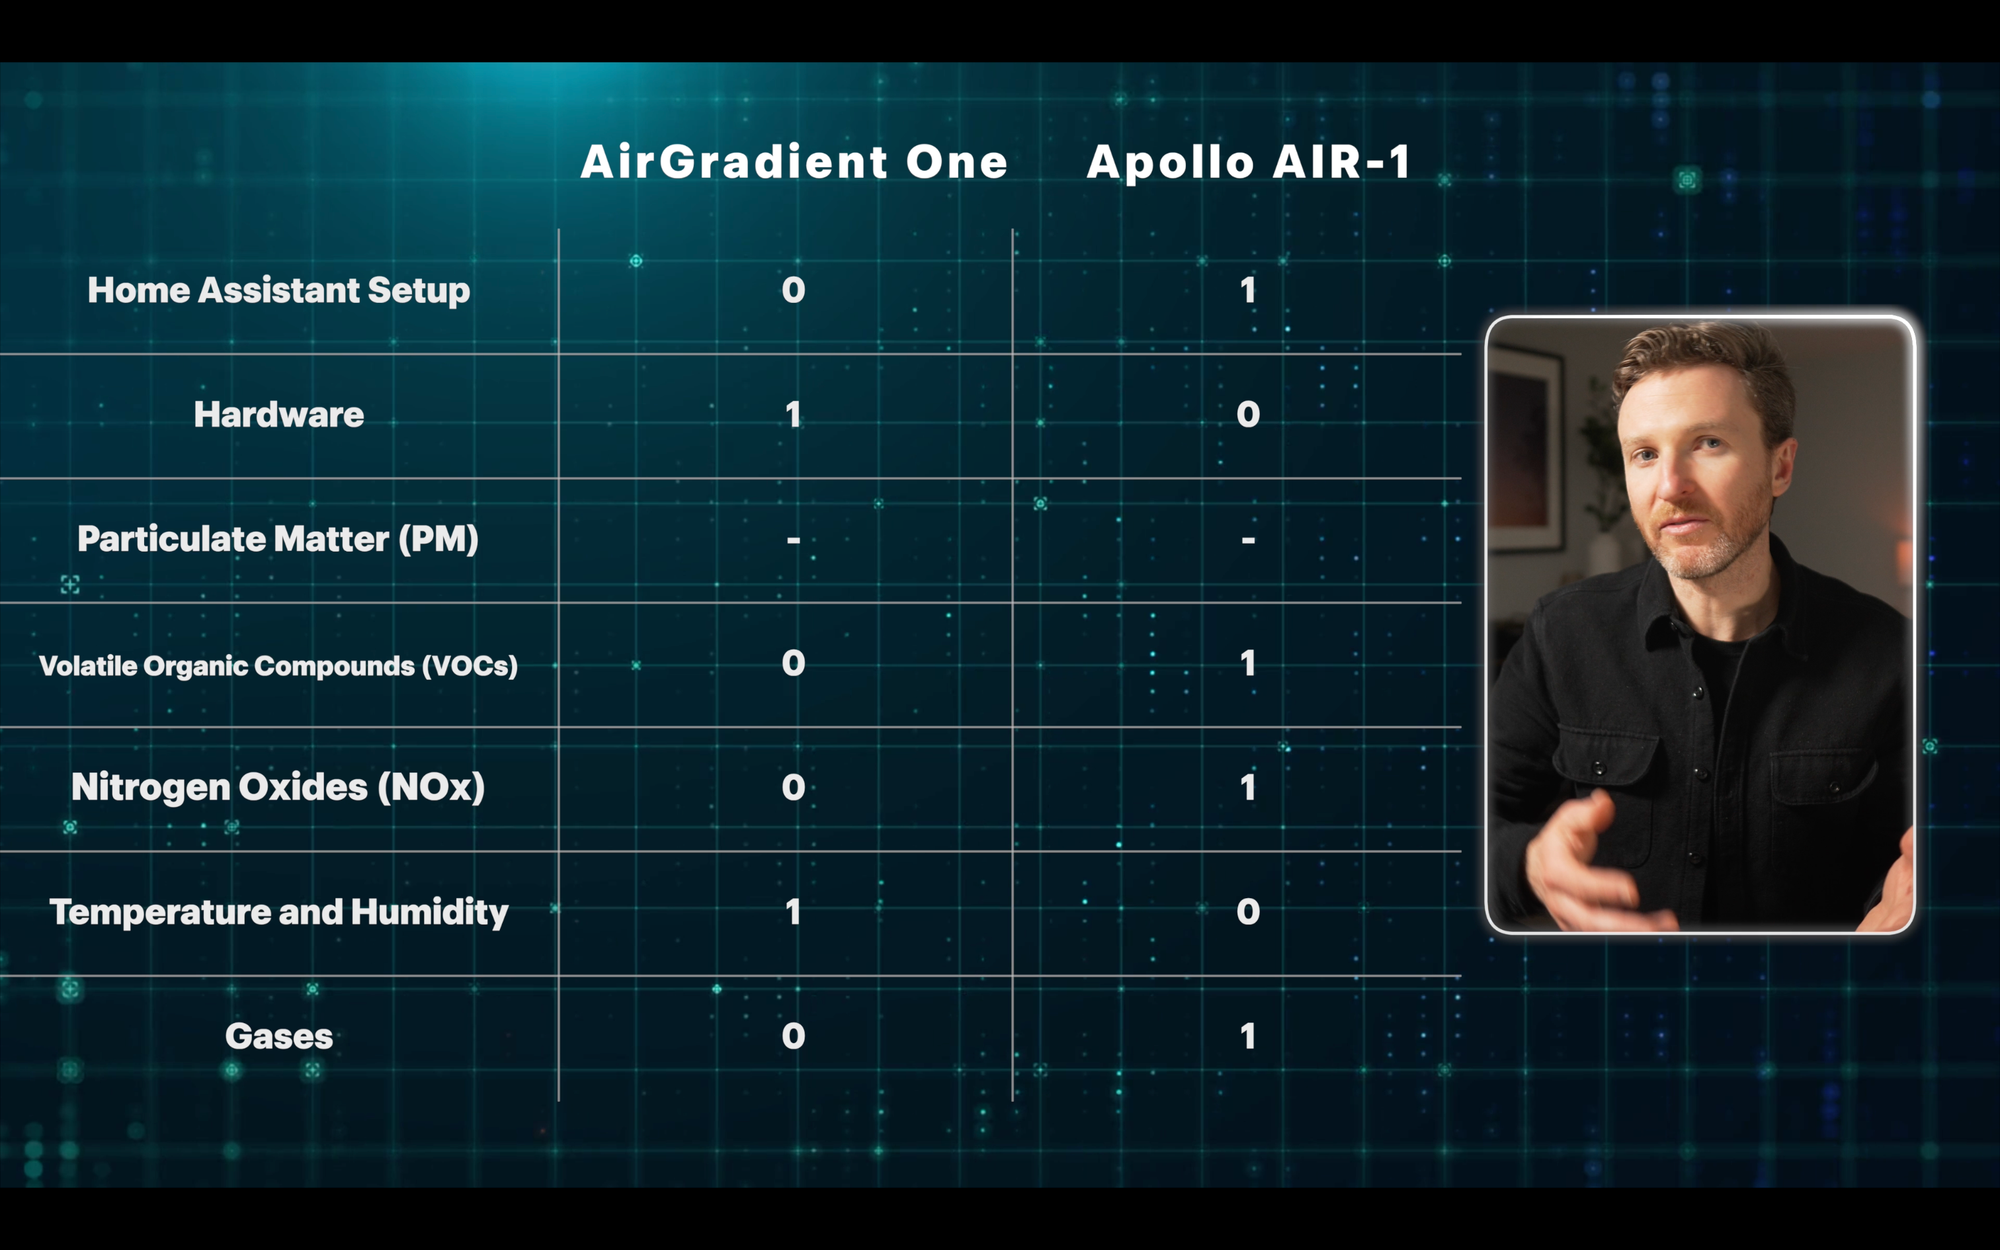
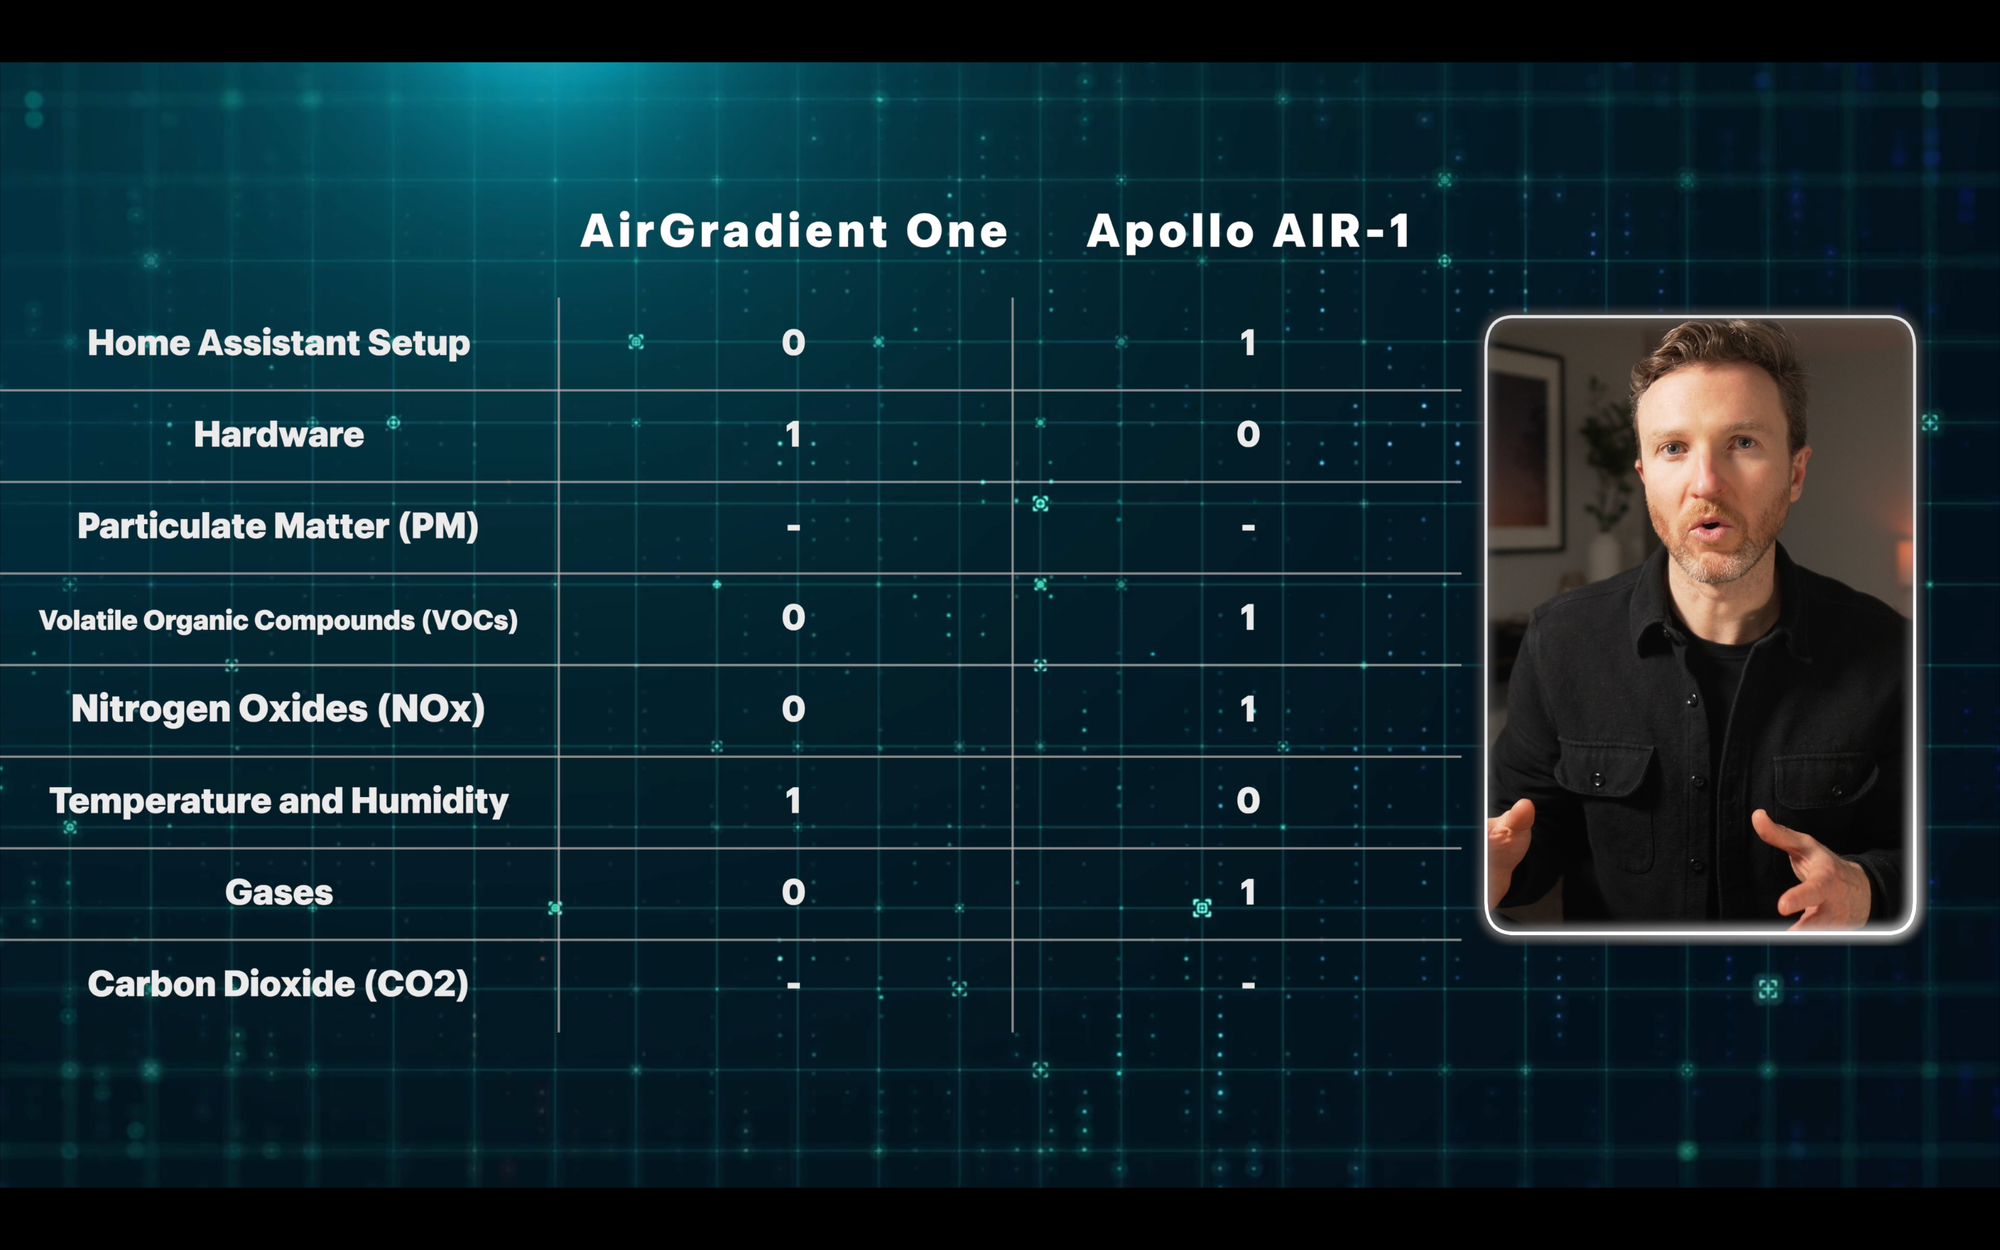
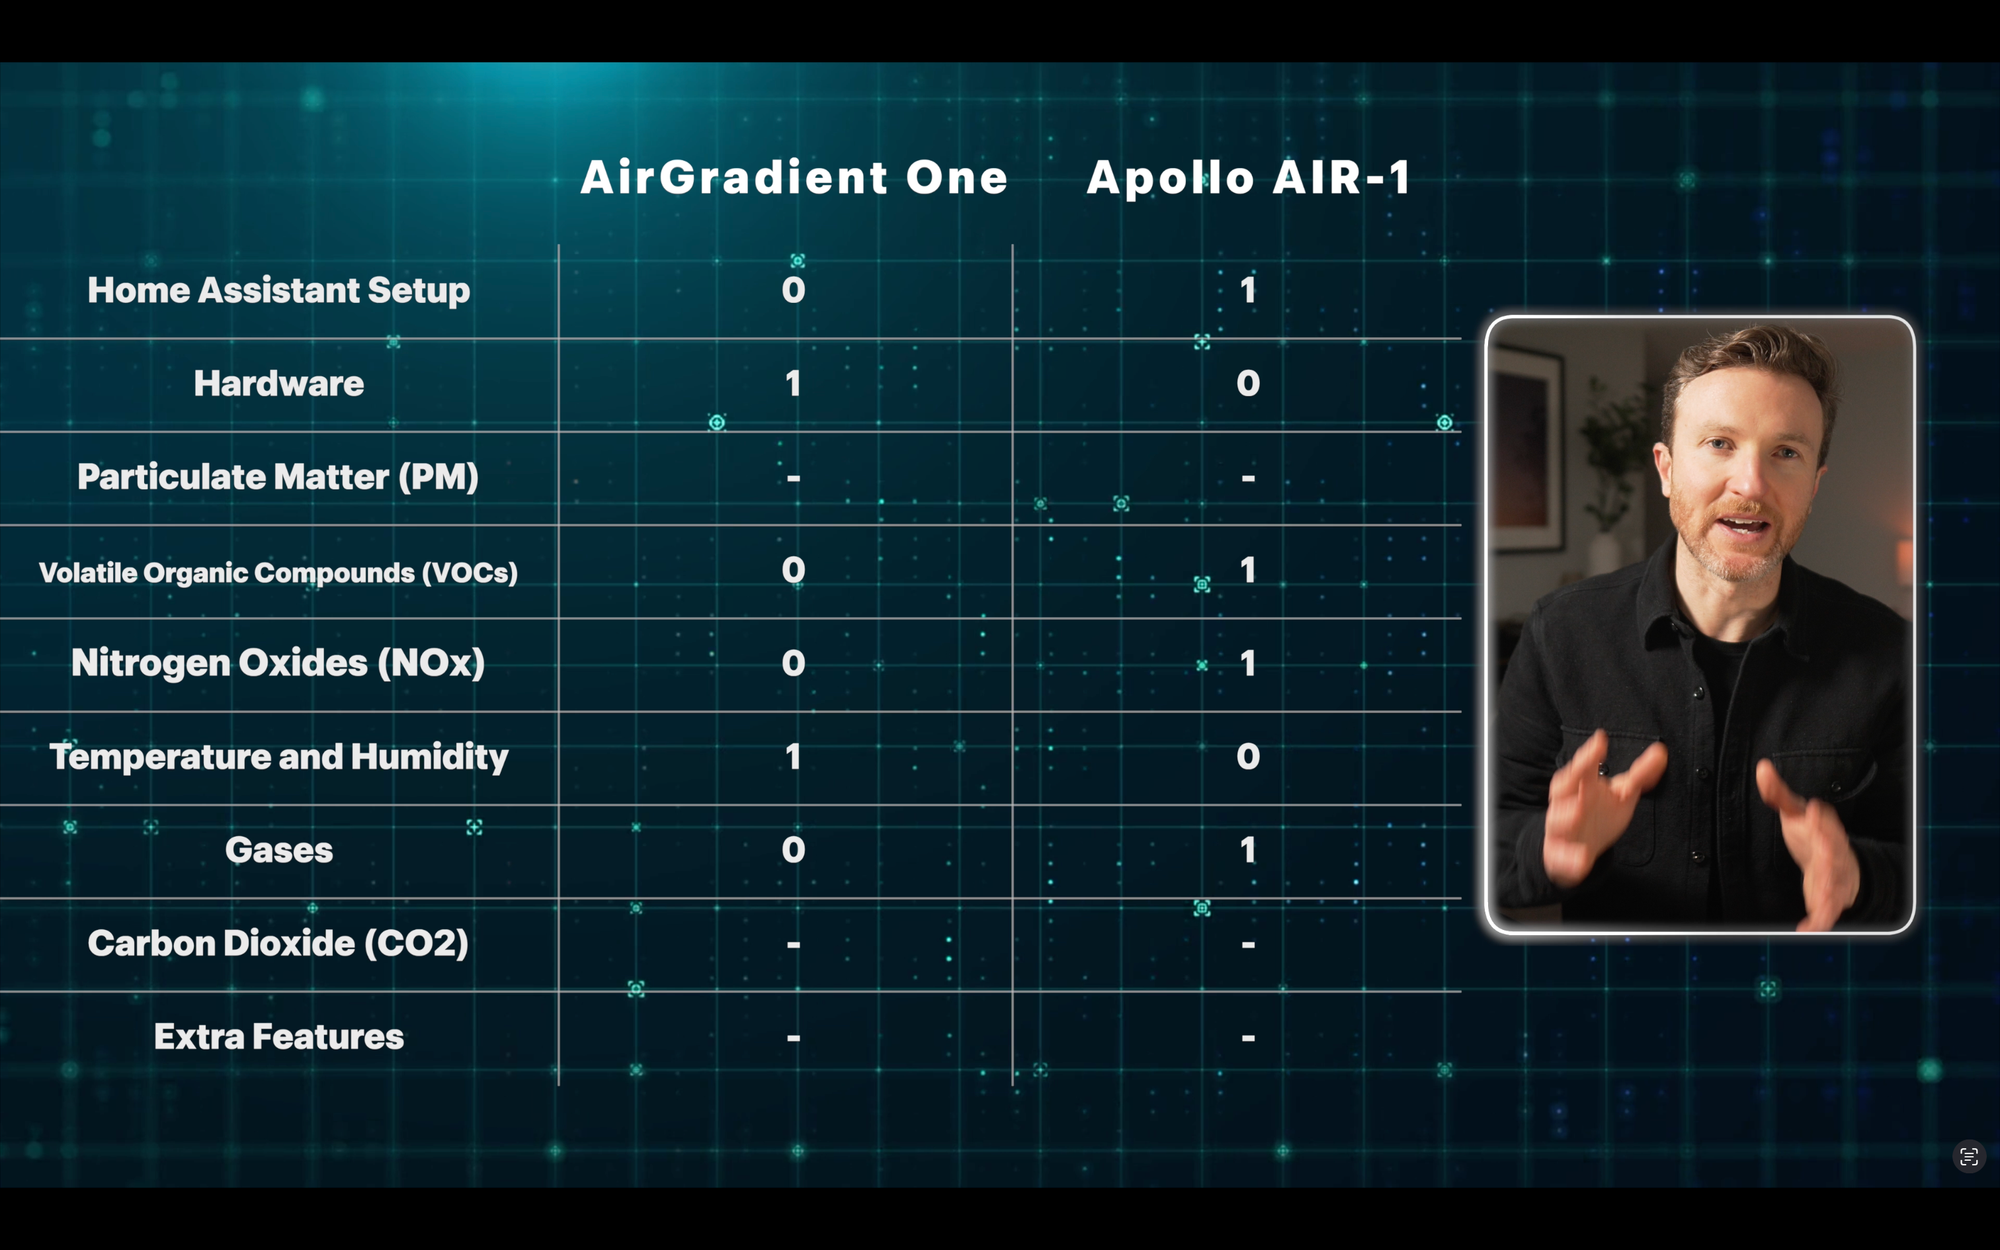
Table 1: Feature Comparison
| # | Feature | AirGradient One | Apollo AIR-1 |
|---|---|---|---|
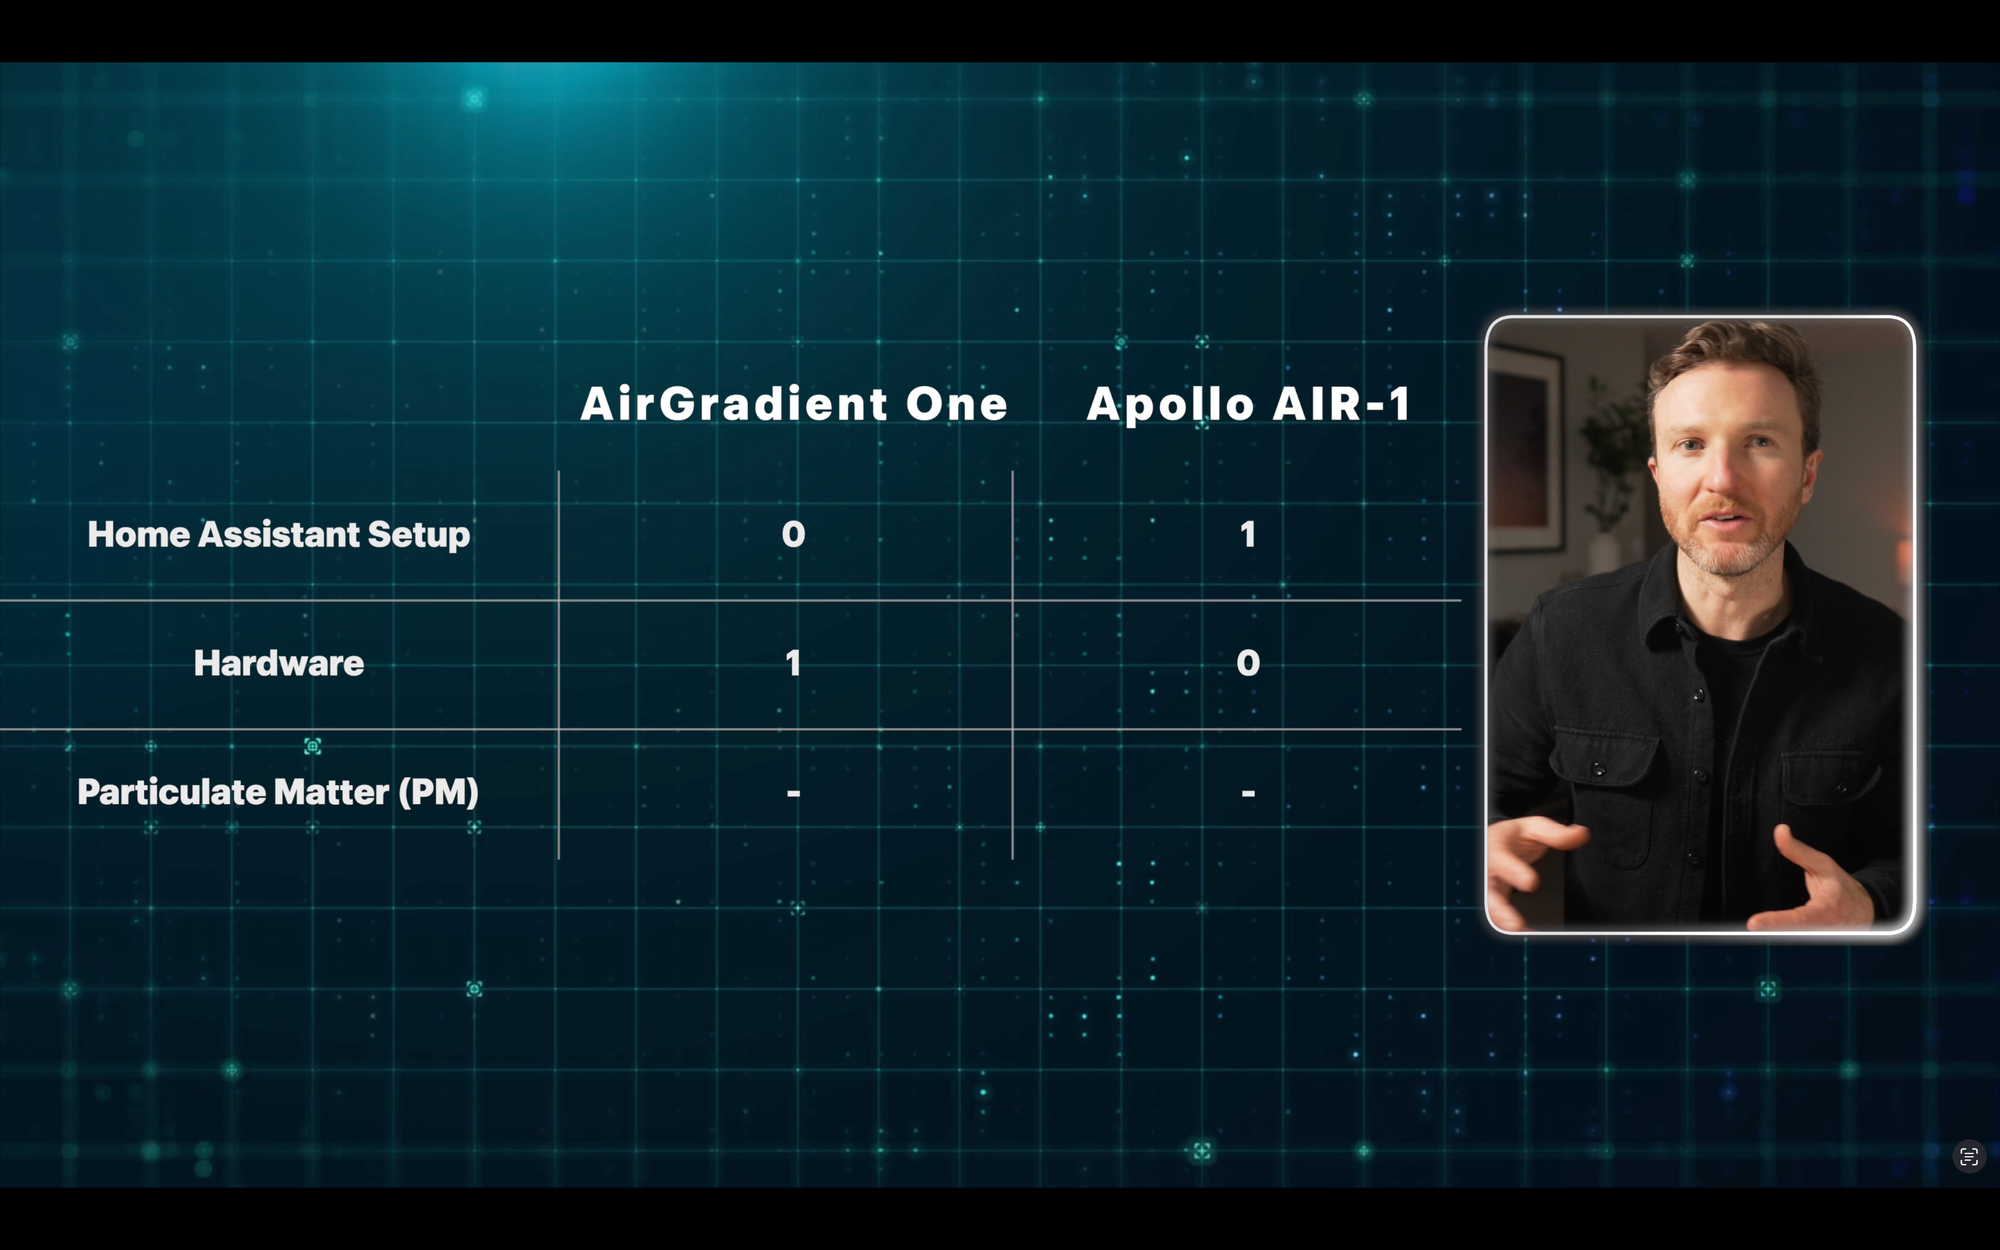
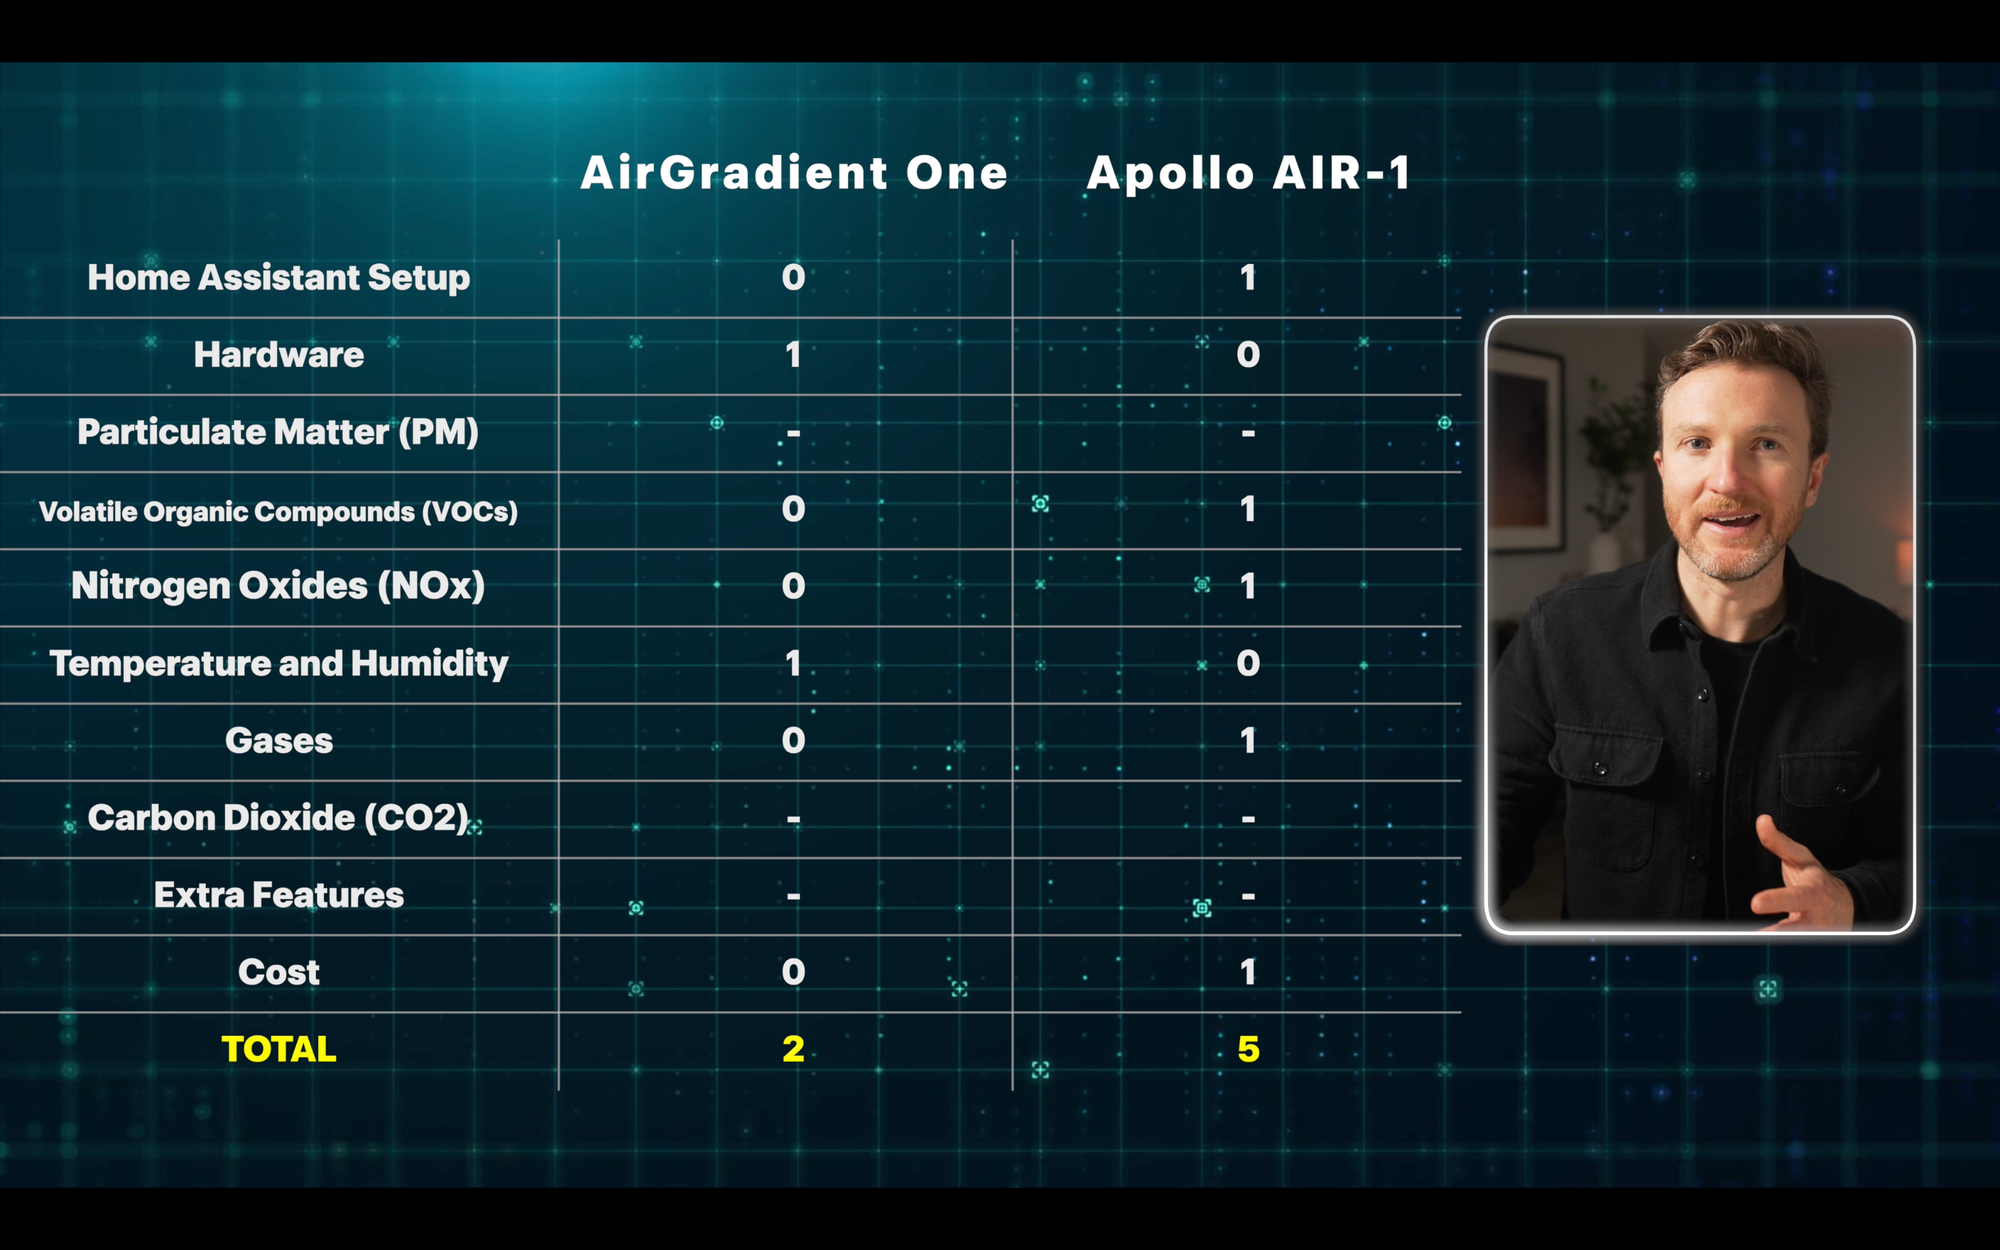
| 1 | Home Assistant Setup | 0 | 1 |
| 2 | Hardware | 1 | 0 |
| 3 | Particulate Matter (PM) | - | - |
| 4 | Volatile Organic Compounds (VOCs) | 0 | 1 |
| 5 | Nitrogen Oxides (NOx) | 0 | 1 |
| 6 | Temperature and Humidity | 1 | 0 |
| 7 | Gases | 0 | 1 |
| 8 | Carbon Dioxide (CO2) | - | - |
| 9 | Extra Features | - | - |
| 10 | Cost | 0 | 1 |
| Total | 2 | 5 |
Table 2: Specifications
| Specs | AirGradient One | Apollo AIR-1 |
|---|---|---|
| Home Assistant Setup | AirGradient Integration | ESPHome |
| PM0.3 | Y | N |
| PM1 | Y | Y |
| PM2.5 | Y | Y |
| PM4 | N | Y |
| PM10 | Y | Y |
| VOC (Volatile Organic Compounds) | Y | Y |
| NOx (Nitrogen Oxides) | Y | Y |
| Temperature | Y | Y |
| Humidity | Y | Y |
| CO (Carbon Monoxide) | N | Y |
| C2H5OH (Ethanol) | N | Y |
| H2 (Hydrogen) | N | Y |
| NO2 (Nitrogen Dioxide) | N | Y |
| NH3 (Ammonia) | N | Y |
| CH4 (Methane) | N | Y |
| CO2 (Carbon Dioxide) | Y | Y |
| Barometric Pressure | N | Y |
| RGB LED | Y | Y |
| Expansion Ports | Y | Y |
| OLED Display | Y | N |
| WiFi (2.4GHz) | Y | Y |
| Bluetooth Tracker | N | Y |
| USB-C Power Cable Included | Y | N |
| Size (mm) | 130 x 130 x 36 | 61 x 61 x 30 |
| Price (starting price assembled) | $195.00 | $92.99 |
| Price (with CO2 sensor) | $195.00 | $112.99 |
| Price (with CO2 and gas sensors) | — | $156.99 |
Final Thoughts
Based on point totals, the Apollo AIR-1 comes out ahead, with five points compared with two points for the AirGradient One. Both devices tied in the remaining three categories.
But, some of those differences were negligible, and most of all, those points do not reflect the weighted importance of each feature to you.
If you want a display screen so you can just look at it and know exactly what’s going on with your home’s indoor air quality, or want an air quality monitor that you can use as a standalone device, get the AirGradient One.
If you want the most features for the cost, or a smaller device that you can tuck away discreetly, get the Apollo AIR-1. These are both great devices, and “best” for one person may not be what’s “best” for you.
Let me know your favorite indoor air quality monitor for Home Assistant down in the comments.

Best Air Quality Monitor for Home Assistant: Final Thoughts
Watch on YouTube
Featured Tech
AirGradient One: https://go.michaelsleen.com/air-gradient-one
Apollo Automation AIR-1: https://go.michaelsleen.com/air-1